 Let’s start with a question. What is this? (see blue chip to the right). If you said, “it’s a particularly pleasant shade of blue,” you’d be at least partially right.
However, you’d be only be 100% correct if you said, “a zoomed up section of Cameron Adams’ cheek,” for, as you can see the photo below, the man in blue was the man of blue the day this particular picture was taken.
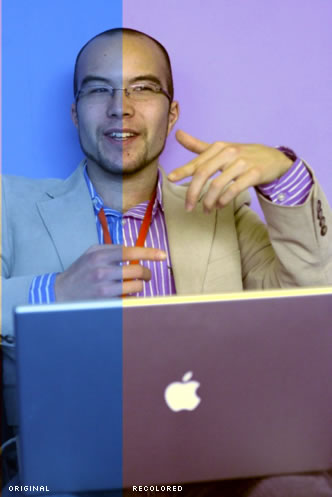
 Now, this is a great photo, but it presented problems when I came to use it as his author shot on a book cover. While the blue tint looks pretty cool in isolation, it comes off a bit odd when placed alongside a handful of normal, pinky-yellow toned author shots. I needed to moderate the blue tint (or more correctly “cast“), but as the chip above shows, there was a lot of it!
Last year, you might remember we looked at using Photoshop’s Lab color mode to give any photo a visual shot in the arm.
Today we’ll look at LAB’s ability to make quite dramatic but highly targeted corrections to problem colors without destroying the overall color balance.
1). First, we need to change the photo from its default RGB to the LAB color space (
Now, this is a great photo, but it presented problems when I came to use it as his author shot on a book cover. While the blue tint looks pretty cool in isolation, it comes off a bit odd when placed alongside a handful of normal, pinky-yellow toned author shots. I needed to moderate the blue tint (or more correctly “cast“), but as the chip above shows, there was a lot of it!
Last year, you might remember we looked at using Photoshop’s Lab color mode to give any photo a visual shot in the arm.
Today we’ll look at LAB’s ability to make quite dramatic but highly targeted corrections to problem colors without destroying the overall color balance.
1). First, we need to change the photo from its default RGB to the LAB color space (Image/Mode/Lab Color
). Feel free to save the image above and follow along in Photoshop.
2). As I explained in my first piece on Lab color, in the Lab universe, everything is explained in terms of three channels:
- L – Lightness vs Darkness
- A – Redness vs Greenness
- B – Blueness vs Yellowness (I remember ‘B’ for blue)
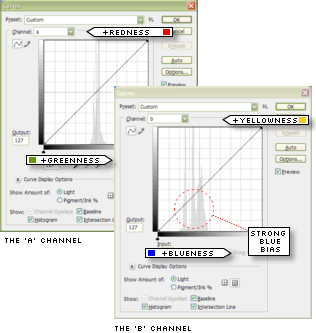
 If any of those colors start to dominate an image, the quickest way to restore the color balance is to boost its opposite color.
As you can see by the screenshot at the right, the B channel is showing almost all its tone bunched up on the blue (left-hand) side of the chart. Rebalancing this channel will go a long way towards fixing this image.
3). With your image selected, bring up the Curves dialog (
If any of those colors start to dominate an image, the quickest way to restore the color balance is to boost its opposite color.
As you can see by the screenshot at the right, the B channel is showing almost all its tone bunched up on the blue (left-hand) side of the chart. Rebalancing this channel will go a long way towards fixing this image.
3). With your image selected, bring up the Curves dialog (Image/Adjustments/Curves) and switch to the B channel.
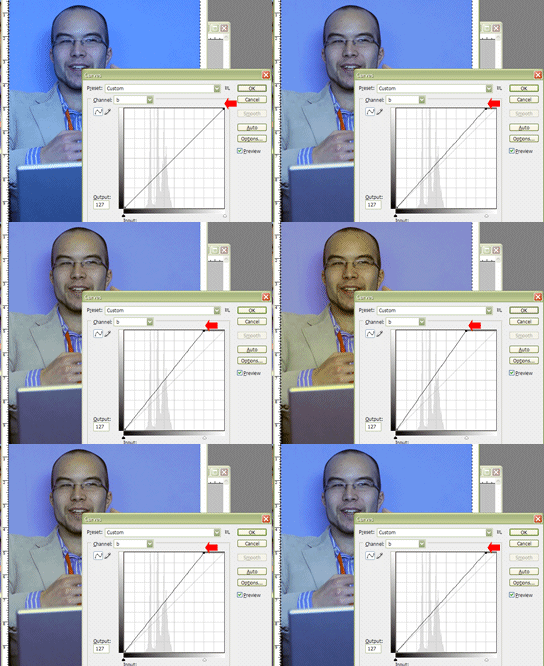
 4). Next, grab the top right (or yellow) corner of the graph and drag it slowly to the left, watching the blue cast start to rinse away as you do.
As you can see in the example at left, while the skintones begin to clear immediately, the true blues and reds are only marginally affected by the change.
5). Okay, the skintone is better, but moderating the blue has brought out a slight greeny tinge. We can tackle that by switching to the A channel and boosting the red just a tiny bit.
 You’ll need to be a little sensitive with this channel as the blue wall behind Cameron has quite a bit of red in it, so adding too much red will start to turn the background towards purple.
 6). Lastly, we’ll make a final adjustment to clean up the L channel.
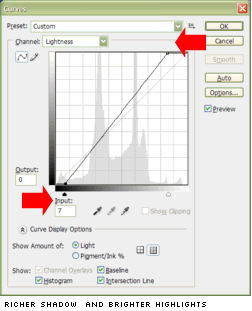
Take each end of the line and slide it slowly horizontally back towards the centerline of the graph.
There’s no mathematically correct formula for placing your points, but:
- Your shadows should look richer without getting too “blocky,” or filling in.
- Your highlights should look brighter without showing a visible edge or step between the lightest tone and the second-lightest tone.

Published in Design View #42
Frequently Asked Questions about Removing Color Casts Using Photoshop LAB Color
What is the LAB color mode in Photoshop?
The LAB color mode in Photoshop is a color space that separates color from luminosity. It stands for Lightness, A channel (green to red), and B channel (blue to yellow). This mode is particularly useful for color correction as it allows you to adjust colors without affecting the brightness of the image.
How does LAB color mode differ from RGB and CMYK modes?
Unlike RGB and CMYK color modes that are device-dependent, LAB color mode is device-independent. This means that it describes what a color looks like rather than how much of a particular colorant is needed for a device to produce colors. This makes LAB color mode more accurate for color correction.
How can I switch to LAB color mode in Photoshop?
To switch to LAB color mode in Photoshop, go to the ‘Image’ menu, select ‘Mode’, and then choose ‘Lab Color’. Remember to convert your image back to RGB or CMYK mode before printing or exporting it.
How can I remove color casts using LAB color mode?
To remove color casts using LAB color mode, you can adjust the curves in the A and B channels. This allows you to correct color casts without affecting the overall brightness of the image.
Can I use LAB color mode for black and white images?
Yes, you can use LAB color mode for black and white images. The L channel in LAB color mode represents the lightness of the image, which can be used to adjust the brightness and contrast of black and white images.
What are the advantages of using LAB color mode for color correction?
The main advantage of using LAB color mode for color correction is that it allows you to adjust colors independently of brightness. This means you can make dramatic changes to the color of an image without affecting its tonal values.
Can I use LAB color mode in other Adobe applications?
Yes, LAB color mode is available in other Adobe applications such as Illustrator and InDesign. However, the process of switching to LAB color mode and using it for color correction may vary slightly in these applications.
How can I enhance colors using LAB color mode?
You can enhance colors using LAB color mode by adjusting the curves in the A and B channels. This allows you to increase or decrease the intensity of certain colors in the image.
Can I save my image in LAB color mode?
While you can save your image in LAB color mode, it’s generally recommended to convert it back to RGB or CMYK mode before saving. This is because many devices and applications do not support LAB color mode.
Are there any limitations to using LAB color mode?
One limitation of using LAB color mode is that it’s not supported by all devices and applications. Additionally, it can be more complex to use than RGB and CMYK modes, especially for beginners.
Alex has been doing cruel and unusual things to CSS since 2001. He is the lead front-end design and dev for SitePoint and one-time SitePoint's Design and UX editor with over 150+ newsletter written. Co-author of The Principles of Beautiful Web Design. Now Alex is involved in the planning, development, production, and marketing of a huge range of printed and online products and references. He has designed over 60+ of SitePoint's book covers.
Published in
·APIs·Business·Cloud·Entrepreneur·Libraries·Programming·Software·Software Development·Web·October 13, 2014


