Photo Retouching: Removing Hot Spots In Photoshop
Hot spots are shiny areas on a subject’s face which are caused by a flash reflecting off a shiny surface or by uneven lighting. It tends to make the subject look as if they are sweating, which is not a good look. There are nearly always more that one way to fix problems like this in Photoshop but here I’ll show you how to do it using the clone tool and some blending modes.
1. Open up the photograph with the shiny hot spots that you want to fix. I’m using a picture of Stella McCartney that looks like it was taken in a red carpet situation and she’s looking a little shiny on the forehead and nose.
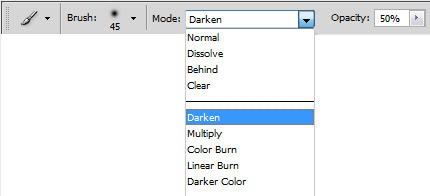
2. Select the Clone Stamp Tool (S) from the toolbox. In the Options Bar at the top of the screen, choose a large, soft-edged brush and set the Mode to Darken and lower the Opacity to about 50%.
The idea behind setting the mode to Darken is that the only pixels that will change are the ones that are lighter than our sample area. The hot spots are essentially light colored pixels.
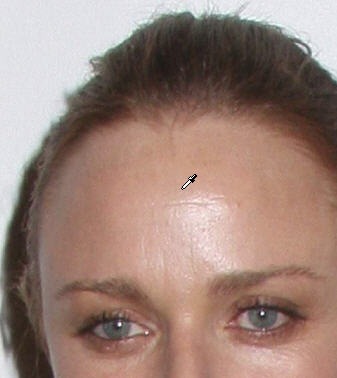
3. On your subject’s face, choose an area of “clean” or non-hot spot skin. This will be the reference point and Photoshop will now only change pixels that are lighter than this. Hold down the Alt (Windows) or Option (Mac) key and click to set the reference point. The cursor will change to an eye-dropper.
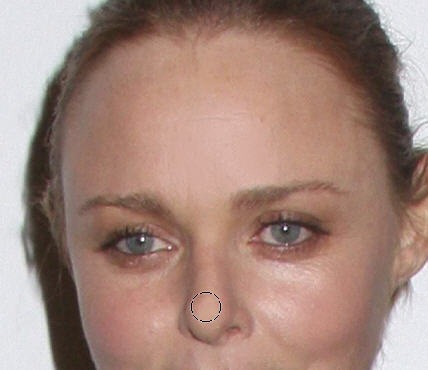
4. Start to paint over the hot spots with the Clone Stamp tool. The hot spots will fade but it will still look like natural skin. You’ll find that you need to resample several times in order to correctly match the skin tones. Just Alt/Option click every time you want to resample and start to paint again.
If the effect is too much, you can also reduce down the Opacity of the Clone Stamp Tool a little further to about 45 – 40%. Be especially careful on the skin under the eyes. You don’t want to replace hot spots with dark bags! Work around your image until you’ve removed all of the hot spots. Below you can see Before, on the left, and After.
So with a couple of seconds of retouching with the Clone Stamp Tool and the right blending mode you can quickly and easily do a makeover and remove the sweaty, shiny look.
Frequently Asked Questions (FAQs) on Photo Retouching: Removing Hot Spots in Photoshop
What are hot spots in photography and how do they affect my images?
Hot spots in photography refer to areas in an image that are excessively bright or overexposed. They often appear as white or very light patches and can distract from the overall composition of the photo. Hot spots can be caused by various factors such as direct sunlight, flash photography, or reflective surfaces. They can affect the quality of your images by drawing attention away from the main subject, causing loss of detail in the highlighted areas, and disrupting the overall color balance and contrast of the photo.
How can I prevent hot spots when taking photos?
Preventing hot spots begins at the shooting stage. Try to avoid direct sunlight or harsh lighting conditions that can cause overexposure. Use diffusers or reflectors to soften the light, and adjust your camera settings to correctly expose the image. If you’re using flash, try to bounce it off a surface instead of pointing it directly at the subject. Additionally, shooting in RAW format can give you more flexibility in post-processing to correct any potential hot spots.
Can I remove hot spots from photos using Photoshop?
Yes, Photoshop offers several tools and techniques to remove or reduce hot spots from photos. These include the Clone Stamp tool, the Healing Brush tool, and the Patch tool. Each tool has its own strengths and can be used depending on the specific requirements of the image. The process involves sampling from an unaffected area of the image and then painting over the hot spot to blend it with the surrounding area.
How do I use the Clone Stamp tool to remove hot spots?
The Clone Stamp tool in Photoshop allows you to copy pixels from one area of an image and paint them onto another area. To use this tool, first select it from the toolbar. Then, while holding down the Alt key (Option key on Mac), click on an area of the image that you want to copy. Release the Alt key and then paint over the hot spot. The tool will clone the selected area onto the hot spot, helping to blend it with the surrounding area.
What is the Healing Brush tool and how can it help with hot spots?
The Healing Brush tool in Photoshop is similar to the Clone Stamp tool, but it also matches the texture, lighting, and shading of the sampled pixels to the source pixels. This can result in a more natural and seamless correction of hot spots. To use the Healing Brush tool, select it from the toolbar, hold down the Alt key (Option key on Mac) and click on an area to sample. Then paint over the hot spot to apply the correction.
Can the Patch tool be used to remove hot spots?
Yes, the Patch tool in Photoshop is another effective way to remove hot spots. This tool allows you to make a selection around the hot spot and then drag that selection to another area of the image that you want to use as a patch. The tool then blends the patch with the selected area, helping to remove the hot spot.
Are there any other techniques to remove hot spots in Photoshop?
Besides the Clone Stamp, Healing Brush, and Patch tools, there are other techniques that can be used to remove hot spots in Photoshop. These include using adjustment layers and masks to selectively adjust the exposure of the hot spots, or using the Dodge and Burn tools to manually lighten or darken areas of the image.
Can I remove hot spots from photos in other software besides Photoshop?
Yes, there are other photo editing software that offer tools and features to remove hot spots from photos. These include Lightroom, GIMP, and PaintShop Pro, among others. The specific process may vary depending on the software, but the general principle of sampling from an unaffected area and applying it to the hot spot remains the same.
What if I can’t remove a hot spot completely?
In some cases, it may not be possible to completely remove a hot spot, especially if it’s very large or in a critical area of the image. In such cases, you can try to reduce the visibility of the hot spot as much as possible, or use creative techniques like cropping, converting to black and white, or adding filters to minimize its impact.
Can I learn more advanced techniques to remove hot spots?
Yes, there are many resources available to learn more advanced techniques for photo retouching, including removing hot spots. These include online tutorials, video courses, and books on Photoshop and photo editing. Additionally, practicing on different types of images can help you improve your skills and develop your own techniques.
Jennifer Farley is a designer, illustrator and design instructor based in Ireland. She writes about design and illustration on her blog at Laughing Lion Design.


