

In part one of this series we had a broad introduction to OXID eSales, a high quality e-commerce package which is simple to install, configure, and extend. We looked at some of its features and requirements, and then finished with its installation for a fully working shop.
Here we’ll be building on what we learned in part 1, learning how themes work in OXID and how we can write new ones by extending its default theme. So, let’s dive in and look at just what a theme is.
Key Takeaways
- OXID eSales is a high-quality e-commerce platform that is straightforward to install, configure, and extend. It offers a theming system that uses the Smarty Template engine, allowing templates to be built using PHP-like syntax.
- OXID themes manipulate information provided from the business logic layer and are made available via the core libraries, custom modules, and extensions. Themes can be created from scratch or by extending an existing one, such as the default theme called Azure.
- The platform allows for customization of the look and feel of the store, from changing the logo and removing elements, to adding extra content in the users account profile. This is achieved through modifying templates and interacting with OXID template objects.
- OXID eSales is highly customizable and offers a modular architecture. It supports multiple languages and currencies, making it suitable for international businesses. It also provides a robust and secure platform for managing all aspects of an online store.
- In the upcoming part 3 of the series, the author will cover building a custom module to further customize OXID, taking customization abilities to the “next level”.
What is a Theme?
Themes in OXID are like themes in most other applications which you’re most likely already familiar with. Themes allow both developers and designers alike to manipulates the information provided from the business logic layer made available via the core libraries, custom modules, and extensions that we write.
The theming system in OXID uses the Smarty Template engine which allows templates to be built using PHP-like syntax, as well as full access to the PHP core if desired.
Below is a snippet of the header.tpl template. In it you can see the Smarty Template tags interspersed with standard HTML. The template tags used in OXID are a slight variation on the standard version which use both a square and curly bracket instead of just the curly brace.
[{assign var="slogoImg" value="logo.png"}]

  <a id="logo" href="[{$oViewConf->getHomeLink()}]"

      title="[{$oxcmp_shop->oxshops__oxtitleprefix->value}]"

          ><img src="[{$oViewConf->getImageUrl($slogoImg)}]"

              alt="[{$oxcmp_shop->oxshops__oxtitleprefix->value}]"

          ></a>

    [{oxid_include_widget cl="oxwCategoryTree"

        cnid=$oView->getCategoryId() sWidgetType="header"

        _parent=$oView->getClassName() nocookie=1}]
      [{if $oxcmp_basket->getProductsCount()}]

          [{assign var="blAnon" value=0}]

          [{assign var="force_sid" value=$oViewConf->getSessionId()}]

      [{else}]

          [{assign var="blAnon" value=1}]

      [{/if}]

    [{oxid_include_widget cl="oxwMiniBasket" nocookie=$blAnon

        force_sid=$force_sid}]

    [{include file="widget/header/search.tpl"}]

</div>

[{if $oView->getClassName()=='start' && $oView->getBanners()|@count > 0 }]

    <div class="oxSlider">

        [{include file="widget/promoslider.tpl" }]

    </div>

[{/if}]
As you can see in the table below, there’s really not much difference. If you’re already familiar with Smarty (or another PHP template language), then you’ll feel right at home.

OXID also makes a number of custom plugins available which makes using it simpler and easier. You can find these interspersed with the included Smarty ones under /core/smarty/plugins. There’s quite a few available, but I’ll stick to covering the ones relevant for this article series. If you’d like to know more, I encourage you to read through the source code at your leisure.
Getting back to templates, in the template snippet above you can see the conditional logic and inclusion of other templates. I’ve formatted it slightly for readability. Let’s step through the template so you get a bit better of an understanding as to the parts involved.
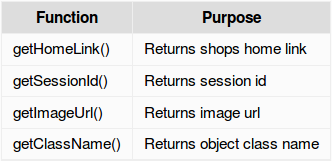
At the start we’re assigning logo.png to the template variable slogoImg. Then we pass it to the getImageUrl method of the $oViewConf object. This returns a shop-specific reference to the image requested.
There are several methods called on the $oViewConf object. These are:
[{assign var="slogoImg" value="logo.png"}]
  <a id="logo" href="[{$oViewConf->getHomeLink()}]"

      title="[{$oxcmp_shop->oxshops__oxtitleprefix->value}]"

      ><img src="[{$oViewConf->getImageUrl($slogoImg)}]"

          alt="[{$oxcmp_shop->oxshops__oxtitleprefix->value}]"></a>
In this line, we’re using an excellent feature of OXID, widgets, which allow us to reuse conditional business and template logic throughout the application. In this case we’re referencing the oxwCategoryTree widget as identified by the cl argument.
    [{oxid_include_widget cl="oxwCategoryTree"

        cnid=$oView->getCategoryId() sWidgetType="header"

        _parent=$oView->getClassName() nocookie=1}]
Here we use simple conditional logic to determine which template variables to set.
      [{if $oxcmp_basket->getProductsCount()}]

          [{assign var="blAnon" value=0}]

          [{assign var="force_sid" value=$oViewConf->getSessionId()}]

      [{else}]

          [{assign var="blAnon" value=1}]

      [{/if}]
Finally, we include another widget oxwMiniBasket and the widget/header/search.tpl template.
    [{oxid_include_widget

        cl="oxwMiniBasket"

        nocookie=$blAnon

        force_sid=$force_sid}]

    [{include file="widget/header/search.tpl"}]
One convention you’ll want to get used to is how OXID objects and the database tables are dynamically referenced. Take the following snippet from the above code sample as an example:
title="[{$oxcmp_shop->oxshops__oxtitleprefix->value}]"
In this example, the template is retrieving the value of the oxtitleprefix column in the oxshops table. It does this through magic methods on the oxcmp_shop class which extends the oxView class. You can find this under application/components. In short, we’re able to retrieve a value from the database through a pre-defined template object.
I realize this is starting to race through everything just a bit, but after this introduction the rest is rather simple as it consistently builds on it.
Theme File Structure
Now that we have a basic understanding of the structure of templates. Let’s have a look at the file structure of an OXID Theme. Starting in OXID Community Edition (CE) 4.7 and Professional/Enterprise Edition (PE/EE) 5.0, the theme is split in to two locations.
/application/views/: for templates, translations, and configuration files/ /out/: for public files ( CSS, JavaScript, images, etc.)
Have a look through them in your installation and familiarize yourself with them.
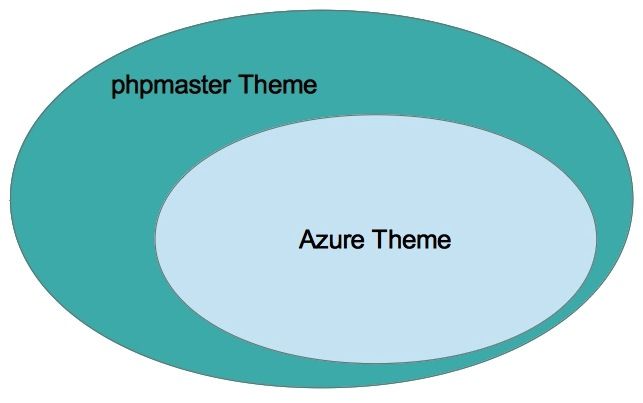
We can create a theme in one of two ways. We can either create all the templates, images, CSS, and JavaScript ourselves, or we can extend an existing theme and change only what we need. Both the CE 4.7 and PE/EE 5.0 versions of the store come with a default theme called Azure which provides all of the core templates, CSS, JavaScript, and image files required to build a working shop. For the sakes of time and simplicity, in this example, we’ll be extending it to build our custom theme.
Extending the Basic Theme
Let’s get started creating our new custom theme. Under application/views, create a new directory called sitepoint. In it, create a file called theme.php and add the information below to it.
<?php

/**

 * Theme Information

 */

$aTheme = array(

    'id'             => 'sitepoint',

    'title'          => 'SitePoint',

    'description'    => 'example for SitePoint.com',

    'thumbnail'      => 'theme.jpg',

    'version'        => '1.3',

    'author'         => 'Matthew Setter <matthew@maltblue.com>',

    'parentTheme'    => 'azure',

    'parentVersions' => array('1.3')

);
This give a unique ID and name to our theme and tells OXID we’ll be using the Azure theme as the foundation. That way, if OXID can’t find a template in our theme, it will then go look in the Azure theme for it and serve it from there.
To keep these examples practical, we’ll implement three minor changes to the look and feel of the store.
- Changing the logo
- Removing the image scroller from the home page
- Display extra content in the users account profile
Changing the Logo
Under /out create a new directory called sitepoint. Under it, create two new directories: img and src and download the theme.jpg file. Next download the logo.png file into /img. This is a slightly modified version of the default which I made to clearly show we’re changing the theme.
Now that’s done, you need to login to the shop and enable the new theme. So go to
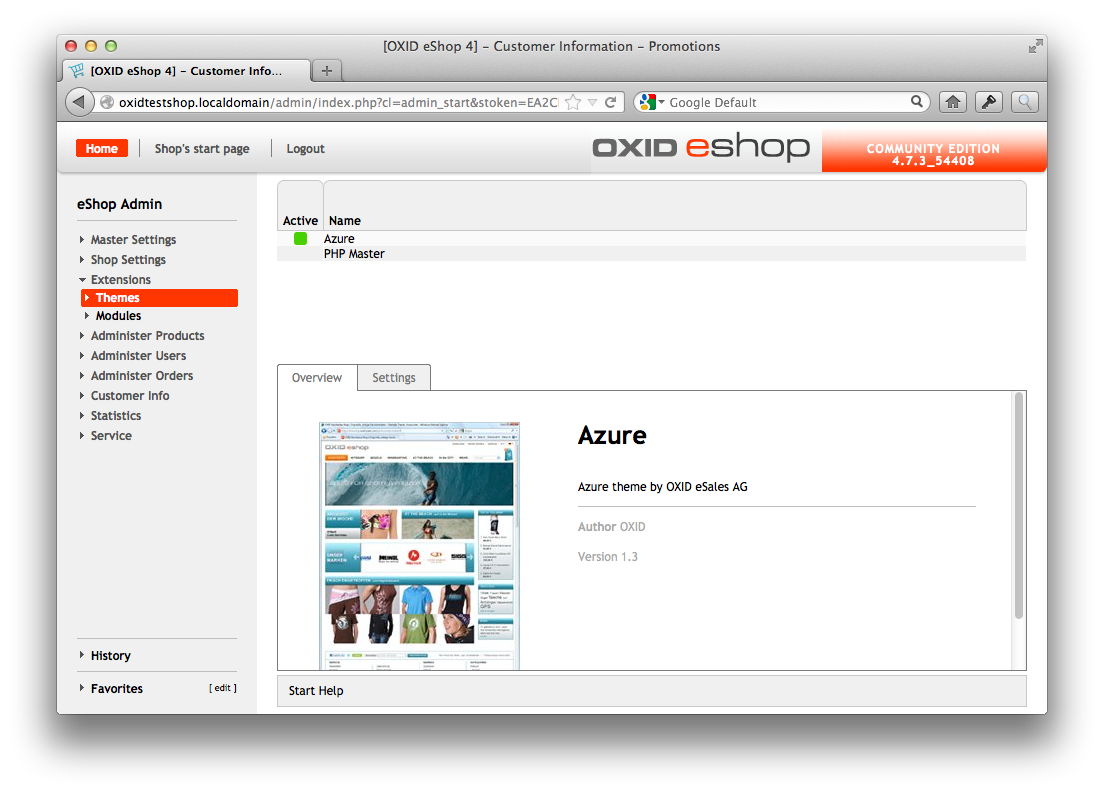
In the list which comes up on the right hand side, you’ll see Azure and PHP Master. Click “PHP Master”. Then in the top right hand side of the bottom panel, click Activate. All being well, your theme is now active.
When you reload the shop, you’ll likely see the original logo there, not the one you’ve just put in place. This is a good time to introduce the tmp directory. Like all good software, OXID makes extensive use of caching.
It’s caching covers the Smarty templates, database queries, modules, and so on. In the third and final part of this series, I’ll be going over the caching configuration and options – so stay tuned for that one.
In the meantime, in the root of your installation, you’ll see a directory called tmp. Delete all the files in it and then reload the shop. Now you’ll be seeing your new amazing shop logo.
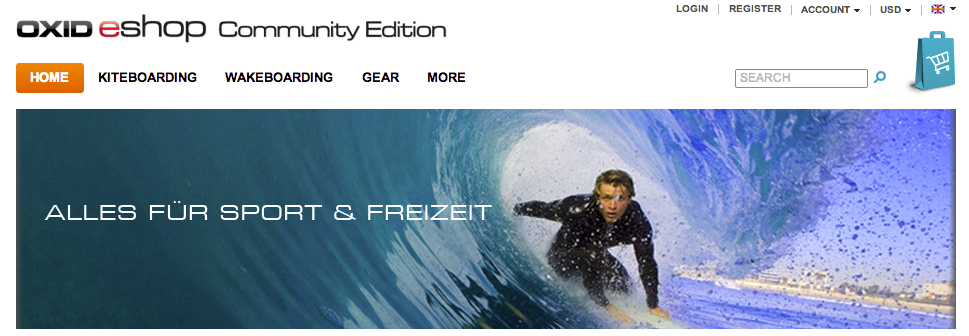
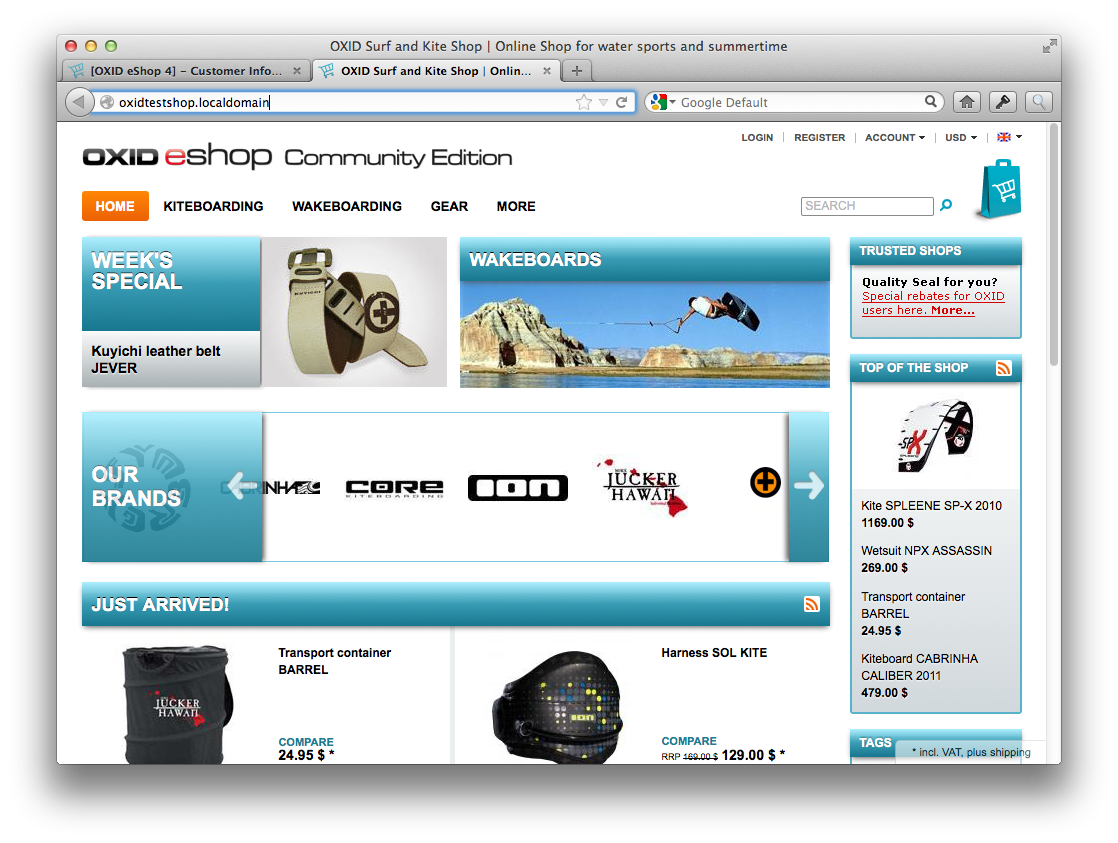
Removing the Home Page’s Image Scroller
Ok, changing the logo was a pretty simple, an easy way to get started. Now let’s do some actual template changes. Let’s remove the image scroller from the home page. It’s the large image area just below the main navigation section and search bar, as shown in the screenshot below.
Copy application/views/azure/tpl/layout/header.tpl to application/views/sitepoint/tpl/layout/header.tpl, creating the directory structure as required. Once that’s done, open up the copied file and remove the section right at the bottom which resembles the code below:
[{if $oView->getClassName()=='start' && $oView->getBanners()|@count > 0 }]

 <div class="oxSlider">

  [{include file="widget/promoslider.tpl" }]

 </div>

[{/if}]
Clear the tmp directory and reload the shop. With this removed, your shop should now resemble the screenshot below.
Display Output Conditional
Now let’s continue to step up with a slightly tougher example. This time, we’re going to display some extra information in the users account when they’re logged in.
To see what an existing account of the user looks like, login to the fronted of the shop and then navigate to /en/my-account/. Alternatively, when you’re logged in you can click Account in the top right hand side of the shop and then click My Account as in the screenshot below.
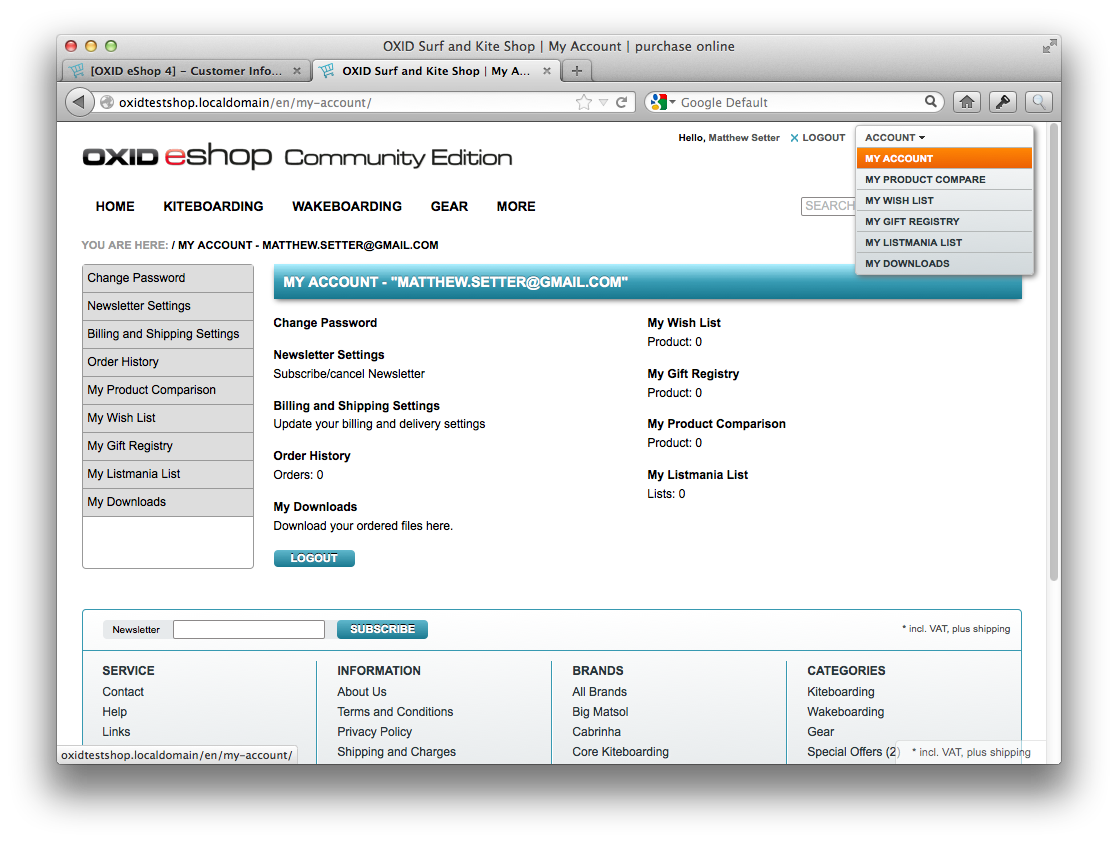
On that page, you’ll see a number of links and also user details, such as email address, and name. If you do a DESCRIBE on the table oxuser in the database, you’ll see the schema looks like this:

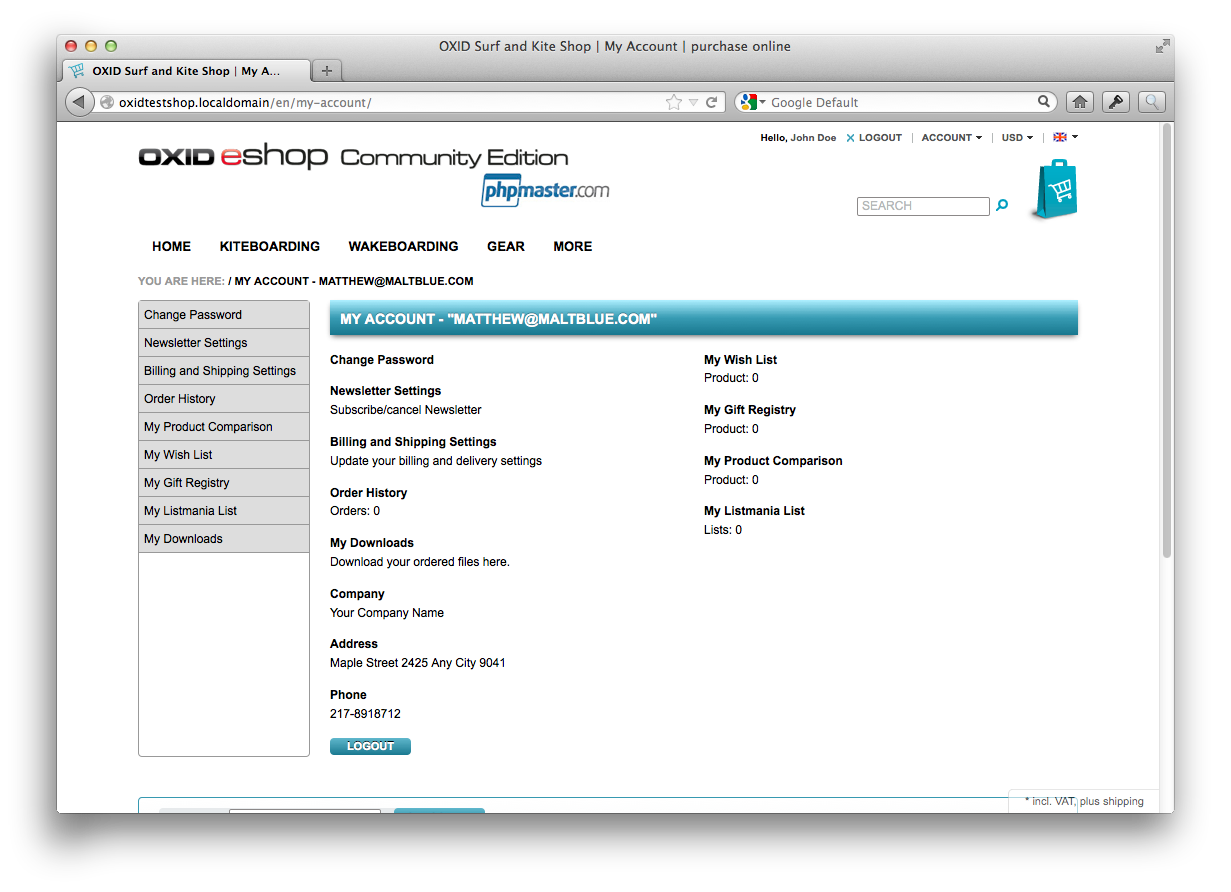
What we’re going to do is to add a small table at the bottom of the My Account page which lists several key details about the user. These are:
- Company
- Address
- Phone Number
To do this, we’ll need to do two things:
- Modifyi another template
- Interact with some OXID template objects
First copy the template application/views/azure/tpl/page/account/dashboard.tpl to the same location under application/views/sitepoint/tpl/page/account/dashboard.tpl, creating the directory structure where required. In it, you’ll notice two divs, one for each column in the layout. At the bottom of the first div you’ll see the following code:
[{if $oView->isEnabledDownloadableFiles()}]

 <dl>

  <dt><a id="linkAccountDownloads" href="[{ oxgetseourl ident=$oViewConf->getSelfLink()|cat:"cl=account_downloads" }]" rel="nofollow">[{ oxmultilang ident="MY_DOWNLOADS" }]</a></dt>

  <dd>[{ oxmultilang ident="MY_DOWNLOADS_DESC" }]</dd>

 </dl>

[{/if}]
Under which, add the following:
<dl>

 <dt>[{ oxmultilang ident="PAGE_ACCOUNT_DASHBOARD_COMPANY" }]</dt>

 <dd>[{ $oxcmp_user->oxuser__oxcompany->value }]</dd>

</dl>

<dl>

 <dt>[{ oxmultilang ident="PAGE_ACCOUNT_DASHBOARD_ADDRESS" }]</dt>

 <dd>

  [{ $oxcmp_user->oxuser__oxstreet->value }] [{ $oxcmp_user->oxuser__oxstreetnr->value }]

  [{ $oxcmp_user->oxuser__oxcity->value }] [{ $oxcmp_user->oxuser__oxzip->value }]

 </dd>

</dl>

<dl>

 <dt>[{ oxmultilang ident="PAGE_ACCOUNT_DASHBOARD_PHONE" }]</dt>

 <dd>[{ $oxcmp_user->oxuser__oxfon->value }]</dd>

</dl>
This will add in both a label and the value of the respective properties by using the available objects magic methods to retrieve the information from the database.
Adding Translations
If we clear the tmp directory and reload the shop, we’ll have some rather nasty warnings be displayed because translations are missing. We need to add in the custom translation files along with the new translations so that no matter the user’s language, our changes will work.
So, under application/views/sitepoint/ create two directories: de and en. Under those, create a new file called cust_lang.php. In the one under de, add the following:
<?php

$sLangName  = "Deutsch";

// -------------------------------

// RESOURCE IDENTIFIER = STRING

// -------------------------------

$aLang = array(

    'charset'                        => 'ISO-8859-15',

    'PAGE_ACCOUNT_DASHBOARD_COMPANY' => "Company",

    'PAGE_ACCOUNT_DASHBOARD_ADDRESS' => "Address",

    'PAGE_ACCOUNT_DASHBOARD_PHONE'   => "Phone Nummer"

);
In the one under en add:
<?php

$sLangName  = "English";

// -------------------------------

// RESOURCE IDENTIFIER = STRING

// -------------------------------

$aLang = array(

    'charset'                        => 'ISO-8859-15',

    'PAGE_ACCOUNT_DASHBOARD_COMPANY' => "Firma",

    'PAGE_ACCOUNT_DASHBOARD_ADDRESS' => "Adresse",

    'PAGE_ACCOUNT_DASHBOARD_PHONE'   => "Telefonnummer"

);
Now, when you clear the tmp directory and reload the page, you’ll see the new additions which will look like the screenshot below.
In Conclusion
We’ve gone from installing a copy of OXID eSales community edition to customizing the look and feel for our needs. All very simple, predictable, and straight-forward.
I hope you’ve enjoyed this series so far and it’s showing you what an excellent tool OXID is for eCommerce. Stay around for part 3 where we build a custom module taking your ability to customize OXID to the proverbial “next level”.
Image via Fotolia
Frequently Asked Questions about Oxid eSales eCommerce
What makes Oxid eSales eCommerce different from other PHP eShop scripts?
Oxid eSales eCommerce is a highly flexible and scalable eCommerce solution that is built on PHP. Unlike other PHP eShop scripts, Oxid eSales eCommerce offers a comprehensive set of features that cater to both B2B and B2C businesses. It provides a robust and secure platform for managing all aspects of an online store, including product management, customer management, order processing, and payment processing. Additionally, it supports multiple languages and currencies, making it suitable for international businesses.
How does Oxid eSales eCommerce handle security?
Security is a top priority for Oxid eSales eCommerce. The platform incorporates several security measures to protect against common online threats. These include SSL encryption for secure data transmission, CSRF protection to prevent cross-site request forgery attacks, and a robust user authentication system. Furthermore, Oxid eSales eCommerce regularly releases updates to address any potential security vulnerabilities.
Can I customize my Oxid eSales eCommerce store?
Yes, Oxid eSales eCommerce is highly customizable. It offers a modular architecture, which means you can add or remove functionalities as per your business needs. The platform also provides a variety of themes and templates that you can use to customize the look and feel of your online store. If you have coding skills, you can even create your own custom themes and modules.
Does Oxid eSales eCommerce support mobile devices?
Absolutely. Oxid eSales eCommerce is designed to be responsive, meaning it automatically adjusts to fit the screen size of any device, including smartphones and tablets. This ensures that your online store provides a seamless shopping experience for customers, regardless of the device they are using.
How does Oxid eSales eCommerce handle payment processing?
Oxid eSales eCommerce supports a wide range of payment methods, including credit cards, debit cards, PayPal, and bank transfers. It integrates with several payment gateways, allowing you to process payments securely and efficiently. The platform also supports multiple currencies, making it easy to sell products internationally.
Can I use Oxid eSales eCommerce for international business?
Yes, Oxid eSales eCommerce is designed to support international business. It offers multi-language and multi-currency support, allowing you to cater to customers from different countries. The platform also supports various tax rates and shipping methods, making it easy to comply with international regulations.
Does Oxid eSales eCommerce offer customer support?
Yes, Oxid eSales eCommerce provides comprehensive customer support. They offer a variety of support options, including email support, phone support, and a dedicated support portal. Additionally, they provide extensive documentation and a community forum where you can get help from other Oxid eSales eCommerce users.
How does Oxid eSales eCommerce handle SEO?
Oxid eSales eCommerce incorporates several SEO-friendly features to help improve your online store’s visibility in search engine results. These include SEO-friendly URLs, meta tags, and sitemaps. The platform also supports Google Analytics integration, allowing you to track and analyze your website’s traffic.
Can I integrate Oxid eSales eCommerce with other systems?
Yes, Oxid eSales eCommerce supports integration with a variety of third-party systems, including CRM, ERP, and accounting software. This allows you to streamline your business processes and improve efficiency.
Is Oxid eSales eCommerce suitable for large-scale businesses?
Absolutely. Oxid eSales eCommerce is designed to handle high volumes of traffic and transactions, making it suitable for large-scale businesses. It offers a scalable architecture, which means you can easily expand your online store as your business grows.