

Key Takeaways
- Understand the Basics: Grasp the foundational concepts of caching in Django, including its importance for reducing server load and enhancing user experience by speeding up response times.
- Setup and Configuration: Learn how to set up a Django project and configure various caching methods like local memory, file-based, database, and Redis caching within the `settings.py` file.
- Redis for Advanced Caching: Dive into using Redis for caching in Django, which offers rapid data retrieval capabilities, making it suitable for high-performance and distributed systems.
- Practical Implementation: Explore practical caching techniques such as view caching, template fragment caching, and per-site caching to optimize web application performance significantly.
- Performance Benefits: Recognize the dramatic improvements in application speed and efficiency that can be achieved by implementing Django’s caching strategies, ultimately leading to a better end-user experience.
In this article, you’ll get a comprehensive understanding of caching in Django and web development as a whole. You’ll learn about what caching is, the benefits of caching, how to set up caching in Django, the backend systems that Django supports, and the best practices of caching.
By the end of the article, as a backend web developer, you’ll have a solid understanding of caching and how you can implement it in your Django projects for the best performance.
The Django framework is one of the most popular backend frameworks used by web developers these days. As a developer, building web applications with high performance should be one of the goals on your list. So building a web application in Django for high performance shouldn’t be a hassle, since Django comes with a caching framework that allows you to use various caching backends like in-memory cache, file-based cache, database cache, and more.
Introduction to Django Caching
Caching in web development is a technique used by web developers to improve the performance of web applications. Every web application possesses resources that its users consistently desire to utilize. A resource could be anything from a straightforward web page to data stored in a database. Caching plays a significant role in maximizing the speed at which resources are accessed.
Common caching scenarios and use cases
The Django caching framework provides a wide range of scenarios and use cases that enable a developer to cache frequently accessed data. The following are the common caching scenarios:
-
Page Caching. This is a scenario where frequently visited pages on a site are entirely cached. The application fetches the cached versions of the pages and renders them when a request is made, as opposed to creating the content of the page from scratch.
-
Database Query Caching. Database query caching is a good approach for applications that depend on frequently requesting the database for information. A series of requests can be satisfied by the same piece of cached data without the need to hit the database, hence lowering database hits and speeding up server response time.
-
Session and Authentication Caching. Caching may be used to offer a streamlined user experience and a quicker response time. Since cached data will enable users to move easily across the authenticated sections of an application, caching authentication and session details can help to reduce redundant authentication operations.
Benefits of Django caching
Caching has grown more advantageous to web developers in this modern environment where data is of the essence and speed is more essential. These are some of the benefits of caching:
-
Improved Performance. Caching enhances the performance of web applications by reducing server load. When the server gets requests from the application, Caching ensures that some requests are satisfied using previously cached data. This prevents the server from having to conduct those operations from scratch. As a result, the users’ experience is improved overall, and reaction times are sped up.
-
Reduced response time. Caching minimizes response time by reducing database hits. Caching enables the data to be fetched from a convenient location rather than directly from the database each time it is needed. Since some data need pricey calculations that can take some time to complete, fetching data every time it is needed from the database might not be the best choice for all data. By saving the data and promptly making it available whenever needed, caching saves the day.
-
Resource Optimization. Caching data or resources in a web application, allows resources to be accessible and retrievable without performing repetitive operations that output the same resources.
Setting up A Django Project
The main tasks in this section are to create the virtual environment and install the required modules for the project. To create the virtual environment, enter this command in your terminal:
$ python -m venv project
All the modules for the project will be installed inside this environment, so to start using it, we need to activate it.
On Windows use this:
$ .\project\Scripts\activate
And on macOS or Linux, use this:
$ source project/bin/activate
Before we implement caching, the first thing to do is set up a Django project. So let’s first install Django. Open your terminal, and run this command:
$ pip install django
After successfully installing Django, let’s create a Django project and application. To create a Django project run:
$ django-admin startproject cachedproject
Navigate into the project’s folder. Here, we’ll create a Django application. Run this command:
$ cd cachedproject
And then run this:
$ python manage.py startapp cachedapplication
After successfully creating the project and the application, we have to register the application to the project. Open the settings.py file, and make the INSTALLED_APPS list look like this:
INSTALLED_APPS = [
    'django.contrib.admin',
    'django.contrib.auth',
    'django.contrib.contenttypes',
    'django.contrib.sessions',
    'django.contrib.messages',
    'django.contrib.staticfiles',
    # new application added
    'cachedapplication',
]
Note: to use the application in your Django project, it must be registered in the INSTALLED_APPS list.
Now, to verify that the Django framework has been installed successfully, let’s test it. In the terminal, run this command:
$ python manage.py runserver
Make sure you get the output pictured below.
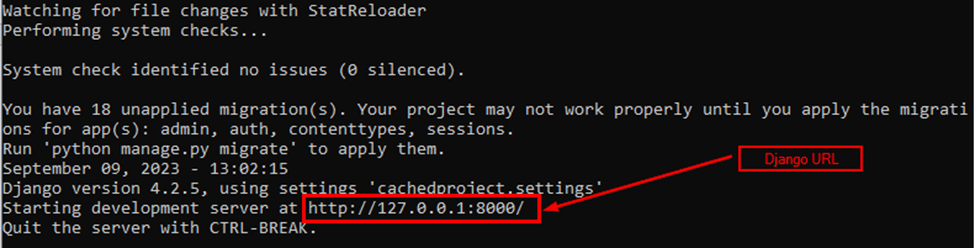
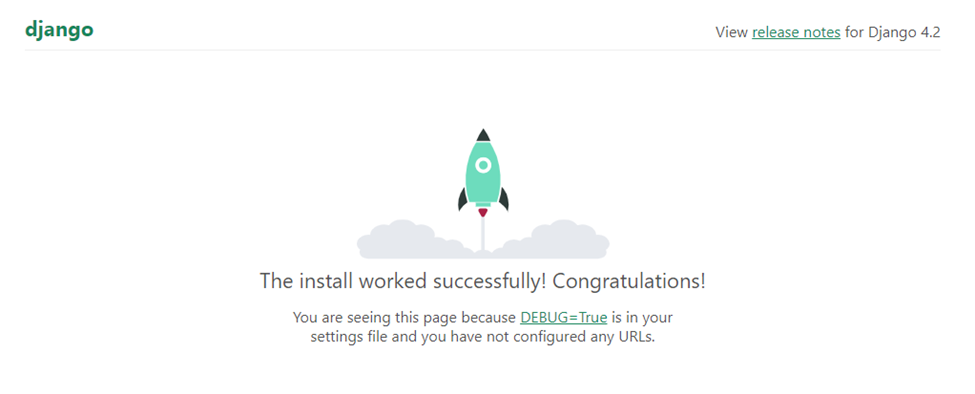
Now copy the URL and paste it into the web browser. The expected output is pictured below.
Note: you can read more about quickly starting a Django project and a Django app on SitePoint.
Configuring Different Caching Settings in settings.py
To use caching, we need to configure it in our Django project, so in this section, we’ll look at how we can configure different caching systems available in Django.
Local memory caching
As its name implies, Local Memory Cache, sometimes abbreviated as locmem, stores cached data in the RAM of the hosting machine.
Django automatically uses local memory caching as the default caching system if you don’t provide an alternate caching mechanism in your settings.py file. Its thread-safe, quick, and responsive caching technique is notable.
Local Memory Cache is less appropriate for use in production environments, since it includes a per-process mechanism that prevents any kind of cross-process caching and makes individual processes maintain separate private cache instances. It’s still a good choice, nevertheless, for development.
To configure local memory caching in your application, add the following code in the settings.py file:
# CACHES dictionary which contains caching configurations.
CACHES = {
    # a cache alias or name. In this case, we use "default" as the alias.
    "default": {
        # Here, we're using the in-memory cache backend.
        "BACKEND": "django.core.cache.backends.locmem.LocMemCache",

        # LOCATION parameter gives a unique name or identifier to this cache instance.
        "LOCATION": "unique-snowflake",
    }
}
File-based caching
In file-based caching, each cache value is serialized and kept separately in a file when caching. It’s useful for small-scale applications or where memory-based caching is not practical.
The downside of this caching system is that it’s relatively slower compared to memory-based caching.
To configure file-based caching in your application, add the following code in the settings.py file:
# A CACHES dictionary, which contains caching configurations.
CACHES = {
    # we use "default" as the alias.
    "default": {
        # Here, we're using the file-based cache backend.
        "BACKEND": "django.core.cache.backends.filebased.FileBasedCache",

        # LOCATION parameter to specify the file system path where cached data will be stored.
        "LOCATION": "/var/tmp/django_cache",
    }
}
If you’re on Windows, make sure you start the location’s path with the respective drive letter like this:
CACHES = {
    "default": {
        "BACKEND": "django.core.cache.backends.filebased.FileBasedCache",
        "LOCATION": "C:/my/path-to/file",
    }
}
Database caching
Apart from storing caches in files and hosting the machine’s RAM, Django also provides the ability to store the cache in a database.
This works best if you’ve got a fast, well-indexed database server.
To use database caching in your application, add the following code inside the settings.py:
# CACHES dictionary, which contains caching configurations.
CACHES = {
    # we use "default" as the alias.
    "default": {
        # Here, we're using the database-backed cache backend.
        "BACKEND": "django.core.cache.backends.db.DatabaseCache",

        # Provide a LOCATION parameter to specify the database table name where cached data will be stored.
        "LOCATION": "my_cache_table",
    }
}
Use the following command to construct the database table mentioned in the setup above before using the cache:
python manage.py createcachetable
The command above creates a table in the database in a proper format that Django’s database cache system expects. The name of the table is taken from the LOCATION. In this case, the table’s name will be my_cache_table.
Memcached caching
Memcached is an in-memory caching system that’s used by web developers even in several popular companies to reduce database access and increase site performance.
In contrast to the locmem cache, Memcached operates as a daemon, which implies that the Memcached server runs as a background process, independently of any direct user interaction. Memcached must therefore be installed separately on your machine. Then in your Django application, install and configure one of its bindings, such as pylibmc or pymemcache, to use Memcached.
A Django application can be linked to a Memcached daemon by adding the cache settings, location, IP address, and other details, as shown below:
# A dictionary named CACHES, which contains caching configurations.
CACHES = {
    # "default" is the alias.
    "default": {
        # Here, we're using the Memcached cache backend.
        "BACKEND": "django.core.cache.backends.memcached.PyMemcacheCache",

        # LOCATION parameter to specify the Memcached server's IP address and port.
        "LOCATION": "127.0.0.1:11211",
    }
}
Memcached technology is especially suited for applications with high read or query loads, as it was designed for fast data storage and retrieval.
The downside of Memcached is that, since the data is stored in memory, it will be lost if your server crashes.
Redis
Redis is an in-memory database that can be used for caching. It caches data using the Redis in-memory data storage. Redis is renowned for its quickness and adaptability, making it a great option for distributed systems and high-performance caching.
To cache data using Redis in your application, you need a Redis server running either locally or on a remote machine. To set up Redis on your machine, read the Redis getting started guide.
After setting up the Redis server, you’ll need to install Python bindings for Redis. Use this command to install it:
$ pip install django-redis
The redis-py interface is the binding supported natively by Django or using the django-redis and redis packages.
To configure Redis caching in your application, given that your Redis server is running on localhost (127.0.0.1), port=6379, add the following code in the settings.py:
# A dictionary named CACHES, which contains caching configurations.
CACHES = {
    # "default" is the alias.
    "default": {
        # Here, we're using the Redis cache backend.
        "BACKEND": "django.core.cache.backends.redis.RedisCache",

        # A LOCATION parameter to specify the Redis server's address and port.
        "LOCATION": "redis://127.0.0.1:6379",
    }
}
Redis’ complexity and reliance on outside services are its trade-offs. Redis installation and configuration could be trickier than with certain other cache backends. It needs a second server and upkeep when online. Redis usage creates a reliance on an outside service. Your application’s caching capabilities may be affected if Redis has problems or goes down.
Performing Caching in Django Using Redis
Okay, that’s enough theory. In this section, we’ll demonstrate how to perform caching in a Django application. We’ll focus on three forms of caching:
- view caching
- template fragment caching
- per-site caching
But before we perform each caching form in detail, let’s first set up the project properly. We’ll create, register, and populate the models, configure the application’s URLs, create a template, install the Django debug toolbar, and configure it.
Inside the cachedapplication app, open the models.py file and make it look like this:
from django.db import models

class Programmer(models.Model):
    name = models.CharField(max_length=50)
    dob = models.CharField(max_length=20)
    language = models.CharField(max_length=20)
    quote = models.CharField(max_length=150)

    def __str__(self):
        return f"{self.name}"
Next, open the admin.py file and paste this code:
from django.contrib import admin
from .models import Programmer

admin.site.register(Programmer)
This code snippet registers the model Programmer in the Django admin dashboard.
Before populating the models, let’s do some migrations. In the terminal, run this:
$ python manage.py makemigrationsAnd also run this:
$ python manage.py migrateIn Django, we can populate our models in two ways: via the terminal, and via the admin dashboard. But for simplicity’s sake, we’ll use the admin dashboard. Since the admin dashboard is for the superuser only, we need to create one. In the terminal, run the following command:
$ python manage.py createsuperuser
This command will prompt you to enter superuser details like username, email, and the two passwords.
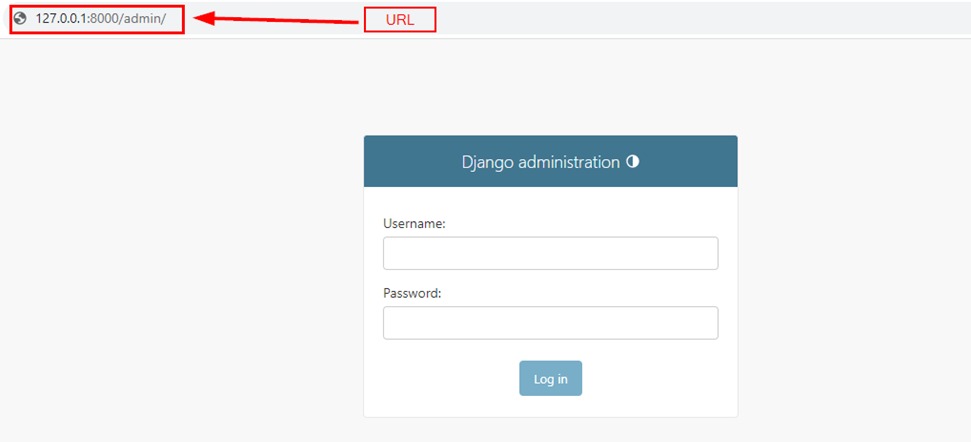
After successfully creating the superuser, fire up the local server, and in your browser enter this URL: http://127.0.0.1:8000/admin/. The image below shows the page you’ll be taken to.
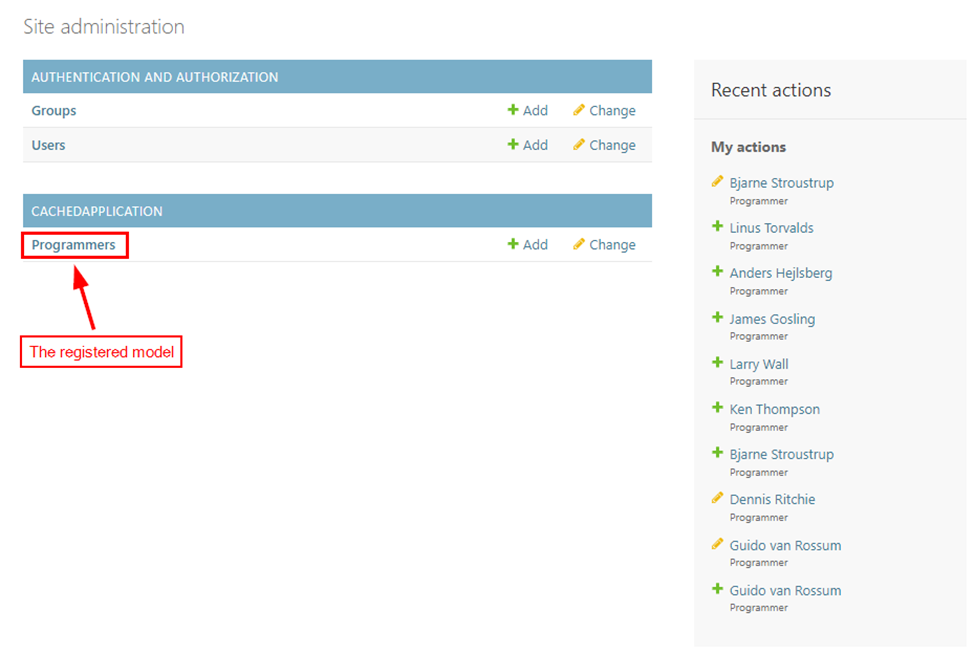
To log in, provide the superuser credentials, and once you’re in, populate the models with data, as pictured below.
Inside the application, create a templates folder, and inside it create a list_all.html file. For now, leave the HTML file empty. Open the views.py file and make it look like this:
from django.shortcuts import render
from .models import Programmer

def home(request):

    programmers = Programmer.objects.all()

    context = {
        'programmers': programmers
    }

    return render(request, 'list_all.html', context)
Now let’s register the home view in the project’s urls.py file. Inside the cachedproject folder, open the urls.py file and paste this code:
from django.contrib import admin
from django.urls import path, include
from cachedapplication import views

urlpatterns = [
    path('admin/', admin.site.urls),
    # the home view from the cachedapplication
    path('home/', views.home, name='home'),
]
Now open the list_all.html file and paste the following code:
<!DOCTYPE html>
<html lang="en">
<head>
    <meta charset="UTF-8">
    <meta name="viewport" content="width=device-width, initial-scale=1.0">
    <title>Caching</title>
    <link href="https://cdnjs.cloudflare.com/ajax/libs/mdb-ui-kit/6.4.2/mdb.min.css" rel="stylesheet"/>
</head>
<body>
    <div class="container py-5">
        <table class="table">
           <thead>
              <tr>
                 <th>Name</th>
                 <th>DOB</th>
                 <th>Language</th>
                 <th>Quote</th>
              </tr>
           </thead>
           <tbody>
              {% for programmer in programmers %}

              <tr>
                 <td>{{programmer.name}}</td>
                 <td>{{programmer.dob}}</td>
                 <td>{{programmer.language}}</td>
                 <td>{{programmer.quote}}</td>
              </tr>
              {% endfor %}
           </tbody>
        </table>
     </div>
</body>
</html>
Let’s install a Django debug toolbar. This is a Python package that helps developers monitor the performance of their Django applications, providing detailed information about database queries, HTTP requests, template rendering times, and more. So in your terminal, enter this command:
pip install django-debug-toolbar
To configure the django-debug-toolbar, open the settings.py file and edit the INSTALLED_APPS list to look like this:
# Application definition
INSTALLED_APPS = [
    'django.contrib.admin',
    'django.contrib.auth',
    'django.contrib.contenttypes',
    'django.contrib.sessions',
    'django.contrib.messages',
    'django.contrib.staticfiles',
    # new application added
    'cachedapplication',

    # the debug toolbar
    'debug_toolbar',
]
Add the debug toolbar to the MIDDLEWARE list:
MIDDLEWARE = [

    # debug toolbar middleware
    'debug_toolbar.middleware.DebugToolbarMiddleware',
]
Make the debug toolbar middleware come right after this:
django.middleware.csrf.CsrfViewMiddleware
It should also come before this:
django.contrib.auth.middleware.AuthenticationMiddleware
Add the Redis cache configurations as follows:
CACHES = {
    "default": {
        "BACKEND": "django_redis.cache.RedisCache",
        "LOCATION": "redis://127.0.0.1:6379/1",
        "OPTIONS": {
            "CLIENT_CLASS": "django_redis.client.DefaultClient",
        }
    }
}
Also, add this code to the to the settings.py file:
INTERNAL_IPS = [
    # ...
    '127.0.0.1',  # Add your development machine's IP address here
]
Finally, let’s configure the debug toolbar URLs in the urls.py file. Just below the imports, add this line of code:
import debug_toolbar
Inside the urlpatterns list add this code:
urlpatterns = [

    # debug toolbar URLS
    path('__debug__/', include(debug_toolbar.urls)),
]
Having reached this far, we’re good to go. Run the server and paste this URL into your browser: http://127.0.0.1:8000/home/. The image below shows the page we get.
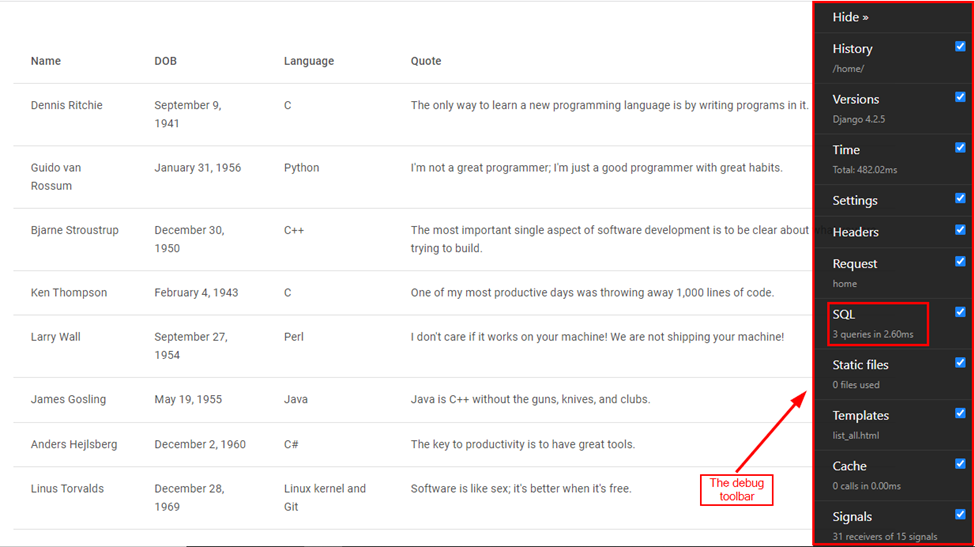
Every time you run the application using this view, it will make SQL queries. In this case, three queries have taken 2.60ms. So to avoid making SQL queries for the same data every time, we’ll implement the view caching.
View caching
As the name suggests, view caching caching involves caching the results of individual Django views. In this section, we’ll implement the view caching. To do this, we’ll make a few modifications to the view.py file. Open it and add this import:
from django.views.decorators.cache import cache_page
Right above the view, also add this decorator:
@cache_page(60*15)
(60*15) is the argument passed to @cache_page. It represents the cache timeout in seconds. The home view will be cached for 15 minutes.
Now visit the same view and refresh the page. We’ll get the result pictured below.
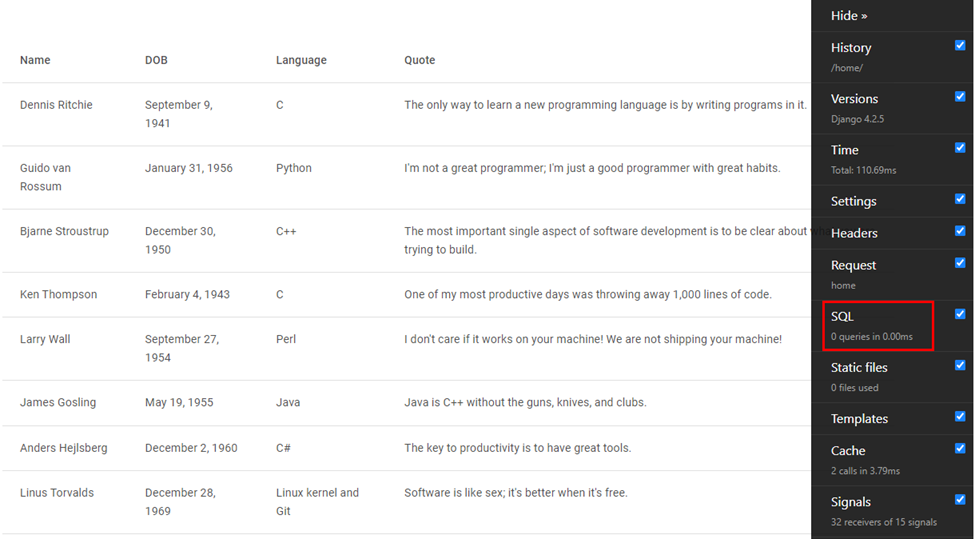
In the image above, we can see that there are 0 SQL queries performed, as data is being fetched from the cache. This helps reduce the load on the server by serving cached content to users.
Template fragment caching
This caching involves caching specific parts of a template in your project. When your template has portions with heavy calculations, template fragment caching comes in handy. To implement this caching, we use these tags: {% load cache %}, {% cache %}, and {% endcache %}. The {% cache %} tag takes two arguments: the cache timeout, and a unique cache key for identifying a specific cached fragment.
Now try running the project before implementing this caching technique. the image below shows what we’ll get.
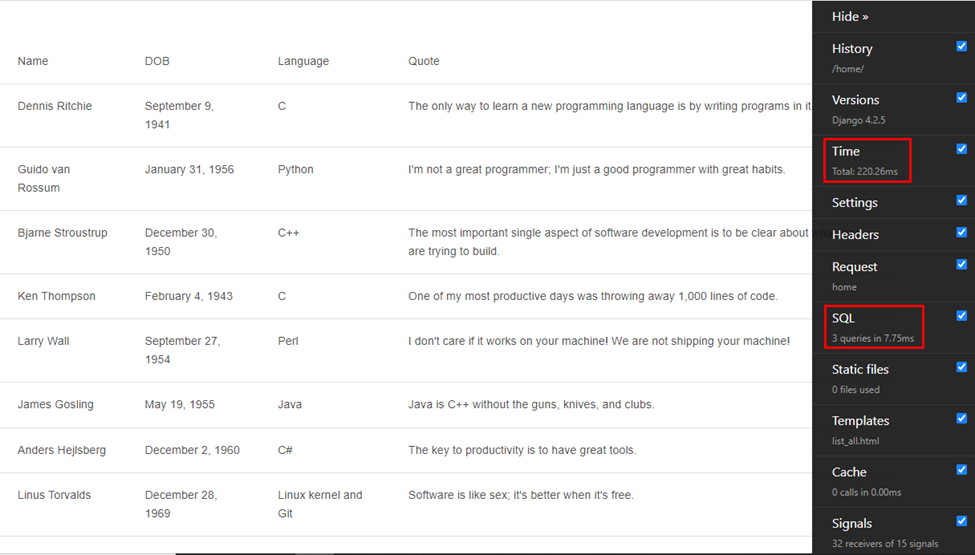
The total time is 220.26ms, and three SQL queries are performed in 7.75ms.
Now let’s implement the caching technique. We’ll cache the <div> portion of the template. Open the templates/list_all.html, and modify it to look like this:
{% load cache %}
<!DOCTYPE html>
<html lang="en">
<head>
    <meta charset="UTF-8">
    <meta name="viewport" content="width=device-width, initial-scale=1.0">
    <title>Caching</title>
    <link href="https://cdnjs.cloudflare.com/ajax/libs/mdb-ui-kit/6.4.2/mdb.min.css" rel="stylesheet"/>
</head>
<body>
   {% cache 500 programmers %}
    <div class="container py-5">
        <table class="table">
           <thead>
              <tr>
                 <th>Name</th>
                 <th>DOB</th>
                 <th>Language</th>
                 <th>Quote</th>
              </tr>
           </thead>
           <tbody>
              {% for programmer in programmers %}

              <tr>
                 <td>{{programmer.name}}</td>
                 <td>{{programmer.dob}}</td>
                 <td>{{programmer.language}}</td>
                 <td>{{programmer.quote}}</td>
              </tr>
              {% endfor %}
           </tbody>
        </table>
     </div>
   {% endcache %}
</body>
</html>
On top of the file, we’re loading the cache via {% load cache %} and we’ve enclosed the div portion with {% cache 500 programmers %} and {% endcache %}.
If you run the project again you will get the result pictured below.
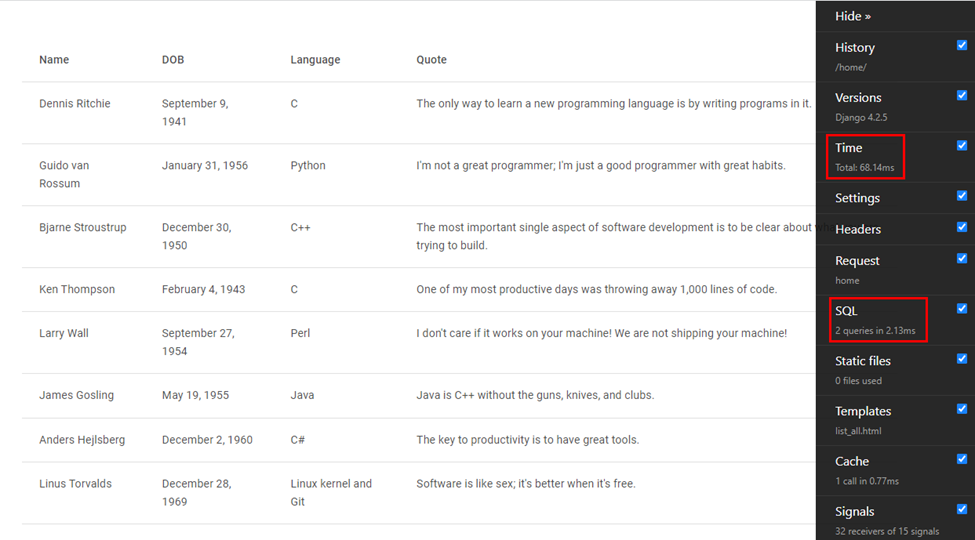
In the image above, we can see that the results have improved after the caching has been implemented.
Per-site caching
Per-site caching is also known as whole-site caching. It involves caching the whole site’s pages. To implement it, you need to add these middleware configurations in the settings.py file:
MIDDLEWARE = [
    # …
    'django.middleware.cache.UpdateCacheMiddleware',
    'django.middleware.common.CommonMiddleware',
    'django.middleware.cache.FetchFromCacheMiddleware',
    # …
]
And also add these lines:
CACHE_MIDDLEWARE_ALIAS  = ' ' # cache alias
CACHE_MIDDLEWARE_SECONDS = 600 # number of seconds each page should be cached.
CACHE_MIDDLEWARE_KEY_PREFIX = ''  # name of site if multiple sites are used
Conclusion
In conclusion, understanding caching in Django is essential for web developers looking to create high-performance web applications. This article has provided a comprehensive guide to caching in Django, covering topics such as the benefits of caching, setting up caching in Django, and the best practices for implementation. Armed with this knowledge, backend web developers can confidently incorporate caching into their Django projects to optimize performance.
If you enjoyed this article, check out some more Django articles on SitePoint.