jQuery Parallax Tutorial – Animated Header Background
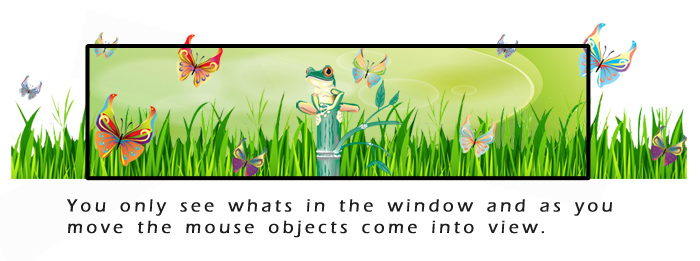
I think we all agree that the parallax effect can get you that WOW factor when someone visits your website. So, I thought i would show you a live jQuery parallax example. In this tutorial i will explain in detail how to create your own parallax background effect using jQuery to manage the animation aspects of the banner which you could use for your header background.
Update: The Parallax Plugin demo now works on jQuery 1.6.4+. I have updated this post, the demo and new download package to include working functionality with the new version of jQuery. Happy parallaxing!
The Images
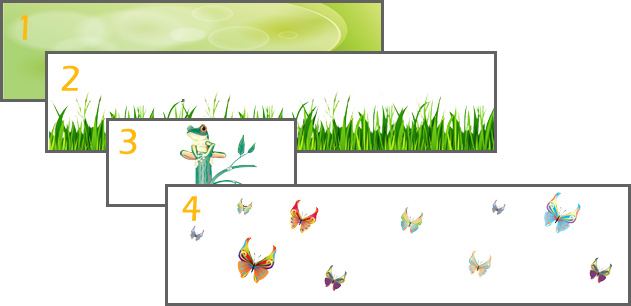
You will need the background images for the parallax banner. I have chosen to go with 4 images to keep it basic. I have chosen the following 4 images (note that images 2,3,4 are transparent png’s):
- Image layer1: The main background – green vector background
- Image layer2: Overlay image – the frog
- Image layer3: Overlay image – the grass
- Image layer4: Overlay image – the butterflies

Here a few websites where you can get free vector background images:
http://www.freevectordownload.com/Free_Vector_Banners.asp
http://www.vectorportal.com/
http://www.vectorjungle.com/
http://www.vectorjunky.com/
http://www.vecteezy.com/
Note: To edit vector files you will need an editor such as Adobe Illustrator/Photoshop.
The Code
You will need the jparallax plugin, the jquery.event.frame and latest version of jQuery – include this in your source code. *The jparrallax.js plugin may already contain jquery.event.frame.js methods, if so you can remove it from the includes below.
<script type="text/javascript" src="js/jquery-1.6.4.min.js"></script>
<script type="text/javascript" src="js/jquery.jparallax.min.js"></script>
<script type="text/javascript" src="js/jquery.event.frame.js"></script>
Now we add the images to the html code using the following markup structure into your body tag:
<div id="parallax" class="clear">
	<div class="parallax-layer" style="width:1200px; height:250px;">
		<img src="images/grass.png" />
	</div>
	<div class="parallax-layer" style="width:500px; height:250px;">
		<img src="images/frog2.png" />
	</div>
   <div class="parallax-layer" style="width:1200px; height:300px;">
		<img src="images/butterflies3.png" />
   </div>
</div>
Then you add the jQuery code to initialise the parallax plugin into your head tag:
jQuery(document).ready(function()
{
	$('#parallax .parallax-layer')
	.parallax({
		mouseport: $('#parallax')
	});
});
Also add the css style required for the parallax:
#parallax {
   position:relative; overflow:hidden; width:950px; height:250px;
   background-image:url('background.jpg');
}
.parallax-viewport {
    position: relative;     /* relative, absolute, fixed */
    overflow: hidden;
}
.parallax-layer {
    position: absolute;
}
Finishing up

Children of a parallaxed element become layers, and are automatically given position:absolute; in order to start moving them around, but the parallaxed element itself needs position:relative; or position:absolute; or the layers will move relative to the document rather than the viewport. overflow:hidden; stops layers displaying outside of the bounds of the viewport, and width and height should be set to prevent the viewport collapsing.
Tip: play around with the layer image dimensions to get the animation speeds that you want. The smaller the image compared to the background layer the faster it will move when the mouse hovers. The frog only moves left and right, this is achieved by having the same height as the window (background element) but a smaller width. The butterflies is the opposite effect and move when the mouse goes up and down.
That’s pretty much it. Hope you have fun creating your own jQuery animated parallax banners!
Frequently Asked Questions about jQuery Parallax
How can I create a parallax effect with jQuery?
Creating a parallax effect with jQuery involves manipulating the CSS properties of an element based on the scroll position of the browser window. You can use the jQuery’s scrollTop() method to get the scroll position and then change the CSS background-position property of the element. The key is to move the background at a different speed than the foreground, creating a sense of depth and motion.
What are the benefits of using jQuery for parallax scrolling?
jQuery is a powerful JavaScript library that simplifies HTML document traversing, event handling, and animation. It’s lightweight, easy to use, and has a lot of built-in functions, which makes it a great tool for creating parallax scrolling effects. With jQuery, you can create smooth, fluid parallax animations with just a few lines of code.
Can I use jQuery parallax on mobile devices?
Yes, you can use jQuery parallax on mobile devices. However, keep in mind that performance may vary depending on the device’s processing power and browser compatibility. It’s always a good idea to test your parallax effects on multiple devices to ensure they work properly.
How can I optimize my jQuery parallax for better performance?
There are several ways to optimize your jQuery parallax for better performance. One way is to use CSS3 transitions and transforms instead of jQuery animations whenever possible, as they are more performant. Another way is to use the requestAnimationFrame method for animation, which can result in smoother animations.
Why is my jQuery parallax not working?
There could be several reasons why your jQuery parallax is not working. It could be due to a syntax error in your code, a missing or incorrect file path, or a conflict with other scripts on your page. Make sure to check your browser’s console for any error messages, as they can provide clues to what’s going wrong.
How can I add multiple parallax elements to my page?
You can add multiple parallax elements to your page by creating multiple instances of the parallax function, each targeting a different element. Just make sure to adjust the speed and direction of each element to create a cohesive parallax effect.
Can I use jQuery parallax with Bootstrap?
Yes, you can use jQuery parallax with Bootstrap. In fact, jQuery and Bootstrap work very well together, as Bootstrap uses jQuery for many of its components. Just make sure to include the jQuery library before the Bootstrap JavaScript file in your HTML document.
How can I make my jQuery parallax responsive?
To make your jQuery parallax responsive, you can use CSS media queries to adjust the size and position of your parallax elements based on the viewport size. You can also use jQuery’s resize() method to update the parallax effect when the browser window is resized.
Can I use jQuery parallax with WordPress?
Yes, you can use jQuery parallax with WordPress. You can either use a WordPress theme that already includes parallax effects, or you can add your own custom jQuery parallax code to your theme’s JavaScript file.
How can I add a fade effect to my jQuery parallax?
You can add a fade effect to your jQuery parallax by changing the opacity of your parallax elements based on the scroll position. You can use jQuery’s scrollTop() method to get the scroll position and then use the css() method to change the opacity.
Sam Deering has 15+ years of programming and website development experience. He was a website consultant at Console, ABC News, Flight Centre, Sapient Nitro, and the QLD Government and runs a tech blog with over 1 million views per month. Currently, Sam is the Founder of Crypto News, Australia.


