

I have recently been tracking my time on projects more closely throughout the day. It is useful to see which projects take up more time than others and helps me measure which days I’m most productive (and what is distracting me!). My service of choice for this is Toggl. It is simple, clean and syncs across devices. Best of all – it has an API which you can hook up your own applications and devices to. I decided to set up a button connected to my Particle Photon that would start and stop my Toggl timer for me. I used a simple Node server to manage the communication between my Particle device and Toggl.
Clicking a physical button feels just that little bit more empowering than tapping a software button and prevents me needing to get out my smartphone or click around on my Mac to find the timer!
Key Takeaways
- Utilize both Particle Photon and Node.js to create a physical button that interacts with Toggl’s API, allowing for a tangible and satisfying way to track time.
- Gather necessary components including a Particle Photon or Core, a physical button, a breadboard, resistors, jumper wires, and access to a Toggl account.
- Follow detailed steps to connect the Particle device with Toggl via API keys, ensuring secure communication between the hardware and the time tracking service.
- Implement a Node server to handle the logic of starting and stopping the Toggl timer based on button presses, with the added visual feedback through an LED indicator.
- Explore the potential of expanding this setup into more complex IoT applications for productivity, demonstrating the versatility and integration capabilities of Particle devices and Toggl.
What You’ll Need
- A Particle Core or Photon – I’ll be using a Particle Photon but both should be compatible with the demo
- A physical button of some kind
- A breadboard, resistors and jumper wires – If you are new to tinkering with microcontrollers, SparkFun has a great new Inventors Kit for the Photon
- A Toggl account – If you don’t have one, head to the Toggl website to sign up!
- Knowledge of how to get code onto your Particle device – if you’re new to this, I published a SitePoint article a few weeks back on connecting to the Photon. The Particle Core is similar.
- A basic understanding of running a Node server and using npm – Peter Dierx at SitePoint has written a pretty comphrensive guide on starting with npm.
Note: Particle also sell a big physical button. You could quite likely adapt this concept to the big button for a lot of fun, I just don’t own one of those… yet.
Finding Your API Keys
To get your Toggl API key, visit the Toggl “My Profile” Page. If you scroll down to the bottom of this page, you’ll find a unique API token you can use like so:
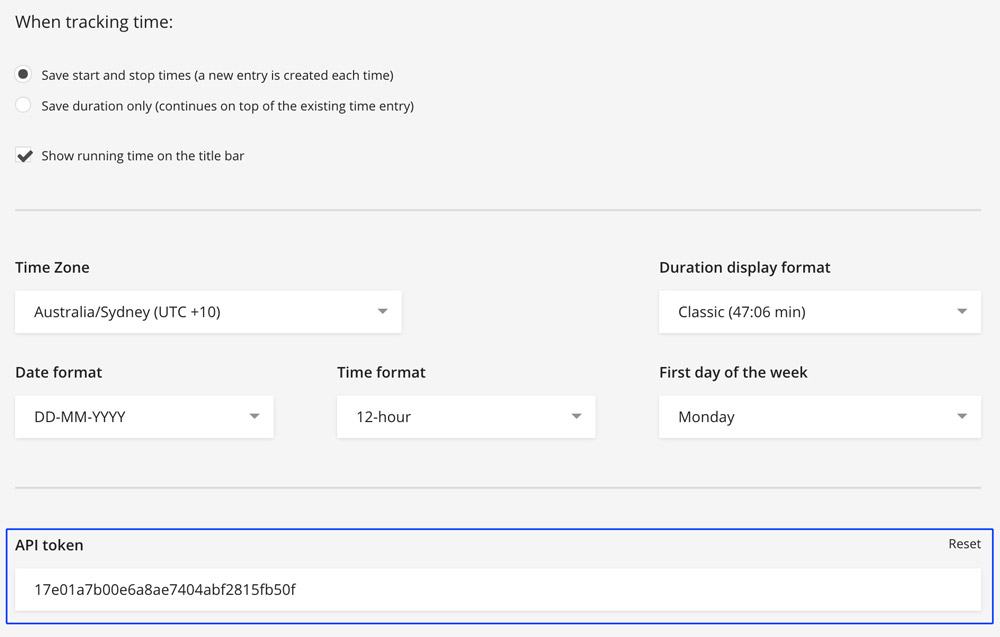
Copy that token to a safe place. You’ll need it!
You can also reset it using the tiny “Reset” link on the right hand side (useful in moments like just then when I revealed my API key to you all).
If it has been a while since your last Particle build session and you need a refresher on finding your Particle API key, go to the Particle Build online editor and click the gear icon at the very bottom to get to the settings page. From there, you’ll see a screen which shows you your access token.
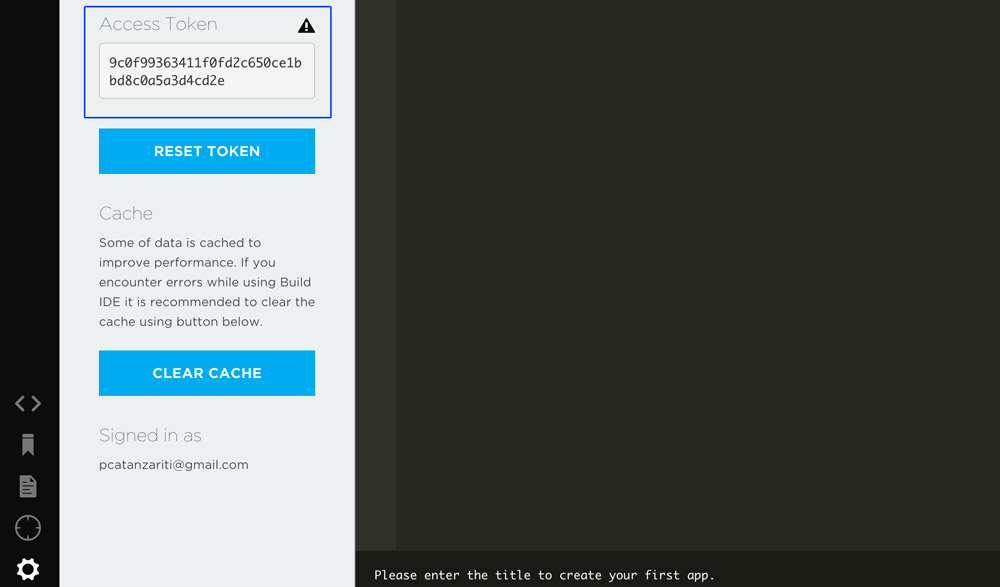
Copy that one too.
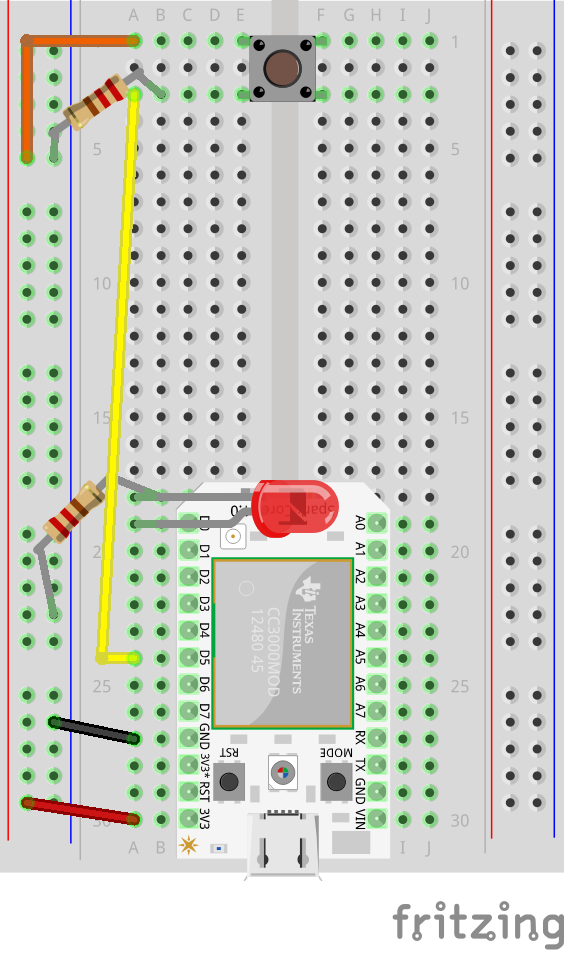
Our Particle Sketch
Our sketch with the layout of the breadboard, Particle device (shown as a Core in this pic but both this and a Photon will work), LED and button looks like so:
Download The Code
All of the code for this example can be found on GitHub.
Our Particle Code
Our Particle code will keep track of whether or not the button is pressed and whether or not we want to have our LED lit up or not. All the rest of the functionality will be taken care of by our Node server.
The Particle code looks like so:
int ledPin = D0;

int buttonPin = D5;

bool ready = true;

int last;
void setup() {

    pinMode(ledPin, OUTPUT);

    pinMode(buttonPin, INPUT);

    last = millis();

    digitalWrite(ledPin, LOW);
    Spark.function("ledTrigger", ledTrigger);

}
void loop() {

    if (millis() - last > 200) {

        if (digitalRead(buttonPin)) {

          if (ready) {

            ready = false;

            Spark.publish("buttonPressed");

            last = millis();

          }

        } else {

          ready = true; // button ready to be pressed again

        }

    }

}
int ledTrigger(String value) {

    if (value == "ON") {

      digitalWrite(ledPin, HIGH);

    } else {

        digitalWrite(ledPin, LOW);

    }
  return 0;

}
I’ll explain what each bit of that code means. To start with, we define our two components and the pins they are attached to. Our button is attached to D5 and our LED is attached to pin D0.
int ledPin = D0;

int buttonPin = D5;
The next two variables are there to keep track of timing within our loop. ready tracks whether our button is ready to be pressed again. We want to ensure there is a period between when we first click it and when it can be clicked again. last is the variable which helps track this period of time, it keeps track of the last time the loop has been run. That might make more sense when you see it in action soon.
bool ready = true;

int last;
In our setup() function, we start by setting the pin mode for our LED to output and set it to input for our button.
void setup() {

    pinMode(ledPin, OUTPUT);

    pinMode(buttonPin, INPUT);
    // more code explained next!

}
After that, we use the last variable I was explaining earlier. We initially set it to millis(). The millis() function returns the number of milliseconds since this program began running on our Particle device. This way, we know the time our setup() function began to run.
last = millis();
We set our LED to LOW initially, which turns it off.
digitalWrite(ledPin, LOW);
Lastly, in our setup() function, we define a public function that our Node code will be able to access. This function is our ledTrigger() function, as we want our Node code to be able to turn the LED on and off.
Spark.function("ledTrigger", ledTrigger);
In our loop() function, we run code every 200 milliseconds. We work that out by reading the current value of millis() and taking it from our last value. There are other alternative methods to check for button presses but this was one shown by the Particle team and also the only one that seems to work for me!
void loop() {

    if (millis() - last > 200) {

      // Our checks for button presses

    }

}
Each 200 milliseconds, we check if there is a signal from our button. If we are seeing a signal from our button and our ready variable is true, then we publish out a "buttonPressed" event for our Node server to hear. We also set ready to false so the button won’t press multiple times and last to this current millis() (so we can now wait another 200 milliseconds before running again).
if (digitalRead(buttonPin)) {

  if (ready) {

    ready = false;

    Spark.publish("buttonPressed");

    last = millis();

  }

}
If there is no signal from our button after the 200 milliseconds, we set ready to true, as our button has been released and thus we can start watching for the next 200 millisecond interval when it is pressed again.
else {

  ready = true; // button ready to be pressed again

}
The last bit of code is our public ledTrigger() function we mentioned earlier. This is what our Node code will use to turn our LED on and off. Each function call is also passed a string of either "ON" or "OFF". If we see "ON" passed into the function, we set our LED to HIGH. Otherwise, we set it to LOW turning it off.
int ledTrigger(String value) {

    if (value == "ON") {

      digitalWrite(ledPin, HIGH);

    } else {

        digitalWrite(ledPin, LOW);

    }
  return 0;

}
Our Node Server
Within our Node server, we take care of all the integration between our Toggl account and our Particle device. Our Node server looks like so:
var spark = require("spark"),

  TogglClient = require("toggl-api"),

  toggl = new TogglClient({apiToken: "YOURAPITOKEN"}),

  _ = require("underscore"),

  currentParticle;
initParticle();
function initParticle() {

  spark.on("login", function(err, body) {

    console.log("Particle Core login successful: ", body);

    var deviceList = spark.listDevices();
    deviceList.then(function(devices) {

      currentParticle = _.find(devices, function(device) {

        return device.name == "Timon";

      });
      console.log("Timon was found: ", currentParticle);
      currentParticle.onEvent("buttonPressed", function() {

        console.log("Button was pressed!");
        toggl.getCurrentTimeEntry(function(err, currentEntry) {

          if (currentEntry) {

            console.log(currentEntry.description + " is running");
            toggl.stopTimeEntry(currentEntry.id, function(err, stoppedEntry) {

              console.log(stoppedEntry.description + " was stopped");
              currentParticle.callFunction("ledTrigger", "OFF", function(result) {

                console.log("LED should be off");

              });

            });

          } else {

            var currentDate = new Date(),

                yesterday = new Date();
            yesterday.setDate(currentDate.getDate() - 1);
            toggl.getTimeEntries(yesterday.toISOString(), currentDate.toISOString(), function(err, data) {

              if (!err) {

                var lastEntry = data[data.length - 1];

                console.log(lastEntry);
                toggl.startTimeEntry({

                  description: lastEntry.description,

                  pid: lastEntry.pid,

                  wid: lastEntry.wid

                }, function(err, timeEntry) {

                  console.log("Entry started");
                  currentParticle.callFunction("ledTrigger", "ON", function(result) {

                    console.log("LED should be on");

                  });

                });

              }

            });

          }

        });

      });

    });

  });
  spark.login({

    accessToken: "YOURACCESSTOKEN"

  }, function(err, body) {

    if (!err) console.log("API login complete!");

  });

}
It begins with us requiring the spark, toggl-api and underscore npm libraries. spark is the library we use to access the Particle Core (it used to be called a “Spark Core”), toggl-api is a nice and simple library that lets us access our Toggl API, we just need to pass in our API token as you see below. underscore will be used to make it simpler to look through the data that is returned from the Toggl API. currentParticle is where we’ll store the details of the Particle Core we’re using.
var spark = require("spark"),

  TogglClient = require("toggl-api"),

  toggl = new TogglClient({apiToken: "YOURAPITOKEN"}),

  _ = require("underscore"),

  currentParticle;
Everything happens within a function we’ve got called initParticle(). We initially log into the Particle service using our access token and then use our access within the spark.on("login") event:
function initParticle() {

  spark.on("login", function(err, body) {

    console.log("Particle device login successful: ", body);
    // We'll be accessing our Particle here

  });
  spark.login({

    accessToken: "YOURACCESSTOKEN"

  }, function(err, body) {

    if (!err) console.log("API login complete!");

  });

}
Within our logged in state, we then use spark.listDevices() to get a list of all devices attached to that account. Once that has been returned, we use the underscore library to search through the results and find the particular Particle device we have our button attached to. I named my Particle device “Timon”, so I look for that name below. Once we find the device, we attach it to the currentParticle.
var deviceList = spark.listDevices();
deviceList.then(function(devices) {

  currentParticle = _.find(devices, function(device) {

    return device.name == "Timon";

  });
  console.log("Timon was found: ", currentParticle);
Once we have our Particle device, we watch for the "buttonPressed" event that we set our Particle device to emit whenever it finds our button was pushed down. If we see that event, we respond:
currentParticle.onEvent("buttonPressed", function() {

  console.log("Button was pressed!");
  // We'll talk to Toggl here next!

});
We have reached the point in our code where we need to speak to Toggl to let them know that we want to do something with our time tracking. We first want to know whether there is a project already being tracked. We can do that with toggl.getCurrentTimeEntry(). If there is a current time entry, it is returned within the currentEntry variable. We check for that variable and if there’s already an entry running, we want our button press to stop that timer. We do that via the toggl.stopTimeEntry() function. When that function is successful, we tell our Particle device to turn our LED off via the currentParticle.callFunction("ledTrigger") call you can see below.
toggl.getCurrentTimeEntry(function(err, currentEntry) {

  if (currentEntry) {

    console.log(currentEntry.description + " is running");
    toggl.stopTimeEntry(currentEntry.id, function(err, stoppedEntry) {

      console.log(stoppedEntry.description + " was stopped");
      currentParticle.callFunction("ledTrigger", "OFF", function(result) {

        console.log("LED should be off");

      });

    });

  }

  // We will have an else statement next!

}
If there isn’t a current event running, we instead want to find the last event that ran and resume it via the button press (as we can’t really define an event within a button press, we’ll assume we are restarting our last event that we defined within the desktop or mobile apps).
To find past events, we use the toggl.getTimeEntries() function. This function takes two variables, the start date and end date we want to look for events within. We only really want the very last event, so we set it to look through the past day. We set up two variables for this, currentDate which is the typical new Date() in JavaScript, and yesterday which is our currentDate minus one. These need to be in ISO 8601 date time format for them to work with Toggl, so we convert them both using toISOString().
else {

  var currentDate = new Date(),

      yesterday = new Date();
  yesterday.setDate(currentDate.getDate() - 1);
  toggl.getTimeEntries(yesterday.toISOString(), currentDate.toISOString(), function(err, data) {

    if (!err) {

      // We have a time entry to begin!

    }

  });

}
If we have no errors returned, we’ll have an array called data which contains our Toggl time entries of the last day. To get the very last one we’ve logged, we get the last element in the array via data[data.length - 1] and assign it to lastEntry.
var lastEntry = data[data.length - 1];

console.log(lastEntry);
Now we know our last entry and can start a new entry of the same project and task. To start a new time entry, we run the toggl.startTimeEntry() function. We pass in the description (the name of your entry in Toggl), pid (the project ID) and wid (the workspace ID) of our lastEntry, so that it starts the same task and assigns it to the same project. When it successfully starts our time tracking, we call our "ledTrigger" function again, this time turning our LED on to show we’re tracking a project via the Particle device.
toggl.startTimeEntry({

  description: lastEntry.description,

  pid: lastEntry.pid,

  wid: lastEntry.wid

}, function(err, timeEntry) {

  console.log("Entry started");
  currentParticle.callFunction("ledTrigger", "ON", function(result) {

    console.log("LED should be on");

  });

});
In Action
Put this code onto your Particle device and run the usual npm install and node index.js to get your Node server running.
You should now be able to click the button to start and stop your Toggl tracking! One thing I noticed is that my Mac Toggl app doesn’t pick up time entries straight away if they weren’t initially run from the app. However, my Android Toggl app syncs much faster and had an almost real time response to my button presses, showing a new time entry starting and stopping.
Here’s a video of mine in action:
[youtube Qat3GeA1KcI]
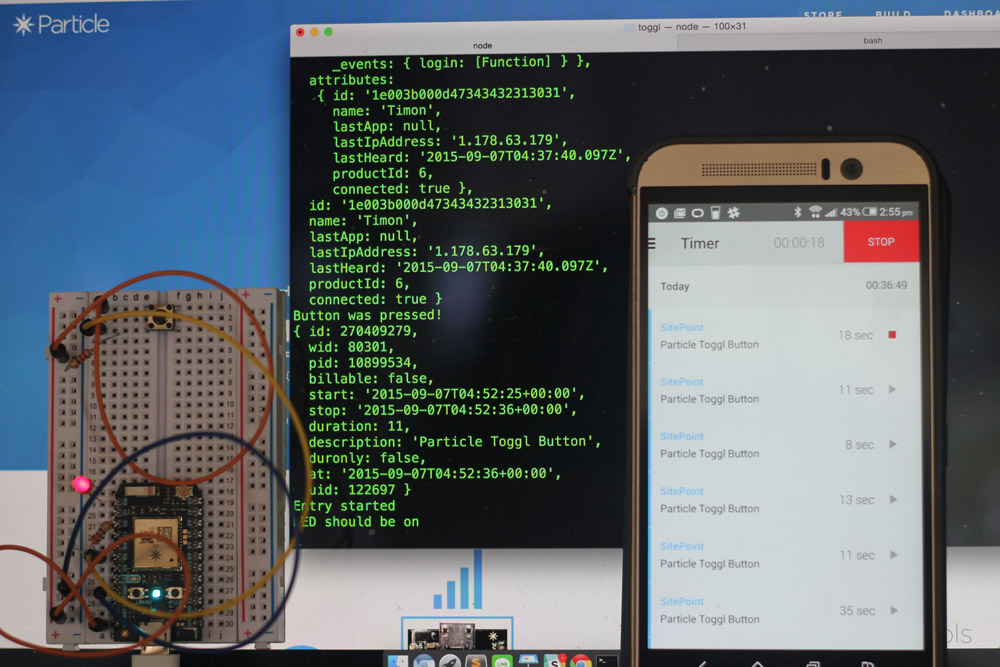
For those who don’t want to watch video, here’s a picture the moment before the button is pressed, my Toggl tracking is ready and waiting:
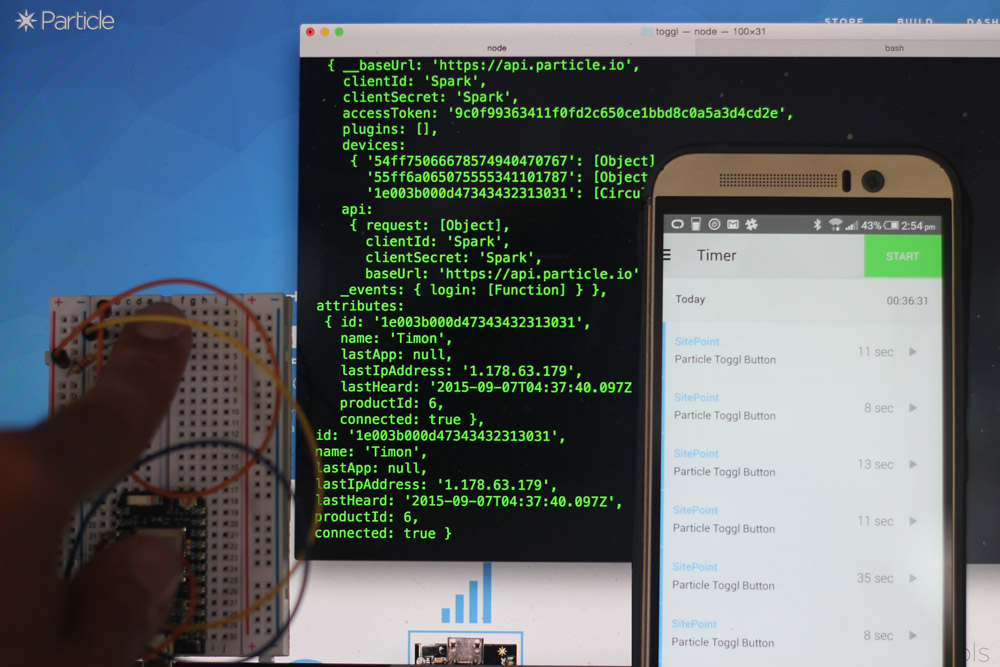
Once it registers the click, Toggl begins tracking the last task and project I’d previously been working on. The LED also turns on to show the Particle device has successfully started tracking something:
Click the button once more when you are ready to stop the project tracking!
Conclusion
With this knowledge you can go out and build your own IoT connected Toggl applications. Connect it up to absolutely anything to track your productivity, use your imagination and see what brilliant ideas come into your mind! There is definitely more that could be done with this demo. One area that definitely warrants more work is syncing the LED with Toggl when tracking is begun on other devices.
If you do make a really interesting and unique Toggl time tracker app based upon this code, please share it in the comments or get in touch with me on Twitter (@thatpatrickguy). I’d love to see it!
If you’re looking for more links and sample projects to guide you in your Particle development, I’ve got a set of curated links that might help! Head over to Dev Diner and check out my Dev Diner Particle Developer Guide.
Frequently Asked Questions (FAQs) about Toggl Time Tracker with Particle and Node
How can I integrate Toggl Time Tracker with Particle and Node?
Integrating Toggl Time Tracker with Particle and Node involves a series of steps. First, you need to install Node.js and npm on your computer. Then, you need to install the Particle CLI and log in to your Particle account. After that, you need to create a new project in Particle and add the necessary libraries. Finally, you need to write the code for the integration and flash it to your Particle device.
What are the benefits of using Toggl Time Tracker with Particle and Node?
Using Toggl Time Tracker with Particle and Node offers several benefits. It allows you to track your time more accurately and efficiently. It also enables you to automate the time tracking process, reducing the chances of errors and saving you time. Moreover, it provides you with detailed reports on your time usage, helping you to manage your time better.
Can I use Toggl Time Tracker with other programming languages besides Node.js?
Yes, you can use Toggl Time Tracker with other programming languages besides Node.js. Toggl provides a RESTful API that can be used with any programming language that supports HTTP requests. However, the process of integrating Toggl with other languages may be different from that of Node.js.
What is the Particle CLI and why do I need it?
The Particle CLI (Command Line Interface) is a tool that allows you to interact with your Particle devices and the Particle Cloud from your command line. You need it to create projects, add libraries, write code, and flash code to your devices.
How can I troubleshoot issues with my Toggl Time Tracker integration?
If you encounter issues with your Toggl Time Tracker integration, you can try several troubleshooting steps. First, check your code for errors. Second, ensure that your Particle device is connected to the internet and is properly configured. Third, make sure that your Toggl API key is correct. If you still can’t resolve the issue, you can seek help from the Particle and Toggl communities.
Can I use Toggl Time Tracker with Particle and Node for team projects?
Yes, you can use Toggl Time Tracker with Particle and Node for team projects. Toggl allows you to create team projects and track time for each team member. You can also generate team reports to analyze your team’s time usage.
How secure is Toggl Time Tracker?
Toggl Time Tracker uses secure HTTPS connections for all data transfers, ensuring that your data is safe. Moreover, Toggl complies with GDPR and other data protection regulations, providing further assurance of data security.
Can I use Toggl Time Tracker with Particle and Node offline?
While Toggl Time Tracker itself can be used offline, the integration with Particle and Node requires an internet connection. This is because the Particle device needs to connect to the Particle Cloud to receive the code and send data to Toggl.
How can I customize my Toggl Time Tracker integration?
You can customize your Toggl Time Tracker integration by modifying the code. You can add features, change the behavior of existing features, or integrate Toggl with other services. However, you need to have a good understanding of Node.js and the Toggl API to do this.
What are the alternatives to Toggl Time Tracker?
There are several alternatives to Toggl Time Tracker, such as RescueTime, Clockify, and Time Doctor. These tools offer similar time tracking features, but they may have different integrations, pricing plans, and user interfaces. You should choose the one that best fits your needs.

