
Key Takeaways
- The process of cleaning up a self-portrait in Photoshop involves several steps, including duplicating the original image, brightening the overall image, correcting the subject’s skin, removing unwanted objects, and making other enhancements.
- The use of a Wacom Bamboo Pen Tablet, a mouse, or a touch pad can all work effectively for image retouching in Photoshop.
- The article provides a detailed step-by-step tutorial on how to enhance an image without making it appear unnatural, which includes techniques such as lightening the image, adjusting levels, enhancing the sky, spot healing, using the patch tool, quick masking, smoothing and texturing the skin, and removing objects.
- The tutorial also emphasizes the importance of preserving a natural look in the retouched image, and suggests optional tonal changes to further enhance the photo. It encourages practicing these techniques to develop a comfortable workflow for naturally retouching photos.
Whether it’s for a high fashion magazine, an advertisement for a new product, a marketing promotion, or just for your new Facebook photo, we all end up retouching photos on occasion. With a few Photoshop techniques, you can change a boring, flawed photo into something much more eye-catching and professional. Your subject may not be a model, but you can still create a pristine picture that you can be proud of. Today, we are going to cover some basic photo retouching techniques that enhance an image without making it appear unnatural. We will be brightening our overall image, correcting the subject’s skin, removing some unwanted objects, and making a few other enhancements.
I’ll be working with a Wacom Bamboo Pen Tablet, but a mouse or even the touch pad on your laptop will work just as well; I have done retouching using all three instruments. To make sure you can follow along easily with this tutorial, I recommend downloading the same source file that I’m using (source image) from Photol.com. You may need to create an account to do this, but the download is free.
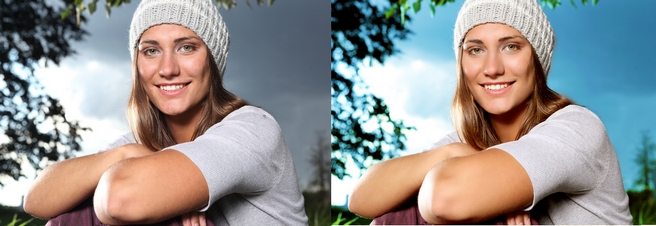
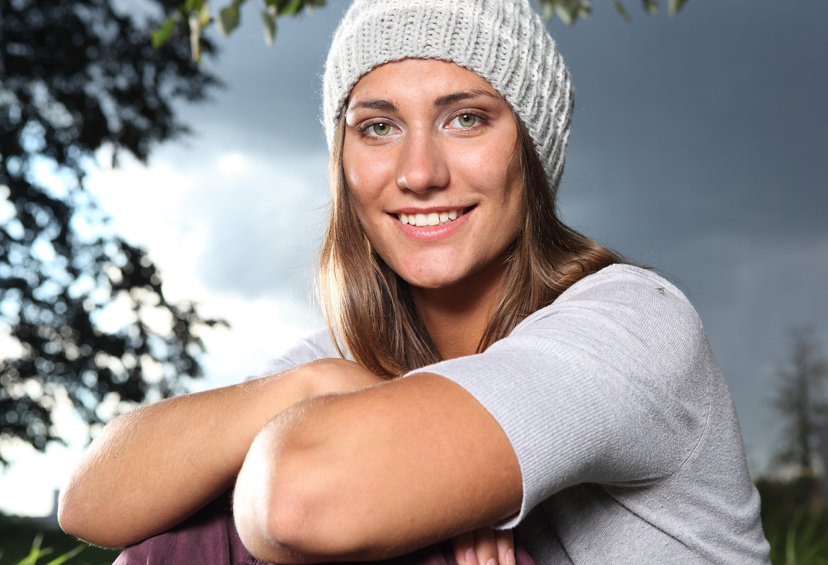
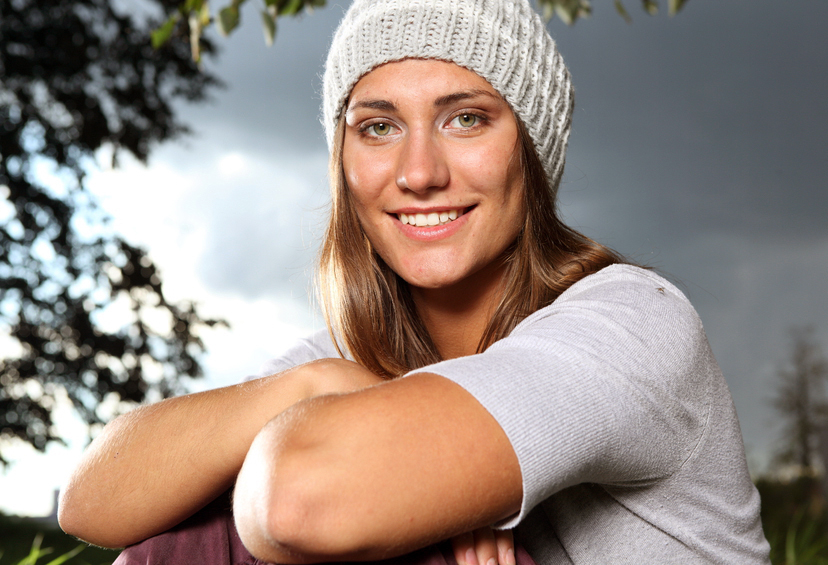
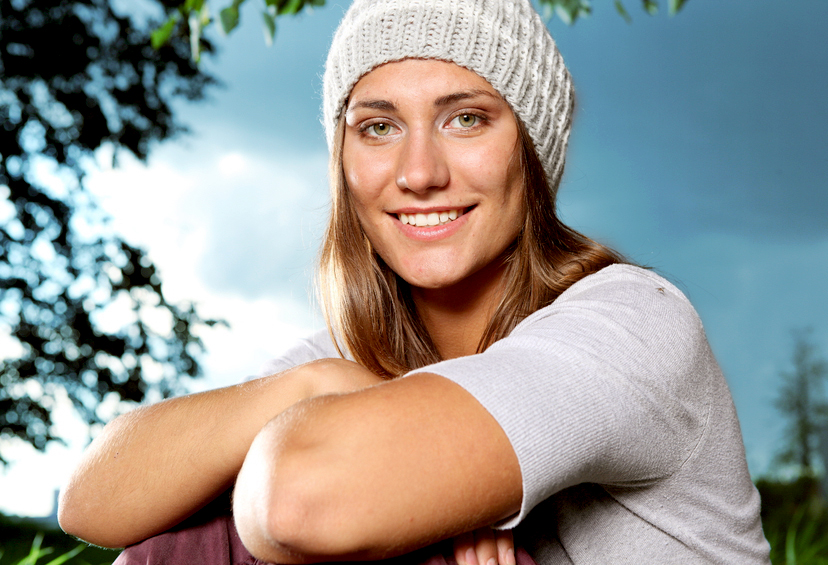
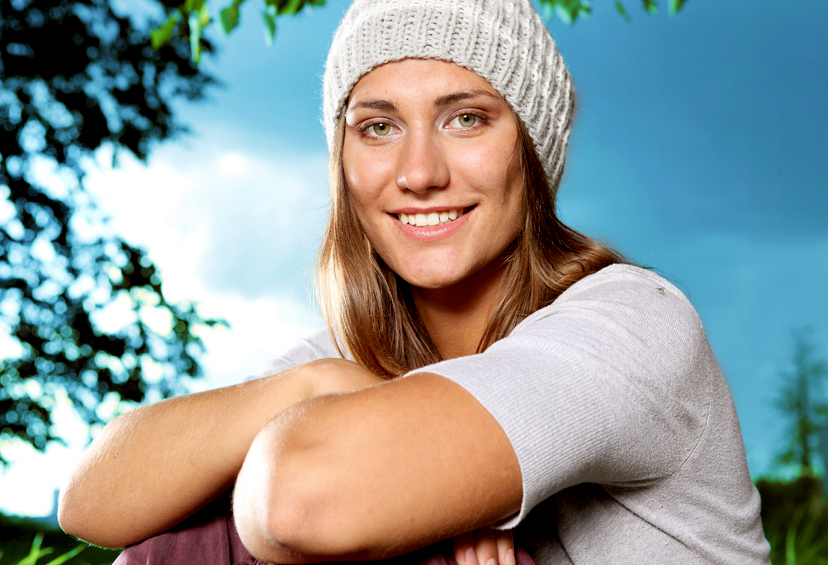
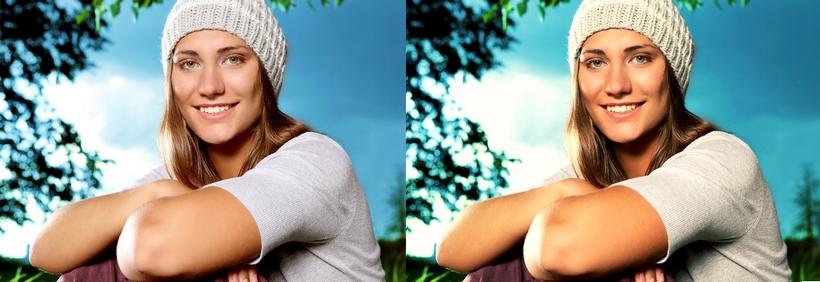
Here is the image before and after our enhancements:
Step 1: Open Your Image
Open the image in Photoshop if you haven’t already.
Step 2: Duplication
As a rule of thumb, and for precaution (because sometimes things can go wrong), I always duplicate my original image. Duplicating your image not only allows you to switch back and forth to see what changes have been made, but it also keeps you from “destroying” the original image.

Step 3: Lighten Up
As you can see, our image is a little dark both in the foreground and in the background which makes it look a little “grayed out” and drab. To make our image brighter, we will do a quick auto color adjustment. Making sure you are on your duplicated original layer, go to “Image” > “Auto Color,” or you can simply press Shift + Ctrl + “B”. You should see an immediate change take place. Now, as you can see, our image is a bit warmer tonal wise.
Step 4: Levels
Our image is still pretty dark, so in order to make it even brighter we need to go to “Image” > “Levels,” (or Ctrl + “L”) and change your first two sliders to 19 and 1.27. You can refer to the image below so that you know you’re inputting the right values. Once done, click “OK.”

We’re looking pretty good now as far as lightening up our image goes, but we still have that gray sky in the background.

Step 5: Sky
Create a new layer by clicking the layer icon in between the delete and group folder icons at the bottom of your layer menu. You could also just press Shift + Ctrl + “N”, or going to “Layer” > “New Layer.” To stay organized, name this layer “blue sky.” Once you have done that, select a hard round brush (your default round brush) and paint in the entire background with #44cdff. When you have finished, change your layer mode to “Overlay,” and drop the opacity down to about 38%.
Step 6: Brighten Sky
Duplicate your blue sky layer, and change the layer mode to “Saturation,” leaving the opacity at 38%. Now that we have done that, we have a bluer and richer sky that gives us a more sunny appearance compared to the stormy grey sky in the original picture.
Step 7: Spot Healing
If we zoom into our image, we can see that our model doesn’t have immaculate skin; we are going to correct that. Find the Spot Healing Brush Tool located on your toolbar; you’ll need to grab that by either clicking on it or pressing “J” on your keyboard. If for some reason you have a different icon there, you will need to hold your cursor over the icon until a smaller menu pops out and select the rightmost icon (which looks like a little Band-Aid). Making sure your brush is around 5px and 0% hardness, select your duplicate layer and zoom in to the subject’s face. Simply start clicking on the most notable blemishes until the face is a bit clearer. Keep your brush size just a bit bigger than the spot you’re correcting.

Step 8: Patch Tool
Now that we have the most noticeable blemishes taken care of, we need to work on some other parts of the face. As you can see the image below, I have highlighted the problem areas that we are going to minimize.
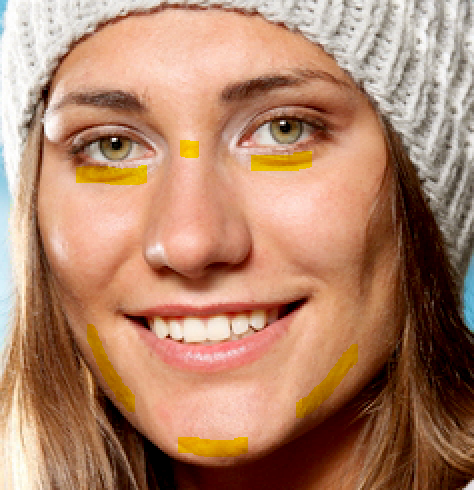
Select the Patch Tool, which is located in the small popup menu with the Spot Healing Brush Tool from the earlier step. Once you have the right tool selected, you want to select the bags under the eyes. Let’s start with the right eye first (your right, not the subject’s right). When you have the patch selected, drag it to a section of clear skin, in this instance I used the forehead.

After this is done, you will notice the patch is too blurred out so go to “Edit” > “Fade Patch Selection,” or just hold down Shift + Ctrl + “F” to lower the opacity until it looks natural. This depends on where your selection is, but for the most part you can get away with putting your slider somewhere around the 30%-50% mark. Continue doing this for the other areas on the face until you have something that looks like this.

Step 9: Quick Mask
Our model’s face is looking really good compared to what we started with, and we could just leave it in its current state, but we’re going to go one step further. Just to even out the skin tones and the skin texture, we want to smooth out everything a little bit more. Since this is for everyday photos and not fashion photography, we don’t want to overdo this technique and end up with an unnatural look. Press “D” on the keyboard to set your colors to default black and white. Then, press “Q”, or click the Quick Mask tool located underneath the color swatches on your left toolbar. You should now be in Quick Mask mode.
![]()
Start painting in the model’s face, making sure not to go over the hair, lips, nostril openings or the eyes, it should look like this when you’re done.
Step 10: Face Selecting and Duplication
Now that we have our face all painted over thanks to the Quick Mask tool, press “Q” on your keyboard (or just click the Quick Mask icon) so that your face is now selected.

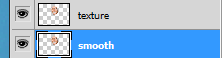
Go to your toolbar up at the top and click “Select” > “Inverse” (or Shift + Ctrl + “I”), and then copy your selection. Making sure your selection is copied, paste it twice into your layer menu, naming the bottom layer “smooth” and the top duplicated layer “texture.”
Step 11: Smoothing
Turn off your “texture” layer and select the “smooth” layer in the layer window. As I mentioned before, we just want to smooth the face very slightly to blend in the skin tones, but we don’t want to overdo it. A lot of people just select the face and use Gaussian Blur, which doesn’t always yield the most pleasing results. Today, we’re not going to do that; we are going to use a technique that will look a lot better and take a lot less time compared to the dodge and burn method that’s often used in professional retouching. That being said, go to “Filters” > “Blur” > “Surface Blur,” and when the window pops up, change the Radius to somewhere around 9 and the Threshold to 27. Then. click “OK.”
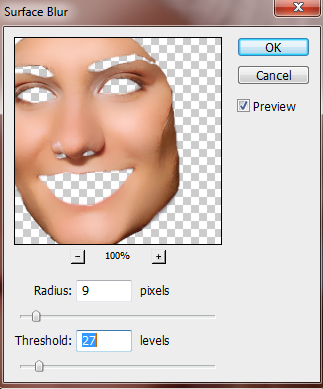
As you can see, the skin tones of the model’s face are blending in well, eliminating spot discoloration as well as the unwanted shadows resulting from the lighting and positioning of her body. This is exactly what we want.

Step 12: Texturing
Like I mentioned before, when it comes to cleaning and smoothing skin, many Photoshop users will just use the Gaussian Blur filter and end up with an overly smooth face that just doesn’t look right. We need to remember that even perfect skin still has pores, and that’s why we’ve included this texture layer. Turn your texture layer back on and lower the opacity to 50%. Your model’s face should have gone from slightly to smooth to natural, clear skin, as illustrated below.

Step 13: The Rest of the Skin
We have just finished the face, and before we go into anything else, let’s finish up the rest of the subject’s skin, which includes the arms and neck. Use the Spot Healing Brush and Quick Mask tools and utilize the same techniques covered in steps 10-12 so so that the all of the skin in the photo has the same clear, natural look. You might need to tweak your layer opacity for both the smooth and texture layers. For my new smooth layer, I dropped the opacity to 69% and reduced the texture layer’s opacity to 48%.

Step 14: Object Removal
Now that we are finally done with all of the skin, we need to remove the mosquito that is on the model’s shoulder. In order to remove the mosquito, simply create a new layer and select your Spot Healing Brush Tool. At the top of the toolbar make sure that Proximity Match is selected along with Sample All Layers.
![]()
Once you have your settings all checked, simply click on the mosquito on your new layer to remove it.

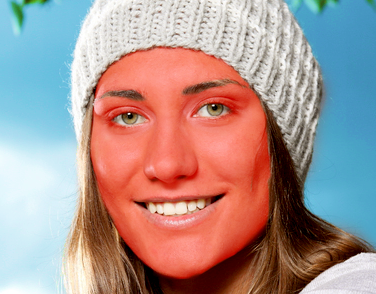
Step 15: Tonal Changes (Optional)
Technically, you are all done with retouching your picture, optimizing the color, and preserving a natural look. But, if you want to take this photo one step further, you can always tweak your curves and levels to change the tones of the overall piece. I adjusted the curves and levels, and the resulting change is shown below:
Conclusion
Learning to enhance and optimize your photography isn’t as hard as some may think; a little practice goes a long way. I encourage everyone to practice these techniques and create their own comfortable workflow for naturally retouching photos. Remember, there is never one single correct method to do anything in Photoshop; I will occasionally switch methods if it suits the image that I am working on. Try experimenting on different photos, including landscapes and other non-human based photography. And, of course, have fun!
Frequently Asked Questions on Cleaning Up a Self-Portrait in Photoshop
How can I remove blemishes and spots from a self-portrait in Photoshop?
To remove blemishes and spots from a self-portrait in Photoshop, you can use the Spot Healing Brush tool. This tool works by replacing the selected area with pixels from the surrounding area. Simply select the Spot Healing Brush tool from the toolbar, adjust the size of the brush to cover the blemish or spot, and then click on the area you want to fix. Photoshop will automatically replace the blemish with the surrounding skin texture.
How can I smooth skin in Photoshop without losing texture?
To smooth skin in Photoshop without losing texture, you can use the Frequency Separation technique. This technique separates the color and texture layers of an image, allowing you to edit them separately. You can smooth out color inconsistencies on the color layer and preserve the skin texture on the texture layer. This results in a natural-looking smooth skin.
How can I whiten teeth in a self-portrait in Photoshop?
To whiten teeth in a self-portrait in Photoshop, you can use the Sponge tool and the Dodge tool. First, use the Sponge tool set to Desaturate to remove any yellow tones from the teeth. Then, use the Dodge tool set to Highlights to brighten the teeth. Be careful not to overdo it, as this can result in unnaturally white teeth.
How can I enhance the eyes in a self-portrait in Photoshop?
To enhance the eyes in a self-portrait in Photoshop, you can use the Dodge tool and the Burn tool. Use the Dodge tool set to Midtones to brighten the iris and make the color pop. Then, use the Burn tool set to Midtones to darken the pupil and the eyelashes. This will make the eyes stand out and look more vibrant.
How can I remove stray hairs in a self-portrait in Photoshop?
To remove stray hairs in a self-portrait in Photoshop, you can use the Clone Stamp tool. This tool works by copying pixels from one area and pasting them onto another. Simply select the Clone Stamp tool from the toolbar, Alt-click on a clean area of skin to set the source, and then click on the stray hair to remove it.
How can I adjust the lighting in a self-portrait in Photoshop?
To adjust the lighting in a self-portrait in Photoshop, you can use the Curves adjustment layer. This tool allows you to increase or decrease the brightness and contrast of an image. Simply add a Curves adjustment layer, and then drag the curve up to brighten the image or down to darken it.
How can I retouch the lips in a self-portrait in Photoshop?
To retouch the lips in a self-portrait in Photoshop, you can use the Burn tool and the Dodge tool. Use the Burn tool set to Midtones to darken the outer edges of the lips and create depth. Then, use the Dodge tool set to Highlights to brighten the center of the lips and make them look fuller.
How can I remove wrinkles in a self-portrait in Photoshop?
To remove wrinkles in a self-portrait in Photoshop, you can use the Healing Brush tool. This tool works by blending the selected area with the surrounding pixels. Simply select the Healing Brush tool from the toolbar, Alt-click on a smooth area of skin to set the source, and then click on the wrinkle to remove it.
How can I add a glow to the skin in a self-portrait in Photoshop?
To add a glow to the skin in a self-portrait in Photoshop, you can use the Soft Light blending mode. Simply duplicate the background layer, apply a Gaussian Blur to the duplicate layer, and then set the blending mode to Soft Light. This will give the skin a soft, glowing effect.
How can I change the background in a self-portrait in Photoshop?
To change the background in a self-portrait in Photoshop, you can use the Quick Selection tool and the Refine Edge command. First, use the Quick Selection tool to select the person in the portrait. Then, use the Refine Edge command to refine the selection and remove any background details. Finally, add a new background layer and place it below the portrait layer.

