

Android provides many views which we can use to define a user interface for our apps. Amongst these it provides a large number to display information and take input from the user, these include text and image views.
Android provides views which can be used to display images from various sources and provide transitions between them. Some of these views are the ImageView and the ImageSwitcher. These views provide a high level of functionality to display images in a user interface so that we can concentrate on the images we want to display rather than taking care of rendering.
In this article we are going to see how we can use these views effectively in a user interface.
Key Takeaways
- Android provides views like ImageView and ImageSwitcher to display images from various sources and provide transitions between them, allowing developers to focus on the images they want to display instead of rendering.
- The ImageView class in Android can be used to display images, and a button can be incorporated to change the image displayed. The ImageSwitcher View provides a smoother transition when changing images.
- Images can be downloaded and set on ImageView from the internet using an AsyncTask, which performs the download in a background thread to avoid network operations in the UI thread.
- A gallery of images can be implemented using a horizontal scroll view. By putting a LinearLayout inside the scroll view, ImageViews can be dynamically added to the layout, allowing the user to scroll through a variable number of images.
Using the Image View to Display Images.
To render images Android provides us with the ImageView class. Let’s start by creating a program that will use an ImageView to display some images and a button which when clicked will change the image in the ImageView. You can find the code for this section on GitHub.
Create a basic Android project with an Activity that sets the main view from a layout file and does nothing else. Then open the layout file and add the ImageView and a button as shown below:
<?xml version="1.0" encoding="utf-8"?>

<LinearLayout xmlns:android="http://schemas.android.com/apk/res/android"

    android:layout_width="match_parent"

    android:layout_height="match_parent"

    android:paddingLeft="16dp"

    android:paddingRight="16dp"

    android:orientation="vertical">
    <ImageView

        android:id="@+id/imageDisplay"

        android:layout_width="wrap_content"

        android:layout_height="wrap_content" />
    <Button

        android:id="@+id/btnRotateImage"

        android:layout_width="wrap_content"

        android:layout_height="wrap_content"

        android:text="Next Image" />

</LinearLayout>
In the code above we created a LinearLayout and added an ImageView to display an image and a button which will rotate the images in the imageView.
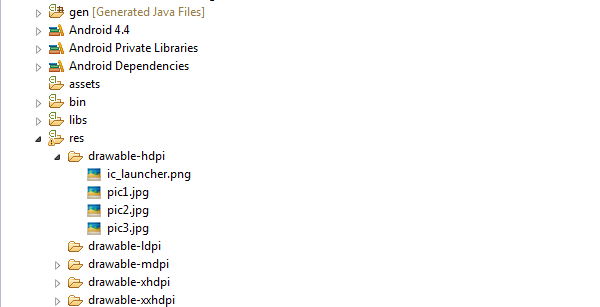
Add some images to the resource folder depending on the screen sizes you are planning to support as shown below:
Now update your Activity code as follows, using appropriate names for your project:
public class ImageChangingActivity extends Activity {
    private Integer images[] = {R.drawable.pic1, R.drawable.pic2, R.drawable.pic3};

    private int currImage = 0;
    @Override

    protected void onCreate(Bundle savedInstanceState) {

        super.onCreate(savedInstanceState);

        setContentView(R.layout.activity_image_changing);
        setInitialImage();

        setImageRotateListener();

    }
    private void setImageRotateListener() {

        final Button rotatebutton = (Button) findViewById(R.id.btnRotateImage);

        rotatebutton.setOnClickListener(new OnClickListener() {

            @Override

            public void onClick(View arg0) {

                currImage++;

                if (currImage == 3) {

                    currImage = 0;

                }

                setCurrentImage();

            }

        });

    }
    private void setInitialImage() {

        setCurrentImage();

    }
    private void setCurrentImage() {
        final ImageView imageView = (ImageView) findViewById(R.id.imageDisplay);

        imageView.setImageResource(images[currImage]);
    }

}
Above we created an Array of the resource IDs for the images stored in our resources folder. In the OnCreate method we set the content view to the layout created. In the setImageRotateListener function we set up a listener to the onClick event of the button which changes the currentImage counter and sets the new image in the ImageView.
The setCurrentImage function gets the ImageView object using the findViewById function, then sets the resource id of the current image using the setImageResource function on the ImageView which will display the image in the image view.
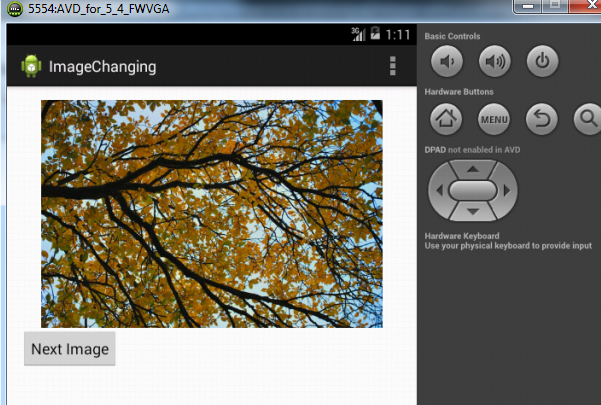
If you run the program you should see the image in the image view and clicking it should change the image to the next one:
Using the Image Switcher View in Android.
In the above example we switched the image in the image view. This switching of images does not happen in a very smooth way and you might want to use a transition when the image changes. For this we use the ImageSwitcher View.
Find the code for this example on GitHub.
First add an image switcher view to the layout as follows:
<?xml version="1.0" encoding="utf-8"?>

<LinearLayout xmlns:android="http://schemas.android.com/apk/res/android"

    android:layout_width="match_parent"

    android:layout_height="match_parent"

    android:paddingLeft="16dp"

    android:paddingRight="16dp"

    android:orientation="vertical">
    <ImageSwitcher

        android:id="@+id/imageSwitcher"

        android:layout_width="wrap_content"

        android:layout_height="wrap_content" />
    <Button

        android:id="@+id/btnRotateImage"

        android:layout_width="wrap_content"

        android:layout_height="wrap_content"

        android:text="Next Image" />

</LinearLayout>
Then add the following code to our Activity which will initialise the ImageSwitcher and setup the button to change the image with a transition.
public class ImageSwitcherExampleActivity extends Activity {
    private Integer images[] = {R.drawable.pic1, R.drawable.pic2, R.drawable.pic3};

    private int currImage = 0;
    @Override

    protected void onCreate(Bundle savedInstanceState) {

        super.onCreate(savedInstanceState);

        setContentView(R.layout.activity_image_switcher_example);
        initializeImageSwitcher();

        setInitialImage();

        setImageRotateListener();

    }
    private void initializeImageSwitcher() {

        final ImageSwitcher imageSwitcher = (ImageSwitcher) findViewById(R.id.imageSwitcher);

        imageSwitcher.setFactory(new ViewFactory() {

            @Override

            public View makeView() {

                ImageView imageView = new ImageView(ImageSwitcherExampleActivity.this);

                return imageView;

            }

        });
        imageSwitcher.setInAnimation(AnimationUtils.loadAnimation(this, android.R.anim.slide_in_left));

        imageSwitcher.setOutAnimation(AnimationUtils.loadAnimation(this, android.R.anim.slide_out_right));

    }
    private void setImageRotateListener() {

        final Button rotatebutton = (Button) findViewById(R.id.btnRotateImage);

        rotatebutton.setOnClickListener(new OnClickListener() {

            @Override

            public void onClick(View arg0) {

                currImage++;

                if (currImage == 3) {

                    currImage = 0;

                }

                setCurrentImage();

            }

        });

    }
    private void setInitialImage() {

        setCurrentImage();

    }
    private void setCurrentImage() {

        final ImageSwitcher imageSwitcher = (ImageSwitcher) findViewById(R.id.imageSwitcher);

        imageSwitcher.setImageResource(images[currImage]);

    }

}
In the code above we get the ImageSwitcher object and then set the ViewFactory which creates a plain ImageView. Then we set the animation to fade in and fade out. We update the setCurrentImage function to set the images in the ImageSwitcher.
Now the image will change with an animation.

Downloading and Setting Images on ImageView from Internet.
The code for this section can be found on GitHub.
You might not always have images available to you locally and may instead want to display them from the internet.
You should not undertake any network operations in the UI thread, instead the download should happen in a different background thread. We will do this in an Async Task. First set the permission to use the Internet in our AndroidManifest.xml as follows:
<uses-permission android:name="android.permission.INTERNET" />The layout of your project should have one ImageView and a Button as shown:
<?xml version="1.0" encoding="utf-8"?>

<LinearLayout xmlns:android="http://schemas.android.com/apk/res/android"

    android:layout_width="match_parent"

    android:layout_height="match_parent"

    android:paddingLeft="16dp"

    android:paddingRight="16dp"

    android:orientation="vertical">
    <ImageView

        android:id="@+id/imageDisplay"

        android:layout_width="wrap_content"

        android:layout_height="wrap_content" />
    <Button

        android:id="@+id/btnRotateImage"

        android:layout_width="wrap_content"

        android:layout_height="wrap_content"

        android:text="Next Image" />

</LinearLayout>
Then we create an AsyncTask which takes the ImageView and URL to download, downloads the image and sets the image in the ImageView.
The ImageDownloader async task downloads the image data and sets the ImageView. The complete activity code should now be as follows:
public class ImagedownloaderActivity extends Activity {
    private String imageUrls[] = {"http://www.abc.com/image1.jpg",

            "http://www.abc.com/image2.jpg",

            "http://www.abc.com/image3.jpg"

    };
    private class ImageDownloader extends AsyncTask<String, Void, Bitmap> {

        ImageView bmImage;
        public ImageDownloader(ImageView bmImage) {

            this.bmImage = bmImage;

        }
        protected Bitmap doInBackground(String... urls) {

            String url = urls[0];

            Bitmap bitmap = null;

            try {

                InputStream in = new java.net.URL(url).openStream();

                bitmap = BitmapFactory.decodeStream(in);

            } catch (Exception e) {

                Log.e("MyApp", e.getMessage());

            }

            return bitmap;

        }
        protected void onPostExecute(Bitmap result) {

            bmImage.setImageBitmap(result);

        }

    }
    private int currImage = 0;
    @Override

    protected void onCreate(Bundle savedInstanceState) {

        super.onCreate(savedInstanceState);

        setContentView(R.layout.activity_imagedownloader);
        setInitialImage();

        setImageRotateListener();

    }
    private void setImageRotateListener() {

        final Button rotatebutton = (Button) findViewById(R.id.btnRotateImage);

        rotatebutton.setOnClickListener(new OnClickListener() {

            @Override

            public void onClick(View arg0) {

                currImage++;

                if (currImage == 3) {

                    currImage = 0;

                }

                setCurrentImage();

            }

        });

    }
    private void setInitialImage() {

        setCurrentImage();

    }
    private void setCurrentImage() {

        final ImageView imageView = (ImageView) findViewById(R.id.imageDisplay);

        ImageDownloader imageDownLoader = new ImageDownloader(imageView);

        imageDownLoader.execute(imageUrls[currImage]);

    }

}
In the above code we stored the URLs of the images in the imageUrls array. In the setCurrentImage function we pass the ImageView to the ImageDownloader Async task and pass the URL of the image to download and set in the ImageView. The ImageDownloader Async task will download the image and set it in the ImageView.
Implementing a Gallery Using the Horizontal Scroll View.
The code for this example can be found on GitHub.
In the above examples we saw how to display one image at a time using an ImageView. Sometimes we might want to display a variable number of images and let the user scroll through them. This we can achieve by putting a LinearLayout inside a horizontal scrollView and then dynamically add ImageViews to that linear layout. For this we create a new activity called ImageGalleryActivityand update the layout file accordingly:
<RelativeLayout xmlns:android="http://schemas.android.com/apk/res/android"

    xmlns:tools="http://schemas.android.com/tools"

    android:layout_width="match_parent"

    android:layout_height="match_parent"

    android:paddingBottom="@dimen/activity_vertical_margin"

    android:paddingLeft="@dimen/activity_horizontal_margin"

    android:paddingRight="@dimen/activity_horizontal_margin"

    android:paddingTop="@dimen/activity_vertical_margin"

    tools:context="com.example.imagegallery.ImageGalleryActivity">
    <HorizontalScrollView

        android:layout_width="match_parent"

        android:layout_height="wrap_content">
        <LinearLayout

            android:id="@+id/imageGallery"

            android:layout_width="wrap_content"

            android:layout_height="wrap_content"

            android:orientation="horizontal" />

    </HorizontalScrollView>

</RelativeLayout>
And code of the Activity:
public class ImageGalleryActivity extends Activity {
    private Integer images[] = {R.drawable.pic1, R.drawable.pic2, R.drawable.pic3};
    @Override

    protected void onCreate(Bundle savedInstanceState) {

        super.onCreate(savedInstanceState);

        setContentView(R.layout.activity_image_gallery);

        addImagesToThegallery();

    }
    private void addImagesToThegallery() {

        LinearLayout imageGallery = (LinearLayout) findViewById(R.id.imageGallery);

        for (Integer image : images) {

            imageGallery.addView(getImageView(image));

        }

    }
    private View getImageView(Integer image) {

        ImageView imageView = new ImageView(getApplicationContext());

        LinearLayout.LayoutParams lp = new LinearLayout.LayoutParams(LinearLayout.LayoutParams.WRAP_CONTENT, LinearLayout.LayoutParams.WRAP_CONTENT);

        lp.setMargins(0, 0, 10, 0);

        imageView.setLayoutParams(lp);

        imageView.setImageResource(image);

        return imageView;

    }

}
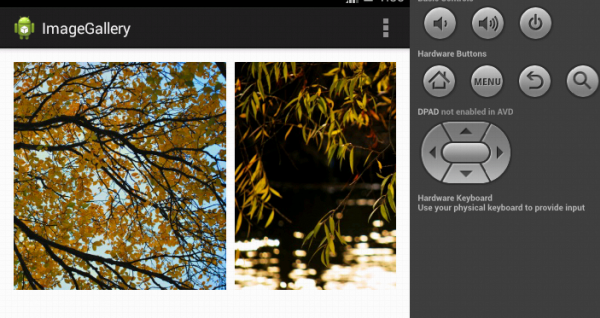
In the code above we dynamically create the ImageViews and add margins to them. The LinerLayout has the orientation set to horizontal. Now if we run the program, we will be able to see the images in a Horizontally scrollable gallery as seen below.
Conclusion
Images are a big part of modern mobile interfaces and hopefully this tutorial has shown you some of the tools Android provides to make this easy. What are you waiting for? Get visual!
Frequently Asked Questions (FAQs) about Handling and Displaying Images in Android
How can I resize an image in Android?
Resizing an image in Android can be done programmatically using the Bitmap class. First, you need to decode the image into a Bitmap object. Then, you can use the createScaledBitmap() method to resize the image. Here’s a simple example:Bitmap originalBitmap = BitmapFactory.decodeResource(getResources(), R.drawable.your_image);Bitmap resizedBitmap = Bitmap.createScaledBitmap(originalBitmap, newWidth, newHeight, false);
In this code, newWidth and newHeight are the desired dimensions for the resized image. The last parameter, when set to false, means the filter will not be applied to the original bitmap.
How can I add an image to the Drawable folder in Android Studio?
To add an image to the Drawable folder in Android Studio, follow these steps:
1. Right-click on the res folder in the Android Studio Project view.
2. Navigate to New > Image Asset.
3. In the dialog box that appears, select Launcher Icons (Adaptive and Legacy).
4. Click on the Path field and browse to the location of your image file.
5. Click Next and then Finish.
Your image will now be added to the Drawable folder and can be referenced in your code using R.drawable.your_image_name.
How can I display an image from a URL in Android?
To display an image from a URL in Android, you can use libraries like Picasso or Glide. These libraries handle image loading and caching, making it easier to display images from a URL. Here’s an example using Picasso:Picasso.get().load("http://your-image-url.com").into(imageView);
In this code, imageView is the ImageView object where you want to display the image.
How can I rotate an image in Android?
Rotating an image in Android can be done using the Matrix class. Here’s a simple example:Matrix matrix = new Matrix();matrix.postRotate(90);Bitmap rotatedBitmap = Bitmap.createBitmap(originalBitmap, 0, 0, originalBitmap.getWidth(), originalBitmap.getHeight(), matrix, true);
In this code, originalBitmap is the Bitmap object of the image you want to rotate. The postRotate() method is used to specify the angle of rotation.
How can I display a list of images in Android?
To display a list of images in Android, you can use a RecyclerView with a custom adapter. The adapter will inflate a layout that contains an ImageView for each item in the list. You can then set the image for each ImageView using the setImageResource() method or a library like Picasso or Glide if the images are from a URL.
How can I apply a filter to an image in Android?
Applying a filter to an image in Android can be done using the ColorMatrix and ColorMatrixColorFilter classes. Here’s an example that applies a grayscale filter:ColorMatrix matrix = new ColorMatrix();matrix.setSaturation(0);ColorMatrixColorFilter filter = new ColorMatrixColorFilter(matrix);imageView.setColorFilter(filter);
In this code, imageView is the ImageView object that displays the image.
How can I save an image to the device storage in Android?
To save an image to the device storage in Android, you can use the FileOutputStream class. Here’s an example:FileOutputStream out = new FileOutputStream("/path/to/your/file.jpg");bitmap.compress(Bitmap.CompressFormat.JPEG, 100, out);out.close();
In this code, bitmap is the Bitmap object of the image you want to save. The compress() method is used to write the image data to the output stream.
How can I crop an image in Android?
Cropping an image in Android can be done using the Bitmap class. Here’s a simple example:Bitmap croppedBitmap = Bitmap.createBitmap(originalBitmap, x, y, width, height);
In this code, originalBitmap is the Bitmap object of the image you want to crop. The x and y parameters specify the starting point of the crop, and width and height specify the dimensions of the cropped image.
How can I convert an image to a Bitmap in Android?
To convert an image to a Bitmap in Android, you can use the BitmapFactory class. Here’s an example:Bitmap bitmap = BitmapFactory.decodeResource(getResources(), R.drawable.your_image);
In this code, R.drawable.your_image is the resource ID of the image you want to convert to a Bitmap.
How can I display an image in a Dialog in Android?
To display an image in a Dialog in Android, you can use the AlertDialog.Builder class. Here’s an example:AlertDialog.Builder builder = new AlertDialog.Builder(this);builder.setView(R.layout.your_layout);AlertDialog dialog = builder.create();dialog.show();
In this code, R.layout.your_layout is the layout resource that contains your ImageView. You can set the image for the ImageView using the setImageResource() method or a library like Picasso or Glide if the image is from a URL.