


If you visit my profile on GitHub, you’ll notice that it contains images, social network links, some GitHub statistics and links to my blogs, which makes the GitHub profile stand out. This is possible through the GitHub profile README feature. In this article, we’ll learn how to create a GitHub profile README.
We’ll cover the following:
- what a GitHub profile README is
- how to create a GitHub profile README
- adding social badges, skills and descriptions about oneself
- adding GitHub stats
- creating a GitHub workflow to pull latest published blogs
To follow along with the tutorial, you’ll need to have a basic understanding of HTML and Markdown. If you’d like an introduction to Markdown, check out this Markdown introduction. Also, you should have a GitHub account. If you don’t have one yet, sign up at GitHub.
The code for this tutorial is available on GitHub.
Key Takeaways
- Start with the Basics: Begin by creating a special repository with your GitHub username to house your README.md, ensuring it’s visible and set to public.
- Enhance Visual Appeal: Incorporate GIFs, badges, and a banner to make your profile visually engaging. Utilize platforms like Shields.io for creating social media badges and Giphy for dynamic GIFs.
- Showcase Your Skills: Detail your technical skills and tools using images from resources like DevIcons, and provide a succinct ‘About Me’ section to personalize your profile.
- Display GitHub Stats: Add widgets like GitHub Streak Stats and GitHub Readme Stats to display your coding activity and most used languages, enhancing your profile’s credibility.
- Automate Content Updates: Implement a GitHub workflow to automatically update your profile with your latest blog posts, keeping your content fresh and relevant.
- Keep It Organized and Updated: Regularly update your README to reflect your latest projects and achievements, ensuring the content remains current and organized for easy navigation.
What a GitHub Profile README Actually Is
A GitHub profile README is a feature of GitHub that allows users to use a Markdown file named README to write details about themselves such as their skills, interests, GitHub stats and showcase it to the GitHub community. It’s shown at the top of your GitHub home page, above the pinned repositories. This is a fancy way to showcase one’s skills and stats on GitHub.
Pictured below is the final look of the GitHub profile that we’ll create for this article.
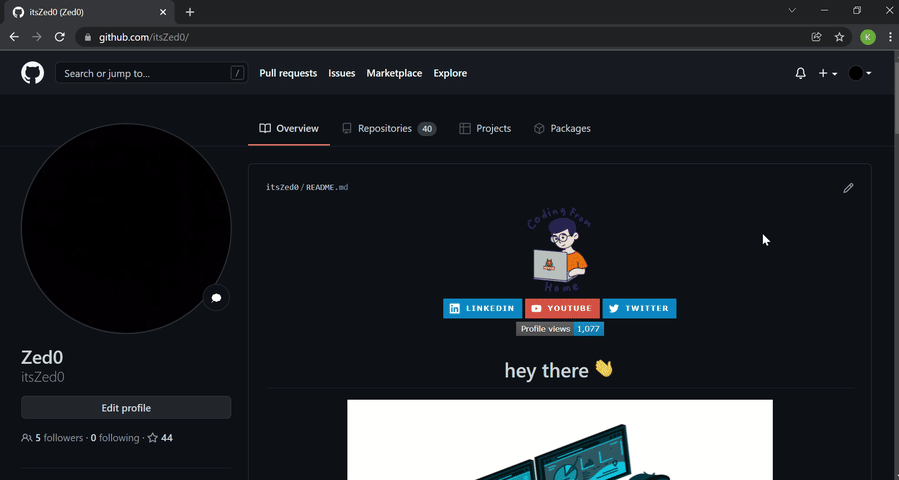
We’ll divide this into multiple sections and add contents for each section incrementally. The background color will change based on the GitHub theme settings of the user.
In the next section, we’ll look at the steps for creating the README file.
Creating a GitHub Profile README
The README file resides in a GitHub repository, the name of which is the same as the username of your GitHub account. To create the repository, follow these steps:
- Log in to GitHub.
- Click on + icon at top right of the page and select New Repository.

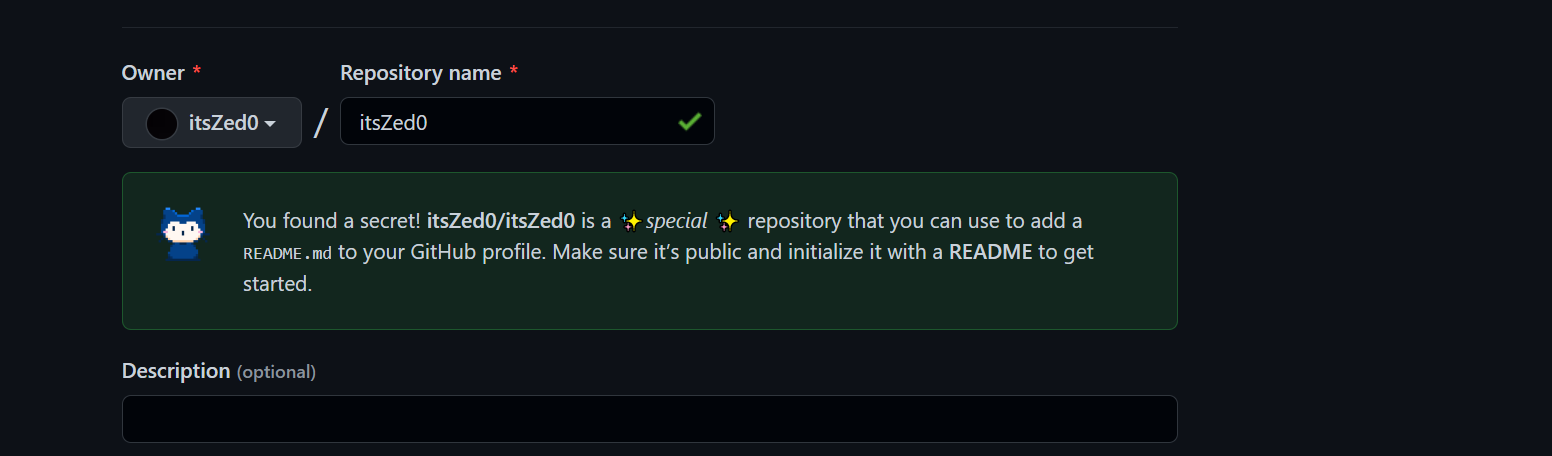
- A Create a new repository page opens. In the Repository name field, enter the username of your GitHub account. After entering the username, GitHub displays a message describing that you’re about to create a GitHub special repository.
- Check the Public checkbox under repository type to make the GitHub profile README visible to everyone who visits the GitHub profile page. If you don’t want users to see your GitHub profile README while it’s still in development, you can choose Private. Once you’re done with the complete development of your README, make sure to change the visibility to Public.
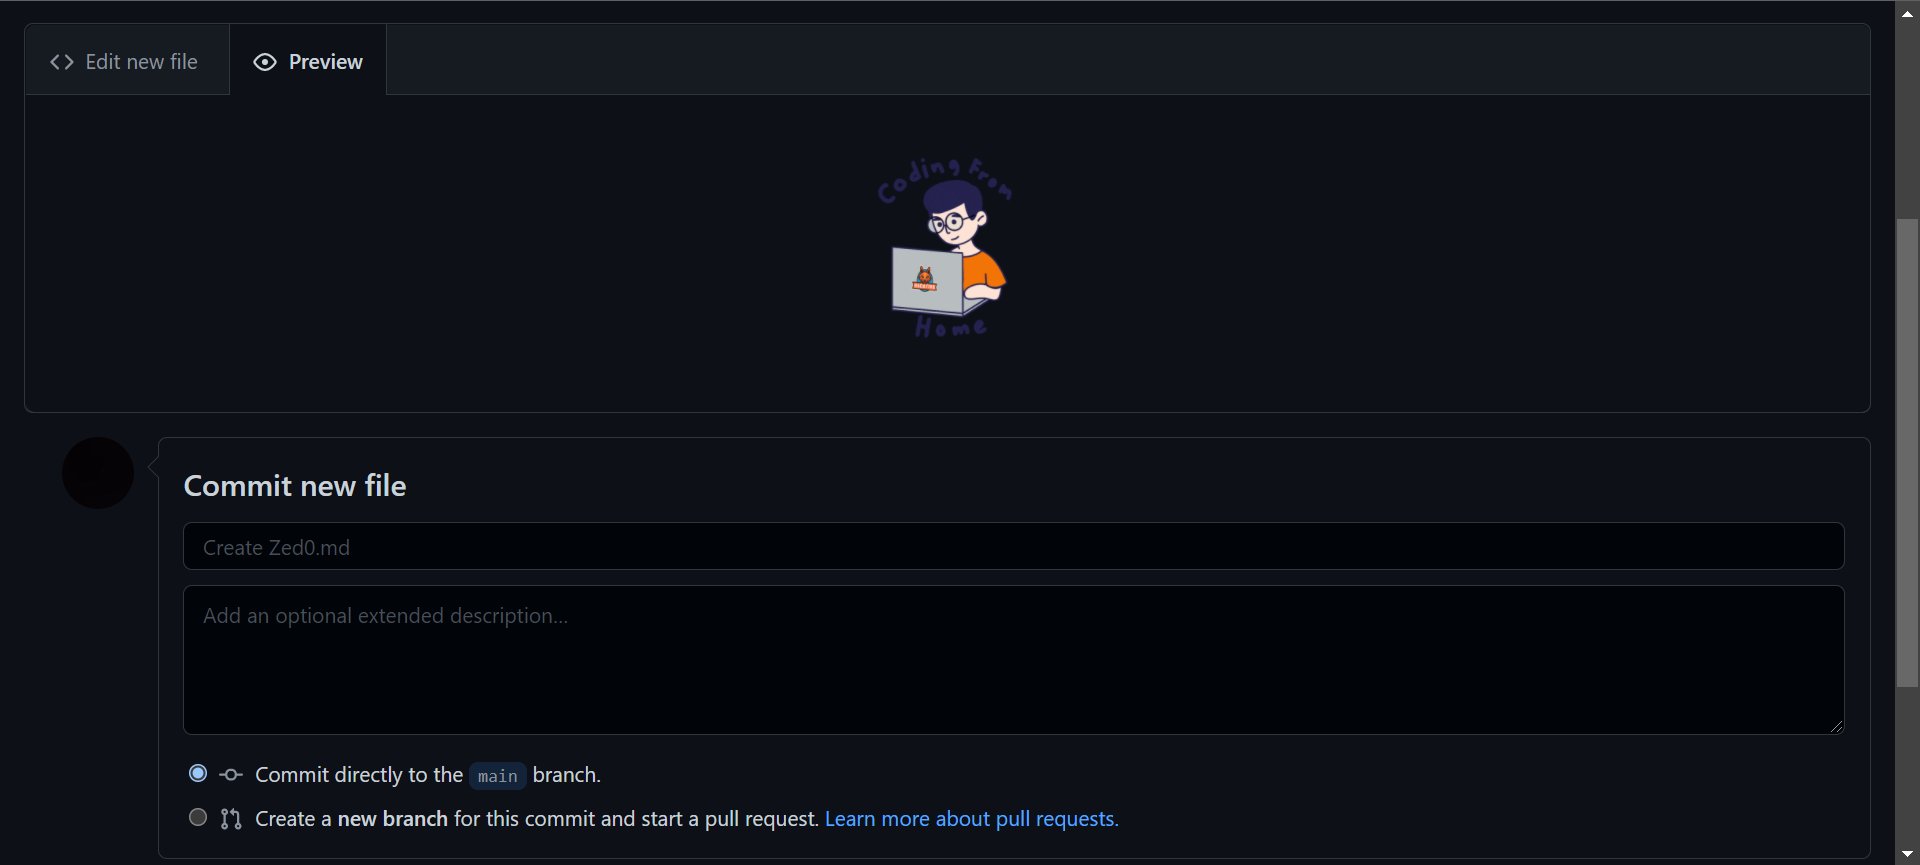
- Check the Add a README file checkbox. This will add a
README.mdfile where we’ll add the profile contents. The field values should look similar to thepicture below.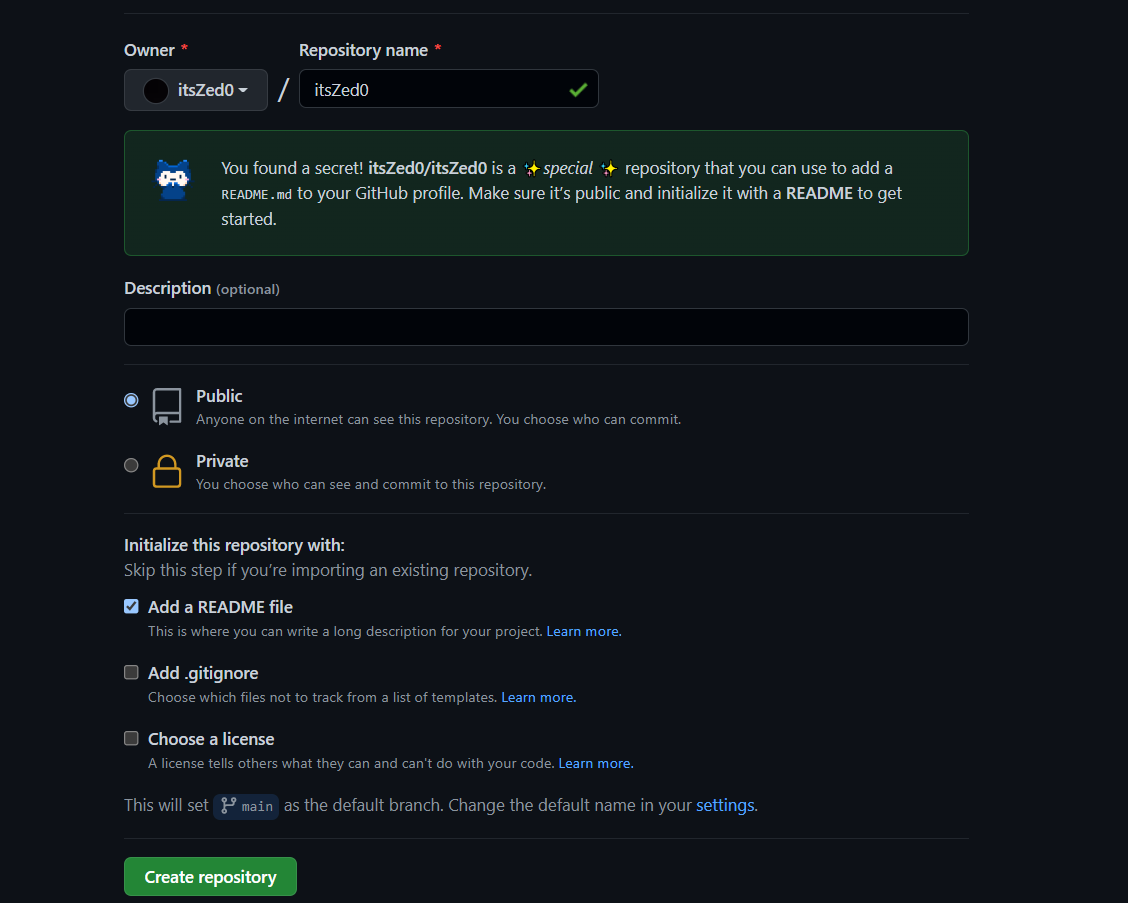
- Click on the Create repository button. A special repository is created successfully. Go to the repository you just created and you’ll see a
README.mdfile added to the repository.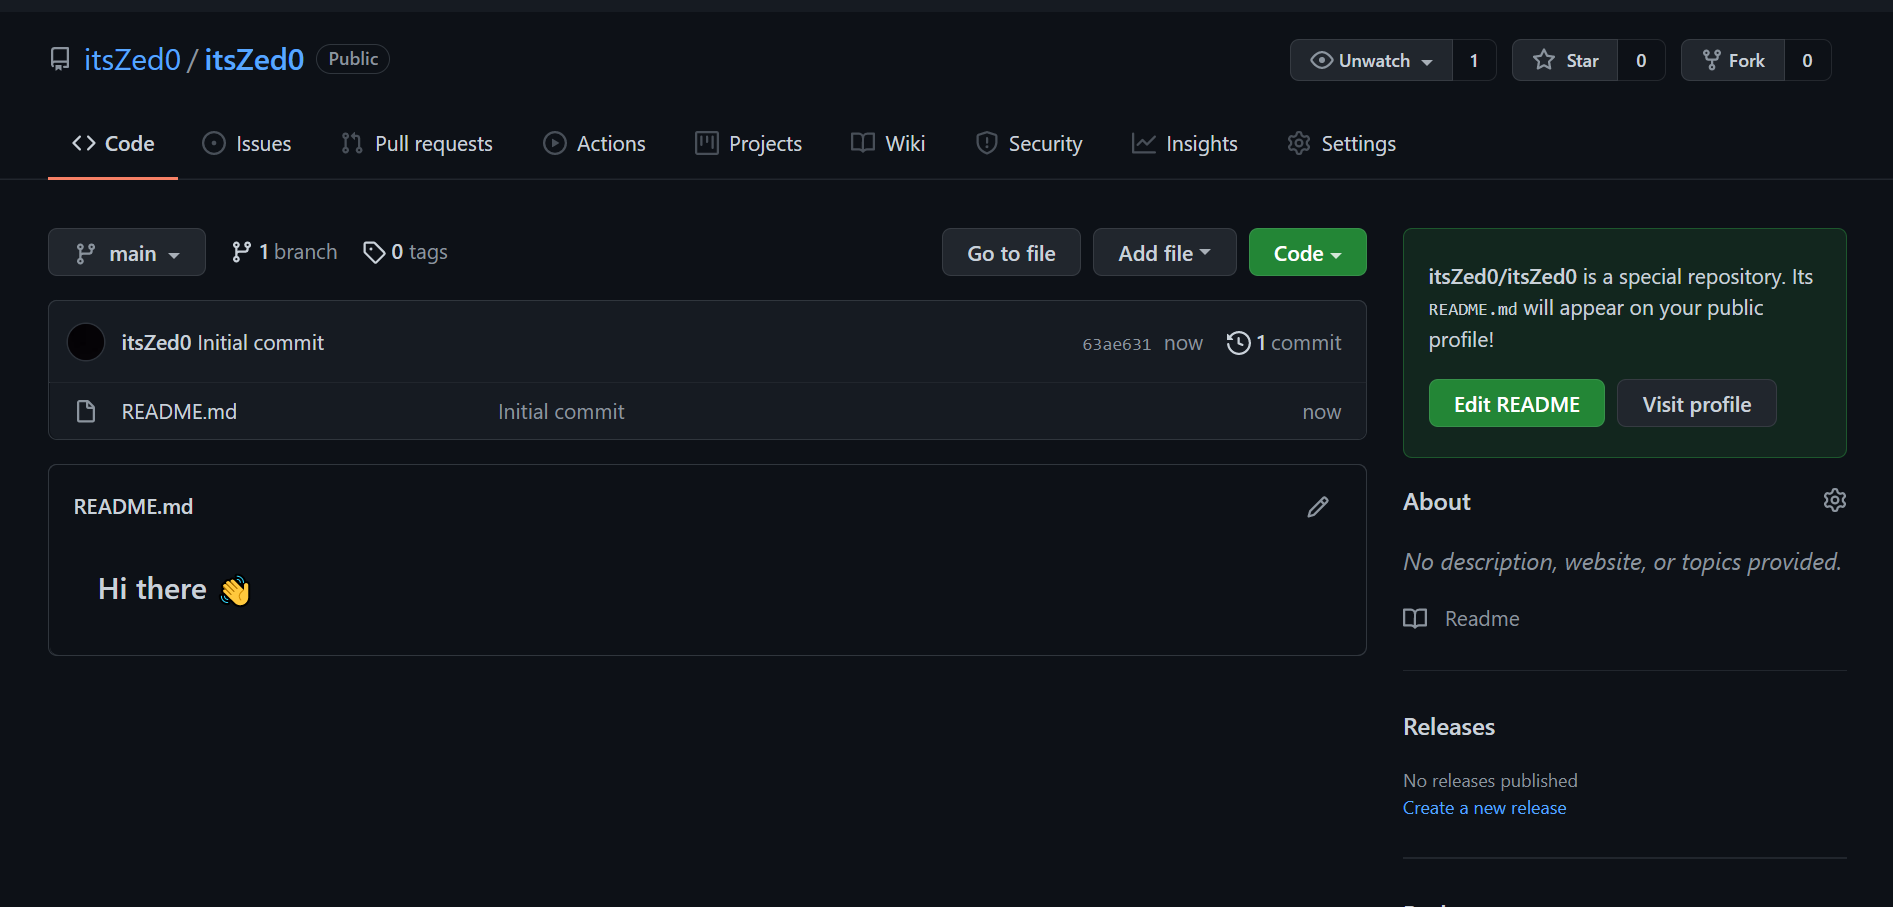
In the next few sections, we’ll add contents to our README.md file. We’ll use GitHub’s file editor to write and preview the changes. You can use any other text editor you’re comfortable with.
To use the GitHub file editor, open README.md and click on the Edit this file icon (a pencil icon) on the top right of the page. You can read more about editing GitHub files at the official GitHub documentation on editing files.
Adding GIFs and Badges to Your GitHub Profile README
Here’s an image of the content that will be added in this section:

The GIF used in this section can be found here. I found this GIF on Giphy, which is full of free GIFs to use.
Go to the GIF Link and click on the Share button and then Copy GIF Link. We’ll add this copied link to an HTML img tag to display it in the Markdown file. We’re using the img tag as it’ll help us specify the width of the image.
In the GitHub file editor, replace the README.md file content with the following code:
<div id="header" align="center">
  <img src="https://media.giphy.com/media/M9gbBd9nbDrOTu1Mqx/giphy.gif" width="100"/>
</div>
The src attribute points to the URL we copied in the previous step. Since all the contents in this section are center-aligned, we’ve wrapped the image in an HTML div tag with the align="center" attribute.
Note: GitHub converts the README Markdown to HTML and renders it on GitHub. After conversion, the HTML is sanitized, and for security reasons, it ignores certain HTML tags and attributes such as <script>, <style>, style etc. For this reason, we’ve used an align attribute instead of CSS.
Now go to the preview tab. Pictured below is the output we get.
Next, we’ll add social network badges. On clicking the badge, it will redirect to the respective social networking sites. You can add social badges of various websites like Instagram, Facebook, Twitter, etc. For this tutorial, we’ll add three: Twitter, YouTube and LinkedIn.
To get the respective badges for each social network, we’ll use Shields.io, which provides various endpoints letting users create and customize social badges. We’ll use the https://img.shields.io/badge/ URL and pass additional parameters to this URL to get the respective social badges.
The first parameter we’ll pass is of the following format:
Label-Color
Label is the social network site name shown on the badge.Color is the color of the badge.
For the three social networks, the values for this parameter will be:
- LinkedIn: LinkedIn-blue
- Twitter: Twitter-blue
- YouTube: YouTube-red
When combined with https://img.shields.io/badge/, the following URL is created for LinkedIn:
https://img.shields.io/badge/LinkedIn-blue
After entering the above URL in the browser, we get the following output:
Note that we don’t have the icon for the badge added yet. To add it, we’ll use two query parameters in the following format:
logo={your social network icon name}
logoColor={color of the icon}
We’ll add both the parameters to the URL as below:
https://img.shields.io/badge/LinkedIn-blue?logo=linkedin&logoColor=white
We’ll also add a style parameter to the above URL. There are various styling options available, the details of which you can find at Shields.io. We’ll use for-the-badge styling.
The final URL for LinkedIn will be:
https://img.shields.io/badge/LinkedIn-blue?logo=linkedin&logoColor=white&style=for-the-badge
Now, when we hit this URL in the browser, we get the output pictured below.

Similarly, we create URLs for other badges:
https://img.shields.io/badge/YouTube-red?style=for-the-badge&logo=youtube&logoColor=white
https://img.shields.io/badge/Twitter-blue?style=for-the-badge&logo=twitter&logoColor=white
We’ll wrap each URL in img tag like so:
<div id="badges">
  <img src="https://img.shields.io/badge/LinkedIn-blue?style=for-the-badge&logo=linkedin&logoColor=white" alt="LinkedIn Badge"/>
  <img src="https://img.shields.io/badge/YouTube-red?style=for-the-badge&logo=youtube&logoColor=white" alt="Youtube Badge"/>
  <img src="https://img.shields.io/badge/Twitter-blue?style=for-the-badge&logo=twitter&logoColor=white" alt="Twitter Badge"/>
</div>
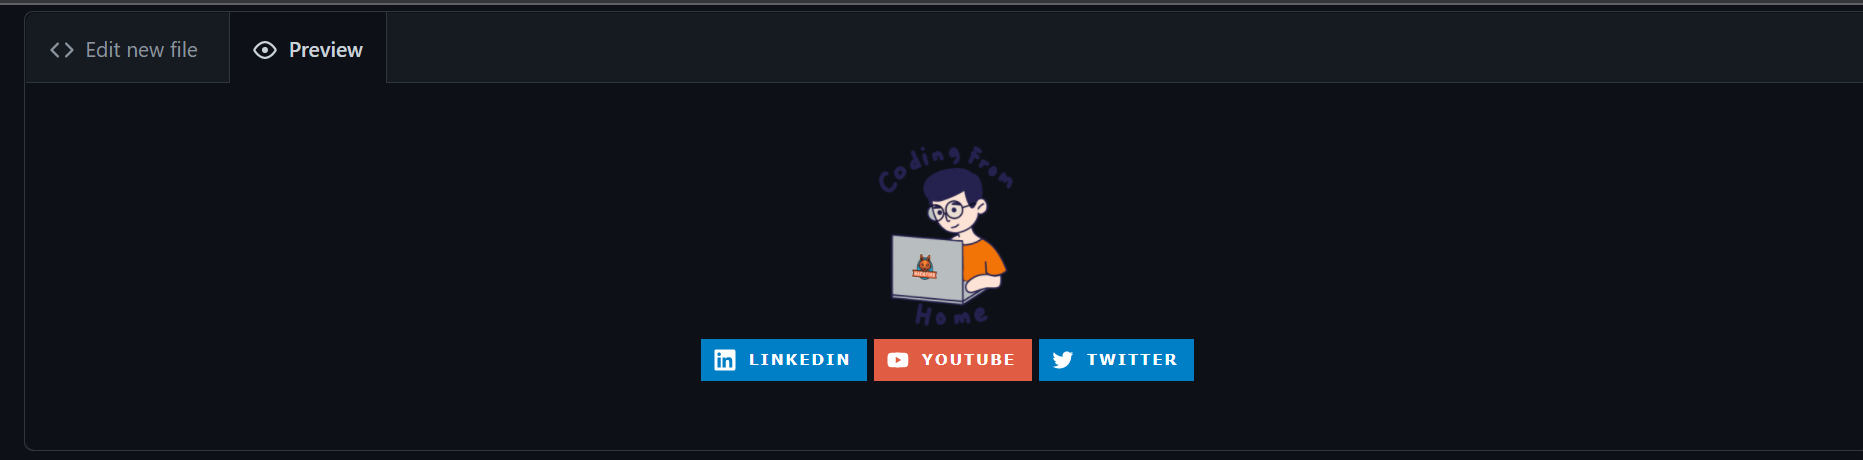
We’ve wrapped the images in <div> tags to make sure all badges come on a single line. The above code will only display the image generated from the URL. To add hyperlinks for each of the badges, we’ll wrap each image with an <a> tag.
Add the below code inside the <div> tag with id="header" and after the GIF <img> tag. Make sure to change the href attribute to point to your social profiles:
<div id="badges">
  <a href="your-linkedin-URL">
    <img src="https://img.shields.io/badge/LinkedIn-blue?style=for-the-badge&logo=linkedin&logoColor=white" alt="LinkedIn Badge"/>
  </a>
  <a href="your-youtube-URL">
    <img src="https://img.shields.io/badge/YouTube-red?style=for-the-badge&logo=youtube&logoColor=white" alt="Youtube Badge"/>
  </a>
  <a href="your-twitter-URL">
    <img src="https://img.shields.io/badge/Twitter-blue?style=for-the-badge&logo=twitter&logoColor=white" alt="Twitter Badge"/>
  </a>
</div>
Pictured below is the output we get.
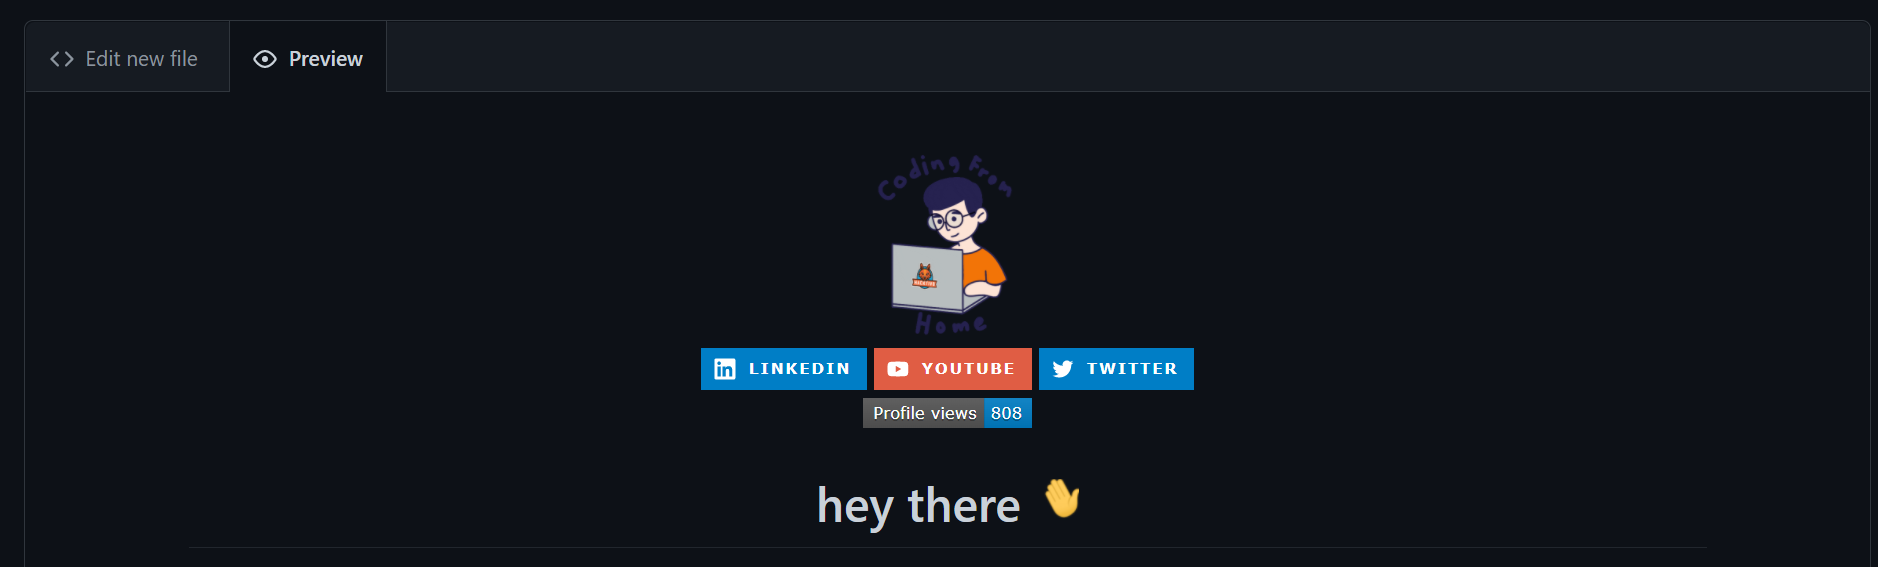
Next in this section, we have a profile views counter. It counts the number of visits your GitHub profile gets. We’ll use an open-source project that offers the view-counter badge, the documentation of which is available at GitHub Profile Views Counter. We use it in a similar way we used the social badges. Below is the endpoint for the same. We’ll also added some styling parameters to this URL:
https://komarev.com/ghpvc/?username=your-github-username
Add the below code after the <div> tag with id="badges". Make sure to replace your-github-username with your username:
<img src="https://komarev.com/ghpvc/?username=your-github-username&style=flat-square&color=blue" alt=""/>
Pictured below is the output we get.

The last part of this sections is text with a wave (:wave:) GIF. The GIF is taken from Giphy and can be found here.
Add the below code after the profile view counter <img> tag:
<h1>
  hey there
  <img src="https://media.giphy.com/media/hvRJCLFzcasrR4ia7z/giphy.gif" width="30px"/>
</h1>
The output is pictured below.
Save the changes by clicking on the Commit changes button. This completes the first section of the GitHub profile README. Let’s move to adding more content to our README.md file.
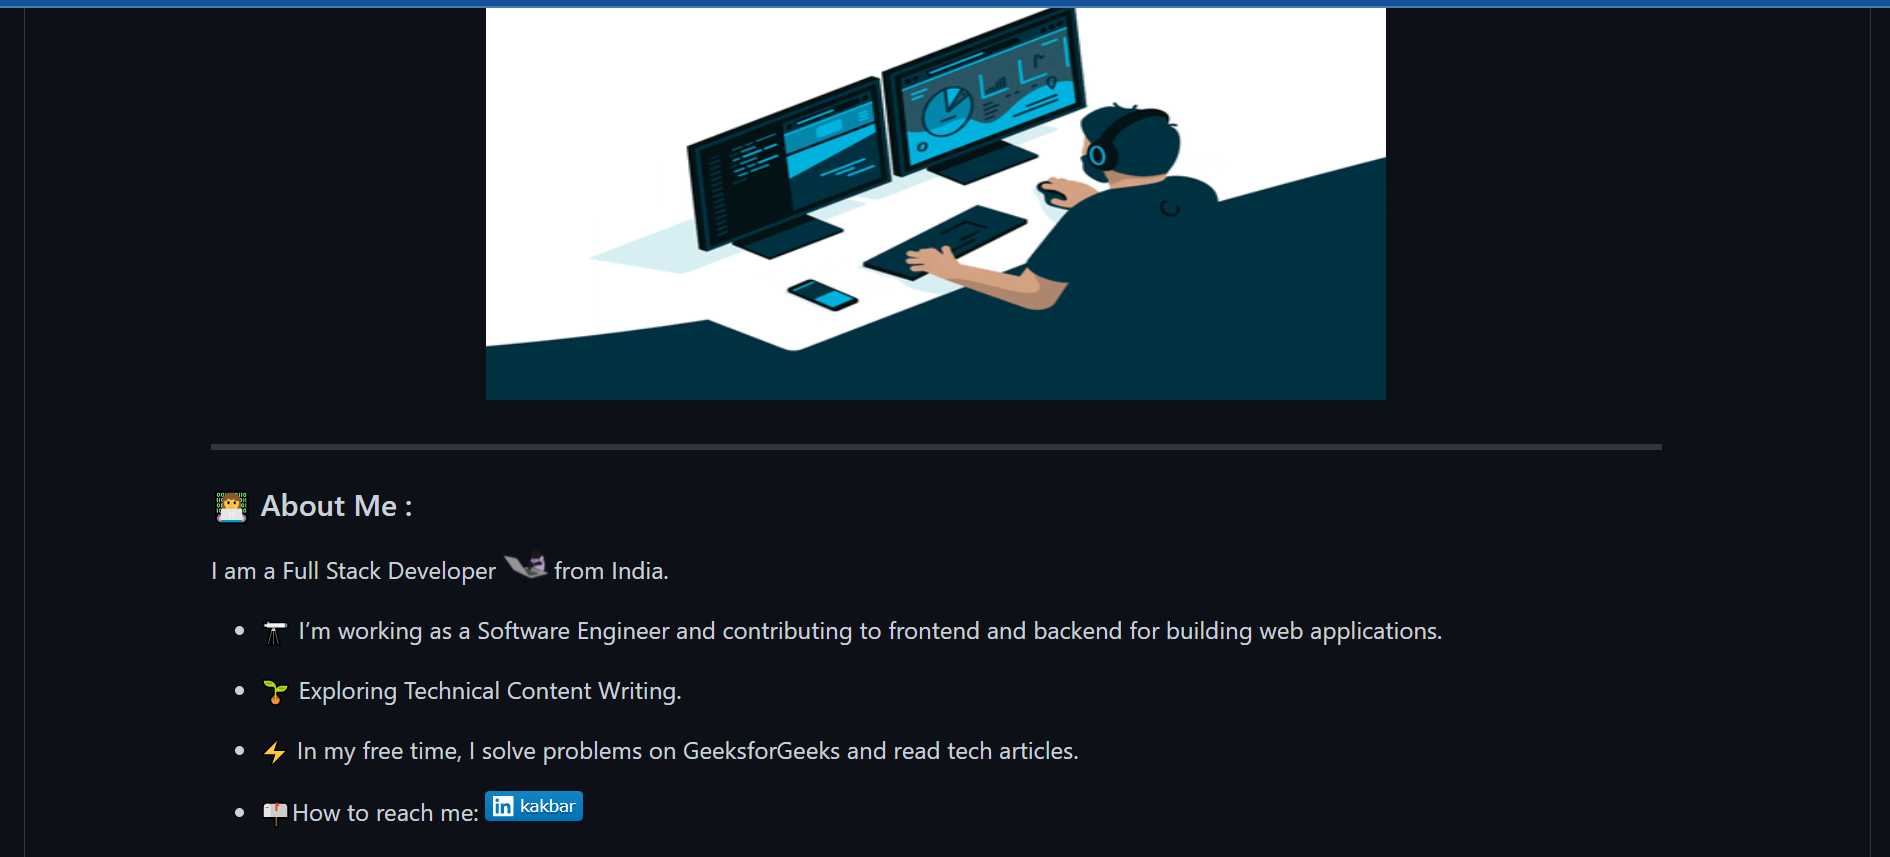
Adding a Banner GIF and About Me Section
Here’s what we’ll be adding to our profile page in this section:
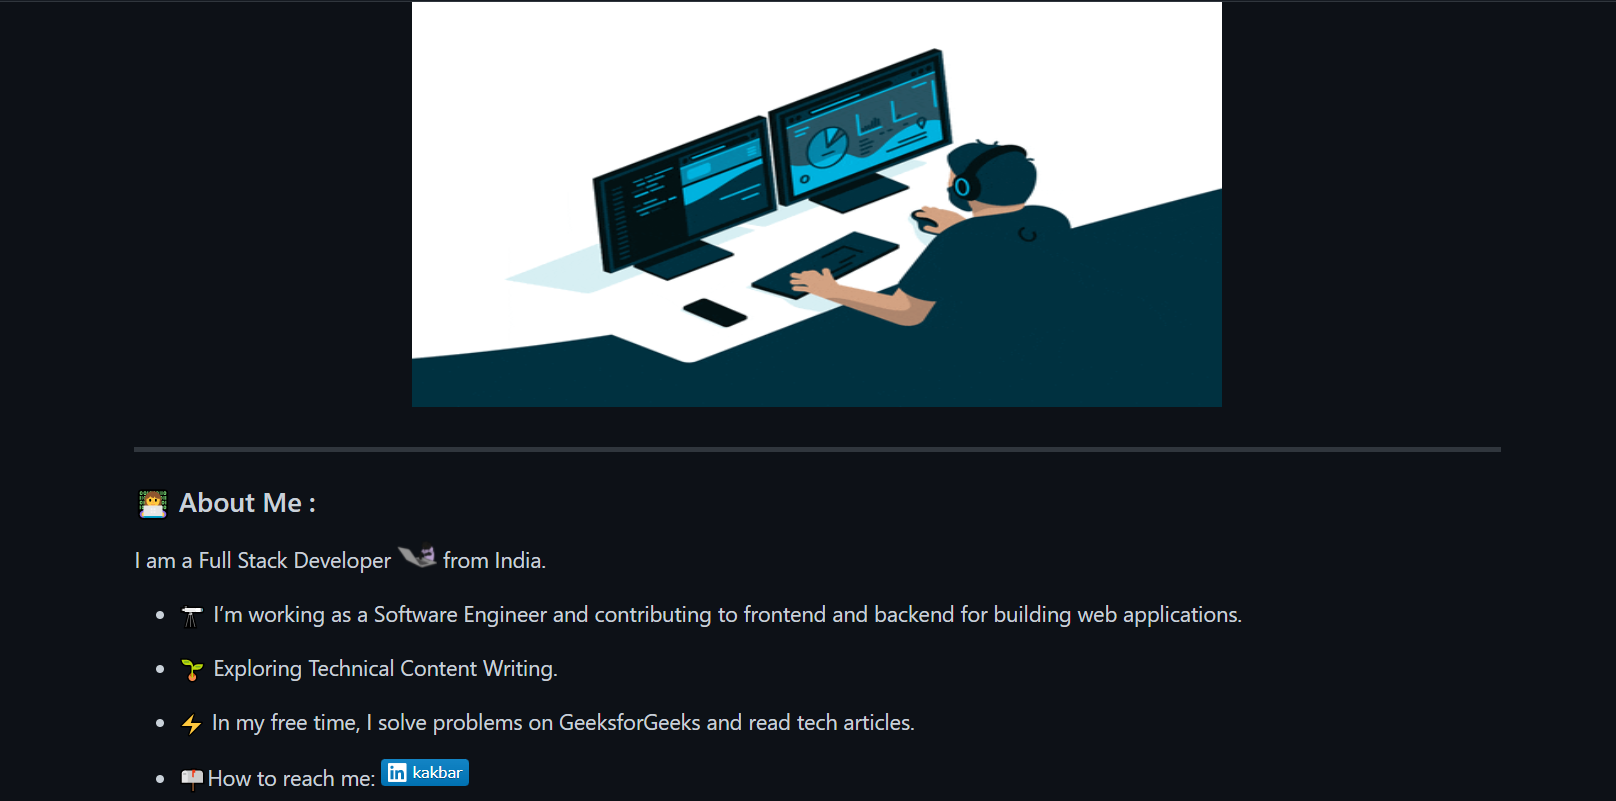
In this section, we’ll add GIF and some words describing details about ourself. You can find the GIF here.
To add the GIF, we’ll use an <img> tag, specify a height and width and wrap it inside a <div> to center the GIF using align="center". Add the following code to your README.md file:
<div align="center">
  <img src="https://media.giphy.com/media/dWesBcTLavkZuG35MI/giphy.gif" width="600" height="300"/>
</div>
The output of this is shown below.

Next, we’ll add the contents for the About Me section. For the description text we’ll use Markdown syntax, as we don’t need any sort of alignments. Append the below code in README.md:
---

### :woman_technologist: About Me :
--- is to add a horizontal rule before a new section. A horizontal rule in Markdown should be surrounded by blank lines. :woman_technologist: is the shortcode for the emoji used. For a male version, you can use :man_technologist:. For others, you can use :technologist:. You can find a list of emojis and the corresponding shortcodes in the GitHub repo.
Next, we’ll add a personal one-line introduction and use a wave (:wave:) GIF. Append the below code to README.md:
I am a Full Stack Developer <img src="https://media.giphy.com/media/WUlplcMpOCEmTGBtBW/giphy.gif" width="30"> from India.
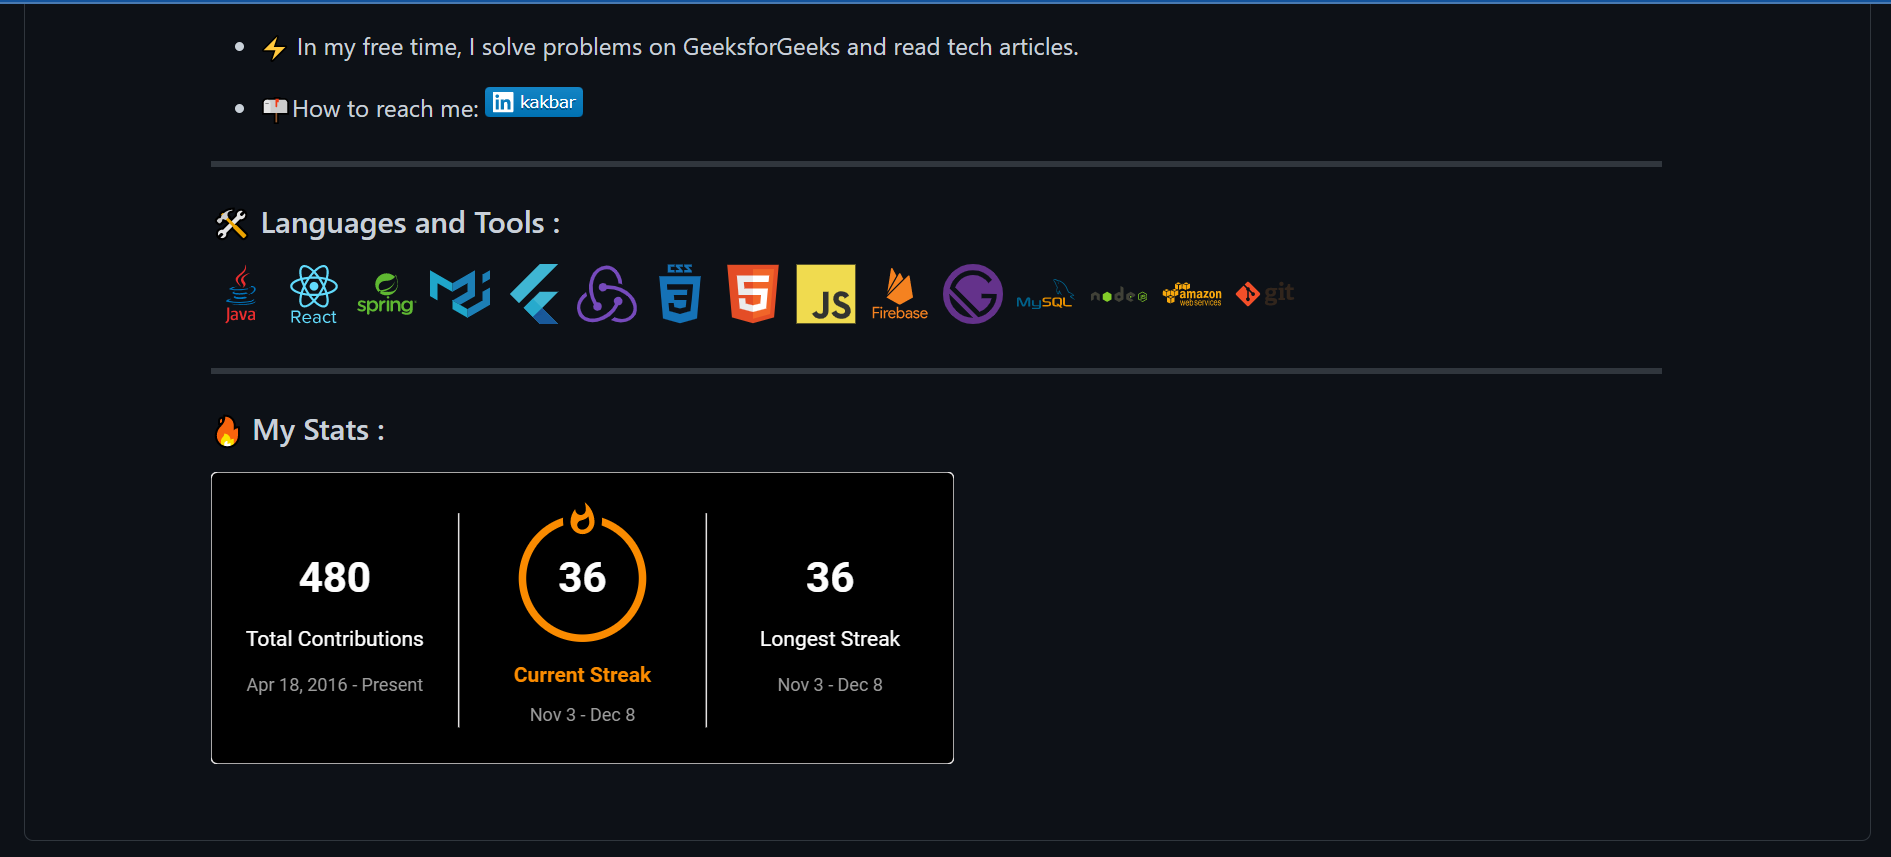
Next is a list of points about yourself. To display a list, we’ll use - Markdown syntax. We’ll also prefix each line with an emoji. Add the following code to README.md and make changes according to your profile. Also, change your-linkedin-url to your profile URL:
- :telescope: I’m working as a Software Engineer and contributing to frontend and backend for building web applications.
- :seedling: Exploring Technical Content Writing.
- :zap: In my free time, I solve problems on GeeksforGeeks and read tech articles.
- :mailbox:How to reach me: [](your-linkedin-url)
Note that in the last line, the inner ![]() syntax is to display the LinkedIn badge image. The outer []() is Markdown hyperlink syntax to make the badge point to the LinkedIn profile URL. We’ve used Shields.io here for displaying a customized LinkedIn badge. You can also add any other links where people can reach out to you.
See the output in the picture below.
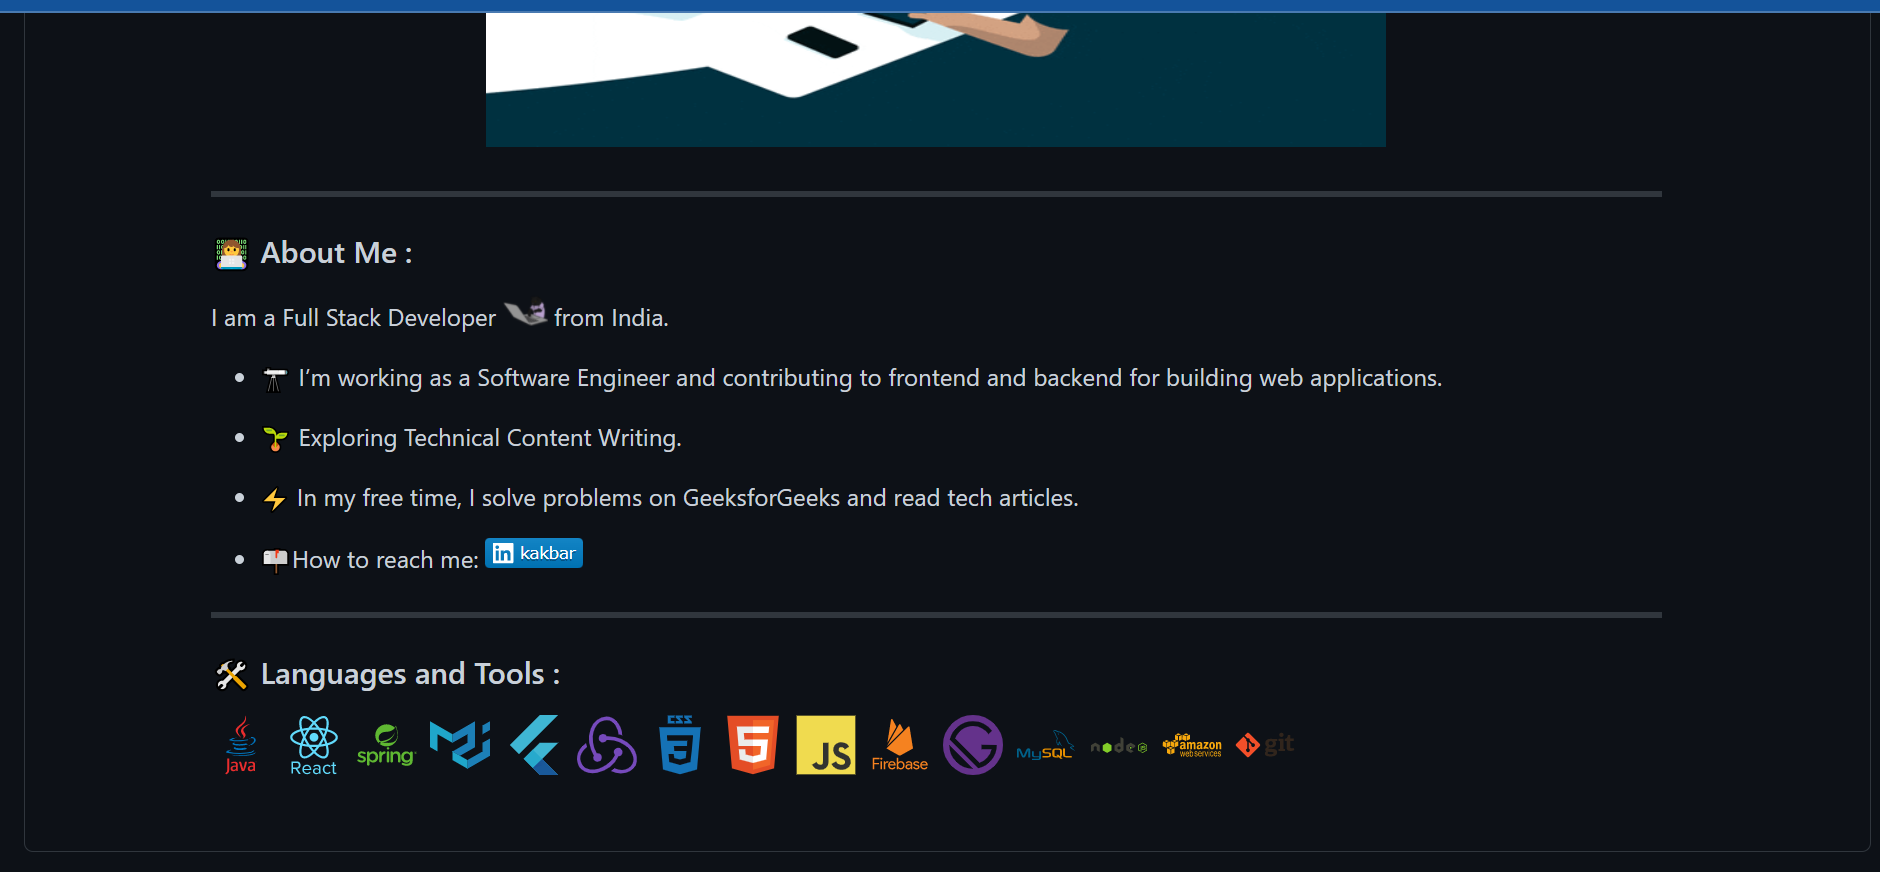
Adding Languages and Tools
Here’s a picture of the content that we’ll add in this section.

For the heading, add the following code to README.md:
---

### :hammer_and_wrench: Languages and Tools :
We’ll add images representing technologies and skills one holds. You can find several free logos for many languages and tools in the DevIcons GitHub Repository.
Go to the icons folder and search and open the react folder. You’ll find images in SVG and EPS format. Click on any image and copy the URL shown in the browser’s address bar.
We’ll use this URL in the <img> tag and specify the height and width attribute accordingly. Similarly, you can search for other skills and add them in separate <img> tags.
Append the below code to README.md. Add/remove the necessary skills you want in your profile:
<div>
  <img src="https://github.com/devicons/devicon/blob/master/icons/java/java-original-wordmark.svg" title="Java" alt="Java" width="40" height="40"/>
  <img src="https://github.com/devicons/devicon/blob/master/icons/react/react-original-wordmark.svg" title="React" alt="React" width="40" height="40"/>
  <img src="https://github.com/devicons/devicon/blob/master/icons/spring/spring-original-wordmark.svg" title="Spring" alt="Spring" width="40" height="40"/>
  <img src="https://github.com/devicons/devicon/blob/master/icons/materialui/materialui-original.svg" title="Material UI" alt="Material UI" width="40" height="40"/>
  <img src="https://github.com/devicons/devicon/blob/master/icons/flutter/flutter-original.svg" title="Flutter" alt="Flutter" width="40" height="40"/>
  <img src="https://github.com/devicons/devicon/blob/master/icons/redux/redux-original.svg" title="Redux" alt="Redux " width="40" height="40"/>
  <img src="https://github.com/devicons/devicon/blob/master/icons/css3/css3-plain-wordmark.svg"  title="CSS3" alt="CSS" width="40" height="40"/>
  <img src="https://github.com/devicons/devicon/blob/master/icons/html5/html5-original.svg" title="HTML5" alt="HTML" width="40" height="40"/>
  <img src="https://github.com/devicons/devicon/blob/master/icons/javascript/javascript-original.svg" title="JavaScript" alt="JavaScript" width="40" height="40"/>
  <img src="https://github.com/devicons/devicon/blob/master/icons/firebase/firebase-plain-wordmark.svg" title="Firebase" alt="Firebase" width="40" height="40"/>
  <img src="https://github.com/devicons/devicon/blob/master/icons/gatsby/gatsby-original.svg" title="Gatsby"  alt="Gatsby" width="40" height="40"/>
  <img src="https://github.com/devicons/devicon/blob/master/icons/mysql/mysql-original-wordmark.svg" title="MySQL"  alt="MySQL" width="40" height="40"/>
  <img src="https://github.com/devicons/devicon/blob/master/icons/nodejs/nodejs-original-wordmark.svg" title="NodeJS" alt="NodeJS" width="40" height="40"/>
  <img src="https://github.com/devicons/devicon/blob/master/icons/amazonwebservices/amazonwebservices-plain-wordmark.svg" title="AWS" alt="AWS" width="40" height="40"/>
  <img src="https://github.com/devicons/devicon/blob/master/icons/git/git-original-wordmark.svg" title="Git" **alt="Git" width="40" height="40"/>
</div>
The results are pictured below.
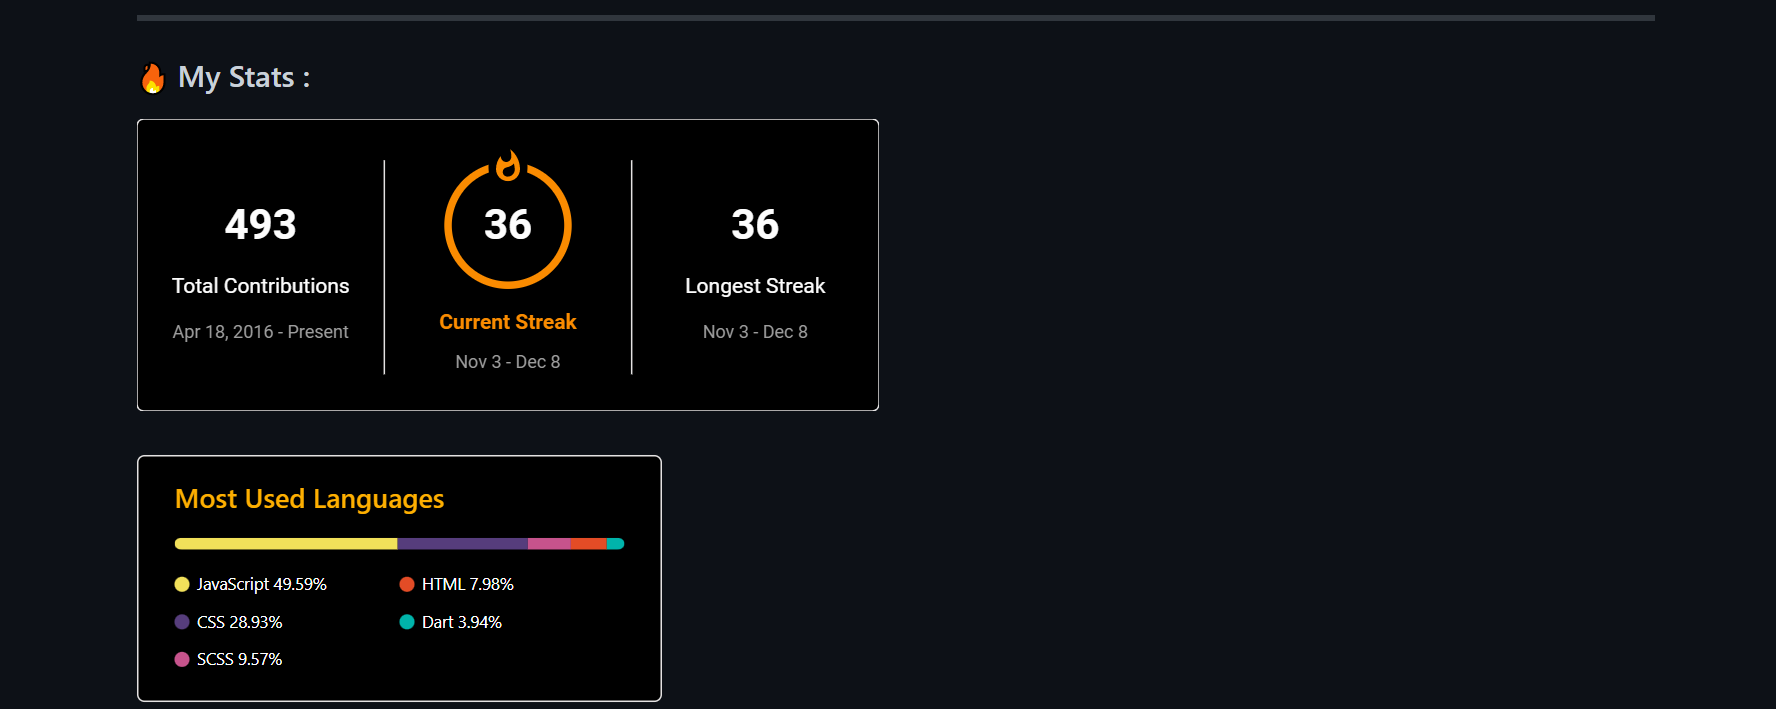
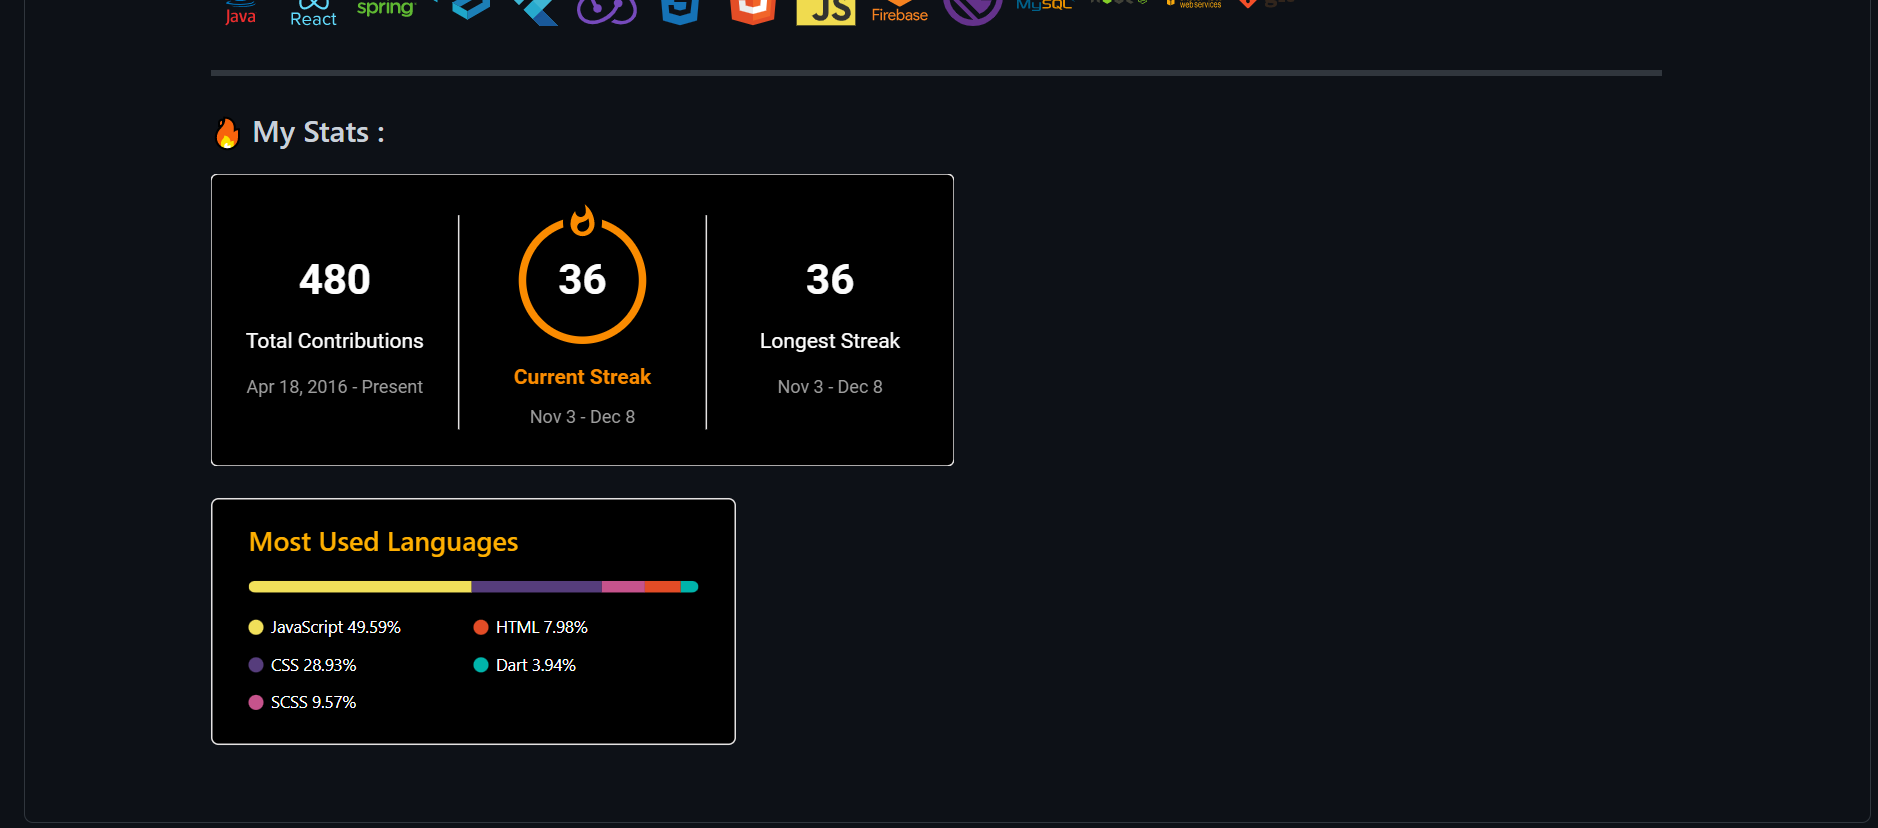
Adding GitHub Stats
Here’s an image of what we’ll add in this section.
For heading, add the following code to README.md:
---

### :fire: My Stats :
We’ll add some stats about the user’s GitHub activity like the number of commits, number of PRs, etc., to this section. There are many open-source projects on GitHub that offer different stats for the GitHub profile. In this tutorial, we’ll see how to use two such open-source projects.
The first open-source project that offers GitHub stats is GitHub Streak Stats. This project provides the following three stats:
- total number of contributions by a user
- longest streak of contributions for a user
- current streak stat for a user
Access the stats using the following URL:
https://github-readme-streak-stats.herokuapp.com/?user=your-github-username
We can add customizations like theme, background color, and so on, by adding query parameters to the above URL. Add the following code to README.md. Replace the github-username with your GitHub username:
[](https://git.io/streak-stats)
Here’s a preview with itsZed0 as the username.
We can also use the Streak Stats Website to generate the URL. To do so, follow these steps:
- Go to the Streak Stats Website. In the Username field, enter your GitHub username. Change the other fields as needed.
- Once you’ve customized all the fields, click on the Submit button.
- After the Markdown is generated, click on the Copy To Clipboard button and add the copied Markdown to
README.md.
The next open-source project that provides some more GitHub stats of a user is GitHub Readme Stats by Anurag Hazra. This project provides many stats, but for this tutorial, we’ll only use the one which displays the top languages used by the GitHub user. If you want to explore and use more stats from this project, you can go through the detailed documentation available in their repository.
Below is the Markdown to display the top languages of a user:
[](https://github.com/anuraghazra/github-readme-stats)
We can customize it to give a different color, limit the maximum number of languages to show, and so on. For customization details, refer to the GitHub Readme Stats repository.
Add the following code to README.md. Replace the your-github-username with your username:
[](https://github.com/anuraghazra/github-readme-stats)
Pictured below is the preview for my itsZed0 account.
Adding Recent Blogs to Your GitHub Profile README
The picture below shows what we’re aiming for in this section.

For the heading, add the following code to your GitHub profile README.md:
---

### :writing_hand: Blog Posts :
This section will show the recent blog posts published by a GitHub user at different blogging platforms. To achieve this, we’ll create a GitHub workflow, which is an automated process to execute jobs. Each job in a workflow will have one or more actions. A GitHub action is a set of executable commands combined into steps. We can either create our own GitHub action or use an action created by some other user.
To fetch the blog posts, we’ll use two already existing actions:
- Checkout: used to check out all the files in the current repository to a Git workspace where our workflow can access it.
- Blog Post Workflow: used to fetch recent blog posts published by a user on various websites.
The workflow can be run on a specific schedule or an event trigger. For this tutorial, we’ll execute the workflow every one hour, to fetch the recent blog post. You can read more about GitHub actions from the official documentation.
To configure the GitHub workflow, follow these steps:
- Add the following code to your
README.md. The workflow will replace the comment below with the list of published blog posts:<!-- BLOG-POST-LIST:START --> <!-- BLOG-POST-LIST:END --> - Save the changes by clicking on the Commit changes button.
- The configuration of GitHub workflow is defined in a
.ymlfile, which follows a YAML syntax. In your repository, in the Add File dropdown, select Create New file.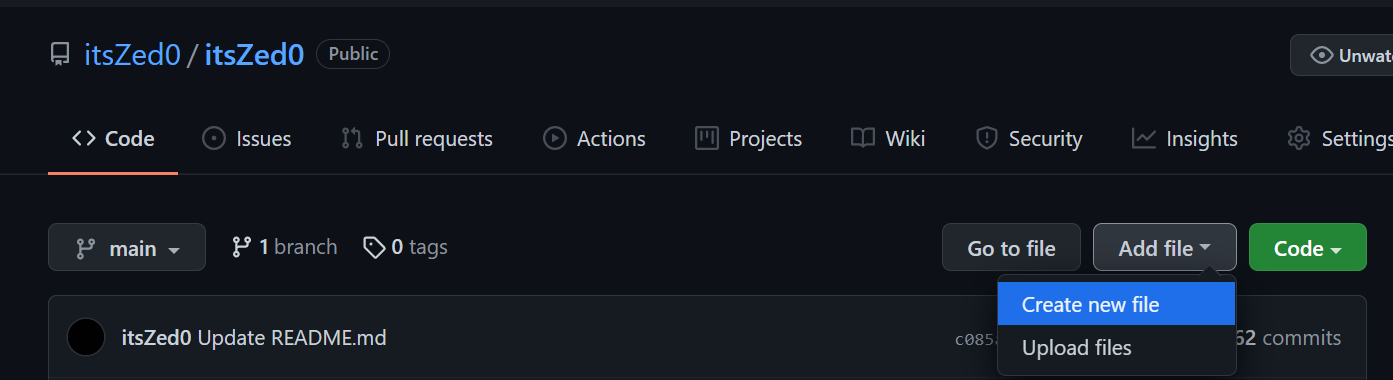
- In Name your file.. field, enter
.github/workflows/blog-post-workflow.yml. All GitHub workflow’s.ymlconfiguration files reside under the.github/workflowsdirectory.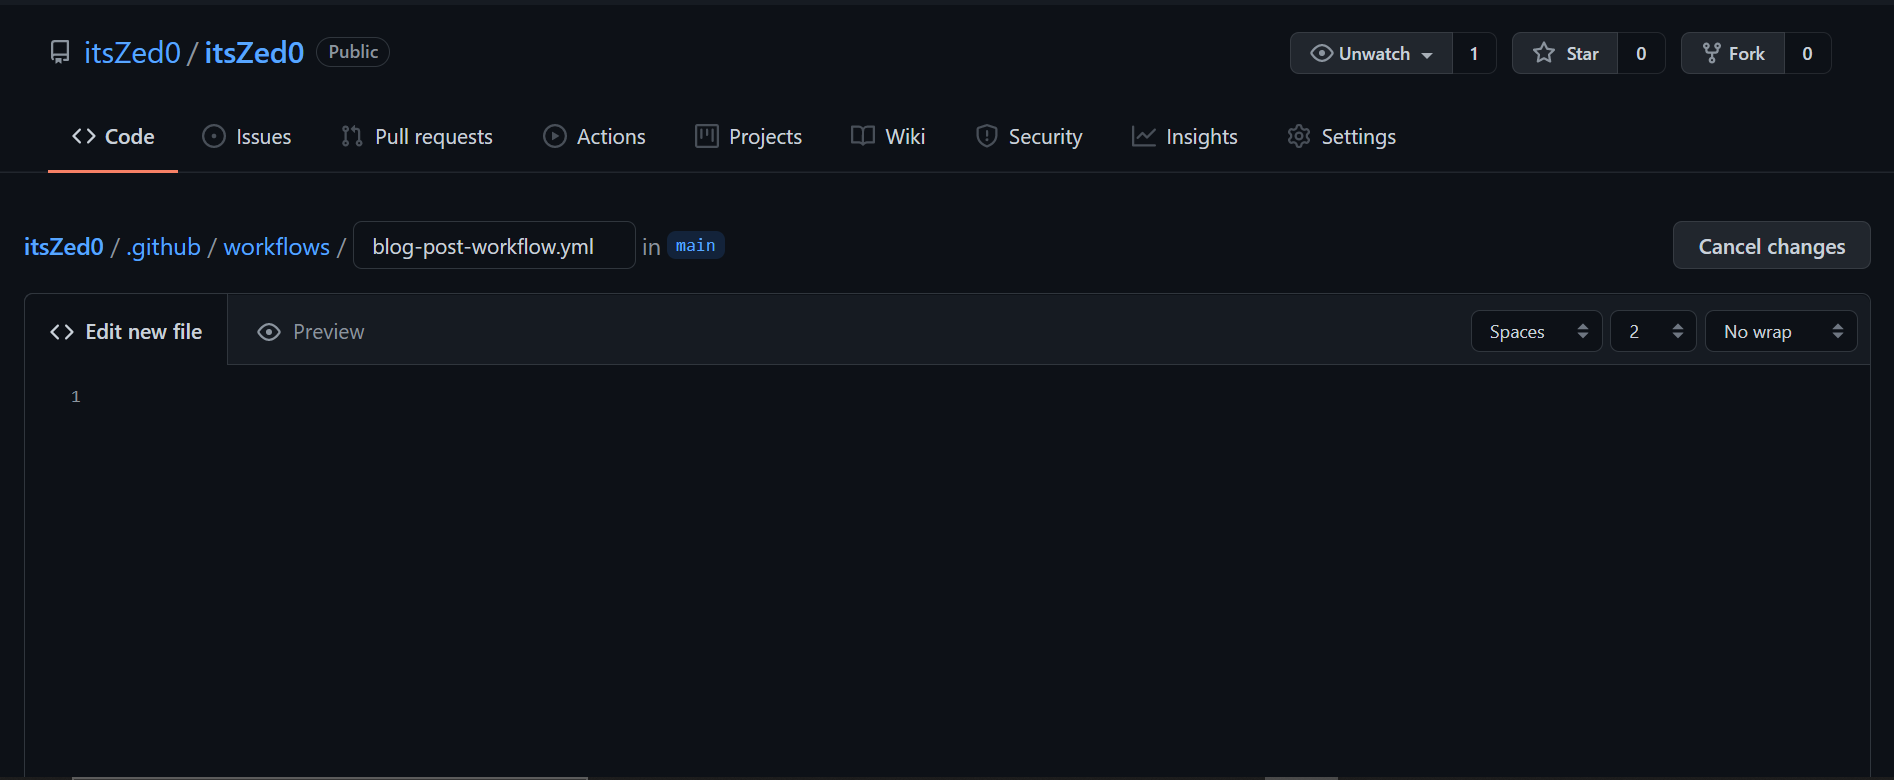
- Add the following code in the Edit new file tab:
name: Latest blog post workflow
on:
  schedule:
    # Runs every hour
    - cron: '0 * * * *'
  workflow_dispatch:

jobs:
  update-readme-with-blog:
    name: Update this repos README with latest blog posts
    runs-on: ubuntu-latest
    steps:
      - uses: actions/checkout@v2
      - uses: gautamkrishnar/blog-post-workflow@master
        with:
          max_post_count: "4"
          feed_list: "https://dev.to/feed/itszed0"
In the above code, we’ve defined a workflow with name as “Latest blog post workflow”, which runs on a schedule mentioned in the cron field. 0 * * * * is a POSIX cron syntax, meaning that the schedule is to run at the 0th minute every hour.
workflow_dispatch: allows the user to trigger the workflow manually. jobs let us define one or more jobs that will run when the workflow is executed. In our case, we have one job — that is, update-readme-with-blog — which runs-on an Ubuntu environment machine hosted by GitHub.
steps define a set of actions or commands to be executed. We’ve defined two actions under steps: actions/checkout@v2 and gautamkrishnar/blog-post-workflow@master. The latter takes two input parameters defined under the with field. max_post_count defines the maximum number of posts to show in the README, feed_list is a comma-separated RSS feed of URLs for different blogging platforms.
In this tutorial, we’ve fetched blogs from the dev.to platform. For the list of all supported platforms, check this documentation.
To learn more about GitHub workflow syntax, check out this Workflow Syntax documentation.
Replace the feed_list with your RSS feed URLs and click on the Commit new file button. This will successfully create the workflow. It will fetch new blog posts from dev.to and add them to your README.md file every hour.
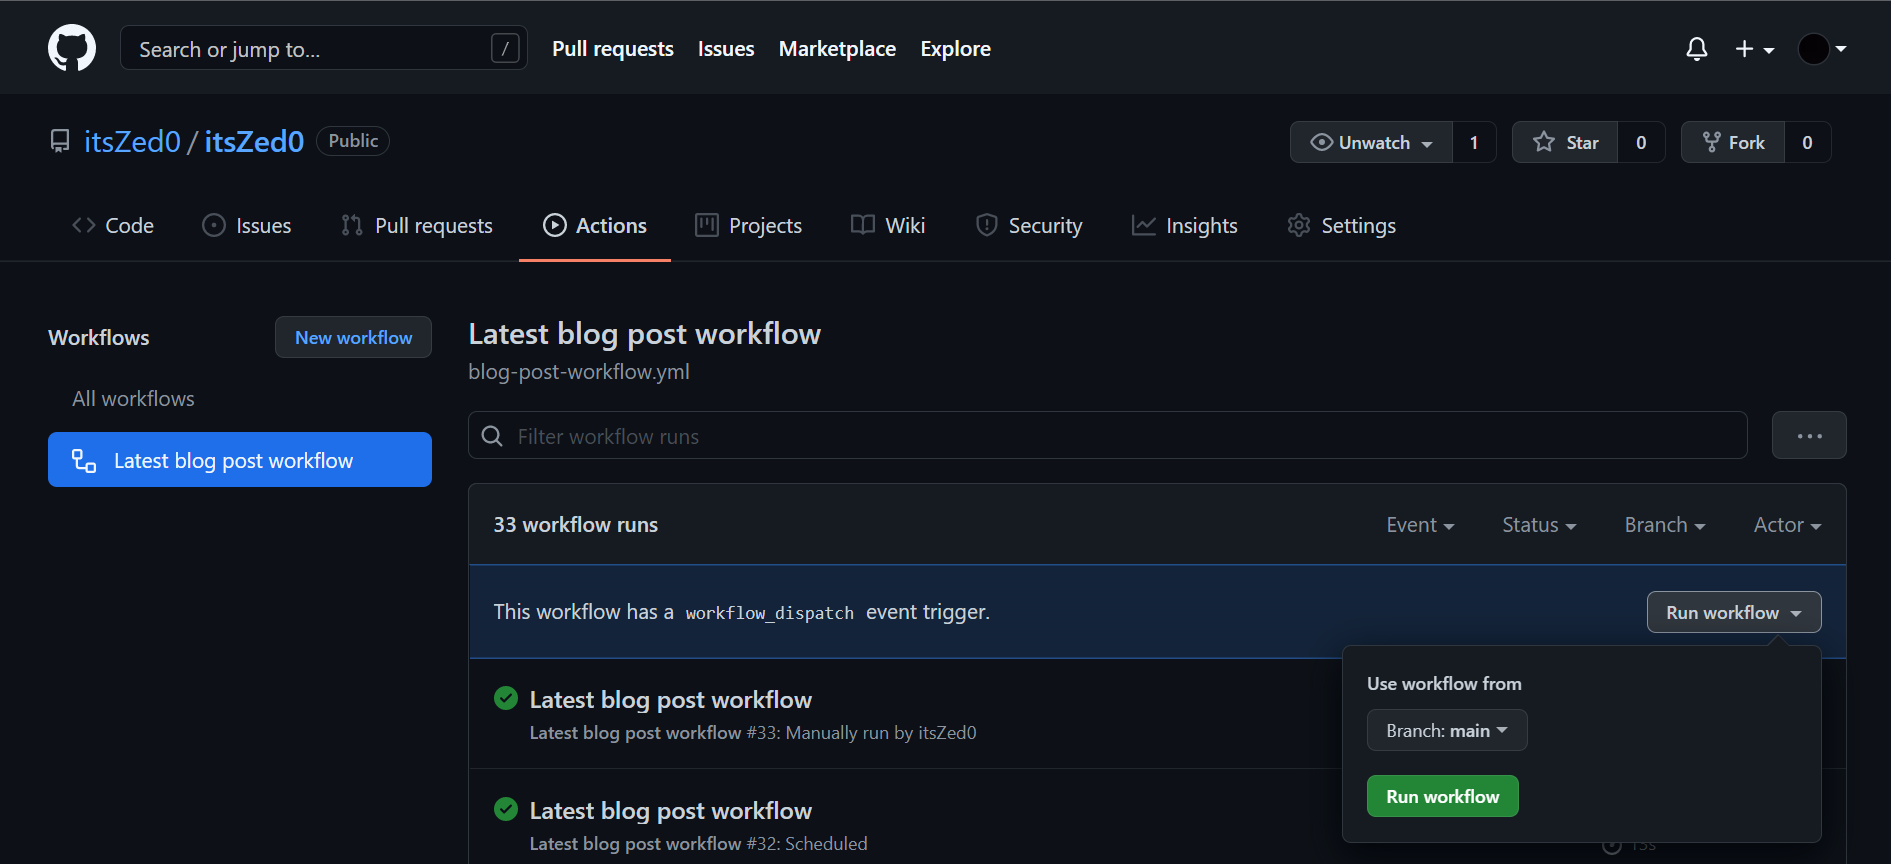
To trigger the workflow manually, follow these steps:
- In your repository, go to the Actions tab.
- Under All workflows, click on Latest blog post workflow.
- In the Run workflow dropdown, click on the Run workflow button. The workflow will start executing.
- Go to your GitHub profile page, and under the “Blog Posts” section you’ll see a list of all the blog posts from the blogging platforms defined in the
blog-post-workflow.ymlfile. Below is the output for"https://dev.to/feed/itszed0"in thefeed_list.
Note that the user itsZed0 has one article titled “Test Post” at dev.to, which can be found here. Hence, the workflow fetches that one article and displays it in the GitHub profile README.
The final GitHub profile is pictured below.
Conclusion
In this tutorial, we’ve learned what a GitHub profile README is and how to:
- create a GitHub profile README
- add GIFs, descriptions, skills
- add GitHub Streak Stats and GitHub Readme Stats
- create a GitHub workflow to fetch the latest published blog posts
I hope this tutorial inspires you to create an amazing GitHub profile README. Also, you can go through these open-source projects that’ll let you add some more cool features to your GitHub profile README:
- Display weekly Dev metrics
- Display Spotify recently played song card
- Show a new programming joke every day
FAQs About GitHub Readme
What is a GitHub README?
A GitHub README is a fundamental document in a software project hosted on GitHub, typically named “README.md” using Markdown formatting. Serving as the front page of a repository, it offers a concise yet informative introduction to the project. The README’s primary purpose is to provide an overview of the project’s purpose, features, and usage. It often includes installation instructions, usage examples, and links to more comprehensive documentation.
Moreover, the README may contain guidelines for contributing to the project, specifying how users can report issues, propose changes, or adhere to coding conventions. It also mentions the project’s license, outlining how others can use and contribute to the code. Visual elements like badges may be added to display essential information such as build status, code coverage, or version numbers. In essence, a well-crafted README is instrumental in facilitating project understanding, user adoption, and collaboration within the GitHub community.
How to customize a GitHub profile?
Customizing your GitHub profile is a great way to personalize your presence on the platform and highlight your work and interests. To get started, create or update a repository with the same name as your GitHub username. Within this repository, add a README.md file where you can provide information about yourself, your projects, and other details you want to showcase. You can use Markdown formatting to style your content, including text, images, links, and more.
After customizing your README.md, commit your changes to the repository. Then, navigate to your repository’s settings, specifically the “GitHub Pages” section. Here, set the branch containing your README.md as the source, and save your settings. Your customized profile will now display your README.md content, allowing you to share your story and projects with the GitHub community. If desired, you can further personalize your profile by pinning repositories that you want to feature prominently.
Remember that your GitHub profile is visible to the public, so make sure your customization represents you and your work effectively. This customization not only adds a personal touch to your GitHub presence but also serves as a valuable portfolio for potential collaborators and employers.
How to add GitHub stats to README?
To add GitHub stats to your README, you can utilize third-party services like GitHub Readme Stats or shields.io. With GitHub Readme Stats, you can easily embed dynamic GitHub statistics directly into your README. Start by visiting the GitHub Readme Stats repository, copying the provided code snippet, and pasting it into your README.md file. Customize the code with your GitHub username and preferred options, then commit the changes. When someone views your README on GitHub, it will automatically fetch and display your GitHub statistics, enhancing your profile’s visibility.
Another option is to use shields.io, a versatile badge generator service. You can access shields.io and select the GitHub category to create badges showcasing various GitHub statistics, such as followers, stars, or your latest commit. After configuring your badge, shields.io will generate a URL that you can embed in your README. Simply insert an image tag with the generated URL in your README.md, and the badge will appear, offering a quick snapshot of your GitHub activity.
How to make a good GitHub profile README?
To create an impactful GitHub profile README, focus on a concise yet engaging presentation of your skills and projects. Begin with a brief introduction, including your name, role, and a touch of personalization to make it relatable. Use a professional photo to humanize your profile.
Next, showcase your work by organizing sections with project thumbnails, titles, descriptions, and links to your repositories or deployed applications. Consider incorporating GitHub Readme Stats or widgets to display your GitHub activity, lending credibility to your contributions. List your skills and technologies to give viewers insight into your expertise. Highlight significant achievements and contributions, and provide contact information for networking and collaboration opportunities.
Customize the appearance with Markdown or HTML for formatting and maintain a consistent theme. Keep your README updated as you embark on new projects or attain milestones, and encourage engagement from visitors by including a call to action. Don’t hesitate to infuse creativity through GIFs, emojis, or unique design elements. Lastly, review and proofread your README for clarity and accuracy, aiming to create a lasting and positive impression for those who explore your GitHub profile.