
Key Takeaways
- Varnish is a reverse proxy server that sits in front of your web server, caching content and serving it quickly to visitors. This helps manage high traffic and keeps the bounce rate low. It is designed for improved performance and flexibility, making it a great choice for modern hardware running FreeBSD and GNU/Linux.
- The article provides a step-by-step guide on setting up Varnish to cache a simple web page. This includes installing Varnish, configuring it, and testing its functionality. It also outlines how to adjust Varnish’s settings to meet your specific needs.
- Varnish has its own configuration language called VCL, which allows for greater flexibility and performance. Understanding VCL is crucial for further configuring Varnish and optimizing its use. Tools like varnishlog can help analyze and view Varnish’s results and performance.
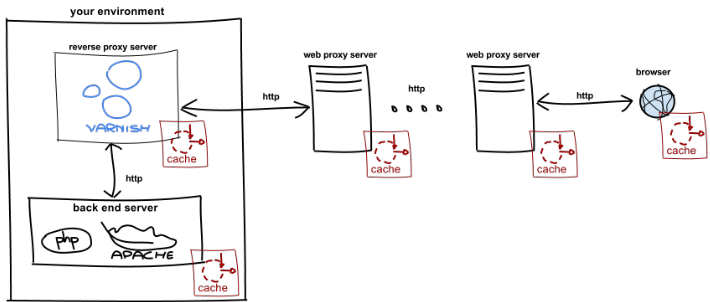
Caching is everywhere. A request from your browser to its destination will pass a cache at almost every node. Your browser has a cache, most web proxy servers cache requests, and web servers like Apache and nginx will potentially be caching.
Varnish is a reverse proxy server; it sits in front of your web server and serves content from your server and no one else’s. Reverse proxy servers are tightly coupled to the web server and can act on messages received from it. For example, a cached page can be refreshed with a purge command from the backend, something you are unable to do with caches closer to the client. This means reverse proxy servers can, in some cases, cache content longer than the other types of caches.
Simply put, Varnish does one thing: serve web content super fast. It keeps your web server happy by handling most of the high traffic, and serves your visitors quickly. In other words, Varnish makes sure you are prepared for spikes in traffic and helps keep your bounce rate low.
As a caching service, Varnish is not unique, but, when it comes to performance, it really shines. The head architect of Varnish is Paul Henning Kamp (who is also a prominent FreeBSD developer). Every architectural decision made is focused on improved performance and/or better flexibility, which is why Varnish has few dependencies, its own configuration language, and is optimized for modern hardware running FreeBSD and GNU/Linux. All this results in a reverse proxy server that takes full advantage of the operating system in order to serve content extremely fast.
In this article we’ll set up Varnish to cache a simple web page for two minutes. We’ll walk through setting up a web server and configuring Varnish to cache our page. To keep things simple, we’ll set up both on the same host and use a Debian-based distro. You can later customize your setup as your needs dictate.
Your First Varnish Setup
Varnish fetches content from a backend server, which is the web server where your content is generated (in this case Apache). Our example will use a simple PHP Hello World page that updates every time its refreshed. So, let’s set that up first:
$ sudo apt-get install apache2 php5
$ echo '<?php echo date('h:i:s') . 'Hello, world!'; | sudo tee /var/www/world.php
Test that the page works by opening it in your browser. The time should update every time you refresh the page.
Let’s install Varnish next. It’s currently at version 3.x, and because it’s is developed and optimized for FreeBSD and GNU/Linux, you’ll find that all the main package systems support Varnish.
$ sudo apt-get install varnish
To configure Varnish, there are two files we need to edit: /etc/default/varnish and /etc/varnish/default.vcl. The first sets the options for varnishd, the Varnish daemon, and the second configures Varnish itself.
The location of the varnishd options file depends on your choice of operating system. For Debian based systems, make sure the DAEMON_OPTS variable in /etc/default/varnish is:
DAEMON_OPTS="-a :6081
             -T localhost:6082
             -f /etc/varnish/default.vcl
             -S /etc/varnish/secret
             -s malloc,256m"
The -a option tells varnishd to listen on port 6081 for requests. You can change this to port 80 when you are finally ready to let Varnish handle requests. The option -f tells varnishd the location of the second configuration file. The -T sets the location of the management interface. The management interface is where you can make changes to Varnish runtime. The -S options sets the location of the authentication secret for the management interface. The option -s decides how cached objects are stored.
Make sure the uncommented lines in /etc/varnish/default.vcl are as follows:
backend default {
    .host = "127.0.0.1";
    .port = "80";
}
Varnish communicates with the backend using HTTP, it also supports multiple backends if you should need that. This setup will fetch content from localhost on port 80.
Now we can start varnishd:
$ sudo service varnish start
Try opening our Hello World page through Varnish by adding the port we set varnishd to listen to to the URL (ie: http://localhost:6081/world.php). When you refresh the page, you’ll notice that the time only updates once every two minutes (a default Varnish setup will cache a page for two minutes given that it is a HEAD or GET request without a set Authorization or Cookie header).
Configuring Varnish
With our current setup, requests to localhost without a specified port will default to port 80 and are routed directly to Apache. When you feel comfortable that Varnish is caching what you want, you can switch Apache to listen on a different port, say 8080, and Varnish to listen on port 80 instead of 6081 in /etc/default/varnish. Remember to change the backend configuration in /etc/varnish/default.vcl too; it should be 8080 and not 80.
To configure Varnish further you need to know VCL, the Varnish configuration language (you might have noticed the file extension of the second file was .vcl). Having its own configuration language is a significant factor for achieving Varnish’s goals of flexibility and performance.
When Varnish processes a request, the request will go through a set of states. VCL code is how you decide what Varnish does with the request in each of these states, and this is why VCL is called a state engine. Each state has its own function in VCL which runs by default. You can edit the behavior of each state by redefining its function in default.vcl. Note that unless you add a return statement, redefining a function prepends the default VCL function. If you want to know what a default VCL function does, there is a copy of all the functions in a commented section at the bottom of the file.
It helps to see an example, so let’s edit vcl_fetch and change the time a page is cached in Varnish to 5 seconds. In default.vcl, add the following function:
sub vcl_fetch {
  set beresp.ttl = 5s;
}
The varnish daemon will need to be reloaded for this to take effect, so restart the service with:
$ sudo service varnish restart
When you refresh your Hello World page now, the time will update every 5 seconds.
When Varnish looks for a page in the cache but can’t find it, it’s a miss. if it does find it, it’s a hit. The function vcl_fetch controls the state your request will eventually be in after a miss. In vcl_fetch Varnish has fetched the page from the backend and now has to decide how to cache the page, if at all. Each function in VCL has a set of objects available to it, vcl_fetch has several, including the backend response object beresp. By setting ttl (time to live) on the beresp object, we are telling Varnish that the page should be stored in cache for 5 seconds before it is invalid. Once 5 seconds have passed, a new request to the page means Varnish will need to fetch the page from the backend again.
Note that in the example above, there is no return statement in vcl_fetch, this means the default function will run afterwards. This is a good idea when writing VCL, the default VCL is there for a reason and you should have a good reason to skip it.
Varnish also has tools for analyzing and viewing its results and performance. These are helpful for fine tuning your configuration for high-load scenarios. To see one of them in action, try running varnishlog while you refresh your Hello World page with varnishlog -c. The -c option filters the varnish log for entries from your users as the requests arrive. To filter on entries to and from the backend, use the -b option.
Conclusion
That’s it, you now have a simple setup to experiment increasing your site’s performance. In this article you’ve learned the basics of Varnish, what it is and what the default setup will give you. We’ve also had a quick look at VCL, Varnish’s configuration language. VCL might be a little hard to wrap your head around, mostly because it is an unusual way of doing configuration – it is however surprisingly simple to use once you accept this approach, and it’s also more flexible than a configuration file.
If you want to continue on your path learning Varnish, visit varnish-cache.org for more information. You can also ask for help on IRC, the #varnish channel on the freenode server is full of skilled and helpful people. And, something all web developers should do at one point, is read RFC2616. The section on caching headers is relevant for those who want to get a better understanding of Varnish and caching. Good luck!
Frequently Asked Questions (FAQs) about Getting Started with Varnish
What is Varnish and why is it important for my website?
Varnish is a powerful HTTP accelerator designed to speed up web applications. It works by storing a copy of a page served by the web server the first time a user visits that page. The next time a user requests the same page, Varnish will serve the copy instead of requesting the page from the web server. This reduces the load on the server and makes the website load faster for the user. In today’s digital age, where website speed can significantly impact user experience and SEO rankings, using a tool like Varnish can be crucial for your website’s success.
How does Varnish Cache work?
Varnish Cache works by sitting in front of your server and caching the content of your website. When a user requests a page, Varnish checks if it has a cached version of that page. If it does, it delivers the cached version, which is much faster than requesting the page from the server. If it doesn’t, it requests the page from the server, delivers it to the user, and stores a copy for future requests. This process is transparent to the user and significantly speeds up website load times.
How can I install Varnish on my server?
Installing Varnish on your server involves a few steps. First, you need to download and install the Varnish package from the official website. Then, you need to configure Varnish to work with your web server. This involves editing the Varnish configuration file and setting up your web server to work with Varnish. Once everything is set up, you can start Varnish and it will begin caching your website content.
How can I configure Varnish for my website?
Configuring Varnish for your website involves editing the Varnish configuration file, known as the VCL file. This file contains rules that tell Varnish how to handle requests for your website. You can specify which pages to cache, how long to keep the cache, and what to do when the cache expires. The VCL file is written in a language called VCL, which is easy to learn and allows for a lot of flexibility in configuring Varnish.
Can I use Varnish with WordPress?
Yes, you can use Varnish with WordPress. In fact, Varnish can significantly speed up WordPress websites by caching static content and reducing the load on the server. However, because WordPress is a dynamic content management system, there are some additional considerations when using Varnish with WordPress. For example, you need to configure Varnish to not cache certain pages, like the WordPress admin and login pages.
How can I clear the Varnish cache?
Clearing the Varnish cache, also known as purging, can be done in several ways. One way is to use the Varnish administration console, which allows you to purge specific pages or the entire cache. Another way is to use the Varnish HTTP Purge plugin for WordPress, which allows you to purge the cache from the WordPress admin dashboard.
What are some common problems with Varnish and how can I solve them?
Some common problems with Varnish include cache misses, where Varnish is not caching pages as expected, and high memory usage, which can slow down your server. These problems can often be solved by adjusting the Varnish configuration settings. For example, you can increase the cache hit rate by adjusting the TTL (time to live) value in the VCL file, and you can reduce memory usage by limiting the size of the cache.
How can I monitor the performance of Varnish?
Monitoring the performance of Varnish can be done using the built-in tools like varnishstat and varnishlog. These tools provide real-time statistics and logs about the performance of Varnish, including cache hits and misses, memory usage, and request times. You can also use third-party monitoring tools like New Relic or Datadog, which provide more advanced monitoring features.
Can Varnish handle SSL/TLS requests?
Varnish itself does not handle SSL/TLS requests, as it is designed to work with unencrypted HTTP traffic. However, you can use a separate SSL/TLS termination proxy, like Nginx or HAProxy, in front of Varnish to handle the SSL/TLS encryption and decryption. This allows you to use Varnish with websites that require SSL/TLS encryption.
What are some alternatives to Varnish?
While Varnish is a powerful tool for speeding up web applications, there are other options available. These include other HTTP accelerators like Squid and Nginx, as well as content delivery networks (CDNs) like Cloudflare and Akamai. These alternatives have their own strengths and weaknesses, and the best choice depends on your specific needs and circumstances.