Get Rid of Those Pesky Edge Halos in Photoshop

When you make a selection in an image in Photoshop, then paste the selection to another image or background, very often you’ll find (when it’s placed on a different colored background) a stubborn ring of pixels around your initial selection. This is known as an edge halo, fringing or matting.
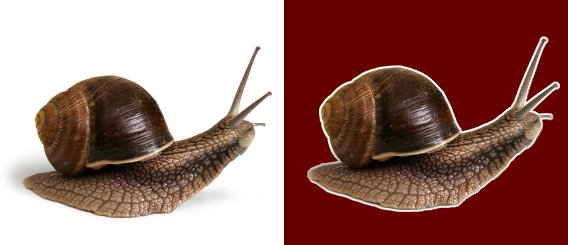
Here’s a fairly extreme example. The snail was selected on a white background and pasted onto the dark red background. We can clearly see the white halo. This sort of thing is a problem for web designers. If you want to have an object sitting on a colored background you need to remove that edge halo after you remove the background, but it’s close to impossible to do it well using an eraser, so how do you get rid of it ? Well as is often the case with Photoshop, there is more than one way to skin a cat. Here’s three options.
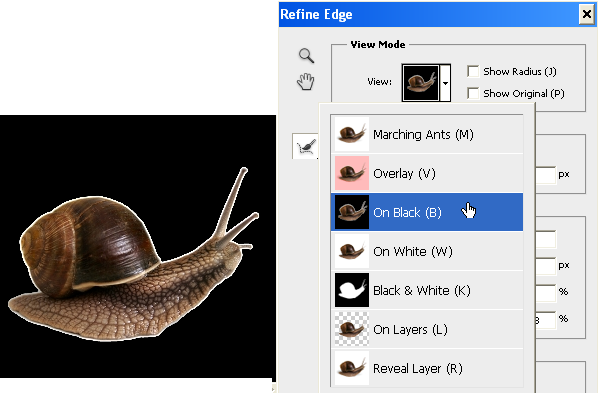
1. Contract your selection
When you make your initial selection on the original image use the Refine Edge dialog box (this gives you a preview) or choose Select > Modify > Contract to contract your selection. Use this technique while you still have the marching ants showing your selection. Using the Refine Edge sliders you will be able to get a much better selection.
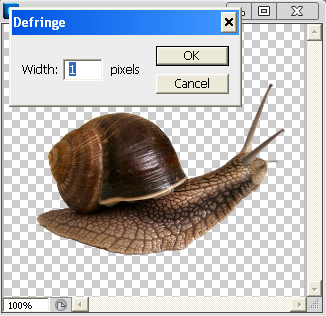
2. Use the Defringe command
You can use this command after you delete the background (it doesn’t work on layer masks or while a selection is active). Make your selection, then delete the background, then choose Layer > Matting > Defringe and enter a value in pixels. Photoshop analyzes the active layer and replaces the color of the pixels around the object’s edge with the color of nearby pixels. For example, if you enter 2 px, it’ll replace a 2-pixel rim of color all the way around the object.
3. Remove Black/White Matting
If your halo is simply black or white, Photoshop can remove it automatically. After you’ve deleted the background, select the layer with the object of interest on it and then choose Layer > Matting > Remove Black Matte or Remove White Matte. Like the Defringe command, this doesn’t work on layer masks or while you have an active selection.
If you enjoyed reading this post, you’ll love Learnable; the place to learn fresh skills and techniques from the masters. Members get instant access to all of SitePoint’s ebooks and interactive online courses, like Foundations of Photoshop.
Comments on this article are closed. Have a question about Photoshop? Why not ask it on our forums?
Frequently Asked Questions (FAQs) about Removing Edge Halos in Photoshop
What are edge halos in Photoshop and how do they affect my images?
Edge halos, also known as fringing or ghosting, are unwanted bright or dark lines that appear around the edges of an object in a photo. They are often caused by over-sharpening, high contrast, or improper use of selection tools in Photoshop. These halos can detract from the overall quality of your image, making it look less professional or realistic.
How can I prevent edge halos from appearing in my Photoshop images?
The best way to prevent edge halos is to use careful selection and editing techniques. Avoid over-sharpening your images and be mindful of high contrast areas. When making selections, use tools like the Pen or Lasso tool for precision, and always refine your selection edges before applying adjustments.
What tools can I use in Photoshop to remove edge halos?
Photoshop offers several tools to help remove edge halos, including the Clone Stamp, Healing Brush, and Patch tools. The Defringe and Matting functions can also be useful for eliminating halos. Each tool has its own strengths and is best suited to different situations, so it may take some experimentation to find the best tool for your specific image.
Can I use the Defringe function to remove edge halos?
Yes, the Defringe function in Photoshop can be very effective at removing edge halos. This function works by replacing the color of the fringe pixels with the color of nearby pixels. It’s particularly useful for images with high contrast edges.
How can I use the Clone Stamp tool to remove edge halos?
The Clone Stamp tool works by copying pixels from one area of an image and pasting them onto another. To use it to remove edge halos, you would first select the tool, then Alt-click (or Option-click on a Mac) on an area of the image without a halo. Then, you would click on the halo area to replace the halo pixels with the non-halo pixels.
What is the difference between the Healing Brush and the Clone Stamp tool?
While both tools can be used to remove edge halos, they work in slightly different ways. The Clone Stamp tool directly copies and pastes pixels from one area to another, while the Healing Brush tool blends the source pixels with the destination pixels for a more seamless result.
How can I use the Patch tool to remove edge halos?
The Patch tool works by replacing a selected area with pixels from another area. To use it to remove edge halos, you would first select the tool, then draw a selection around the halo. Next, you would click and drag the selection to an area without a halo. The halo pixels will be replaced with the non-halo pixels.
Can I use the Matting function to remove edge halos?
Yes, the Matting function in Photoshop can be used to remove edge halos. This function works by reducing the contrast between the edge pixels and the surrounding pixels, effectively blending the halo into the rest of the image.
What should I do if the standard tools aren’t removing the edge halos?
If the standard tools aren’t effectively removing the edge halos, you may need to try more advanced techniques. This could include using the Brush tool to manually paint over the halo, or using the Dodge and Burn tools to adjust the brightness of the halo area.
How can I avoid edge halos in future Photoshop projects?
To avoid edge halos in future projects, be mindful of your selection and editing techniques. Avoid over-sharpening, be careful with high contrast areas, and always refine your selection edges before applying adjustments. Additionally, using a high-quality original image can help prevent halos from appearing.
Jennifer Farley is a designer, illustrator and design instructor based in Ireland. She writes about design and illustration on her blog at Laughing Lion Design.
