
Key Takeaways
- Face proximity detection can be used to guide users on how close they should sit to their device’s camera for optimal video recording or picture taking. This can be achieved using a face detection algorithm that evaluates where a face is in proportion to the frame.
- The getUserMedia stream API can be used to access a user’s camera. This API is supported by most modern desktop browsers, except for Safari and any Webkit based browser on iOS.
- The viewfinder image can be mirrored using CSS, making it easier for users to position themselves in the frame.
- The CCV project by Liu Liu provides a model and script for face detection using a
- The distance of the user from the screen can be estimated using the height of the detected face in relation to the height of the canvas. This can be used to guide users to position themselves at an optimal distance from the screen.
Let’s suppose you’d like to let the visitors of your website make a video recording or take a picture of their face. How can you explain to them how close they’re supposed to sit to the camera? You could write lengthy instructions, but you know that today almost nobody reads the instructions. Probably, a better approach to solve this problem would be to use a face detection algorithm that can evaluate where a face is in proportion to the frame, figuring out if the face is too far away or too close.
My development team at Mozilla needed a “video booth” feature where people were able to record themselves talking into the web camera and have those videos uploaded and shared, all in a web application. In cases like this one, the quality problems are usually related to the audio. Ideally people should use a decent quality microphone and sit in a room with minimal echo, but often it isn’t possible. The best way to solve this issue is to ensure the user sits close to the built-in microphone of their laptop. To do that, we have implemented a face detection on the viewfinder, in order to tell them whether they are sitting near enough or not.
In this article, I’ll show you how to build this functionality and learn something about the components involved.
Let’s Get the Camera Working
The getUserMedia stream API has been in hectic flux across the major modern browsers. The navigator.getUserMedia API really worked only with various vendor prefixing hacks. The new getUserMedia stream API works in most modern desktop browsers including Microsoft Edge but not on either Safari or any Webkit based browser on iOS.
The minimal code you need to start is shown below:
navigator.mediaDevices

   .getUserMedia({audio: false, video: true})

   .then(function(stream) {

       // OK

   })

   .catch(function(error) {

       // Error

   });
However, MDN has a great 8 liner polyfill which helps you support older browsers. After copying that, our code should look like this instead:
navigator.mediaDevices = navigator.mediaDevices || ((navigator.mozGetUserMedia || navigator.webkitGetUserMedia) ? {

   getUserMedia: function(c) {

     return new Promise(function(y, n) {

       (navigator.mozGetUserMedia ||

        navigator.webkitGetUserMedia).call(navigator, c, y, n);

     });

   }

} : null);
// this is not part of the polyfill

if (!navigator.mediaDevices) {

  throw new Error('getUserMedia() not supported.');

}
navigator.mediaDevices

   .getUserMedia({audio: false, video: true})

   .then(function(stream) {

       // OK

   })

   .catch(function(error) {

       // Error

   });
Now that you have the MediaStream object (called just stream in the code example above) you need to project it onto something. What you project it on is a video element by using a method called URL.createObjectURL(blob). We’ll add one of those and continue the example code where the stream object is available.
function startCamera() {}

  return navigator.mediaDevices

    .getUserMedia({audio: false, video: true})

    .then(function(stream) {

      // assume you have a `` tag somewhere in the DOM

      var video = document.querySelector('video');

      video.src = URL.createObjectURL(stream);

      video.play();
      // return the stream so that chained promises can use it

      return stream;

    })

}
Before we play with our first demo, let’s spruce it up with a button that can start and stop the camera. The code isn’t particularly important. However it’s worth noticing that we can use promises to be able to refer when the stream has started. Here’s one simple implementation:
document.querySelector('button').onclick = function() {

  var button = this;

  button.textContent = 'Starting camera';
  // the function that wraps the getUserMedia call

  startCamera()

  .then(function() {

    button.textContent = 'Stop camera';

  });

}
You can find a slightly more complete and functional example here.
One Crucial Trick to the View Finder
If you played with the above demo, you should have been able to see your face animated in the view finder. But did you notice how hard it was to position yourself in the middle? That’s because the picture in the view finder is not your mirror image. It’s an actual view of your face, just like your friends see you. If you tilt your head towards your left ear, the face in the view finder appears to tilt to the right. This is awkward, even though it’s not supposed to be. After all, you intend to record your face talking, so that people who can’t be there in person can benefit from being able to view it later as a video clip or picture. We so rarely see our own faces recorded in a video but we often see our own faces in a mirror.
The solution to solve this problem is surprisingly easy. We can use CSS to mirror the view finder image. In fact, what we do is rotating it 180 degrees on its Y-axis. The magic is done with a simple transform rule:
video {

  transform: rotateY(180deg);

}
On CodePen you can find the first demo enhanced which is also available below:
See the Pen xwzaQE by SitePoint (@SitePoint) on CodePen.
Don’t you think it seems more natural and expected? Suddenly it becomes a lot easier to manage how to center your face.
Projecting the Picture Frames on a Canvas
Projecting the stream onto the <video> tag has the advantage that it’s fast and efficient. The disadvantage is that we can’t manipulate or analyze it there. For this purpose we need a <canvas> tag and its 2D context.
Basically, the whole trick here reduces to this: you take a stream (from starting a navigator.mediaDevices.getUserMedia instance) and display it in two places. One to a <video> tag (that is the “view finder”), one to a <canvas> tag (i.e. the “analyzer”). After that, we send each frame of the <canvas> into the face detection software, draw the conclusions from that and feed them back to the user.
As the first step, let’s add the canvas element and feed frames to it at a rate of every 1/10th of a second.
// assuming you have a  tag somewhere in the DOM

var canvas = document.querySelector('canvas');

var context = canvas.getContext('2d');
function startCamera() {}

  return navigator.mediaDevices.getUserMedia({audio: false, video: true})

  .then(function(stream) {

    // same as before

    var video = document.querySelector('video');

    video.src = URL.createObjectURL(stream);

    video.play();
    // The critical point where we transfer some frames to

    // a canvas element.

    setInterval(function() {

      context.drawImage(video, 0, 0, canvas.width, canvas.height);

    }, 100);

  })

}
You actually don’t need the <canvas> to be visible, so ideally you just add it to your DOM and then hide it, in this way:
canvas {

  display: none;

}
Here’s a demo where the canvas element is employed but hidden.
The context.drawImage API is awesome. We can simply pass it a video element, then the upper left corner coordinate and finally also the lower right corner coordinate.
Here we go! We have the picture of our web camera fully projected onto a <canvas>. Neat!
Bringing on the Actual Face Detection
The files we want to use are available from a GitHub project called ccv developed by Liu Liu who works at Snapchat. CCV is basically a project written in C with some nontrivial learning algorithms that know which patterns to expect when looking for a human face, for example.
Nevertheless we’re not going to use the C code since we’ll do everything in the browser without using a server. The beauty of the CCV project is that its creator has a model saved as a 236Kb JavaScript file and a small script that uses this model with a <canvas> tag.
The API works in a very simple way. You feed it a <canvas> tag, the model, some parameters and as a result you have an array of “objects”. After loading face.js and ccv.js, this is the code you need to add in order to call it:
// using global `ccv` from ccv.js and `cascade` from face.js

var faces = ccv.detect_objects({

  canvas: ccv.pre(canvas),

  cascade: cascade,

  interval: 2,

  min_neighbors: 1

});
These objects are faces and each of them looks like this:
{

  confidence: 0.33769726999999994,

  height: 60.97621039495391,

  width: 60.97621039495391,

  neighbors: 1,

  x: 131.5317891890668,

  y: 66.0158945945334

}
How do we actually use this? Let’s extend our existing demo and let it spit out any found faces on the console.
Here you can find the demo where each detected face is console logged.
To understand what we’ve got, the rather traditional thing to do is to render a square over the image (in the <canvas>) so we can understand what these width, height, x and y are. Let’s do that by not hiding the canvas and drawing a red rectangle on it.
On CodePen you can see the code to draw a typical square around the face and in the demo below you can play with it:
See the Pen dYKqBV by SitePoint (@SitePoint) on CodePen.
At this point, there are a couple of things to notice before watching the demo:
- The face rectangle sometimes disappears. Especially if you “move out of sight” or hold up a hand over one half of your face. This is because the model isn’t perfect. It’s an approximate model that tries to work in the best possible way.
- As you move closer and further away from the camera (i.e. the screen on your laptop) the rectangle shrinks and grows. That is the clue to our next step!
Figuring out How Far You Are from the Screen
The distance from your nose to your screen (where the camera presumably is) is figured out thanks to the height value in the face detection result(s). If you know the height of the face and the height of the canvas, you can figure out a percentage that would represent “the right distance from the screen”. But please note that you decide this percentage! The best way to figure this out is to test it on yourself and look at what percentage the rectangle is.
This demo helps you debug the percentage/ratio of your face compared to the canvas.
Now, one thing you might have noticed is that the number “jumps” a lot. It flickers up and down and it’s almost hard to tell what it is. A simple solution to that is to calculate a “rolling average” (that means a moving average). We don’t do fancy statistics, rather just average out the last five percentages. The function to do that is simple:
var percentages = [];

function rollingAverage(size) {

  percentages.splice(0, percentages.length - size);

  var sum = percentages.reduce(function(total, num) {

    return total + num

  }, 0);

  return sum / percentages.length;

}
This demo shows that now the percentage number doesn’t jump much.
What about the Actual Distance from the Screen?
If you want the actual distance from your face to the screen in inches or centimeters, again, use the percentage of how much your face takes up of the canvas. However, in order to make the conversion you first have to figure out what the percentages mean for your face. Ideally at this point you should get a ruler and ask a partner to measure you while you sit still, observing the percentage number. Here’s one such conclusion from measuring a couple of data points and using Google Docs to extract an exponential trendline:
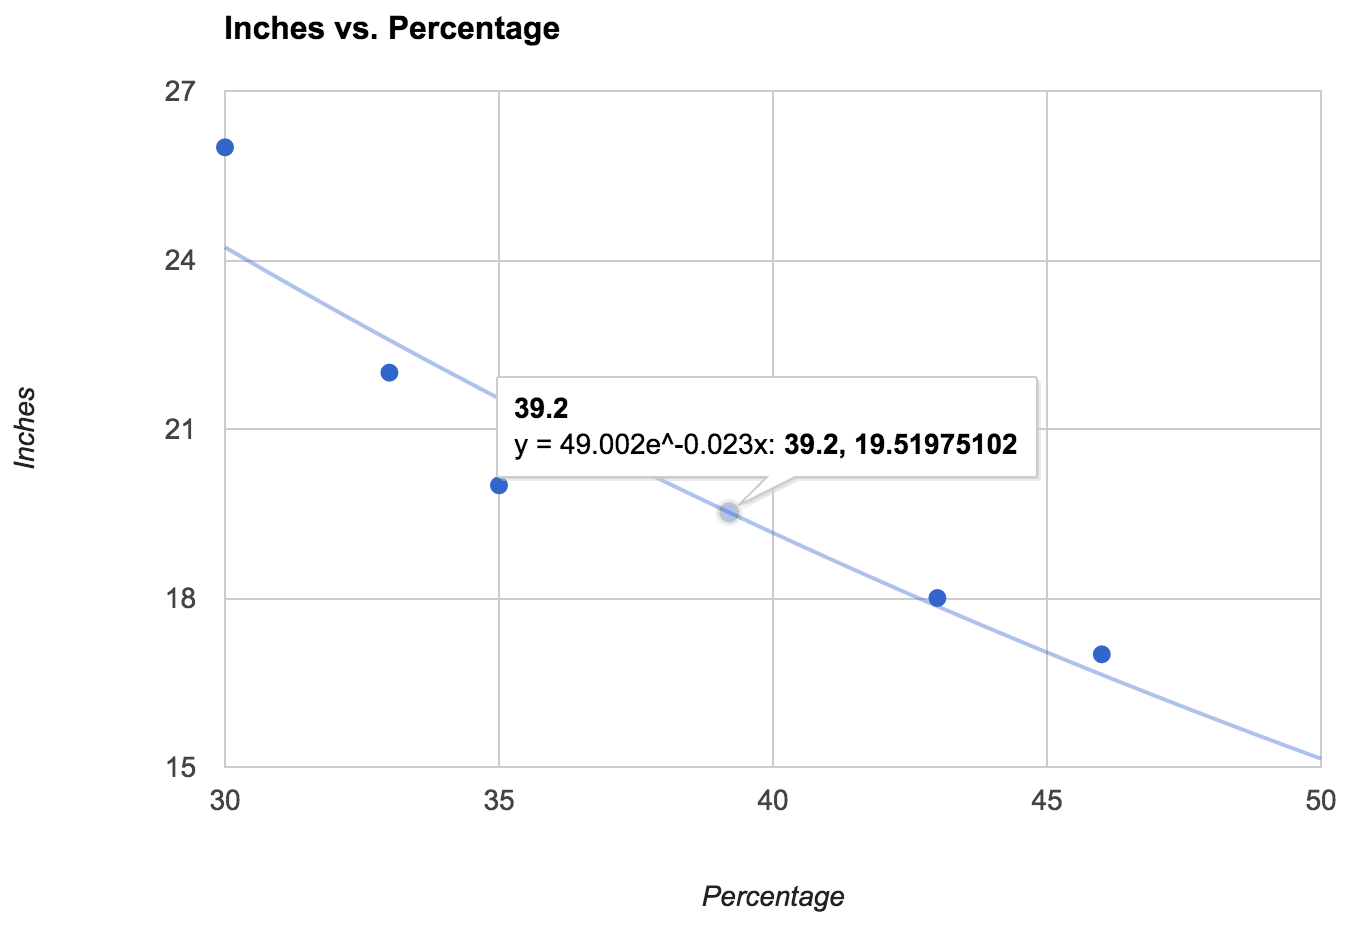
As you can see, this gives us a formula. Let’s use it to say the distance in inches instead.
Here is the final code of the demo with scientific model of converting percentages to inches. Below you can see the result:
See the Pen xwzavg by SitePoint (@SitePoint) on CodePen.
As you can probably see, this isn’t very accurate since the software model isn’t perfect and there are many calculations to repeat. You can’t depend on an exact number. The application we’ve built at work didn’t expose any numbers like this last demo. It just showed a badge that would say: “A bit closer please”, “Back a bit please”, and “Good face distance” as you move back and forth. Nobody expects it to be particularly accurate, but every time we see people using the application for the first time, it puts a smile on their face that we’re at least trying.
Conclusions
In conclusion, was it worth it? This technique of letting the person in front of the camera know if they sit too close or too far away from the screen is very inaccurate. Being aware of that, you need to take that with a pinch of salt and a sense of humor. It’s not very different from those traditional photo booths they have at airports, shopping malls, or train stations. There’s a silhouette of a face with perfect un-human-like geometric proportions and it acts as a guide to where you’re roughly supposed to place your face.
The point of it all was to get a good hold of how to use navigator.mediaDevices.getUserMedia together with the CCV library for something fun. You can probably think of many other funny applications such as overlaying funny hats, sunglasses or mustaches over the viewfinder. All the tools you need to build that are demonstrated in this article, but whatever you do, make it something silly.
Frequently Asked Questions (FAQs) on Face Proximity Detection with JavaScript
How Can I Adjust the Sensitivity of the Face Proximity Detection?
The sensitivity of the face proximity detection can be adjusted by modifying the parameters in the JavaScript code. For instance, you can change the ‘score’ parameter, which determines how confident the model is that it has detected a face. A higher score means the model is more confident. You can also adjust the ‘size’ parameter, which determines the size of the detected face. A smaller size means the face is further away, while a larger size means the face is closer.
Why is My Face Proximity Detection Not Working?
There could be several reasons why your face proximity detection is not working. First, ensure that your browser supports the MediaDevices API, which is necessary for accessing the camera. Second, check that you have given the necessary permissions for the website to access your camera. Third, ensure that your JavaScript code is correct and that there are no errors. If you’re still having trouble, try debugging your code or seeking help from a JavaScript expert.
Can I Use Face Proximity Detection on Mobile Devices?
Yes, you can use face proximity detection on mobile devices. However, keep in mind that the performance may vary depending on the device’s hardware and software capabilities. Also, ensure that the website has the necessary permissions to access the device’s camera.
How Can I Improve the Accuracy of Face Proximity Detection?
The accuracy of face proximity detection can be improved by using a more advanced face detection model, such as a convolutional neural network (CNN). You can also improve accuracy by adjusting the parameters in the JavaScript code, such as the ‘score’ and ‘size’ parameters.
Can I Use Face Proximity Detection for Authentication Purposes?
While it’s technically possible to use face proximity detection for authentication purposes, it’s not recommended due to security concerns. Face proximity detection can be easily fooled by a photo or a mask, making it a weak form of authentication. For secure authentication, consider using biometric methods such as fingerprint or iris scanning.
How Can I Use Face Proximity Detection in My Web Application?
To use face proximity detection in your web application, you need to integrate the JavaScript code into your website’s HTML and CSS. You also need to ensure that your website has the necessary permissions to access the user’s camera.
Can Face Proximity Detection Work in the Dark?
Face proximity detection may not work well in the dark, as it relies on the camera’s ability to capture clear images of the face. For better results, ensure that the face is well-lit.
How Can I Test the Face Proximity Detection?
You can test the face proximity detection by running the JavaScript code in your browser and checking if it correctly detects your face. You can also test it with different faces and distances to see how well it performs.
Can Face Proximity Detection Detect Multiple Faces?
Depending on the face detection model used, face proximity detection may be able to detect multiple faces. However, keep in mind that detecting multiple faces may require more computational resources and may not be as accurate.
How Can I Troubleshoot Issues with Face Proximity Detection?
If you’re having issues with face proximity detection, first check that your browser supports the MediaDevices API and that you have given the necessary permissions for the website to access your camera. If these are not the issues, check your JavaScript code for errors. If you’re still having trouble, consider seeking help from a JavaScript expert.