

In this tutorial I will show you how to extend an existing iOS app with WatchKit using a brain training app called “Brain Enhancer”. The Watchkit version of the app will be a pared down version of the full iOS app. It will be a different experience but within the context of the iOS app to avoid a disjoined experience between the two apps. The user should understand that they are still using the same app.
The Watch App will make use of glances and notifications. Once the user opens the Watch App, they’ll be able to interact with small versions of the quizzes. Think of these as bite size quizzes. This tutorial will show how to add functionality into the Watch App that allows the user to take the short quizzes.
You can find the beginning code for this tutorial on GitHub.
Key Takeaways
- The tutorial demonstrates how to extend an existing iOS app with WatchKit using a brain training app as an example. The WatchKit version of the app will be a pared down version of the full iOS app, aiming to maintain a consistent user experience across both platforms.
- The Watch App will make use of glances and notifications, allowing users to interact with smaller versions of the quizzes. A functionality is added into the Watch App that allows the user to take these short quizzes.
- To add the WatchKit extensions to an existing iOS project, select File -> New -> Target, then select Apple Watch. The WatchKit uses one storyboard for the watch app, glance, and notifications.
- The app simulates data coming from the iOS app to create the glance. This is done by setting a timer in the iOS app to display the glance after 5 seconds. To get data from the iOS app into the glance, an app group is created, which is a shared container for storing data.
- The tutorial also covers building a quiz watch app, wiring up the glance and notification, and enabling app groups. It finishes with running the watch app, where the user can select answers and move to the next question. The final code for the tutorial is available on GitHub.
The User Interface
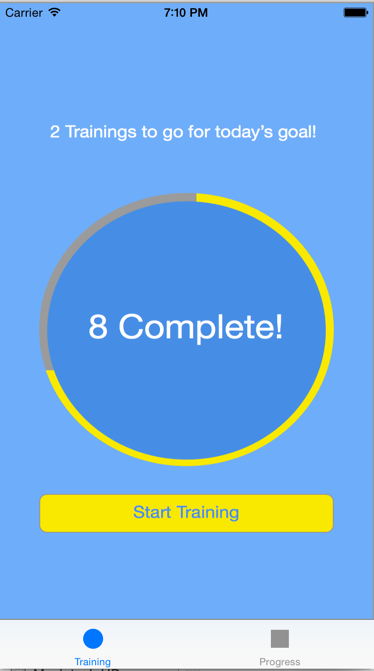
Below are the two main scenes in the iOS app. The first scene will look like this:
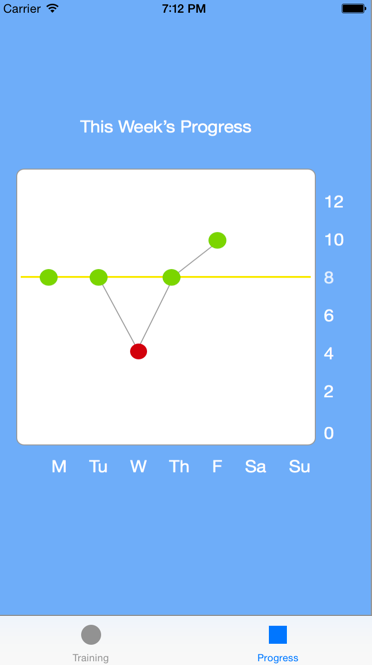
The second like this:
For the Watch App, the glance will display a short notice that scheduled training is coming up.

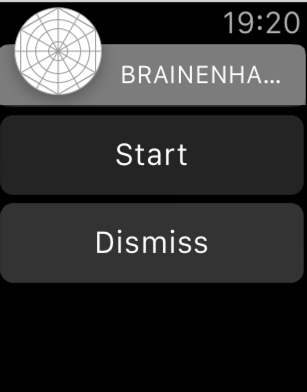
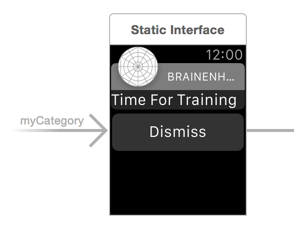
The notification will start with the following screen:
Upon clicking Start, the user will be dropped into the Watch App where the quiz has posted the first question:
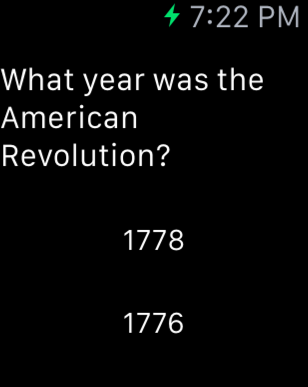
The next question will display when the user clicks the correct answer, otherwise the button will highlight red.
Creating The Watchkit Project
To add the Watch Kit extensions to an iOS project already created, do the following:
Select File -> New -> Target. Select Apple Watch
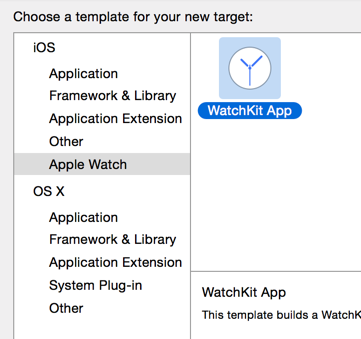
Click Next and select the Notifications and Glances options:

Click Finish and then click Activate on the activate scheme popup window.
There should now be folders that look similar to the following in the project:
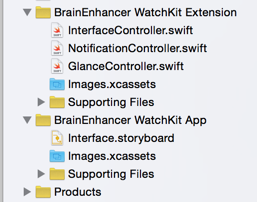
There are controllers for the notification and glance. The actual watch app code will be in InterfaceController.swift.
That completes setting up of the project. Now let’s begin building out the UI and adding functionality.
Building The Watch App User Interface
Watchkit uses one storyboard for the watch app, glance and notifications.
Let’s start with the glance. The glance needs to display the text “Braining Training In 5”. To fit into the glance the label height needs to be increased and it needs to be multi line.
Drag a label into the bottom glance group and adjust the height. It should look similar to the following:
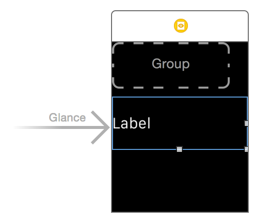
In the Attributes Inspector for the label, adjust lines to 2.
For the notification, change the label to “Time For Training”.
Finally, the Watch app will need one label and two buttons, which will look like this:
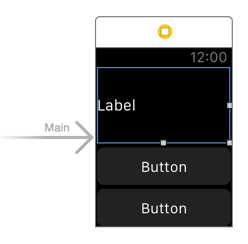
To create this layout, drag a label into the app. Adjust the height to enable three lines of text into the label, a height of 65.5 should be fine. Make the label 3 lines, similar to the glance label.
To finish the watch app UI, drag two buttons onto it.
Enabling App Groups
Next the app will simulate data coming from the iOS app to create the glance. In a real world scenario, the iOS app might be on a schedule to let the user know when the next training is coming up. This app will set a timer in the iOS app to display the glance after 5 seconds. To get data from the iOS app into the glance, create an app group, which is a shared container for storing data. To do this, an account at iOS Dev Center is required.
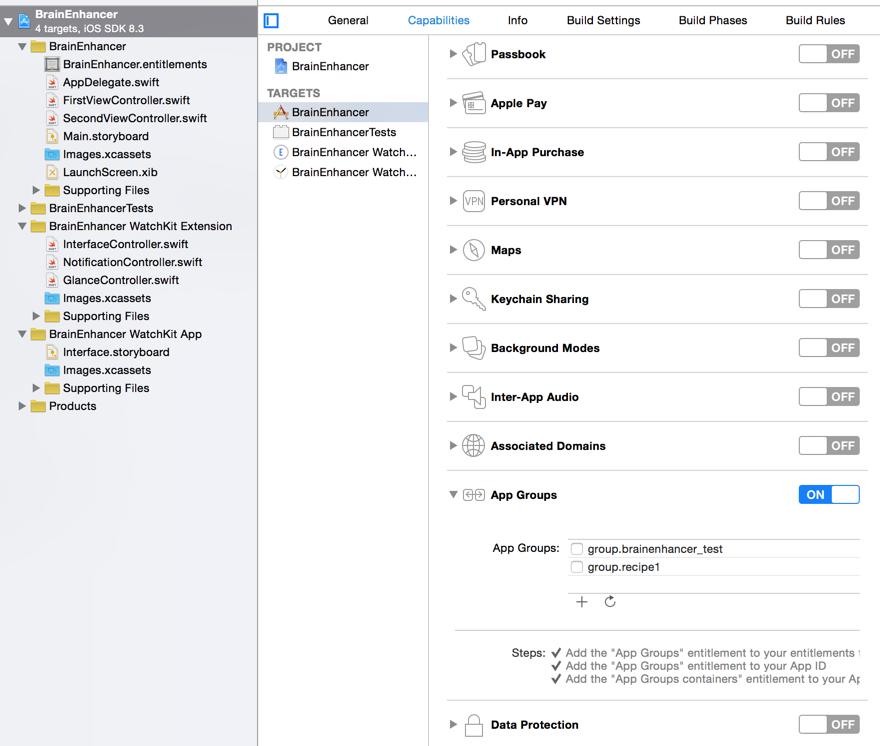
First, turn on the app group. Click the project in the Project Navigator, then click the iOS app target and then Capabilities. Turn on App Groups. If an app group needs to be added, this can be done by clicking the + under any listed app groups.
In the following screenshot, I’m using an app group named groups.brainenhancer_test.
Upon clicking to turn on app groups, there may be a popup like the following:

This popup allows the developer to choose their Dev Center account.
Next enable app groups for the Watch Kit extension. It’s located under Targets. Just follow the same steps as above and be sure to use the same app group as for the iOS app.
Wiring Up The Glance
Next an IBOutlet is needed for the glance label. Open interface.storyboard and control click and drag from the label to GlanceController.swift, which should be open via the Assistant Editor. Name the outlet updateLabel and make it a strong storage type. This will create an IBOutlet. These are the same steps used to create IBOutlets in iOS apps.
@IBOutlet var updateLabel: WKInterfaceLabel!
With the outlet created, add the code that will update the label from the iOS app. To do this, in the iOS app, open the first scene view controller. Add the following to viewDidLoad:
let sharedDefaults = NSUserDefaults(suiteName: "group.brainenhancer_test")

sharedDefaults?.setObject("Braining Training In 5", forKey: "payload")

sharedDefaults?.synchronize()
The above is using NSUserDefaults to push data into the app group. I’m using the key payload, which will be the same key referenced in the watch app to pull out data.
In GlanceController, add the following to the willActivate function:
let timer = NSTimer.scheduledTimerWithTimeInterval(5, target:self, selector: Selector("updatePayLoad"), userInfo: nil, repeats: true)
This sets up a timer that causes the data to display on the glance 5 seconds after the glance appears. The NSTimer references a function named updatePayLoad. Add the following for that method:
func updatePayLoad(){

  let sharedDefaults = NSUserDefaults(suiteName: "group.brainenhancer_test")

  let payload = sharedDefaults?.objectForKey("payload") as! String

  updateLabel.setText(payload)

}
This is the reverse of what is happening in the iOS app. The same app group is referenced, as is the payload key.
Text is assigned to the updateLabel via a function rather than property. This is one difference with Watchkit. Most actions are carried out via functions instead of properties.
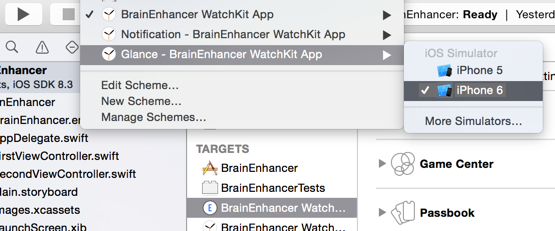
To run the glance, select it from the scheme menu:
The iOS app will not run in this situation, only the glance. If the watch app simulator does appear, open to Hardware -> External Displays -> Apple Watch. After 5 seconds, our message should appear on the watch app label.
Once the glance runs, after 5 seconds, the text “Braining Training In 5” will be visible.
Wiring Up The Notification
Watchkit notifications are similar to notifications in iOS apps. The main difference between glances and notifications is that glances are for quick, read only messages and notifications allow more interaction.
Launch the watch app and start the quiz. I’ll use PushNotificationPayload.apns for the notifications, which can be found under Supporting Files in the extension folder. This file contains JSON that is used to configure the notification UI. The only thing to be changed is the title text:
"WatchKit Simulator Actions": [

    {

        "title": "Start",
There are two buttons that will appear on the notification, Dismiss and Start. If the user clicks Dismiss, the notification will go away and the regular watch will appear. If the user clicks Start, the watch app will launch.
To run the notification, use through the same menu as with the glance but this time choose notification.
Building The Quiz Watch App
Now it’s time to build our watch app.
IBOutlets are required for all three UI elements. Open InterfaceController.swift with the Assistant Editor. Control click and drag from each UI element into InterfaceController. There should be the following outlets:
@IBOutlet var questionLabel: WKInterfaceLabel!
@IBOutlet var buttonA: WKInterfaceButton!
@IBOutlet var buttonB: WKInterfaceButton!
I’m going to add a Question class inside of the extension folder. This will store each question, answer set and correct answer in a structured object. Right click on the Extension folder and select new file. Add an NSObject class and paste the following into the class:
class Question: NSObject {

var questionText: String

var answerId: Int

var answers = [Int: String]()
init(questionText:String, answerId: Int, answers:[Int:String]){

    self.questionText = questionText

    self.answerId = answerId

    self.answers = answers

}

}
class QuestionManager: NSObject {

 func getAnswerText(questionsArray:[Question], answerId:Int, questionId:Int) -> String{

    let question = questionsArray[questionId]

    return question.answers[answerId]!

}
func checkAnswer(questionsArray:[Question], answerId:Int, questionId:Int) -> Bool{

    let question = questionsArray[questionId]

    if(question.answerId == answerId){

        return true

    }

    return false

}
}
Each Question instance is initialized with the question text, answer ID and answer set. There is another class named QuestionManager. This class helps us get the answer text and also check if an answer is correct.
Now go back to InterfaceController and add the following just beneath the class declaration:
var counter = 0

let questionManager = QuestionManager()

var questions = [

    Question(questionText: "What is the capital of Arizona?",

        answerId: 0,

        answers:[0:"Phoenix",1:"Flagstaff"]),

    Question(questionText: "What year was the American Revolution?",

        answerId: 1,

        answers:[0:"1778",1:"1776"])

]
The above code creates an instance of the QuestionManager class and sets up two questions, which are added to an array. Given the question array and how we used NSUserDefaults in association with app groups, you can see how this array coming from the iOS app.
The following method is added to InterfaceController and helps advance to the next question:
func setupNextQuestion(){
    questionLabel.setText(questions[counter].questionText)

    let answerText = questionManager.getAnswerText(questions, answerId: 0, questionId: counter)

    buttonA.setTitle(answerText)

    buttonA.setBackgroundColor(UIColor.blackColor())

    let answerText2 = questionManager.getAnswerText(questions, answerId: 1, questionId: counter)

    buttonB.setTitle(answerText2)

    buttonB.setBackgroundColor(UIColor.blackColor())

}
Button backgrounds are always reset to black in case a wrong answer was selected, which causes the background to change to red.
Now create IBActions for the two buttons. Control click and drag each button to InterfaceController.swift, which should be open in the Assistant Editor. Select IBAction and provide the following names. There should also be the same functions once the actions are created.
@IBAction func buttonA_click() {}

@IBAction func buttonB_click() {}
Modify the above functions so they look like this:
@IBAction func buttonA_click() {

    if(questionManager.checkAnswer(questions,answerId: 0,questionId: counter)){

        counter++

        if(counter < questions.count){

            setupNextQuestion()

        }

    }

    else {

        buttonA.setBackgroundColor(UIColor.redColor())

    }

}
@IBAction func buttonB_click() {

    if(questionManager.checkAnswer(questions,answerId: 1,questionId: counter)){

        counter++

        if(counter < questions.count){

            setupNextQuestion()

        }

    }

    else {

        buttonB.setBackgroundColor(UIColor.redColor())

    }

}
When a button is pressed, check if the correct answer has been selected. If it has, move to the next button. Otherwise, change the button background color to red and do not advance to the next question.
That should complete our watch app. To run it, go to the same menu used for glance and notification, but this time select the Watchkit App. The app will start in the Watch simulator. Select the correct answer and move to question 2. If the wrong answer is selected, the button background should change to red and stay on the answer until the correct button is pushed.
The final code for the tutorial can be found on GitHub, but make sure you change the App Group settings to your own before running.
Conclusion
In this tutorial we saw how to extend an existing iOS app and move data from the iOS app into a Watchkit Extension. We built functionality into the watch app to handle quizzes. We learnt how to start a glance, notification or watch app in Xcode with little effort.
With more exploration of the interface storyboard, you’ll see there’s a lot more you can do with the watch app to brand it similar to your iOS app. There’s lots of functionality that can be built into watch apps. This article provides a great starting point. As always, I’m keen to hear your throughs and experiences.
Frequently Asked Questions (FAQs) about Extending an iOS App with WatchKit
What are the prerequisites for extending an iOS app with WatchKit?
Before you start extending an iOS app with WatchKit, you need to have a basic understanding of Swift programming language and iOS app development. You should also have the latest version of Xcode installed on your Mac. Xcode is the integrated development environment (IDE) for Apple’s software ecosystem. It includes a suite of software development tools that you’ll use to create apps for Apple devices, including the Apple Watch.
How do I create a new WatchKit project in Xcode?
To create a new WatchKit project in Xcode, you first need to open Xcode and select “Create a new Xcode project” from the welcome screen. Then, in the template selection screen, choose “iOS” from the top menu and select “App” from the options. After that, you’ll be asked to fill in some details about your project, such as the product name, team, organization name, and identifiers. Once you’ve filled in these details, make sure to check the “Include WatchKit for iOS” box before you proceed.
How do I design the user interface for my WatchKit app?
Designing the user interface for a WatchKit app is done using the Interface Builder in Xcode. The Interface Builder is a visual design editor that allows you to design your app’s user interface without writing any code. You can drag and drop interface elements onto your storyboard, and then configure their properties in the attributes inspector.
How do I handle user interactions in my WatchKit app?
User interactions in a WatchKit app are handled by creating actions in your interface controller. An action is a method that gets called when a specific event occurs, such as the user tapping a button. You can create an action by control-dragging from an interface element in your storyboard to your interface controller code.
How do I update the data in my WatchKit app?
Updating the data in your WatchKit app is done by calling the setItems(_:) method on your interface table. This method takes an array of any type, and updates the table to display these items. You can customize how each item is displayed by implementing the itemForRow(at:) method in your interface controller.
How do I communicate between my iOS app and my WatchKit app?
Communication between an iOS app and a WatchKit app is done using the WCSession class. This class provides methods for sending data back and forth between your iOS app and your WatchKit app. You can send data either immediately or at a later time, depending on your needs.
How do I test my WatchKit app?
Testing a WatchKit app is done using the iOS Simulator in Xcode. The iOS Simulator allows you to run your app on a virtual Apple device, such as an iPhone or an Apple Watch. You can interact with your app in the simulator just like you would on a real device.
How do I debug my WatchKit app?
Debugging a WatchKit app is done using the debugger in Xcode. The debugger allows you to step through your code line by line, inspect the values of variables, and set breakpoints at specific lines of code. This can help you find and fix any issues in your code.
How do I deploy my WatchKit app to the App Store?
Deploying a WatchKit app to the App Store is done through the App Store Connect portal. You’ll need to create an app record, fill in all the necessary details about your app, upload your app’s binary, and submit it for review. Once your app is approved, it will be available for download on the App Store.
What are some best practices for developing WatchKit apps?
Some best practices for developing WatchKit apps include designing for the small screen size of the Apple Watch, optimizing for quick interactions, providing useful notifications, and ensuring that your app works well when the iPhone is not within reach. It’s also important to test your app thoroughly on different watch models and screen sizes to ensure a good user experience.

