Easy Admin Interfaces with Active Admin in Rails

Key Takeaways
- Active Admin is a highly customizable framework for creating administrative interfaces in Rails applications, allowing for efficient management of data.
- Installation of Active Admin in a Rails 4 environment currently requires using the master branch from GitHub due to the lack of an official release that supports Rails 4.
- Active Admin utilizes Devise for authentication, enabling functionalities like email-based password reset setups for admin users, enhancing security and ease of user management.
- Customization capabilities in Active Admin are extensive, from modifying index pages to display specific columns, to customizing forms and adding filters or download links for data exports.
- Active Admin supports importing and exporting data in various formats (CSV, XML, JSON, XLSX), allowing for efficient data management and integration with other systems.
Application administration is a common requirement in most web applications and building one from scratch can be a daunting task. There are, however, some options that can save you from starting from nothing when creating your admin interface. We’ll be looking at one of the popular options available – Active Admin.
Active Admin is a framework for building administration style interfaces. With little effort, you can create an admin interface that enables you to manage your data and it is highly customizable. We will be looking at how to set up and customize it in a Rails 4 application.
You should note that, at the date of writing this tutorial, there isn’t yet an official release that supports Rails 4 (version 1.0.0 which is in development will support Rails 4). For now, you’ll have to use the master branch. Also, the maintainers of the Active Admin Github repo warn that the documentation at the official website is outdated and, for the latest docs, you should check the Github repo page itself.
Installation and Setup
For this tutorial, I set up three models.
rails g model Genre name:string
rails g model Author first_name:string last_name:string
rails g model Book name:string price:decimal author:references genre:references
rake db:migrate
The models have the following associations.
app/models/genre.rb
class Genre < ActiveRecord::Base
  has_many :books
end
app/models/author.rb
class Author < ActiveRecord::Base
  has_many :books
end
app/models/book.rb
class Book < ActiveRecord::Base
  belongs_to :author
  belongs_to :genre
end
To set up Active Admin, add the gem in your Gemfile. For Rails 4 support at the moment, we are tracking master.
gem 'activeadmin', github: 'gregbell/active_admin'Then install it.
bundle installRun the generator to install Active Admin. This will create an AdminUser model, an initializer file for configuring Active Admin and an app/admin directory that will hold the administration files. It uses Devise for authentication.
rails g active_admin:installIf you had already set up an AdminUser model, then you can run the following instead, which will use the existing AdminUser model.
rails g active_admin:install AdminUserYou will get further setup instructions on the terminal for some settings you need to do manually.
Next, run the migration.
rake db:migrateStart the server and navigate to http://localhost:3000/admin. You should be able to login using the following:
Username: admin@example.com
Password: password
After logging in, the admin dashboard is presented. At the top is a menu showing the models that have been registered with Active Admin. At this point, only the AdminUser model has been registered. You can view a list of registered admin users, edit their information, and create new ones.
Creating Admin Users
Before registering other models with Active Admin, let’s change the default behaviour for creating admin users. By default, to create an admin user, the admin needs to enter an email, password, and confirmation password. It’d be better if the app only asked for an email address and then sent a link to the user so that they can set their password.
Change the form used to create admin users in app/admin/admin_user.rb to only contain the email field.
form do |f|
  f.inputs "Admin Details" do
    f.input :email
  end
  f.actions
end
Now, enable an admin to be created without a password by adding the following in the app/models/admin_user.rb file.
after_create { |admin| admin.send_reset_password_instructions }
def password_required?
  new_record? ? false : super
end
The password_required? method checks if the record is getting created for the first time and returns false if so, thus allowing an admin to be created without a password. The after_create method sends an email to the registered email address with a link to set password. This has already been set up by Devise since, by default, Devise was installed with the rememberable sub module. (This is the same email sent when an admin tries to recover their password via the Forgot Password link. You can modify the default template message to suit both changing password and setting password needs).
If you haven’t defined default url options in your environment files, then sending the email will fail. Since we are in development, include the following in the config/environments/development.rb file.
config.action_mailer.default_url_options = { :host => 'localhost:3000' }Of course, you need to set up a mailer for the email to be sent. That is out of scope for this tutorial, but you can check the Action Mailer documentation to find out how to send emails in a Rails application. Even without setting up Action Mailer to deliver emails, we can view the email content on the terminal. You can locate the Change Password Link url in the email message and copy and paste it to the browser to test if it works.
Customizing Views
Register our three models:
rails generate active_admin:resource Genre
rails generate active_admin:resource Author
rails generate active_admin:resource Book
I populated the database with some data by placing the following in the db/seeds.rb file and ran rake db:seed
ya = Genre.create! :name => "Young Adult"
humor = Genre.create! :name => "Humor"
gnovel = Genre.create! :name => "Graphic Novel"
crime = Genre.create! :name => "Crime"
fantasy = Genre.create! :name => "Fantasy"
business = Genre.create! :name => "Business and Finance"

collins = Author.create! :first_name => "Suzanne", :last_name => "Collins"
kaling = Author.create! :first_name => "Mindy", :last_name => "Kaling"
handler = Author.create! :first_name => "Chelsea", :last_name => "Handler"
ohba = Author.create! :first_name => "Tsugumi", :last_name => "Ohba"
oda = Author.create! :first_name => "Eiichiro", :last_name => "Oda"
grisham = Author.create! :first_name => "John", :last_name => "Grisham"
patterson = Author.create! :first_name => "James", :last_name => "Patterson"
martin = Author.create! :first_name => "George", :last_name => "Martin"
tolkien = Author.create! :first_name => "John", :last_name => "Tolkien"
ende = Author.create! :first_name => "Michael", :last_name => "Ende"
ries = Author.create! :first_name => "Eric", :last_name => "Ries"
eyal = Author.create! :first_name => "Nir", :last_name => "Eyal"

Book.create! :name => "The Hunger Games", :price => 20.00, :author => collins, :genre => ya
Book.create! :name => "Catching Fire", :price => 20.00, :author => collins, :genre => ya
Book.create! :name => "Mockingjay", :price => 20.00, :author => collins, :genre => ya
Book.create! :name => "Is Everyone Hanging out Without Me?", :price => 20.00, :author => kaling, :genre => humor
Book.create! :name => "Are You There, Vodka? It's Me Chelsea", :price => 20.00, :author => handler, :genre => humor
Book.create! :name => "Death Note", :price => 20.00, :author => ohba, :genre => gnovel
Book.create! :name => "One Piece", :price => 20.00, :author => oda, :genre => gnovel
Book.create! :name => "The Pelican Brief", :price => 20.00, :author => grisham, :genre => crime
Book.create! :name => "A Time to Kill", :price => 20.00, :author => grisham, :genre => crime
Book.create! :name => "Along Came a Spider", :price => 20.00, :author => patterson, :genre => crime
Book.create! :name => "A Game of Thrones", :price => 20.00, :author => martin, :genre => fantasy
Book.create! :name => "A Clash of Kings", :price => 20.00, :author => martin, :genre => fantasy
Book.create! :name => "A Storm of Swords", :price => 20.00, :author => martin, :genre => fantasy
Book.create! :name => "A Feast for Crows", :price => 20.00, :author => martin, :genre => fantasy
Book.create! :name => "A Dance with Dragons", :price => 20.00, :author => martin, :genre => fantasy
Book.create! :name => "The Silmarillion", :price => 20.00, :author => tolkien, :genre => fantasy
Book.create! :name => "The NeverEnding Story", :price => 20.00, :author => ende, :genre => fantasy
Book.create! :name => "The Lean Startup", :price => 20.00, :author => ries, :genre => business
Book.create! :name => "Hooked", :price => 20.00, :author => eyal, :genre => business
Running the application, you can now see the Authors, Books and Genres items on the Dashboard menu. On clicking each menu item, you’ll see a list of items in that collection with View, Edit, and Delete links for each.
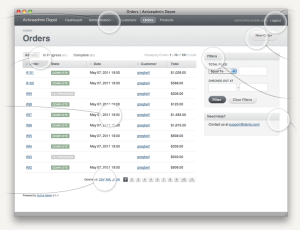
Let’s change the Books page from the default shown below.

First, change the columns that are displayed. Active Admin displays columns for all fields that your object has, but in this case we will remove the Created At and Updated At columns and add the author name and genre name columns. This is done within the index method in app/admin/book.rb, where the included columns are specified.
index do
  column :name
  column :author
  column :genre
  column :price
end
Active Admin will detect the belongs_to relationship that Book has with Author and Genre, but you will notice that for the Author column, the name of the entry is displayed as Author #1 (depending on the id of the record). Looking at the Author dropdown menu that is on the Filters sidebar on the right, notice that the Author object name is what is displayed and not something that is human-readable.
This is due to how Active Admin decides on what name to use as the display name for an object.
# Active Admin makes educated guesses when displaying objects, this is
# the list of methods it tries calling in order
setting :display_name_methods, [ :display_name,
                                  :full_name,
                                  :name,
                                  :username,
                                  :login,
                                  :title,
                                  :email,
                                  :to_s ]
To fix this, define a to_s method for the Author model in the app/models/author.rb file.
class Author < ActiveRecord::Base
  has_many :books

  def to_s
  "#{first_name} #{last_name}"
  end
end
On refreshing the page, the Author column will now display the author’s first and last names.
You can also do some manipulation on the data before it is displayed. Let’s change the ‘Price’ column to display its currency. We’ll use the number_to_currency helper for this. For dollars, no options need to be passed to the method.
ActiveAdmin.register Book do
  index do
    column :name
    column :author
    column :genre
    column :price do |product|
      number_to_currency product.price
    end
    default_actions
  end
end
The default_actions method adds the “View”, “Edit” and “Destroy” links.
You can change the name of a column by specifying the new name before the field name in the index method.
column 'New Name', :nameOn the right side of the page is a filter that is useful in searching through records. You might not require some of the default attributes it offers. For the Book option, let’s specify the attributes we want to use to filter. In app/admin/book.rb add
filter :name
filter :author
filter :genre
filter :price
Active Admin selects the most relevant filter type based on the attribute type. For the author and genre attributes, they are being displayed in select drop-down menus. We might want to filter records belonging to more than one genre or author, so a select menu will not be useful for this. Let’s change this to display the collection items as checkboxes.
filter :author, :as => :check_boxes
filter :genre, :as => :check_boxes
The sidebar can be modified to show more information. As an example, add a sidebar to the Author Show page listing all the books that an author has written in a table. In the app/admin/author.rb file, make the following changes.
ActiveAdmin.register Author do
  sidebar 'Books by this Author', :only => :show do
    table_for Book.joins(:author).where(:author_id => author.id) do |t|
      t.column("Title") { |book| book.name }
    end
  end
end
Importing Data
By default, the interface allows us to create records one by one. This can be inefficient if we have a lot of data that we need to save or we want to use data from another application. It’s possible to enable CSV importation in the application.
We’ll use the active_admin_importable gem for this. In your Gemfile add:
gem 'active_admin_importable'And then execute bundle install.
To enable CSV import on the Author page, in app/admin/author.rb add the following.
active_admin_importableAn Import Authors button will have appeared at the top right corner of the page. Click on it and browse your local file system for the csv file you want to import. The file should have a header row corresponding with your model attributes. You don’t have to include all columns, as default values will be inserted for columns you leave out.
I created a CSV file with the following two records and imported it.
First name,Last name
Jane,Doe
John,Doe
Downloading Data
Active Admin enables you to download the data in CSV, XML or JSON formats.
When you download the CSV file, you will see the model’s attributes as the file’s headers. You can indicate what is included in the CSV file. For the Author model, format our CSV file to only include the author’s first and last names.
In app/admin/author.rb include the following.
csv do
  column :first_name
  column :last_name
end
You can also enable Spreadsheet exports. Add the following to the Gemfile.
gem 'activeadmin-axlsx'Run bundle install. On running the app, you will see an XLSX link included on every resource page as one of the options for downloading data.
It’s possible to format the data exported in the spreadsheet. Below, the author first and last names are included, and the header color is changed. In app/admin/author.rb add.
xlsx(:header_style => {:bg_color => 'C0BFBF', :fg_color => '000000' }) do
  delete_columns :id, :created_at, :updated_at
end
If you don’t want to offer XML as a download option, you can change the options for a particular model by adding the following in the model’s Active Admin file. For example, in app/admin/author.rb add the statement below, which will only change the links on the Author page.
index download_links: [:csv, :xlsx]To set the options for all resources in your namespace add the following to the config/initializers/active_admin.rb file.
ActiveAdmin.setup do |config|
  config.namespace :admin do |admin|
  admin.download_links = [:csv, :xlsx]
  end
end
Conclusion
We have looked at some common customizations, but there are a ton more features that Active Admin has that we haven’t covered. To find out more, start with the documentation and the Github page.
Frequently Asked Questions (FAQs) about Active Admin in Rails
How can I customize the Active Admin dashboard?
Customizing the Active Admin dashboard is quite straightforward. You can modify the dashboard by editing the ‘dashboard.rb’ file located in the ‘app/admin’ directory. Here, you can add sections, columns, and panels to display various types of information. You can also add custom code to display data in a specific format. Remember to restart your server after making changes to see the updates.
How can I add a new resource to Active Admin?
Adding a new resource to Active Admin involves generating a new resource file. You can do this by running the command ‘rails generate active_admin:resource MyModel’. Replace ‘MyModel’ with the name of your model. This will create a file in the ‘app/admin’ directory where you can customize the resource.
How can I customize the index page in Active Admin?
The index page in Active Admin can be customized by modifying the ‘index’ block in your resource file. You can specify which attributes to display, add filters, and even customize the table format. You can also add pagination and sorting functionality.
How can I add custom actions to Active Admin?
Custom actions can be added to Active Admin by defining a member action or a collection action in your resource file. Member actions apply to individual records, while collection actions apply to all records. You can specify the HTTP method, add a route, and define a controller action.
How can I integrate Active Admin with Devise?
Active Admin is built to work seamlessly with Devise. When you install Active Admin, it automatically sets up Devise for authentication. You can customize the Devise setup by modifying the ‘devise.rb’ initializer and the ‘user.rb’ model.
How can I customize the form in Active Admin?
Forms in Active Admin can be customized by modifying the ‘form’ block in your resource file. You can specify which attributes to include, add custom inputs, and even include nested attributes for complex forms.
How can I add a custom filter in Active Admin?
Custom filters can be added to Active Admin by using the ‘filter’ method in your resource file. You can specify the attribute to filter on, the type of filter, and even add a custom label.
How can I customize the menu in Active Admin?
The menu in Active Admin can be customized by using the ‘menu’ method in your resource file. You can specify the label, priority, and parent of each menu item. You can also conditionally display menu items based on user permissions.
How can I add a custom scope in Active Admin?
Custom scopes can be added to Active Admin by using the ‘scope’ method in your resource file. You can specify the name, scope, and default status of each scope. Scopes allow you to filter records based on specific conditions.
How can I customize the show page in Active Admin?
The show page in Active Admin can be customized by modifying the ‘show’ block in your resource file. You can specify which attributes to display, add custom panels, and even include nested attributes for complex data structures.
I am a web developer who dabbles in mobile development from time to time. You can find me on Twitter @joyceechessa to see what I’m up to.

Published in
·CMS & Frameworks·JavaScript·Miscellaneous·Patterns & Practices·PHP·Web·November 4, 2013