
Qt is a cross platform application development framework with a long history and now maintained by the Qt Project. It enables developers to create applications and UIs for desktop, embedded and mobile operating systems. It provides a GUI (Graphical User Interface) for ease of development and allows creation of hybrid applications. Applications can be developed using C++ or the QML language, a JavaScript like language.
In this tutorial, we’ll get started with Qt framework and create a beginner’s application.
Source code from this tutorial is available on GitHub.
Key Takeaways
- Qt is a versatile application development framework, allowing developers to create applications and UIs for desktop, embedded, and mobile operating systems, with a GUI for ease of development and the creation of hybrid applications. It supports both C++ and QML language, a JavaScript-like language.
- The tutorial guides readers through setting up Qt, configuring it for Android development, and creating a simple calculator application for Android. It provides step-by-step instructions on creating the UI, implementing functionality, and adding validation to the code.
- Qt offers numerous benefits for cross-platform application development, including a single codebase for deployment across multiple platforms, support for various platforms including Windows, MacOS, Linux, Android, and iOS, a rich set of libraries and APIs, advanced GUI capabilities, and flexibility in language choice with support for both C++ and QML.
Setting up Qt
To get started with Qt, download the Qt installer for your operating system from the download page and run it. You can find more details related to installing Qt on various platforms in the official docs.
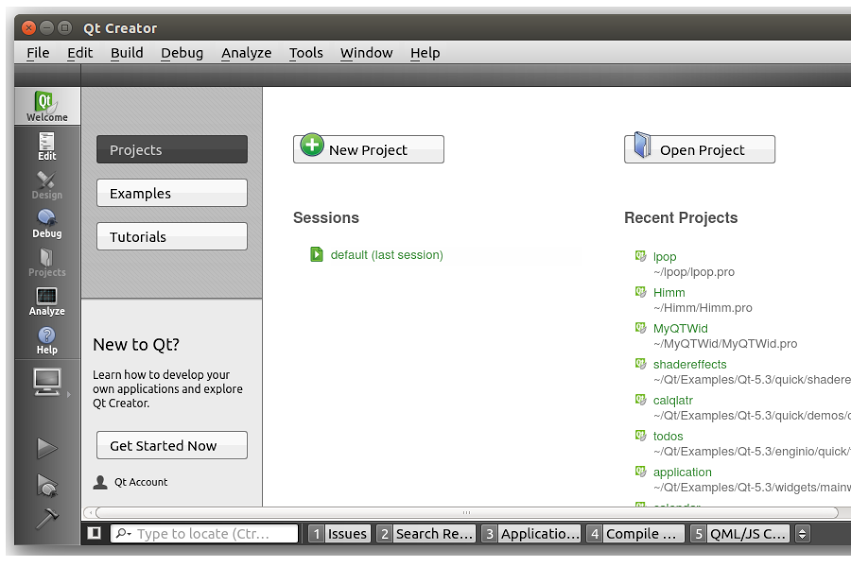
Once the installation is complete, open the application and here is how it should look:
Configure Qt for Android Development
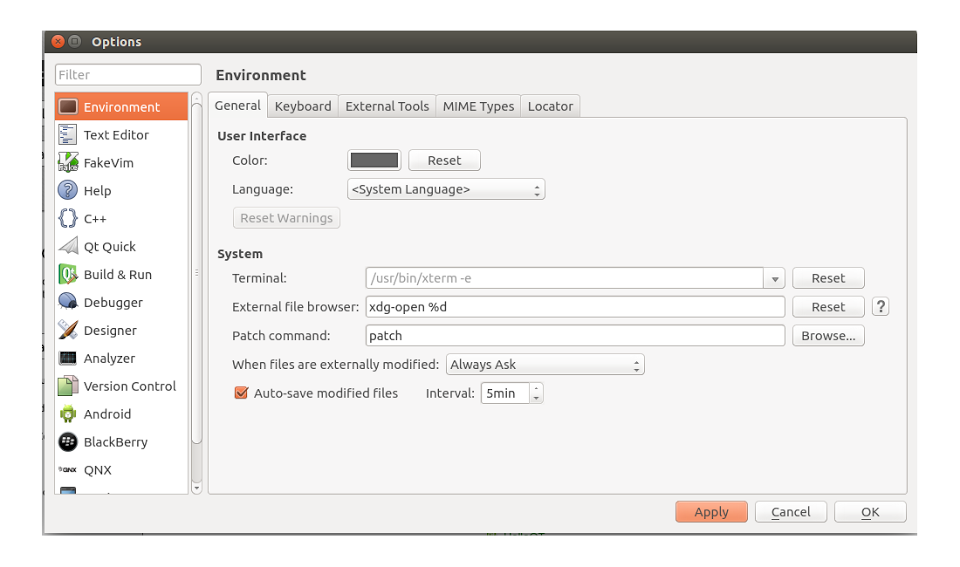
To get started with developing Android applications or widgets using Qt, we need to configure a few things first. Open the Tools -> Options (Application Menu -> Preferences on Mac) menu and you should see the screen below.
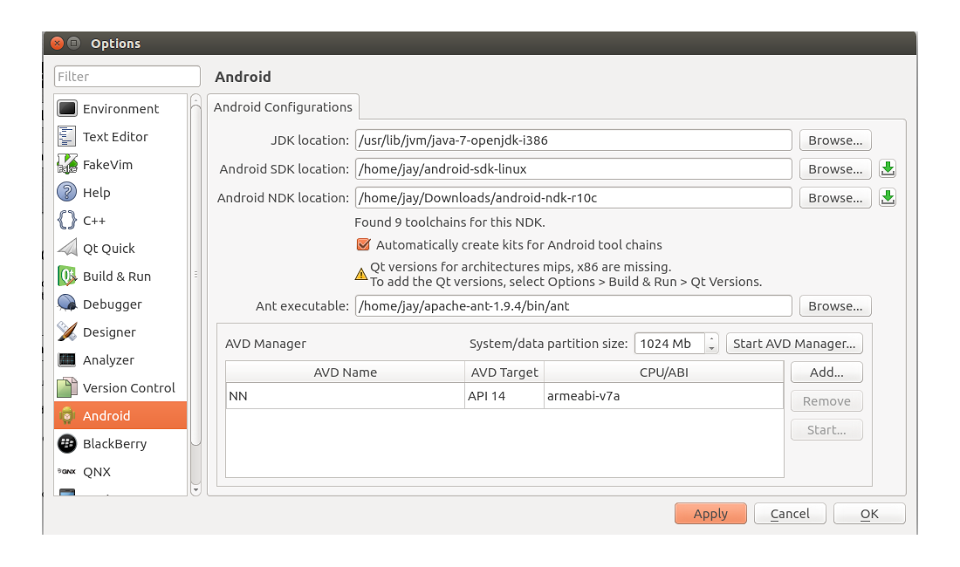
From the left hand side menu, select Android and configure the required paths to JDK location, Android SDK location, Android NDK location (you may need to download this) and Ant executable.
What we’ll be creating
In this tutorial we’ll create a simple calculator for Android. It will support addition, subtraction, multiplication and division.
Getting started
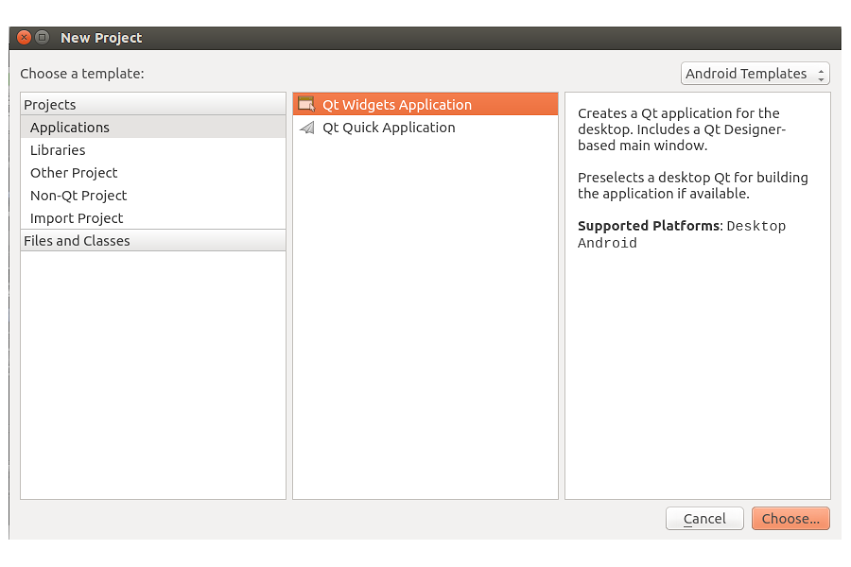
From the Qt Creator, open the File -> New File or Project menu item. From the window that opens, select an Applications project and then Qt Widgets Application as shown below:
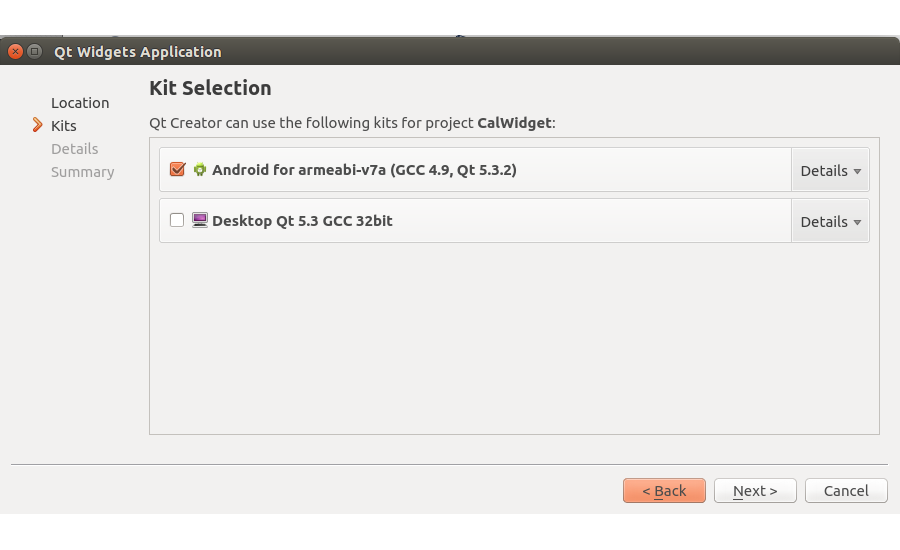
Click Choose… to proceed and on the next screen, name your widget as CalWidget and click next. On the next screen, select the Android kit and proceed (On some OSs, the ‘next’ button may be ‘continue’).
Next you’ll see the class information details screen. Rename the Class name to CalWidget. Click next to configure version control which is not required at the moment. Click Next and then Finish to create the project structure. Here is how the project structure should look now:
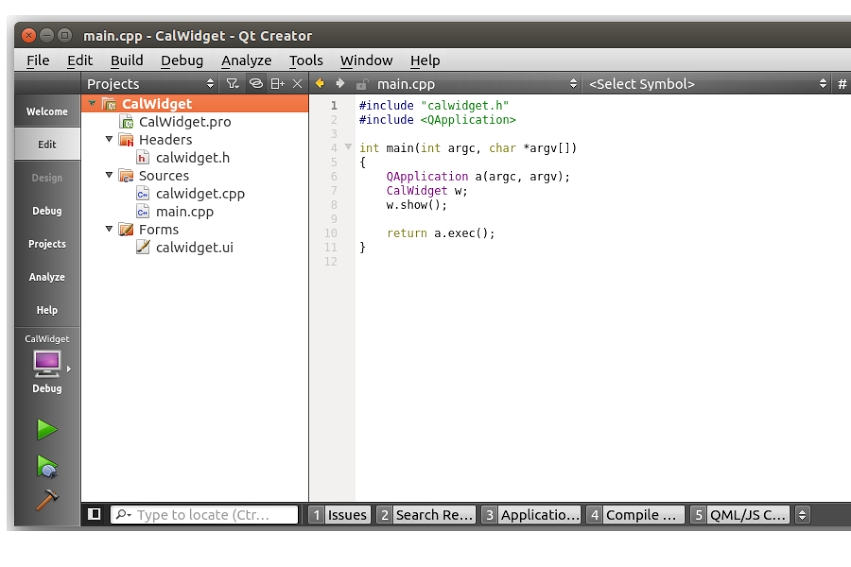
Some of the files we should see in the project are calwidget.h, calwidget.cpp, main.cpp and calwidget.ui. All these files already have some boiler plate code. First, we’ll create our UI and then return to these files to add our required functionality.
Creating the UI
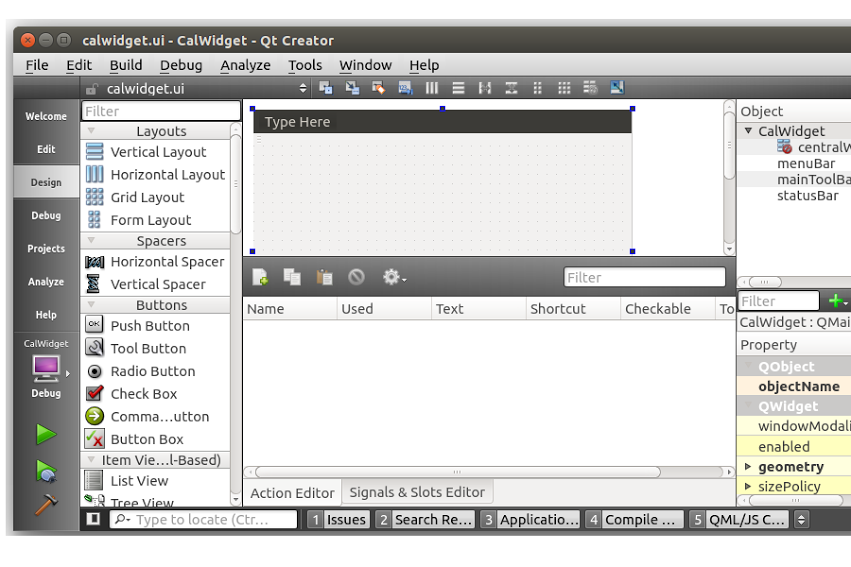
Qt Creator provides an interface where we can drag and drop controls on to the screen and create our UI. Double click on the calwidget.ui file (inside the Forms folder) and it will open up a screen with controls. Here is how it should look:
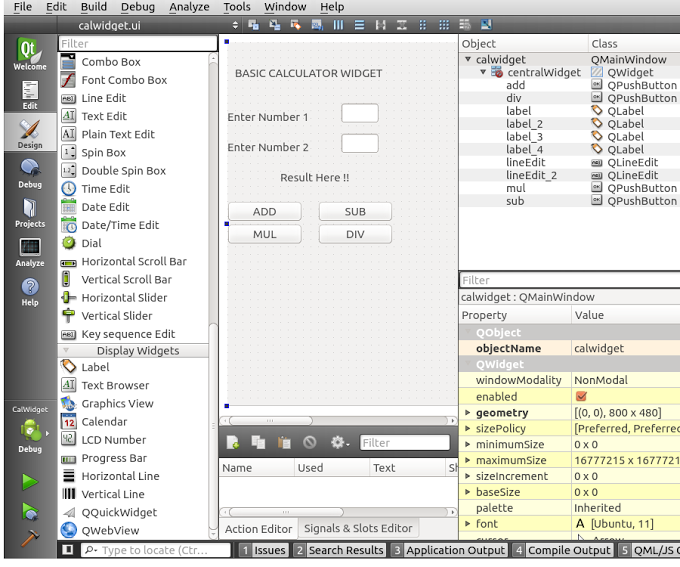
From the list of controls on the left hand side, try dragging and dropping controls onto the widget screen. We’ll need an input text control, label control and button control to create our UI. So drag and drop several Push Button, Label andLine Edit controls onto the widget screen to create a screen as shown:
To run the widget press Ctrl/Cmd+R and you should be able to see the widget running in the emulator.
If you get errors regarding missing button functions when building, Qt seems to hold on to old object names from the last build if you have renamed them. Open Headers -> calwidget.h and delete their references.
Implementing functionality
Next we’ll try to read data from the input text boxes and display the result based on the operation clicked.
To attach a click event to the push buttons, right click on the button and select go to slot, from the signals listed select the clicked signal. As you do, click event functions like below are generated in calwidget.cpp:
void CalWidget::on_btnAdd_clicked()

{

    // Code for Addition logic

}
When the operation button is clicked, we need to read the text value from the input text boxes. To access the elements in the UI, we’ll make use of the ui variable declared above. So the code to access any ui element by id is as follows:
ui->(*elementId*)->text()
Inside the add button click, read the input text box values, sum it and display the result in the lblResult label. Here is my add button click code:
void CalWidget::on_btnAdd_clicked()

{

    int input1,input2,result;
    // reading from input boxes

    input1 = ui->txtNum1->text().toInt();

    input2 = ui->txtNum2->text().toInt();
    // summing it up

    result = input1+input2;
    // Create a QString using the result

    QString qString = QString::number(result);
    // Assign result qString to lblResult label

    ui->lblResult->setText(qString);
}
Save your code and press Ctrl/Cmd+R to run the code. Input values into the text boxes, click Add and you should be able to see the output.
Here is the code for all the four click events :
// Add operation click event

void CalWidget::on_btnAdd_clicked()

{

    int input1,input2,result;

     // reading from input boxes

    input1 = ui->txtNum1->text().toInt();

    input2 = ui->txtNum2->text().toInt();

    result = input1+input2;
    // Assign result to lblResult label

    QString qString = QString::number(result);

    ui->lblResult->setText(qString);
}
// Sub operation click event

void CalWidget::on_btnSub_clicked()

{

    int input1,input2,result;

     // reading from input boxes

    input1 = ui->txtNum1->text().toInt();

    input2 = ui->txtNum2->text().toInt();

    result = input1-input2;
    // Assign result to lblResult label

    QString qString = QString::number(result);

    ui->lblResult->setText(qString);

}
// Mul operation click event

void CalWidget::on_btnMul_clicked()

{

    int input1,input2,result;

     // reading from input boxes

    input1 = ui->txtNum1->text().toInt();

    input2 = ui->txtNum2->text().toInt();

    result = input1*input2;
    // Assign result to lblResult label

    QString qString = QString::number(result);

    ui->lblResult->setText(qString);

}
// Div operation click event

void CalWidget::on_btnDiv_clicked()

{

    int input1,input2,result;

     // reading from input boxes

    input1 = ui->txtNum1->text().toInt();

    input2 = ui->txtNum2->text().toInt();

    result = input1/input2;
    // Assign result to lblResult label

    QString qString = QString::number(result);

    ui->lblResult->setText(qString);

}
Try running the app and check the output for all the implemented operations.
Next, we’ll add validation to our code to check for empty and non numeric values. An approach for checking validation is using QString. It provides certain built in libraries which makes validations easier. Instead of reading the input text values into integer variables, we’ll use QString variables. QString has an inbuilt function called isEmpty which we can use to check for empty values. To validate for both non numeric values and empty values, we’ll use the toInt() and toFloat() functions. Both the functions return 0 on trying to convert non-numeric strings.
Here is the modified code with validations included:
void CalWidget::on_btnAdd_clicked()

{

    QString input1,input2;

    int result;

    QString qString = NULL;
    // Read from input text

    input1 = ui->txtNum1->text();

    input2 = ui->txtNum2->text();
    int isNumber1 = input1.toInt();

    int isNumber2 = input2.toInt();
    // Check if numeric

    if(isNumber1 && isNumber2){

        result = input1.toInt()+input2.toInt();

        qString = QString::number(result);

        ui->lblResult->setText(qString);

    }

    else{

        qString = QString::fromStdString("Enter Valid Numbers");

        ui->lblResult->setText(qString);

    }
}
void CalWidget::on_btnSub_clicked()

{

    QString input1,input2;

    int result;

    QString qString = NULL;
    // Read from input text

    input1 = ui->txtNum1->text();

    input2 = ui->txtNum2->text();
    int isNumber1 = input1.toInt();

    int isNumber2 = input2.toInt();
    // Check if numeric

    if(isNumber1 && isNumber2){

        result = input1.toInt()-input2.toInt();

        qString = QString::number(result);

        ui->lblResult->setText(qString);

    }

    else{

        qString = QString::fromStdString("Enter Valid Numbers");

        ui->lblResult->setText(qString);

    }

}
void CalWidget::on_btnMul_clicked()

{

    QString input1,input2;

    int result;

    QString qString = NULL;
    // Read from input text

    input1 = ui->txtNum1->text();

    input2 = ui->txtNum2->text();
    int isNumber1 = input1.toInt();

    int isNumber2 = input2.toInt();
     // Check if numeric

    if(isNumber1 && isNumber2){

        result = input1.toInt()*input2.toInt();

        qString = QString::number(result);

        ui->lblResult->setText(qString);

    }

    else{

        qString = QString::fromStdString("Enter Valid Numbers");

        ui->lblResult->setText(qString);

    }

}
void CalWidget::on_btnDiv_clicked()

{

    QString input1,input2;

    float result;

    QString qString = NULL;
    // Read from input text

    input1 = ui->txtNum1->text();

    input2 = ui->txtNum2->text();
    float isNumber1 = input1.toFloat();

    float isNumber2 = input2.toFloat();
    // Check if numeric

    if(isNumber1 && isNumber2){

        result = input1.toFloat() / input2.toFloat();

        qString = QString::number(result);

        ui->lblResult->setText(qString);

    }

    else{

        qString = QString::fromStdString("Enter Valid Numbers");

        ui->lblResult->setText(qString);

    }

}
Conclusion
In this tutorial, we looked at how to get started with Qt by creating a simple application for the android platform. We only used some basic features of Qt, for in-depth information on Qt and its features, have a look at their official docs.
Would you use Qt? Do you feel it offers any advantages over other cross platform development options?
Frequently Asked Questions (FAQs) about Cross-Platform Applications with Qt
What are the benefits of using Qt for cross-platform application development?
Qt is a highly versatile tool for developing cross-platform applications. It offers a single codebase, which means you can write your code once and deploy it across multiple platforms. This significantly reduces the time and effort required for coding. Qt supports various platforms including Windows, MacOS, Linux, Android, and iOS. It also provides a rich set of libraries and APIs, which can help in creating powerful and feature-rich applications. Moreover, Qt’s advanced GUI capabilities make it an excellent choice for developing visually appealing applications.
How does Qt compare to other cross-platform development tools?
Qt stands out from other cross-platform development tools due to its comprehensive features and capabilities. Unlike many other tools, Qt supports both C++ and QML languages, offering developers flexibility in choosing the language they are most comfortable with. It also provides a robust set of libraries and APIs, which can help in creating powerful applications. Furthermore, Qt’s advanced GUI capabilities make it an excellent choice for developing visually appealing applications. However, it’s important to note that the choice of a development tool largely depends on the specific requirements of your project.
Is Qt suitable for mobile application development?
Yes, Qt is a great tool for mobile application development. It supports both Android and iOS platforms, allowing developers to create applications that can run on both platforms from a single codebase. Moreover, Qt’s advanced GUI capabilities make it an excellent choice for developing visually appealing mobile applications. It also provides a rich set of libraries and APIs, which can help in creating powerful and feature-rich mobile applications.
What are the main features of Qt?
Qt offers a wide range of features that make it a powerful tool for cross-platform application development. Some of the main features include support for multiple programming languages (C++ and QML), a single codebase for cross-platform development, a rich set of libraries and APIs, advanced GUI capabilities, and support for various platforms including Windows, MacOS, Linux, Android, and iOS.
How can I get started with Qt for cross-platform application development?
To get started with Qt, you first need to download and install the Qt SDK on your system. The SDK includes all the necessary tools and libraries for developing Qt applications. Once the SDK is installed, you can start creating your application using the Qt Creator IDE, which provides a user-friendly interface for coding, debugging, and testing your application. There are also plenty of tutorials and resources available online to help you learn how to use Qt effectively.
Is Qt free to use?
Qt offers both free and commercial licenses. The free version, known as the Open Source Edition, is available under the GPL and LGPL licenses and can be used for developing open-source software. The commercial version, on the other hand, is available under a paid license and offers additional features and support.
What kind of applications can I develop with Qt?
Qt is a versatile tool that can be used to develop a wide range of applications. This includes desktop applications, mobile applications, embedded systems, and even web applications. Its advanced GUI capabilities make it particularly suitable for developing applications that require a visually appealing user interface.
How does Qt handle different screen resolutions and sizes?
Qt provides a flexible layout system that automatically adjusts the size and position of widgets in response to changes in the size of the parent widget or the screen. This makes it easy to create applications that look good on different screen sizes and resolutions.
Can I use Qt with other programming languages?
While Qt is primarily designed to work with C++ and QML, it also provides bindings for other programming languages such as Python, JavaScript, and Rust. This means you can use Qt with your preferred programming language, making it a flexible choice for application development.
What kind of support is available for Qt developers?
Qt offers a variety of support options for developers. This includes comprehensive documentation, tutorials, and examples that can help you get started with Qt and learn how to use its various features effectively. There’s also a large and active community of Qt developers who can provide help and advice. In addition, commercial license holders have access to official support from The Qt Company.