Creating a Simple Windows 8 Game with JavaScript: Game Basics & CreateJS/EaselJS
This is the second in a series of four posts over four weeks that will show you how to create a simple Windows 8 game, using HTML5, JavaScript, WinJS, and CreateJS.
The first post was a quick introduction to the moving parts in a basic Windows 8 App. In this post, we’ll start creating a game in earnest.
Key Takeaways
- This tutorial guides through creating a simple Windows 8 game using HTML5, JavaScript, WinJS, and CreateJS, focusing on using CreateJS and EaselJS to simplify the process and manage the game loop and the drawing of image assets.
- The game is built using Visual Studio 2012, with the project named “CatapultWars” and using the “Blank App” template. Assets from the “Catapult Wars Lab” sample game are used, including images and sounds.
- The HTML5 canvas element is used to render the game and CreateJS is used to manage the game loop and the drawing of image assets. PreloadJS is used to load assets before the game starts, ensuring reliable image sizes at runtime.
- The tutorial includes steps to adjust the splash screen, add logos, add HTML5 canvas, initialize the game, add variables, initialize Canvas and use PreloadJS, use EaselJS to create and draw images, and add text to the game. The game’s mechanics, including motion, collision detection, scorekeeping, and the endgame, are covered in subsequent posts.
What Are We Building?
Here’s what the game looked like in the original XNA version:

We won’t go through adding all of these features, but we’ll get close!
Adding the Assets
Unless you’re creating the next great text-based adventure, you’ll probably need some images and sounds. In our case, we’re using ones already created in the “Catapult Wars Lab” 2D sample game. This tutorial was developed for XNA, but we want JavaScript, so let’s grab the graphics and sounds and get coding!
- Launch Visual Studio 2012 and create a project named “CatapultWars”, using the “Blank App” template from the JavaScript –> “Windows Metro style” templates.
- Download and extract the “Catapult Wars Lab” sample (CatapultWars_4_0.zip)
- From a Windows Explorer view of the folder, select and drag all four folders from the
/Assets/Media/Texturesfolder and in Visual Studio, place them under the images folder. (This will copy and add them to the project.) - Create a new folder called
soundsin the root of the project. - Copy the files from
/Assets/Media/Soundsto the newsoundsfolder.
Your project should look like this:
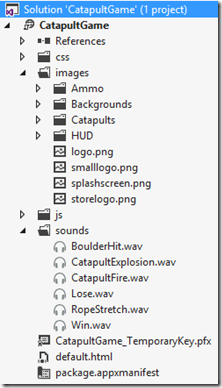
Now that we have some assets, let’s put them to use.
The Splash Screen & Logos
Notice that when you run the game, you first see an “X” in a square? That’s the splash screen, by default showing the /images/splashscreen.png image, but we can do better. To adjust the splash screen, double-click the package.appxmanifest:

The file /images/Backgrounds/gameplay_screen.png is what we want to use, but the image must be 620×300 pixels. So, open the image in your favorite editor, resize and save as title_screen_620x300.png. Add that new file into the project.
Now we can set the Splash screen field to imagesBackgroundstitle_screen_620x300.png. While we’re here, pick whatever background color you’d like to complement the image (e.g. darkGray). Now when run, the game greets us with a new splash screen:
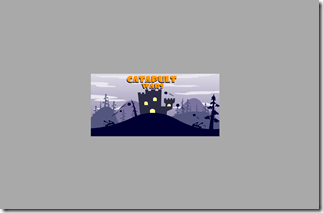
We can also adjust the app’s tile, which by default looks like this:

Also in the app manifest, we see a number of places for logos. We can add 150×150, 310×150, and 30×30 logos for use in various places.

Now we have square and wide format custom tiles:


Looks good! Now if only we had a game to play…
Adding the HTML5 Canvas
First, we’re going to need something to display the game. The HTML5 canvas element is essentially a sandbox of pixels that you can draw to dynamically. We’re going to use a canvas to render the game, so we need to add it to our HTML page. Open default.html and replace Line 17 (the Content goes here line) with a canvas tag, so it looks like this:

Normally, you’d specify width & height and add fallback content in case canvas isn’t supported, but we’ll set width/height later and we know canvas will be supported. However, this is just one of the many times you should consider coding practices in case you want to reuse some of your app code as a traditional web application – but that’s a story for another series of posts…
Making Things Easier with CreateJS
So how do we add things like our background and catapults? Unlike HTML content, canvas content is entirely created via JavaScript instructions. For the basics, read “How to draw on an HTML5 canvas” on MSDN.
Of course, we could use canvas methods to draw our game directly, but there are libraries of JavaScript out there to help, including ones well-suited to game development. CreateJS is a set of JavaScript libraries & tools, including EaselJS, PreloadJS, and others. We’ll use these in our game, so download EaselJS and PreloadJS, create a new folder for them as /js/CreateJS, and copy in the scripts (from the lib folders) as follows:

Adding the JavaScript files to the project isn’t enough to use them, so reference them from default.html:

Tip: You can add script references by dragging the script from Solution Explorer onto the page. (Extra Tip: in HTML5, you don’t need the type="text/javascript" script attribute anymore.)
We’ll use PreloadJS to help load assets before to use in the game and EaselJS to make it easier to manage the game loop and the drawing of image assets.
Starting the Game
To start the game, we need to know when the page is ready to run. For that, we use the DOMContentLoaded event to tell us when the page structure has been loaded and scripts are ready to run. This is different from the onload event, which waits for all referenced content to be downloaded.
In default.js, add an initialize() function and have it called by DOMContentLoaded. While we’re at it, let’s add the basis of the game loop as well:

Note: the app.oncheckpoint function is collapsed to make things easier to read.
Variables
To work with the canvas, store images, and create bitmaps, we’re going to need a bunch of variables. Also, because the original game assumed a 800×480 screen, we need to scale the images we draw to the actual screen size.
Add the following variables to default.js:
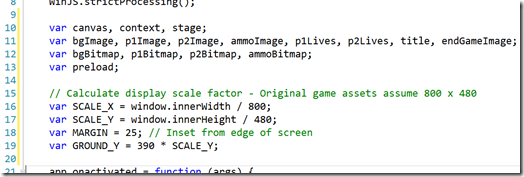
Initializing Canvas and Using PreloadJS
Earlier, I’d mentioned canvas is only updated via JavaScript. To connect to the canvas, you need to first find the element, then retrieve it’s 2D context. That context exposes the drawing functions. We’ll also scale the canvas to match our full screen size.
Update initialize() as follows:

Now we need to load our images so we can draw them to the canvas. There are many ways to do this, but PreloadJS is helpful because we can list what we’ll use and it ensures they are loaded before we reference them. If we don’t do this, we may not reliably get details like image sizes at runtime, creating bugs.
PreloadJS works by reading an array of resources, then calling a function when complete. We’ll specify all of the images we’ll be using.
Extend the initialize() function as follows:
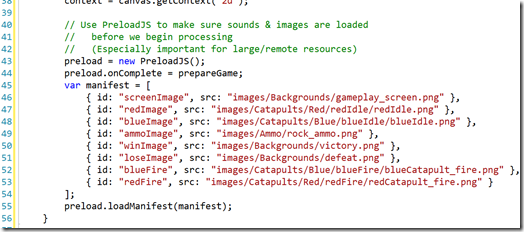
When PreloadJS has readied our assets, the prepareGame() method will be called.
Using EaselJS to Create and Draw Images
Now we need to get those images to the screen (via the canvas). Fortunately, EaselJS has a number of features we’ll find useful:
- A Stage class that manages the canvas and the scene we’re drawing
- Bitmap, Text, and SpriteSheet classes, useful for representing items to draw
- Point class to help position items on the canvas
- A Ticker class to help manage the game loop (think of it as the heartbeat of the game)
We’ll get to the Ticker a bit later, but now let’s add the Stage so we can start populating it with content. In default.js, add the following to the initialize() function:

This creates the stage and connects it to our game’s canvas element. Now we can add items (called children) to the stage.
Right below the initialize() function, add a prepareGame() function. (Remember we told PreloadJS to call prepareGame when it’s done loading assets.) For now, let’s just add one item – the background:
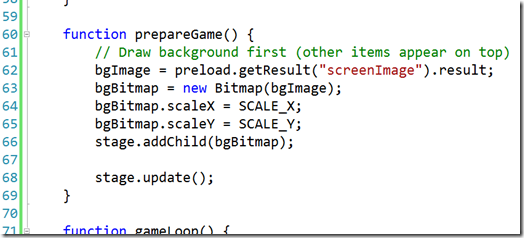
What’s going on here?
- Line 62 –
preload.getResult()is asking PreloadJS for the image it has already loaded for us - Line 63 – Create an EaselJS
Bitmapinstance, using the image as it’s source - Lines 64 & 65 – Scale the
Bitmapto the resolution of our screen (relative to 800×480 of the original assets) - Line 66 – Add the
Bitmapto theStageas a child - Line 68 – Ask the
Stageto tell the canvas about everything it knows
Let’s run the game. After the splash screen, we now see:

A Quick Change with CSS
As you can see, the background image we added is transparent, so our background color is showing through. The black background is spooky, but quite not what we’re looking for.
One thing we can do is to change which WinJS CSS base we’re using. By default, we use ui-dark.css, but a quick change in default.html to point to ui-light.css, and things automatically pick up new styles:

A quick run now shows:

However, let’s try for a more sky-like color… say, “azure”. We can override the WinJS background color by setting our own via CSS. Open /css/default.css and change the body style as shown:

Running again:

A beautiful sky, ready for war!
Adding the Remaining Assets
Now that you’ve seen how to add the background. It’s mostly a matter of repetition to include the others (with a bit more math thrown in.) Head back to default.js and include the following in prepareGame():
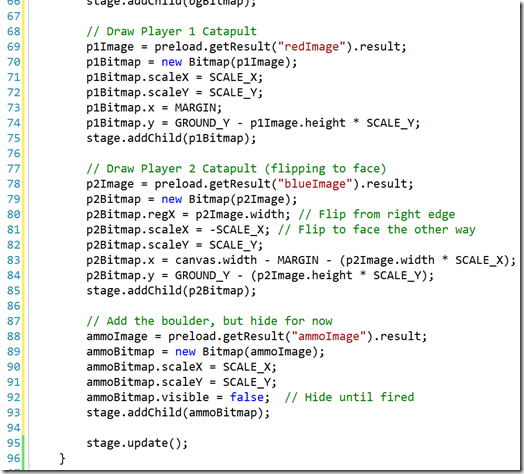
A few notes on this:
- The catapults appear at “ground level” which we need to scale along with the overall size of the images
- Drawing player 2’s catapult is tricky because we need it to face the other direction. Using
regXto set a transform point and setting a negative scale gets the job done. - We create and add the ammo (boulder) image, but hide it until it’s fired later.
Adding Some Text
To wrap things up for this post, let’s use EaselJS’s Text class to add a game title along with indicators for each player’s remaining catapults. First, we’ll need a few variables near the top of default.js:

Then, add the following to prepareGame();
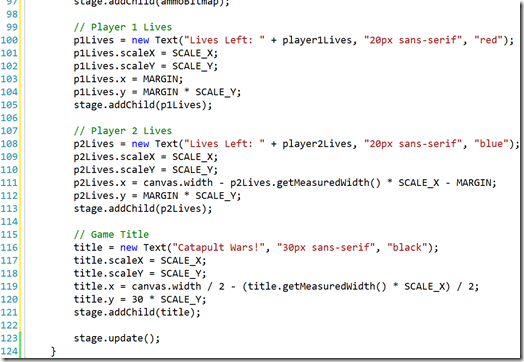
To the Stage, Text instances are children just like the Bitmaps we added earlier.
What does the game look like now?

What’s Next?
Things are looking pretty good, but unfortunately that’s about it – nothing’s moving. In the next post, we’ll dive in to the game’s mechanics, fleshing out the game loop by adding motion, collision detection, scorekeeping, and the endgame.
Frequently Asked Questions about Creating a Simple Windows 8 Game with JavaScript
How can I start creating a game using JavaScript?
To start creating a game using JavaScript, you need to have a basic understanding of HTML, CSS, and JavaScript. Once you have these basics, you can start by setting up your development environment. This includes a text editor like Sublime Text or Visual Studio Code, and a browser for testing your game. You can then start by creating a simple HTML page, linking your JavaScript file, and then start writing your game logic.
What libraries can I use to create a game in JavaScript?
There are several libraries you can use to create a game in JavaScript. One of the most popular ones is CreateJS/EaselJS, which is used in the tutorial on our page. Other libraries include Phaser, Pixi.js, and Three.js. Each of these libraries has its own strengths and weaknesses, so you should choose one that fits your needs.
How can I handle user input in a JavaScript game?
Handling user input in a JavaScript game can be done using event listeners. You can listen for keypress events for keyboard input, and click or touch events for mouse or touch input. You can then use these events to control your game characters or elements.
How can I create game animations in JavaScript?
Creating game animations in JavaScript can be done using the requestAnimationFrame function. This function allows you to create smooth animations by calling a function before the next repaint. You can also use libraries like CreateJS/EaselJS, which provide easier ways to create animations.
How can I add sound to my JavaScript game?
Adding sound to your JavaScript game can be done using the HTML5 Audio API. You can create new Audio objects, load sound files, and then play them when needed. You can also control the volume, loop sounds, and more.
How can I create a game loop in JavaScript?
A game loop in JavaScript can be created using the requestAnimationFrame function. This function calls a specified function before the next repaint, creating a loop. Inside this loop, you can update your game elements, draw them, handle user input, and more.
How can I detect collisions in a JavaScript game?
Detecting collisions in a JavaScript game can be done using bounding box collision detection or pixel-perfect collision detection. Bounding box collision detection checks if the bounding boxes of two elements overlap, while pixel-perfect collision detection checks if the actual pixels of the elements overlap.
How can I optimize my JavaScript game for better performance?
Optimizing your JavaScript game for better performance can be done in several ways. This includes minimizing DOM manipulation, using requestAnimationFrame for animations, optimizing your images and sounds, and more.
How can I make my JavaScript game responsive?
Making your JavaScript game responsive can be done using CSS media queries and JavaScript. You can use media queries to adjust your game layout based on the screen size, and use JavaScript to adjust your game logic based on the screen size.
How can I debug my JavaScript game?
Debugging your JavaScript game can be done using the browser’s developer tools. You can use the console to log messages, the debugger to step through your code, and the profiler to check your game’s performance.
Chris Bowen is a Principal Technical Evangelist with Microsoft, based in the Boston area and specializing in Windows 8 development. An architect and developer with over 19 years in the industry, he joined Microsoft after holding senior technical positions at companies including Monster.com, VistaPrint, and Staples. He is coauthor of two books (with Addison-Wesley and WROX) and holds an M.S. in Computer Science and a B.S. in Management Information Systems, both from Worcester Polytechnic Institute.
Published in
·Design Patterns·Extensions·Libraries·Miscellaneous·Patterns & Practices·PHP·December 16, 2015

Published in
·APIs·Authentication·CMS & Frameworks·Frameworks·Laravel·Libraries·PHP·Web Services·July 22, 2016

