Wrap Dazzling Effects Around Your Subject in Photoshop

Key Takeaways
- Photoshop’s versatility allows users to create dazzling effects that can turn a mundane photo into an eye-catching design. With careful use of layers, masks, and adjustment tools, these effects can be made to look realistic and integrated with the image.
- To create a glowing effect around a subject, the subject needs to be isolated on its own layer. The Quick Selection Tool and the “Refine Edge” option can be used to achieve this. The glow effect can then be added using a soft edge brush and the “Stroke Path With Brush” function.
- The glow effect can be enhanced by adding layer styles, such as “Inner Glow” and “Outer Glow”. Adjusting the settings of these styles can create a more vibrant and realistic glow. The glow effect can then be masked to integrate it with the image and give the impression of light spiraling around the subject.
- Additional effects, such as a particle effect, can be added using a custom brush. The brush’s settings can be adjusted to create a randomized effect, adding depth and variation to the final image. These effects can be masked and integrated with the image in the same way as the glow effect.
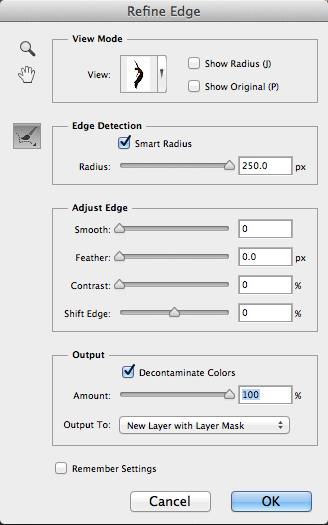
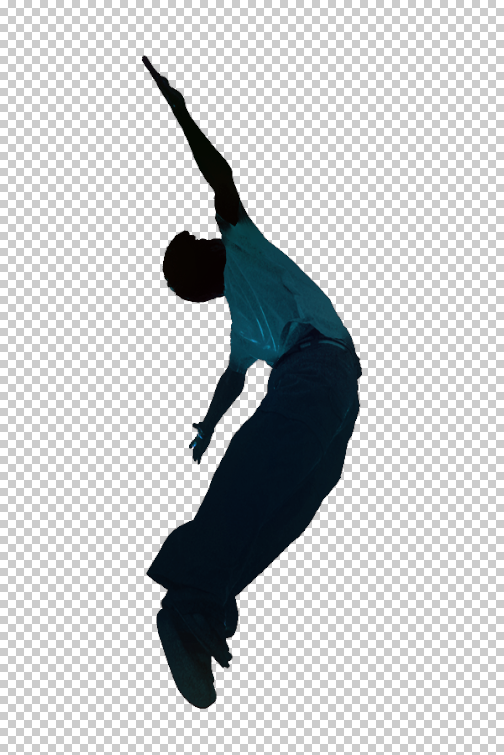
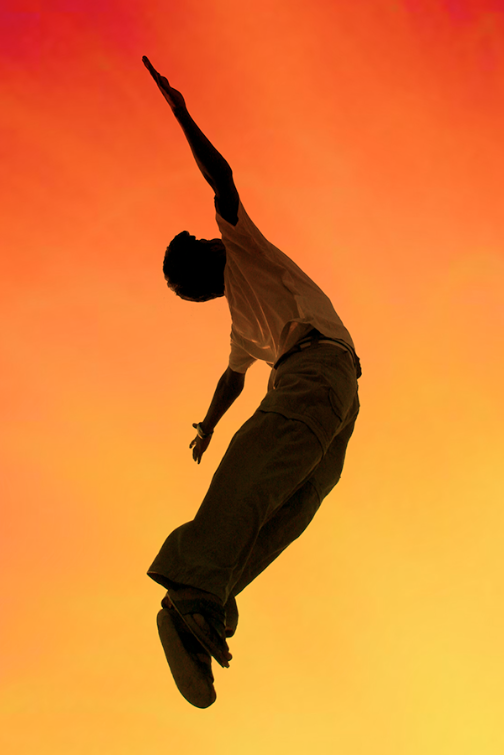 To do that, select the Quick Selection Tool and click and drag over the person to make a selection. Hold shift and add to the selection until you have selected the entire body. Next, choose “Refine Edge” and select on the “Smart Radius” option. Bump up “Smart Radius” all the way, then check the “Decontaminate Colors” option and bump that value all the way up as well. Set the output to New Layer with Layer Mask and click “OK.”
(Note: For more on these selection techniques, check out Making Complex Selections in Photoshop and Mastering Complex Selections in Photoshop.)
To do that, select the Quick Selection Tool and click and drag over the person to make a selection. Hold shift and add to the selection until you have selected the entire body. Next, choose “Refine Edge” and select on the “Smart Radius” option. Bump up “Smart Radius” all the way, then check the “Decontaminate Colors” option and bump that value all the way up as well. Set the output to New Layer with Layer Mask and click “OK.”
(Note: For more on these selection techniques, check out Making Complex Selections in Photoshop and Mastering Complex Selections in Photoshop.)
 You’ll notice that if you look closely, parts of the subject’s skin are transparent. You can’t really see much detail in the image at this point, but the following trick will work for this image. Hit Command/Ctrl + “J” to duplicate the layer several (4-5) times. You can hit Command + “E” to merge the current layer to the one below it, so start at the top of your stack of copies. Photoshop will ask you if you want to preserve the mask or apply it before merging. Select that you want to apply it. If you don’t, you’ll end up with the same results as when you started.
 We want to remove the orange colorcast over the image. We can do that by clicking the “New Fill or Adjustment Layer” icon and choosing “Hue/Saturation.” Move the Hue slider to the left or right until the hue changes to a cool blue.
 Next, we can place a background behind our subject. Create a new layer below your person layer and fill it with black. Next, fill the background with a texture, which you can find almost anywhere online. I chose a dark, grungy background and changed the opacity of the texture layer to 10-15%.
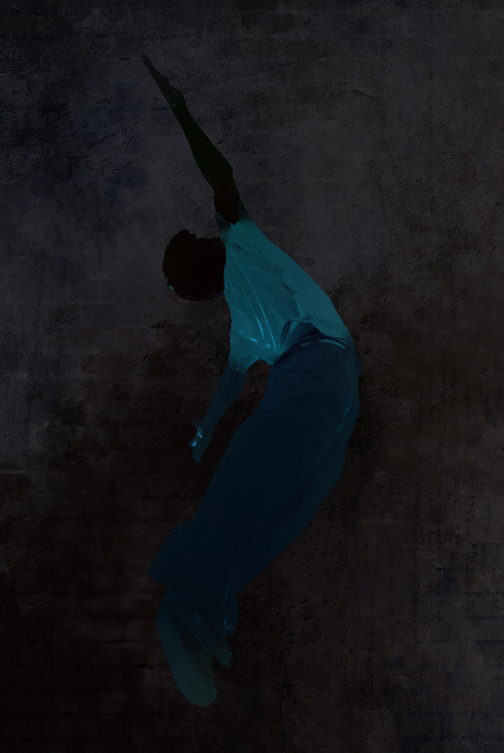 It is okay if the subject tends to look too dark against the background; we will be adding effects to make our subject stand out. Select the Pen Tool, and begin drawing a wavy line that goes back and forth over our subject, which should look like the example below.
 When using the Pen Tool, wherever you want to have a curve, place a point. Then, you can control the contour of the curve to match your subject by using the Direct Selection Tool to pull and refine each curve within your line. Once you are happy, double-click the path in the Paths panel and save your path, naming it something you will recognize later. You will want to do this each time you create a separate color beam, in case you want to go back and add effects that enhance the beam and follow the same path. Next, click the Brush Tool and bring up your brush options.
 Select a soft edge brush sized between 5 and 10px. It’s important that the brush has soft edges for our glow effects to work. Create a new layer above all of the other layers. Make sure that our path is active in the Paths panel, make sure the Brush Tool is active with our soft edge brush in the Tools panel. Within the Paths panel, click the second icon, called “Stroke Path With Brush.”
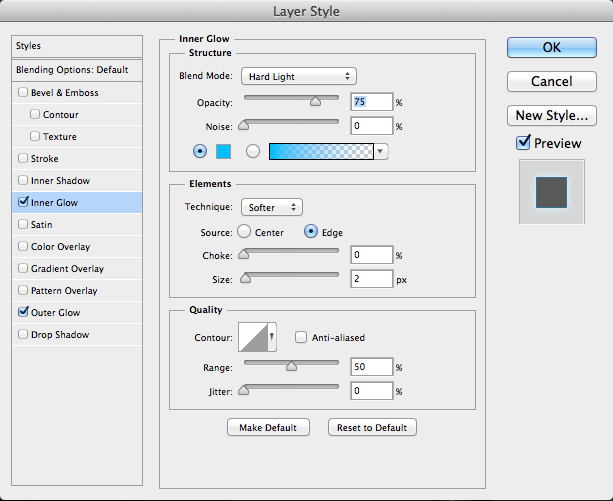
 Adding glow effects is as simple as adding layer styles, since we are working with white on its own layer. Double-click the layer to bring up the “Layer Styles” options. Click on “Inner Glow,” set the color to a bright blue, and set the blend mode to “Hard Light.” Since out brush was only roughly 5 to 10px in size, we want to make sure that our inner glow is only around 2 to 3px, so that the center of the glowing line is white, which makes for a more realistic look.
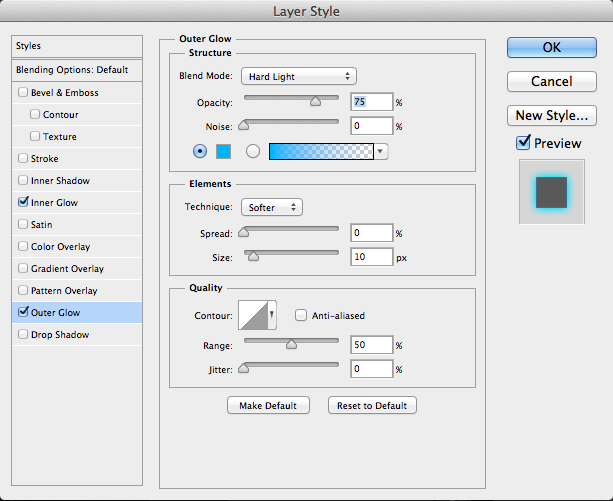
 Next, choose “Outer Glow” and choose the same blue as before. Choose “Hard Light” as your blend mode, set the spread to 0, but bump the size up to around 10px. This will create a vibrant glow, which is what we are looking for. Click “OK.”
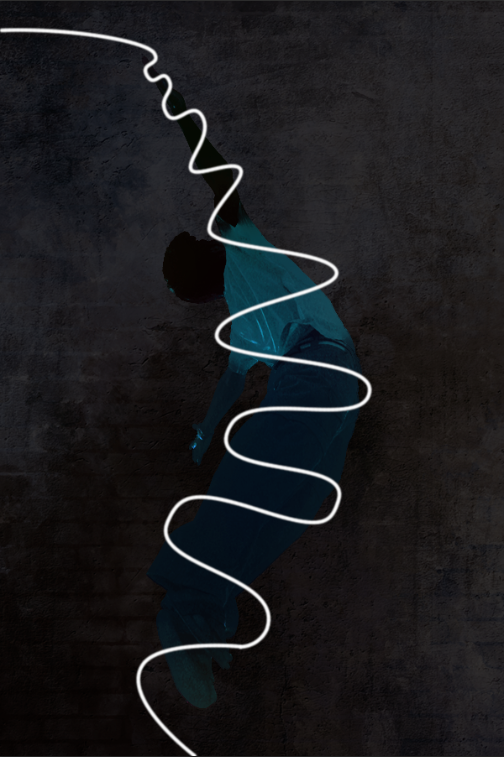
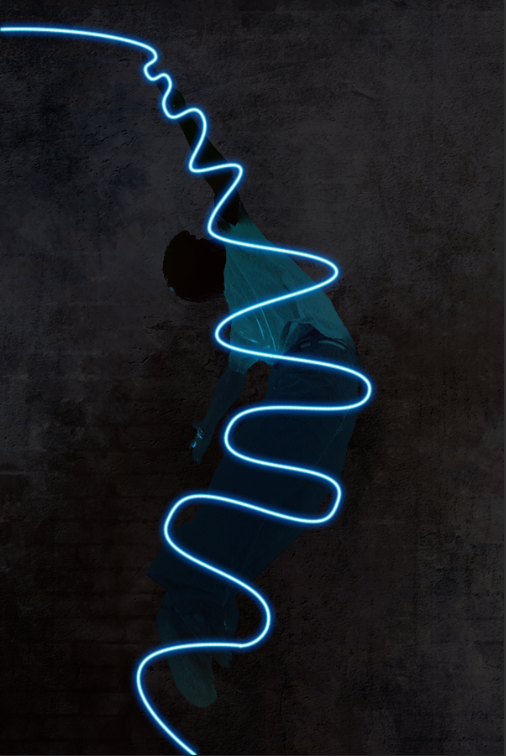
 Your glow effect should look like this so far:
 At this point, we just have a glow effect that looks like it was draw on top of our image. It doesn’t look truly integrated, but with a mask, we can fix this problem quickly and easily. The easiest way to create your mask is to find the layer with the person (where we had extracted him from the background earlier) and load the shape of the body as a selection. Command/Ctrl-Click on the Layer Preview icon to load the body shape as a selection. With that loaded, make the glow effect layer active by single clicking on it, and then click on the Layer Mask icon at the bottom of the Layers Panel.
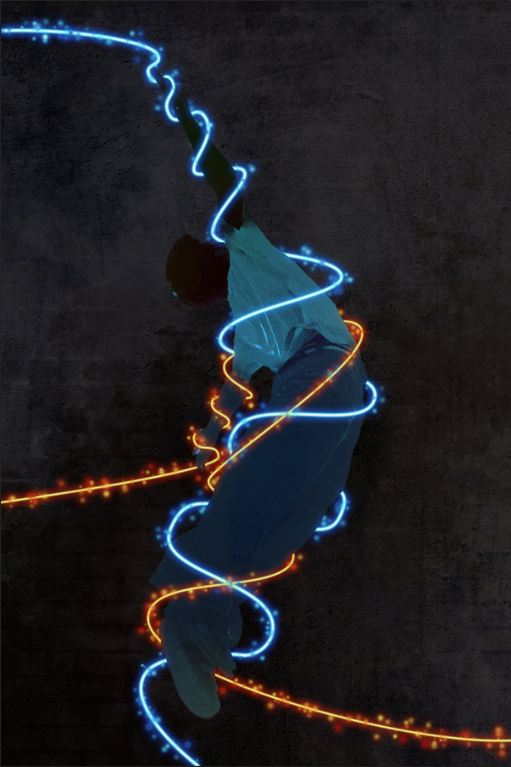
 This is opposite of the effect that we want, so click on the Layer Mask Icon for this layer and hit Command/Ctrl+ “I” to invert the mask. The result below is better, but we still have a little work to do.
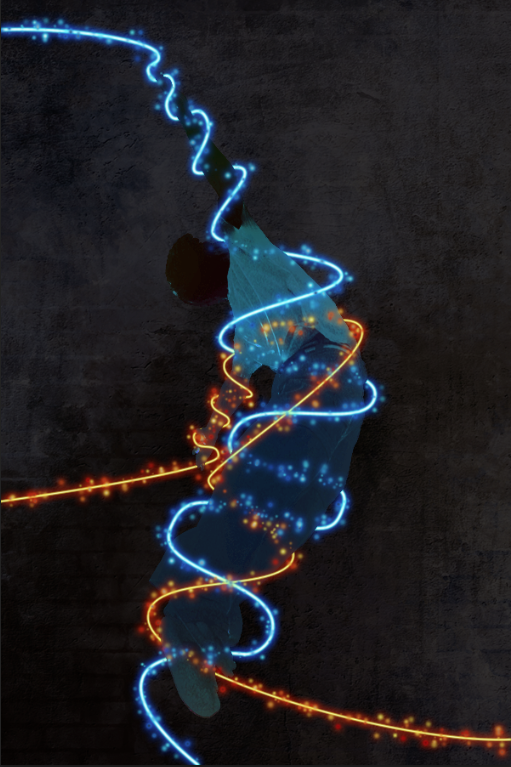
 With the mask still active, select a brush that is slightly larger than the beam itself, and choose white to reveal the glow. Alternate the bands that you paint back in with your brush, which will give your subject the look of having a beam of light spiraling around him. Brush in a beam, skip the next one, brush in the next, etc. You should end up with results similar to the example below.
 Repeat the entire process again, but this time use a different color that contrasts well with the blue, such as orange. Weave the effect inside and outside of the body, brushing in areas and masking out others. Try to integrate the other arm and work it into the layout for the orange beam.
 This effect is interesting so far, but we can make it even better by creating our own custom brush to add particles to our glow effect. Select the Brush Tool and select the default soft edge brush with 0% hardness. Open the Brush panel to select different settings for a custom brush. Select “Brush Tip Shape,” increase the size to around 215px, and increase the spacing to around 120%. You can preview your settings at the bottom of the panel.
 Next, go to “Shape Dynamics” and increase “Size Jitter” to 100%. Set “Control” to “Off” for all values. We want to create a randomized, different effect every time we click our mouse, or use our tablet stylus.
 Under “Scattering,” increase the value to 180%, the “Count” to 3, and the “Count Jitter” to 40%, so that the particle effect scatters and spreads across each stroke in a randomized manner, giving the effect a more natural and less uniform look. When you make an effect look less uniform and appear more natural, it adds to the realism and visual appeal of the effect.
 Click on “Color Dynamics” and set both “Hue Jitter” and “Brightness Jitter” to 100%.
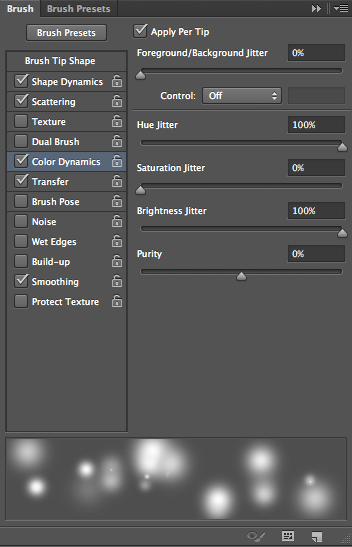 Click on “Transfer” and set the “Opacity Jitter” to 80%. This will add depth, because the particles that have a lower opacity will seem to fade further back in the image. The previous settings (“Hue Jitter” and “Brightness Jitter”) will make some particles brighter and some darker, further adding variation and depth in your effects.
(Note: For more ways to build your own custom Photoshop brushes, check out Create Your Own Custom Photoshop Brushes in Phothshop.)
Click on “Transfer” and set the “Opacity Jitter” to 80%. This will add depth, because the particles that have a lower opacity will seem to fade further back in the image. The previous settings (“Hue Jitter” and “Brightness Jitter”) will make some particles brighter and some darker, further adding variation and depth in your effects.
(Note: For more ways to build your own custom Photoshop brushes, check out Create Your Own Custom Photoshop Brushes in Phothshop.)
 Create a new layer above the other layers and with your Brush Tool active, and go to the Paths panel, making one of the previous paths active. Lower your brush size to around 15px, and click “Stroke Path With Brush” to create some nice particle effects. Right-click on a layer with the same color glow effects that you are following, and choose, “Copy Layer Styles.” Right-click on your other particle layer and choose “Paste Layer Styles.” They will take on the same glow attributes as your light beams. Repeat this process, creating a new layer for each particle effect until you have added particle effects to all of your beams. They’ll have identical effects but complementary colors.
 Now, we just need to mask the particle effects, in the same manner that we did with the beams. Command/Ctrl + click on the layer mask of each corresponding beam to load the mask as a selection. Then, go to the particle layer mask to create a replica of the layer mask for that beam. This will save you from having to paint out all of the particles, since we’ve already masked all of the beams.
 Our final task will be lightening the background in order to increase contrast between the figure and the background. I had kept it a little darker for the purpose of making our effects easier to see. Go to the background texture layer and raise the opacity to 40%, but lower the fill to 55%. This will lighten the background enough to make the subject show up much more distinctly.

Conclusion
Photoshop isn’t purely for photography; creating effects is a big part of why artists and designers use Photoshop. The difference between good effects and great effects can sometimes be as simple as masking areas so that they appear to vanish behind other objects. These techniques gives your effects dimension, and keep them from looking flat and “pasted in.” Masks are a great way of achieving these effects without destroying your effect altogether. You can literally paint in effects so that they match the contour of your subject and fit the overall scene much better.Frequently Asked Questions about Wrapping Dazzling Effects Around Your Subject in Photoshop
What are the basic steps to wrap an image in Photoshop?
The basic steps to wrap an image in Photoshop involve opening the image in Photoshop, selecting the area you want to wrap, and then using the Warp tool to manipulate the image. You can adjust the shape and size of the warp by dragging the control points, lines, or areas within the warp grid. Once you’re satisfied with the warp, you can apply the changes and save your image.
How can I create a dazzling effect in Photoshop?
Creating a dazzling effect in Photoshop can be achieved by using various tools and filters. One popular method is to use the Lens Flare filter, which can add a bright, star-like effect to your image. You can also use the Glowing Edges filter to create a neon-like glow around your subject. Experiment with different tools and filters to create a unique dazzling effect.
Can I wrap text around an image in Photoshop?
Yes, you can wrap text around an image in Photoshop. This can be done by creating a path around the image and then using the Text tool to type your text along the path. You can adjust the path and the text as needed to achieve the desired effect.
How can I create a 3D effect in Photoshop?
Creating a 3D effect in Photoshop can be done by using the 3D tools and options. You can create 3D objects, add 3D effects to your images, and even create 3D animations. The 3D tools in Photoshop allow you to manipulate 3D objects in a 3D space, giving your images a realistic three-dimensional look.
What is the Warp tool in Photoshop and how do I use it?
The Warp tool in Photoshop is a powerful tool that allows you to distort an image by dragging control points, lines, or areas within the warp grid. To use the Warp tool, select the area of the image you want to warp, then choose Edit > Transform > Warp. You can then manipulate the image by dragging the control points, lines, or areas within the warp grid.
How can I improve the quality of my images in Photoshop?
Improving the quality of your images in Photoshop can be done by using various tools and techniques. You can adjust the brightness, contrast, and color balance of your images, use the Sharpen tool to enhance details, and use the Blur tool to soften certain areas. You can also use filters to add special effects to your images.
Can I use Photoshop to create animations?
Yes, you can use Photoshop to create animations. Photoshop’s animation tools allow you to create frame-by-frame animations, add transitions between frames, and even create 3D animations. You can also export your animations as GIFs or videos.
How can I add a background to my image in Photoshop?
Adding a background to your image in Photoshop can be done by using the Layers panel. You can add a new layer behind your image and fill it with a color, gradient, or pattern. You can also use the Selection tools to select the area of the image you want to replace with a background.
Can I use Photoshop to edit videos?
Yes, you can use Photoshop to edit videos. Photoshop’s video editing capabilities include trimming and splitting video clips, adding transitions between clips, and adding text and special effects. You can also adjust the color and lighting of your video clips.
How can I save my work in Photoshop?
Saving your work in Photoshop can be done by choosing File > Save or File > Save As. You can choose to save your work as a Photoshop file (.PSD) to preserve your layers and effects, or you can choose to save it as a JPEG, PNG, or other image format for sharing or printing.
James George is a professional web developer and graphic designer. James is an expert in design, and a professional web developer, with a special interest in WordPress. Founder of Design Crawl, James has been a professional designer since 2005.