

Photoshop lets you add horizontal and vertical text easily to your images. One of the most exciting ways to use type is to wrap it around a path. You can add the type to an open or closed path you’ve drawn with the Pen tool or to a shape such as the rectangle, ellipse or polygon and the Custom Shape tool offers literally hundreds of vector shapes to play with. When you attach text to a path, both the
text and the path remain editable, so you can reshape the path and resize or recolor the text as you want. Here’s how to do it.
Here’s how to attach text to a custom shape:
1. Draw a path using the Pen tool. The direction you draw the path determines which direction the text will flow.
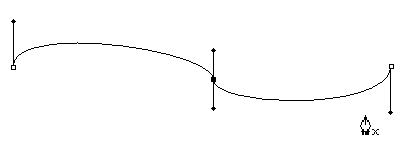
2. Select the Horizontal Type tool from the toolbox and then hover your cursor above the path edge. You’ll see a wavy line appear beneath the I-beam cursor. This tells you that it recognizes the path you’re about to attach the text to. Click once and then start typing.
3. You can use any of the alignment buttons in the Options bar or Character panel to align the text on the path.

![]()
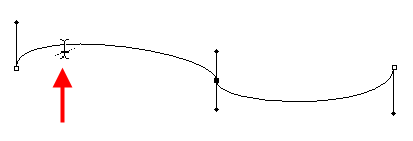
4. You can slide the text back and forth along the path, or flip it from the top of the path to the bottom, using the Path Selection tool (the black arrow below the Type tool) to select it.

When a tiny, right-facing arrow appears next to your cursor, drag to the left or right to move the text. To flip the text to the opposite side of the path drag your cursor below the path.
If your text disappears, that means the space between the start and end points is too small to hold all of your text. You can fix this by adjusting one of the points or change the text size to make it fit.
Just switch back to the Type tool or double-click the Type layer’s thumbnail in the Layers panel and then make a selection.
5. Sometimes the letters will appear too close together and you may need to adjust the Kerning of individual letters or the Tracking of all letters in the Character panel to stop them colliding in tight spaces.

6. To make the text sit above or below the path rather than directly on it, adjust the baseline shift in the Character palette.
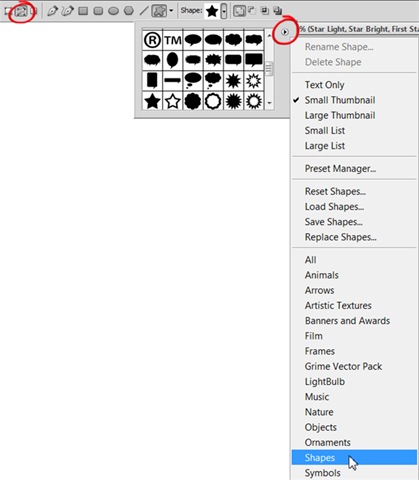
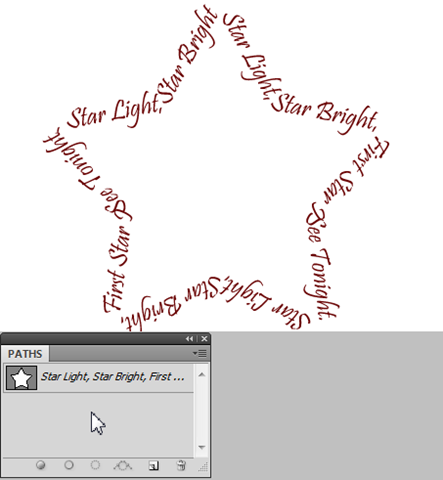
7. The Custom Shape tool offers tons of shapes to play around with. Select the Custom Shape tool from the toolbox. It is hidden under the Rectangle shape tool. On the tool options bar, set the Custom Shape option to Path and on the Shape drop down box, choose a Star shape. If you can’t see a Star shape choose Shapes from the Context Sensitive menu (small triangle).
8. Drag out the Star shape, then use the Horizontal Type tool to add some type. I used Pristina, size 28 set in red.
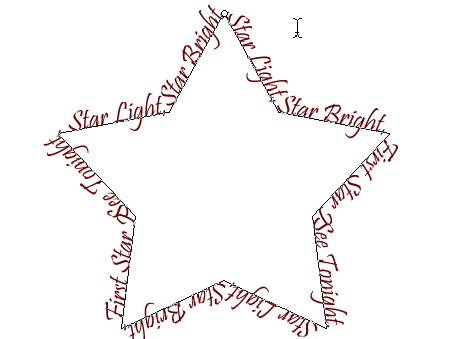
9. When you’re finished, you can hide the path by clicking anywhere on the grey area of the Paths palette. Now all you’ll see is your text appearing in a star shape.
Frequently Asked Questions (FAQs) about Creating Type on a Path in Photoshop
How Can I Adjust the Spacing of My Text on a Path in Photoshop?
Adjusting the spacing of your text on a path in Photoshop is quite simple. You can use the Character panel to adjust the tracking, kerning, and leading of your text. Tracking adjusts the spacing between all characters in a selected text, kerning adjusts the space between two characters, and leading adjusts the space between lines of text. To access the Character panel, go to Window > Character. Select your text and adjust the values as needed.
Can I Create Vertical Text on a Path in Photoshop?
Yes, you can create vertical text on a path in Photoshop. To do this, select the Text tool and click on the path where you want your text to start. Then, in the options bar at the top of the screen, click on the Vertical Type tool. Now, when you type, your text will flow vertically along the path.
How Can I Change the Direction of My Text on a Path?
Changing the direction of your text on a path in Photoshop is straightforward. With your text layer selected, go to the options bar at the top of the screen and click on the ‘Flip’ button. This will reverse the direction of your text along the path.
Can I Edit the Path After I’ve Added Text to It?
Yes, you can edit the path after you’ve added text to it in Photoshop. To do this, select the Direct Selection tool from the toolbar, then click on the path to select it. You can then click and drag the anchor points to adjust the shape of the path. Your text will automatically adjust to follow the new shape of the path.
How Can I Add Text to a Closed Path, Like a Circle or an Oval?
Adding text to a closed path in Photoshop, like a circle or an oval, is similar to adding text to an open path. First, create your closed path using the Ellipse tool or the Pen tool. Then, select the Text tool, hover over the path until you see the ‘Type on a Path’ icon, and click to start typing. Your text will automatically follow the shape of the closed path.
Can I Change the Font of My Text on a Path?
Yes, you can change the font of your text on a path in Photoshop. To do this, select your text layer, then go to the options bar at the top of the screen. Here, you can choose a new font from the drop-down menu. Your text will automatically update to the new font.
How Can I Align My Text to the Center of the Path?
Aligning your text to the center of the path in Photoshop is easy. With your text layer selected, go to the Paragraph panel (Window > Paragraph). Here, you can choose to align your text to the left, center, or right of the path.
Can I Add a Stroke or a Drop Shadow to My Text on a Path?
Yes, you can add a stroke or a drop shadow to your text on a path in Photoshop. To do this, select your text layer, then go to Layer > Layer Style > Stroke or Drop Shadow. Adjust the settings as needed to achieve your desired effect.
How Can I Convert My Text on a Path to a Shape?
Converting your text on a path to a shape in Photoshop allows you to manipulate it as you would any other shape. To do this, select your text layer, then go to Type > Convert to Shape. Your text will now be a shape layer, and you can edit it using the Direct Selection tool.
Can I Save My Text on a Path as a Custom Shape for Future Use?
Yes, you can save your text on a path as a custom shape in Photoshop. After converting your text to a shape (Type > Convert to Shape), go to Edit > Define Custom Shape. Give your shape a name, and it will be saved in the Custom Shape Picker for future use.