


Key Takeaways
- The author, Chris Ward, discusses his process of creating PDFs from Markdown files using Pandoc and LaTeX for his open-source board game, Chip Shop. The game components are written in Markdown and the game’s website is generated from these files.
- Pandoc, an open-source markup conversion tool, and LaTeX, a document declaration and layout system, are used to generate PDFs from Markdown files. Despite their capabilities, they couldn’t combine multiple PDFs onto one page, so Ward used PDFJam, a command line tool, for this requirement.
- The author provides a detailed guide on how to install the necessary dependencies (Markdown, Jekyll, Pandoc, LaTeX, PDFJam), and goes through the build process, which includes generating PDFs from Markdown, creating a LaTeX file, and combining cards onto one page using PDFJam.
- The author’s ideal workflow is to generate the PDF files at the same time as generating the website, rather than generating the files as visitors request them. This approach also allows PDF card versions to look different from the HTML pages, without resorting to complex CSS rules.
If you’ve read some of my previous posts on SitePoint or elsewhere, you may know that I’m working on a board game. In the game, called Chip Shop, you get to run a computer company in 1980s America.

As part of the project, I’m attempting to open source the entire game as much as possible. After several false starts, I’ve decided on a basic framework of Markdown for most of the game components—especially cards and the manual.
As the game’s website uses Jekyll, the website for the game is generated from the Markdown files. I intend to have premium pre-boxed and print-yourself versions of the game, and to achieve this I need to generate PDFs from the Markdown files.
What I’m Trying to Accomplish
My ideal workflow is to generate the PDF files at the same time as generating the website, rather than generate the files as visitors request them. This rules out my usual option for PDF generation, wkhtmltopdf, as it generates PDFs from already generated HTML. Another reason it’s not an option is that I want the PDF card versions to look different from the HTML pages, and Jekyll lacks any kind of view mode
feature to accomplish this without resorting to complex CSS rules.
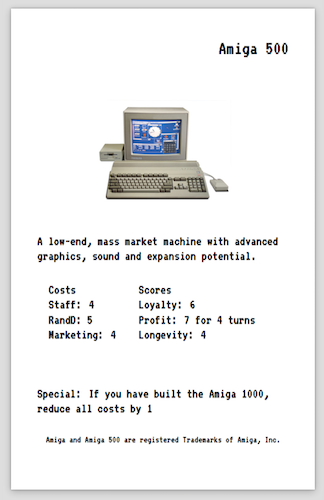
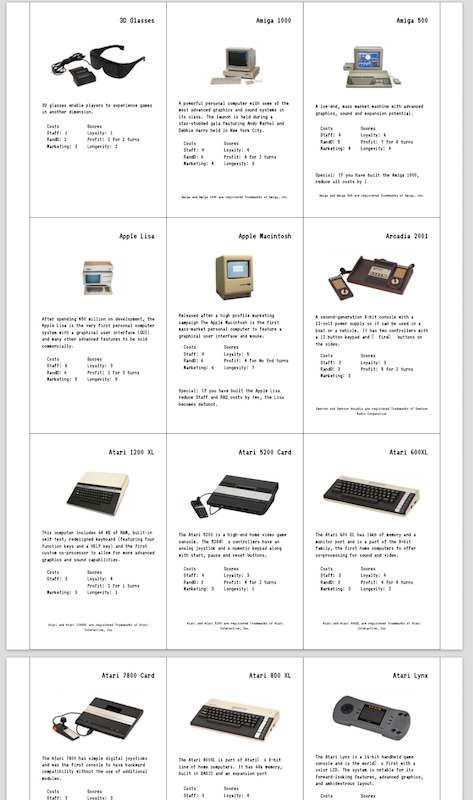
The Markdown template file for cards in the Chip Shop game contains a lot of Markdown front matter fields for game mechanics. Not all are used on every card. For convenience during printing, I need to fit as many cards on an A4 page as possible—in this case, a 3×3 grid. Eventually the pages will need to be double-sided, but I haven’t implemented that yet.
Enter Pandoc and LaTeX
Any internet search looking for solutions to generating PDFs from Markdown will lead you down the Pandoc path. Pandoc is an open-source, Swiss Army knife markup conversion tool that supports a wide and growing variety of input and output markup formats.
To generate PDFs with Pandoc, LaTeX is needed. LaTeX has its roots in the scientific research community, and is a document declaration and layout system. Combining Pandoc and LaTeX allows us to use variables, and thus to generate PDFs from a series of Markdown files and support Markdown front matter.
Despite the power of Pandoc and LaTeX, I couldn’t find any way of combining multiple PDFs (cards) onto one page, especially when using variables from Markdown files. After much research, I settled on PDFJam, a simple command line tool for this requirement.
Installing Dependencies
Markdown
You need no extra software for Markdown, except maybe an editor and there are so many of those, I suggest you read a few SitePoint posts to make your choice.
Jekyll
I’ll continue to use Jekyll in my examples taken from my game to illustrate the build process, but it isn’t an essential part of PDF generation if you don’t need a website.
Pandoc
On my Mac, I installed Pandoc with Homebrew, but there are options for all operating systems.
LaTeX
There are lots of opinions on the best way to install LaTeX, depending on what you need or intend to do with it. A full installation of its common tools and libraries can near 2GB, but for most purposes a minimal installation will be enough. Read the project’s download page to find the best option for you.
For this tutorial, we’ll be using the xelatex engine, as I use custom fonts. But you can select any engine that supplies specific features you require.
PDFJam
Depending on how you installed LaTeX, you may have PDFJam installed already. (Check by typing which pdfjam in the terminal.) If you haven’t, then find details on installation here.
The Build Process
After some consideration, a bash script that I run locally seemed the best option for now. There are better methods, but it works, and I can improve the process later, transferring it to a Continuous Integration system or Git Hooks.
View the bash script on GitHub.
Let’s now step through this script.
Setup
bundle install
bundle update

rm -dfr _site
rm -dfr pod
These commands ensure that the Ruby dependencies Jekyll needs to build the website are up-to-date, and that we remove any existing website and print folders.
Build the Website
jekyll build
mkdir -p pod/pdf/cards
Next we build the website and create a folder for the print versions of the cards.
Generating PDFs from Markdown
Let’s create a folder containing a PDF version of each Markdown file:
for filename in _cards/*.md; do
  echo $filename
  pandoc --from=markdown+yaml_metadata_block --template _layouts/cards.latex -o pod/pdf/cards/"$(basename "$filename" .md)".pdf --latex-engine=xelatex $filename
done
The script processes every Markdown file in the _cards directory, ensuring that the Markdown front matter fields are observed. Using the cards.latex template (we’ll look at that next), the correct LaTeX engine outputs a PDF with an appropriate name.
The LaTeX File
A lot of the magic for generating the card files from Pandoc takes place in a LaTeX template.
View the LaTeX template on GitHub.
LaTeX is new to me, but it isn’t too complex. I’ll explain what I changed from the default LaTeX file (found in Pandoc_install_dir/data/templates/default.latex) to make the cards work. I recommend sharelatex.com for previewing LaTeX files as you edit them.
\usepackage[paperheight=9.0cm,paperwidth=5.7cm,margin=0.5cm]{geometry}
% Set page size
\usepackage{multicol}
% We need column layouts
\usepackage{amsthm,amsmath,amssymb}
\usepackage{graphicx}
% We want images in our layout
\graphicspath{{/Users/chrisward/Workspace/cs_jk/_site/assets/images/cards/}}
% Where are images located
\usepackage{float}
\usepackage[utf8]{inputenc}
\usepackage{fontspec}
\setmainfont{VT323}
% We want to use a custom font installed on our local system, so add that package and select the font
We need a specific page size, and we’ll use columns later for the costs and scores of the cards. We’re using graphics and custom fonts, so we need those packages.
We’re attempting to create a simple layout that’s clear and uncluttered. Here’s how we accomplished it:
\begin{document}
  \begin{flushright}
    {$title$}
  \end{flushright}
  $if(image)$
  \begin{figure}[H]
    \centering
    \includegraphics[height=2cm]{$image$}
  \end{figure}
  $endif$
  \begin{flushleft}
    \scriptsize{$body$}
  \end{flushleft}
  \scriptsize
  \begin{tabular}{ l l }
    Costs & Scores \\
    $if(staffcost)$ Staff: {$staffcost$} $endif$ & $if(loyaltyscore)$ Loyalty: {$loyaltyscore$} $endif$ \\
    $if(rdcost)$ RandD: {$rdcost$} $endif$ & $if(profitscore)$ Profit: {$profitscore$} for {$profitlength$} turns $endif$ \\
    $if(marketingcost)$ Marketing: {$marketingcost$} $endif$ & $if(longevityscore)$ Longevity: {$longevityscore$} $endif$ \\
    $if(longevitycost)$ Longevity: {$longevitycost$} $endif$ &  \\
    $if(moneycost)$ Money: {$moneycost$} $endif$ &
  \end{tabular}
  \begin{flushleft}
    $if(specialscore)$
    Special: {$specialscore$}
    $endif$
  \end{flushleft}
  \begin{center}
    $if(legal)$
    \tiny{$legal$}
    $endif$
  \end{center}
\end{document}
I feel a lot of the above is reasonably self explanatory for anyone used to code or markup. We’re creating the elements of the card, aligning them, setting font sizes and checking if there are values before outputting them, so that the card doesn’t end up with empty fields.
We resize the image to a particular size and centre it. The costs and score values are in a two-column layout, set with the begin{tabular} command and the column quantity with the number of ls.
Combining Cards Onto One Page
We use PDFJam to create a large PDF file combining each of the individual PDF cards:
pdfjam pod/pdf/cards/*.pdf --no-landscape --frame true --nup 3x3 --suffix complete --outfile ./cards.pdf
mv cards pod/cards_complete.pdf
With this command, we specificy the following:
- that the page orientation should always be portrait
- that each individual PDF should be framed
- the grid size
- a file name suffix
- a file name.
PDFJam can give an error if you don’t output into its working directory, so I move the file to where I actually want it (hopefully that’s solvable in the future). Here we could also delete the individual PDF files if we don’t want them.
And that’s it—we have a website and printable PDF of the game cards.
Running the Script
I run the build script with ./build.sh. As there’s a lot of image and PDF processing, it takes about five to ten minutes. I then have a separate script that deploys these folders to a web server.
What’s Next
This process has taken me a while to get right, but it’s now good enough to move forwards and finesse the process and layouts after play testing.
I hope you find my research and experiments useful for your projects. Please let me know if you have any comments or suggestions.
Frequently Asked Questions (FAQs) about Creating PDFs from Markdown with Pandoc and LaTeX
How can I install Pandoc and LaTeX on my system?
To install Pandoc, you can download the installer from the official website (https://pandoc.org/installing.html) and follow the instructions provided. For LaTeX, you can download it from the LaTeX project website (https://www.latex-project.org/get/). Both Pandoc and LaTeX are available for Windows, macOS, and Linux. After downloading, run the installer and follow the on-screen instructions to complete the installation.
Can I customize the appearance of my PDFs created with Pandoc and LaTeX?
Yes, you can customize the appearance of your PDFs by using a LaTeX template. Pandoc uses a default template for generating PDFs, but you can specify your own template using the --template option. You can create your own template or use one of the many templates available online, such as those found on the Wandmalfarbe Pandoc LaTeX template GitHub repository.
How can I convert a Markdown file to PDF using Pandoc and LaTeX?
To convert a Markdown file to PDF, you can use the following command in your terminal or command prompt: pandoc yourfile.md -o yourfile.pdf. Replace yourfile.md with the name of your Markdown file and yourfile.pdf with the desired name of your PDF file. This command tells Pandoc to convert the Markdown file to PDF using the default LaTeX template.
Can I use MathJax in my Markdown files?
Yes, you can use MathJax in your Markdown files. Pandoc supports the use of MathJax, a JavaScript library that allows for the display of mathematical notation in web browsers. To use MathJax in your Markdown files, you can enclose your mathematical expressions in dollar signs (=), as in $x = y^2=.
How can I convert multiple Markdown files to PDF at once?
To convert multiple Markdown files to PDF at once, you can use a wildcard (*) in your command. For example, the command pandoc *.md -o output.pdf will convert all Markdown files in the current directory to a single PDF file named output.pdf.
Can I include images in my Markdown files?
Yes, you can include images in your Markdown files. To include an image, you can use the following syntax: . When you convert your Markdown file to PDF, Pandoc will include the image in the output PDF.
How can I handle errors when converting Markdown to PDF?
If you encounter errors when converting Markdown to PDF, the first step is to check the error message. The error message will often give you a clue as to what the problem is. Common issues include syntax errors in your Markdown file or problems with your LaTeX installation.
Can I use Pandoc to convert other file types to PDF?
Yes, Pandoc supports a wide range of input and output formats, not just Markdown and PDF. You can use Pandoc to convert files from one format to another, such as HTML to PDF, DOCX to PDF, and many more.
How can I add a table of contents to my PDF?
To add a table of contents to your PDF, you can use the --toc option in your command. For example, the command pandoc yourfile.md --toc -o yourfile.pdf will generate a PDF with a table of contents.
Can I use Pandoc and LaTeX on a server or in a cloud environment?
Yes, you can use Pandoc and LaTeX on a server or in a cloud environment. Both Pandoc and LaTeX can be installed and run on a server, allowing you to automate the process of converting files to PDF. This can be particularly useful in a continuous integration/continuous deployment (CI/CD) pipeline.