

Simply put, Xamarin enables you to develop apps for the three major mobile platforms using one type-safe mainstream language, C#. Xamarin lets you share ~60% of your code across iOS, Android and Windows “out of the box” as it’s built on the open source .NET runtime, Mono.
If you use patterns such as dependency injection and frameworks such as MVVM, the code sharing percentage can be even higher. The best part about using Xamarin is that you don’t lose any of the native user experience. An app that shares .NET code will still look and feel like it was developed for the OS it is running on – because it was!
Key Takeaways
- Xamarin allows for the development of apps for iOS, Android, and Windows using one type-safe mainstream language, C#. It enables you to share around 60% of your code across these platforms as it’s built on the open source .NET runtime, Mono.
- Xamarin.Forms is a common user interface abstraction that wraps the native iOS, Android, and Windows interfaces. This layer of abstraction is portable and can be easily installed via nuget packages.
- The tutorial demonstrates how to create an iOS application using Xamarin.Forms, and how to read a credit card with the device camera and store the card number using SQLite.Net. This process can be repeated on Windows with Visual Studio.
- Xamarin-based iOS credit card readers are secure, as Xamarin uses .NET encryption libraries for data security. The data transmission between the card reader and the device is encrypted, and the apps can utilize the built-in security features of iOS devices.
Portability
Now they have reached full maturity, Portable Class Libraries (PCLs) have allowed Xamarin to take another evolutionary “code sharing” leap. For those uninitiated, Microsoft licensed and released documented subsets of the .NET framework that target multiple platforms. Using these subsets it is now possible to write code in one library that can target Windows Phone 8, Windows Store Apps, Silverlight, Xamarin.iOS and Xamarin.Android.
Imaging creating a library with SQLiteORM, data access repositories, business domain objects and view-model binding classes. All compiled and runable on the afore mentioned platforms. There is no need to imagine this possibility because it’s a reality and I will show you an example later.
As you are all good coders, I’m sure you’ve realized the most beneficial part of PCLs. Testability! All of the code coverage will be platform independent. Furthermore, since we can run the tests in a standard test runner like nUnit, mocking and faking frameworks are readily accessible, making integration testing a breeze. This is something that I’ve truly missed while developing for Xamarin.iOS, because prior to PCLs, all C# code written for iOS needed to be compiled to byte-code ahead of time (AOT). This meant that certain parts of the .NET reflection namespace had to be omitted and thus the assistance of powerful mocking frameworks were out of the question.
Version 3 => Xamarin.Forms
Using Xamarin last year I wrote code in common class files and shared them by using platform specific library projects. This technique worked OK but it was a little cumbersome having twice (or sometimes three times) the projects necessary just to share the code.
This year I’m using PCLs to create and reuse the same classes across different platforms.
As of two weeks ago Xamarin 3 was released with the next (even more) exciting iteration of code reuse, shared UI. That’s right, Xamarin have created a common user interface abstraction called Xamarin.Forms, wrapping the native iOS, Android and Windows interfaces. This layer of abstraction is portable and easily installed via nuget packages.
Tutorial – iPhone Credit Card Reader
Did someone order an App with the lot?
In this tutorial we will,
- Use a trial version of Xamarin (30 day Business Edition)
- Make an iOS application using Xamarin.Forms (PCL)
- Read a credit card with the device camera, using SQLite.Net to store the card number
This tutorial is repeatable on Windows with Visual Studio, but my platform of choice is a MacBook using Xamarin Studio. The Xamarin Studio IDE is very similar to Visual Studio in layout and functionality.
Don’t forget that since we’ll be creating an iOS application you’ll still need the latest Xcode installed. You can download it from the Apple AppStore.
Visit here to download and install your trial version of Xamarin. The installer will download any necessary dependencies and then setup the SDKs for iOS and Android.
Beginning
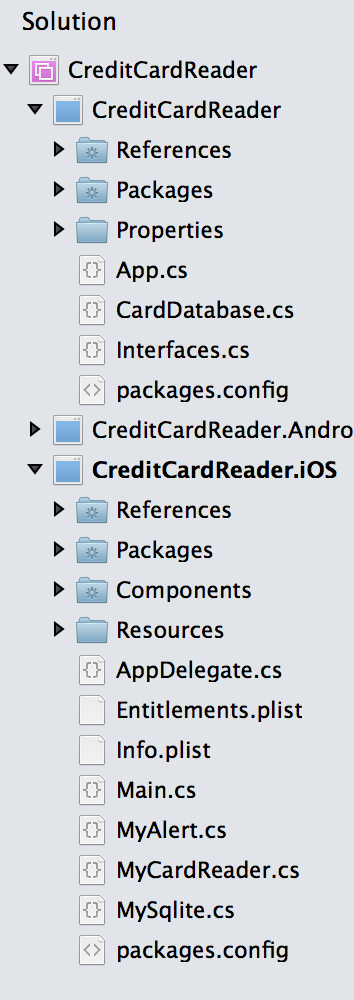
Download the source code for this tutorial here and open the solution file, CreditCardReader.sln as we will be following it.
The end result is a solution with three new projects. Since Xamarin.Forms is multi-platform it creates an iOS and Android project, we will only use the iOS project for this tutorial. Right click the CreditCardReader.iOS project and set it as the “Startup Project”. The third project created is the common library or PCL. All common code goes in there, including common UI code!
Nuget Packages
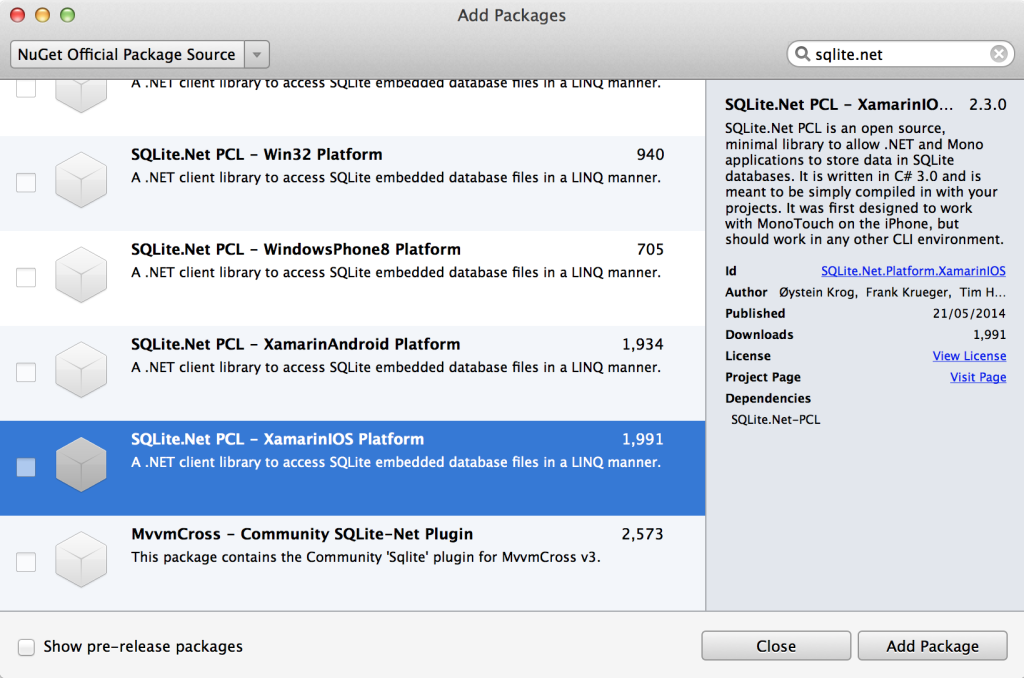
After our app reads the credit card we need to store the result in a database. We’ll use Nuget packages to make sure the PCL and iOS projects are geared up for that. Right click the PCL project and select Add -> Add Packages from the context menu.

Type sqlite.net into the search box and add the SQLite.Net PCL package to the project.
Now do the same for the iOS project except that you need to find and select the one the specifies XamarinIOS Platform.
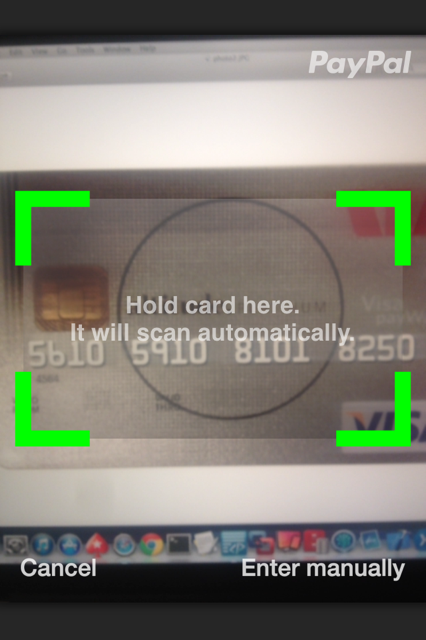
Card.io
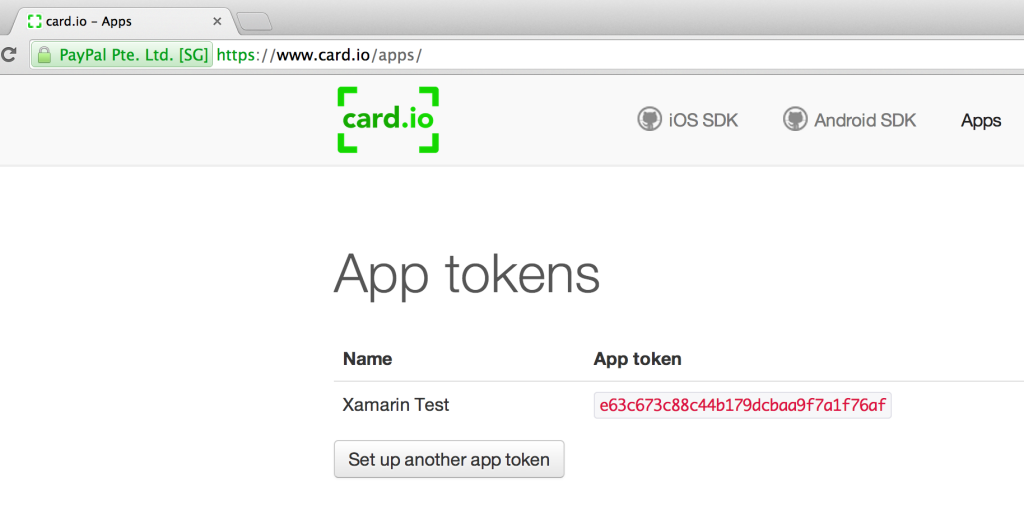
To achieve credit card reading functionality we use a Xamarin Component. Xamarin Components are libraries that you can download and use to make life easier. Most are free but some do cost money. Xamarin have created a “store” for developers to publish components, with Xamarin themselves contributing to many free ones. The Component for reading credit card numbers was published by Xamarin and is just a C# wrapper around a library developed by PayPal. In order to use the component visit Card.io and sign up to create an app-key. Signing up is free.
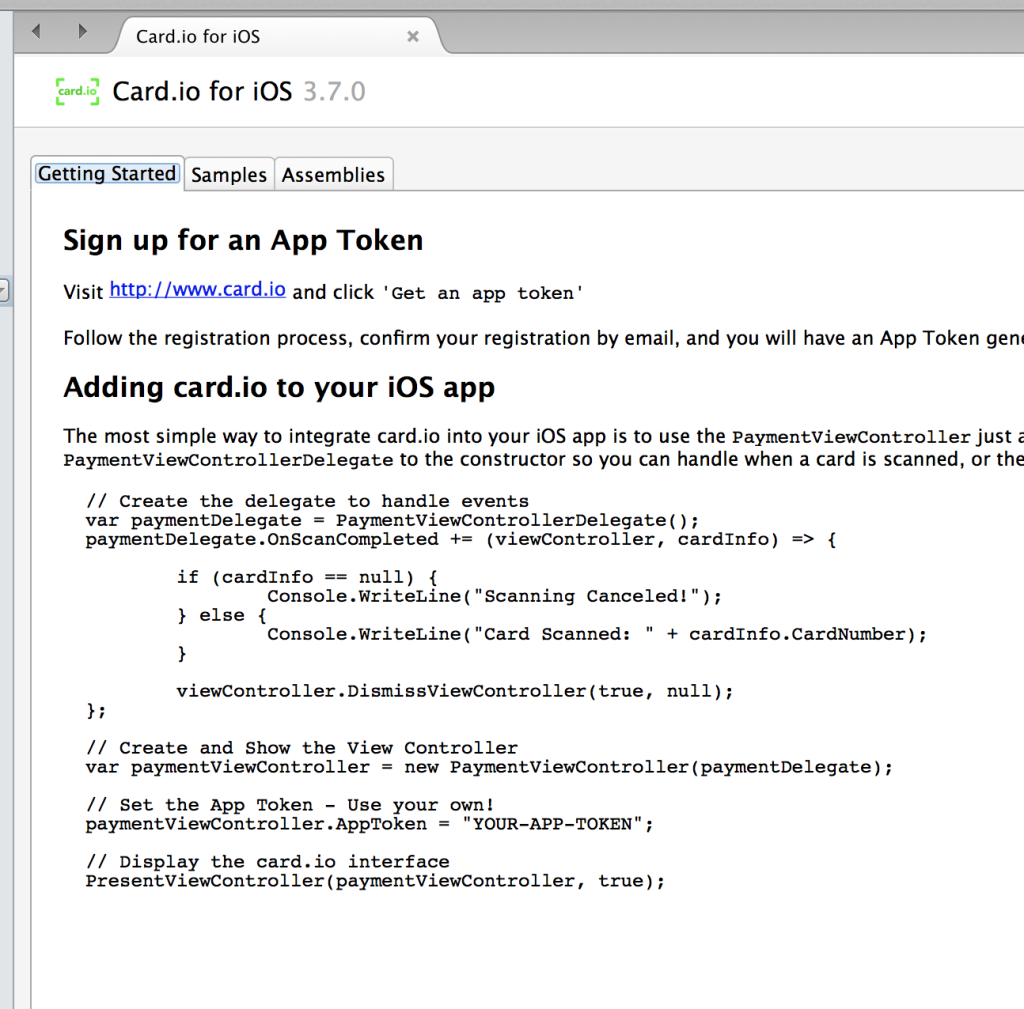
Double click the Components folder in the iOS project, you will see the card.io component has already been added. You can add more by clicking the Get More Components button.
When you install a Component a new tab will open in Xamarin Studio with details about the Component along with some code snippets to get you going quickly. Access this snippet now by clicking the Details link.
The Portable Library
Main View
Inside the PCL, open App.cs and you’ll see the small amount of platform independent code it takes to create the main screen. Depending on which device this code runs on it will create and display native controls. This is the power of Xamarin.Forms.
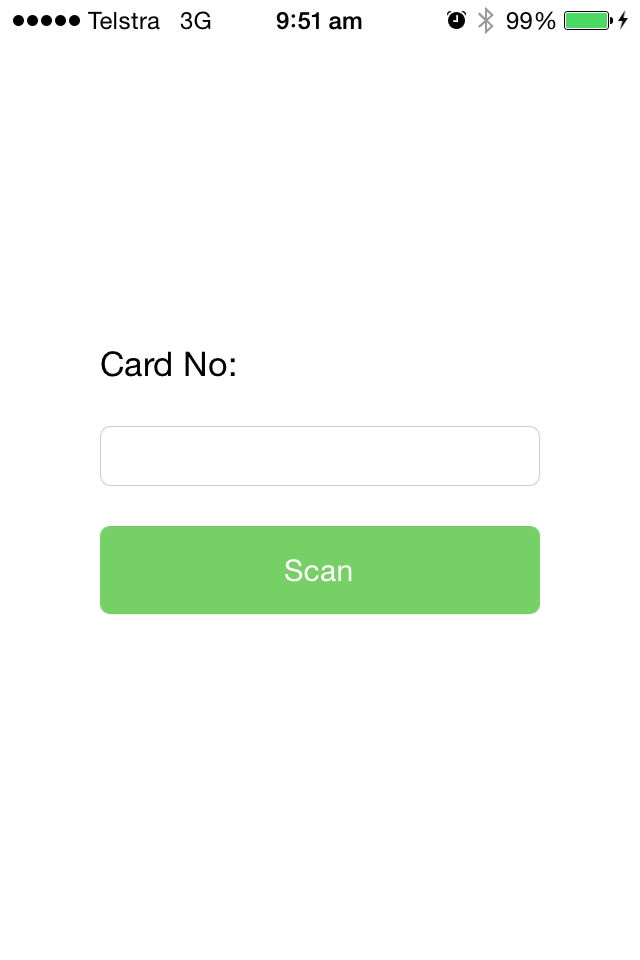
var label = new Label { Text = "Card No:" };

var cardEntry = new Entry { Placeholder = "" };

var scanButton = new Button { Text = "Scan", TextColor = Color.White, BackgroundColor = Color.FromHex ("77D065") };
// code omitted
return new ContentPage

{

    Content = new StackLayout {

    Spacing = 20, Padding = 50,

    VerticalOptions = LayoutOptions.Center,

    Children = { label, cardEntry, scanButton }

  }

};
2. Interfaces
Inside the Interfaces.cs file we declare a couple of contracts that will be used by the iOS project to create concrete classes. Not everything is platform independent and that certainly applies with the Card.io component library. So we need to create an interface that the PCL can refer to and call at runtime without needing to know anything about the implementation at compile time. You’ll see these being used later.
3. Database
CardNumberDatabase.cs has our quick and simple code for storing the incoming credit cards in a SQLite database. The CreditCard class holds the card number with a unique id. We can create CreditCard objects and save them directly into the database using the ORM facility built into SQLite.Net.
public class CreditCard

{

    public CreditCard ()

    {

        Id = Guid.NewGuid ().ToString ();

    }
    [PrimaryKey]

    public string Id { get; set; }

    public string Number { get; set; }

}
The CardNumberDatabase class represents the singleton object that creates a table for us and saves the CreditCard objects. Every time we start the app and create the database object, the CreateTable<> method (in the constructor) will check if it needs to create the table, or (if exists) modify the table columns based on the public properties in the CreditCard class.
public class CardNumberDatabase : SQLiteConnection

{

    public CardNumberDatabase (string path) : base (DependencyService.Get<ISQLitePlatform>(), path, false, null)

    {

        CreateTable<CreditCard> ();

    }
    public int AddCardNumber (string number)

    {

        return Insert (new CreditCard { Number = number });

    }

}
4. Saving The Number
Back in App.cs everything comes together with the click of a button.
var database = new CardNumberDatabase (DBPath);
    // code omitted
            scanButton.Clicked += (sender, e) => {

            var platformCardReader = DependencyService.Get<ICardReader>();

            if (platformCardReader != null)

            {

                platformCardReader.CardFound = delegate (string cardNo) {

                    cardEntry.Text = cardNo;
                    // db save

                    var success = database.AddCardNumber (cardNo) == 1;
                    var alerter = DependencyService.Get<IAlert>();

                    if (alerter != null)

                    {

                        alerter.Show ("Database", success ? "Card Number Saved!" : "Failed!");

                    }

                };
                platformCardReader.ReadCard();

            }

        };
Using the Xamarin.Forms DependencyService we can find the runtime specific implementation of the ICardReader interface and get it to make the Card.io component do its thing. Success or failure will be reported using the runtime specific implementation of the IAlert interface.
Notice that as we enter the GetMainPage method we create a local database object. This object is keep alive by virtue of the fact that it is being used in the anonymous button click delegate. Closures are cool.
iOS Application
1. Setup
Inside the AppDelegate.cs file we need to add one line of code to make sure the SQLite engine knows where to create the database file in the local device file system. Setting this static property on the PCL App class does the trick.
App.DBPath = Path.Combine (Environment.GetFolderPath(Environment.SpecialFolder.MyDocuments), "cards.db");
Concrete Classes
The bulk of the iOS specific work goes into making the concrete classes for the PCL to invoke at runtime.
The IAlert interface (MyAlert.cs) is very simple. We just need to create and show an iOS UIAlertView object.
public class MyAlert : IAlert

{

    #region IAlert implementation
    public void Show (string title, string message)

    {

        var alert = new UIAlertView (title, message, null, "OK", null);

        alert.Show ();

    }
    #endregion

}
The ICardReader (MyCardReader.cs) implementation is bit more work, but not much. Here we need to use the Card.io Component to get the job done. Remember when we installed the Component we got a code snippet to help us get going? Well, the bulk of that snippet is being used here.
When our class method ReadCard is invoked (by the PCL) we create the Card.io specific delegate and controller objects and then present them to the user.
RootViewController is the base controller/view for any iOS application. So here, once we grab its reference, it can do the work of showing the card reader UI.
OnScanCompleted is the event that is fired once the the “reading” of the credit card is done. After some null checks we call our class Action property CardFound, passing the credit card number back to the PCL where it is saved in the database.
You can add your own App Token into this file if you wish.
public class MyCardReader : ICardReader

{

    #region ICardReader implementation
    public Action<string> CardFound { get; set; }
    public void ReadCard ()

    {

        var appcontroller = UIApplication.SharedApplication.KeyWindow.RootViewController;
        var paymentDelegate = new PaymentViewControllerDelegate();

        var paymentViewController = new PaymentViewController(paymentDelegate);
        paymentViewController.CollectCVV = false;

        paymentViewController.CollectExpiry = false;

        paymentViewController.MaskManualEntryDigits = true;

        paymentViewController.AppToken = "e63c673c88c44b179dcbaa9f7a1f76af";
        paymentDelegate.OnScanCompleted += (viewController, cardInfo) => {

            if (cardInfo != null)

            {

                if (CardFound != null)

                {

                    CardFound(cardInfo.CardNumber);

                }

            }
            appcontroller.DismissViewController (true, null);

        };
        appcontroller.PresentViewController(paymentViewController, true, null);

    }
    #endregion

}
Ready…Set…Run
You should be able to get the app running, but here’s a video of it in action:
Here are some screen shots of the app.
Frequently Asked Questions (FAQs) about Creating an iOS Credit Card Reader with Xamarin
What is Xamarin and why is it used for creating an iOS credit card reader?
Xamarin is a Microsoft-owned software platform that allows developers to write native Android, iOS, and Windows apps with native user interfaces and share code across multiple platforms, including Windows and MacOS. It is used for creating an iOS credit card reader because it allows the development of high-performance, visually appealing apps with a single shared .NET code base. Xamarin uses C#, a statically typed language with mature tooling and IDE support, which makes it a more robust choice for large, complex apps like a credit card reader.
How secure is a Xamarin-based iOS credit card reader?
Xamarin-based iOS credit card readers are highly secure. Xamarin uses .NET encryption libraries for data security, and the data transmission between the card reader and the device is encrypted. Moreover, since the apps are native, they can utilize the built-in security features of iOS devices. However, the security also depends on the implementation of the app, so it’s crucial to follow best practices for secure coding and regularly update the app to fix any potential security vulnerabilities.
Can I integrate a Xamarin-based iOS credit card reader with my existing POS system?
Yes, a Xamarin-based iOS credit card reader can be integrated with your existing POS system. Xamarin allows for the integration of native libraries, so you can use any iOS-specific or .NET libraries needed for the integration. However, the complexity of the integration would depend on the specific POS system and its API. It’s recommended to work with a developer experienced in both Xamarin and your POS system for the integration.
How does a Xamarin-based iOS credit card reader compare to other options in the market?
Xamarin-based iOS credit card readers can offer several advantages over other options in the market. They can provide a native user experience, high performance, and the ability to share code across multiple platforms. However, they may require more development time and expertise compared to some other platforms. The best choice would depend on your specific needs, resources, and the skills of your development team.
What are the hardware requirements for a Xamarin-based iOS credit card reader?
The hardware requirements for a Xamarin-based iOS credit card reader would depend on the specific implementation of the app. However, in general, you would need an iOS device with a compatible version of iOS, and a compatible credit card reader. The card reader would need to be able to connect to the iOS device, either via the headphone jack, Lightning connector, or Bluetooth. Some card readers may also require a specific minimum version of iOS.
Can a Xamarin-based iOS credit card reader accept contactless payments?
Yes, a Xamarin-based iOS credit card reader can accept contactless payments if it’s designed to do so and used with a compatible card reader. Xamarin can integrate with native libraries, so it can use the iOS APIs for contactless payments. However, accepting contactless payments would also require a card reader that supports contactless technology, and the payment network and the card issuer must also support contactless payments.
How can I troubleshoot issues with a Xamarin-based iOS credit card reader?
Troubleshooting issues with a Xamarin-based iOS credit card reader would depend on the specific issue. However, Xamarin provides comprehensive debugging and diagnostic tools that can help identify and fix issues. If you’re a user experiencing issues, it’s recommended to contact the app’s support for assistance. If you’re a developer, you can use Xamarin’s debugging tools, check the app’s logs, and consult Xamarin’s documentation and community for help.
How can I update a Xamarin-based iOS credit card reader?
Updating a Xamarin-based iOS credit card reader would typically involve updating the app on the iOS device. If you’re a user, you can do this through the App Store. If you’re a developer, you would need to publish the updated app to the App Store. Xamarin also provides tools for automated testing and continuous integration, which can help ensure that updates don’t introduce new issues.
Can a Xamarin-based iOS credit card reader work offline?
A Xamarin-based iOS credit card reader can be designed to work offline to some extent. For example, it could accept payments and store them locally, then process them when the device is online again. However, this would require careful design to ensure data security and integrity, and some features may not be available offline. Also, the payment network and the card issuer may have specific requirements for offline transactions.
How can I get started with creating a Xamarin-based iOS credit card reader?
To get started with creating a Xamarin-based iOS credit card reader, you would first need to set up your development environment with Xamarin and a suitable IDE, such as Visual Studio. You would also need an iOS device and a compatible card reader for testing. Xamarin provides comprehensive documentation and tutorials to help you get started. You may also want to familiarize yourself with the iOS APIs for card readers and payments, and the requirements of the payment network and the card issuer.

