The demo accompanying this article was updated on 29th April, 2016 to address a XSS vulnerability
Every non trivial software allows to manipulate data, generally stored in a database. The acronym SCRUD refers to the basic manipulation functions that the user needs to work with the available data: Search, Create, Read, Update and Delete.
In this article we’ll create a web application which empowers the user to search a database and fully manage its content. The system is based on jQuery, JSON, and the popular DataTables and jQuery Validation plugins.
Key Takeaways
- The SCRUD system, which stands for Search, Create, Read, Update, and Delete, allows users to manage data in a database. It can be created using jQuery, JSON, DataTables, and jQuery Validation plugins.
- jQuery is a free, open-source JavaScript library that simplifies client-side HTML scripting. Ajax, a technique that allows execution of HTTP requests asynchronously, is also used. JSON format is used for data transfer between the application and the web server.
- DataTables plugin adds advanced interaction controls to HTML tables like pagination, search functionality, and column sorting. The jQuery Validation plugin simplifies the validation of form elements.
- The SCRUD system created using these tools allows users to interact with the database in a user-friendly manner, without having to refresh the page every time a task is performed. The DataTables and jQuery Validation plugins save a lot of development time by providing out-of-the-box functionalities.
What We’ll Use
In this section I’ll briefly cover the libraries and plugins I’ll employ in this tutorial.
jQuery and Ajax
jQuery is a free, open source and cross-platform JavaScript library which simplifies client-side HTML scripting. jQuery makes it easier to select the DOM elements and perform DOM manipulation operations, and handle events, such as mouse clicks and keyboard input. In my opinion, jQuery is the de facto standard for creating Ajax applications.
Ajax is a technique that allows you to execute HTTP requests asynchronously. This means that web applications can retrieve data from and send data to the web server without fully reloading the web page.
At SitePoint we’ve covered jQuery and Ajax multiple times. If you need a refresh on these topics, you can take a look at these articles:
- How to Use jQuery’s $.ajax() Function
- Easy Ajax with jQuery
- An Introduction to jQuery’s Shorthand Ajax Methods
- jQuery articles on SitePoint
- jQuery: Novice to Ninja: New Kicks And Tricks
This tutorial will show you how to create a SCRUD application which performs all the tasks without having to reload the web page even once.
JSON
For the transfer of data between the application and the web server we’ll use the JSON format. The JSON data format is based on attribute-value pairs, which means that each attribute has both a value and a name to identify it.
DataTables and jQuery Validation Plugins
jQuery is very suitable to use in conjunction with plugins and it’s designed to be easily extensible. In this tutorial we’ll employ two plugins. The first one is called DataTables. It adds advanced interaction controls to ordinary HTML tables such as pagination, search functionality, and column sorting. The second is jQuery Validation which makes it easier to validate form elements.
Getting Started
For our example we’ll create the following files in the same folder:
data.php: the PHP script that will perform the database tasksindex.html: the HTML file of our interfacelayout.css: the CSS file containing the style of our web applicationwebapp.js: the JavaScript file, written using jQuery, which manages the front-end actions and events
You can download all the source code from my repository on GitHub. Apart from that, you’ll need a functioning MySQL database.
The first task is to create a new HTML5 file called index.html consisting of:
- An Add button
- A mostly empty table (which will display the database data)
- An add/edit form
- A noscript message
- A message container
- A loading message container
In the head section of the HTML file we load jQuery version 1.11.2. This file is downloaded from a Google server. As stated here:
the Google Hosted Libraries service is a stable, reliable, high-speed and globally available content distribution network for many popular open-source JavaScript libraries.
DataTables provides a similar CDN. We load DataTables version 1.10.0 from their network and the jQuery Validation plugin version 1.13.1 from a CDN to get things started.
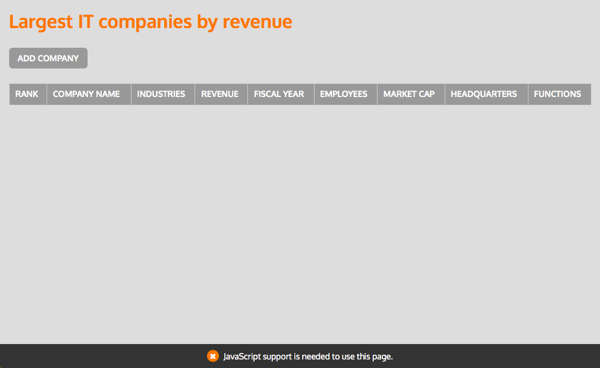
By purpose the HTML table has no content in the tbody section; we’ll insert the table data using the DataTables jQuery plugin. As this page needs JavaScript to work, we provide a noscript tag to inform users in case their browser does not support JavaScript or if JavaScript is disabled. In this case an empty table is shown and the ‘Add company’ button does not work.
This is how the message will look like:
MySQL Database
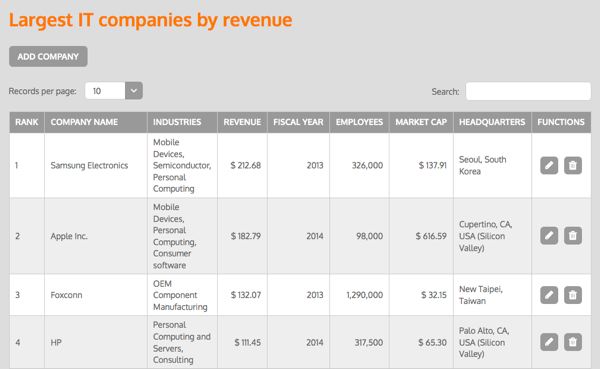
Now it’s time to create a MySQL database to store the example data. The data comes from this Wikipedia page and we have information about the largest IT companies sorted by revenue. Use the following query to create the table:
CREATE TABLE `it_companies` (

  `company_id` int(11) unsigned NOT NULL auto_increment,

  `rank` int(11) unsigned NOT NULL,

  `company_name` varchar(255) NOT NULL,

  `industries` varchar(255) NOT NULL,

  `revenue` float(9,2) NOT NULL,

  `fiscal_year` year(4) NOT NULL,

  `employees` int(11) unsigned NOT NULL,

  `market_cap` float(9,2) NOT NULL,

  `headquarters` varchar(255) NOT NULL,

  PRIMARY KEY  (`company_id`)

) ENGINE=MyISAM DEFAULT CHARSET=utf8;
After the database table has been created, we can insert the example data. To make it easier for you to create the database table and to import the example data, you can use a SQL file called queries.sql which is available on GitHub.
PHP Script to Handle the Database Data
At this point, the data are available in the database. So, we can set up the PHP script which will retrieve the information from the database and send them using the JSON data format. To do that, we need to retrieve the data the PHP script has processed (which will be submitted by our own jQuery script), such as getting all the companies or updating a particular company record. Then we connect to the database and fetch the required data from it. Please be sure to enter your own login details in the data.php script so it’ll be able to connect to your MySQL database:
// Database details

$db_server   = 'localhost';

$db_username = '***';

$db_password = '***';

$db_name     = '***';
We use the same PHP file to provide all the information from the database which the script needs in order to work properly. Using a parameter in the URL, we let the PHP script know which data it needs to send to the web page. We use the same pattern to insert, update and delete.
We use the PHP json_encode function to transform the data in JSON so that DataTables and our own jQuery script can read and parse them. We pass the data using a sub array called ‘data’. There are two other fields in the same base array to pass additional information: whether the database job was successful (result: success or error) and a message for debug purposes (such as id missing). We call this PHP page data.php and put it in the same folder as the other files.
Our Own jQuery Script
Now we can put everything together. We start by creating a file called webapp.js. In this file we’ll put our own jQuery code to initialize DataTables and jQuery Validation. In addition, we write the code to add, update and delete database records.
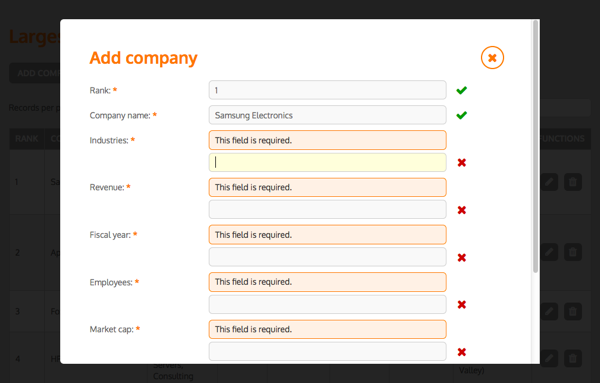
First, we initialize the jQuery DataTables plugin and configure the table settings. After that, the jQuery Validator plugin is invoked using some settings as well. I have added icons to the add/edit form so users can easily see whether the input fields are filled in properly. The jQuery Validation plugin looks at our HTML form code and finds out automatically which input fields are required to fill in. This is done by adding the required attribute to the mandatory fields.
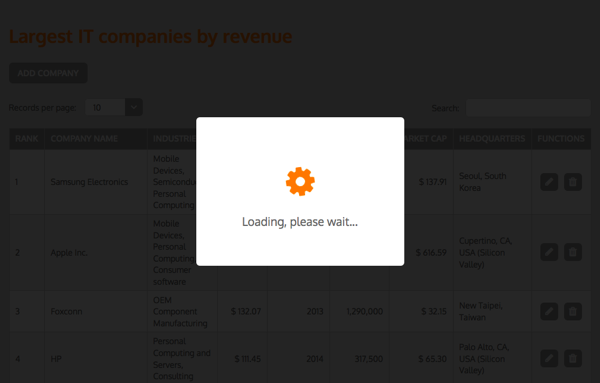
We perform Ajax requests to receive data from and send data to the web server using JSON. A loading message is shown to the user but most of the times you won’t notice it because processing these tasks takes very little time.
If for whatever reason the data can’t be retrieved or submitted, an error message is displayed. This happens when, for example, the database can’t be reached or in case there’s no internet connection available. After a request was executed successfully, the DataTable overview will be reloaded so the new company or company update shows up automatically. And if you delete a company using the trashcan button, it’ll disappear from the table, thanks to the automatic update of the DataTable overview.
The Application in Action
Now it’s time to test the web page to see whether everything works as intended. You need to run this application online, so it’s important to upload the files to your web server (put data.php, index.html, layout.css and webapp.js in the same folder). Don’t forget to set up the MySQL database properly and insert the example data.
When all the files and database data are in place, you can start the application by running index.html. You can also view the application online here.
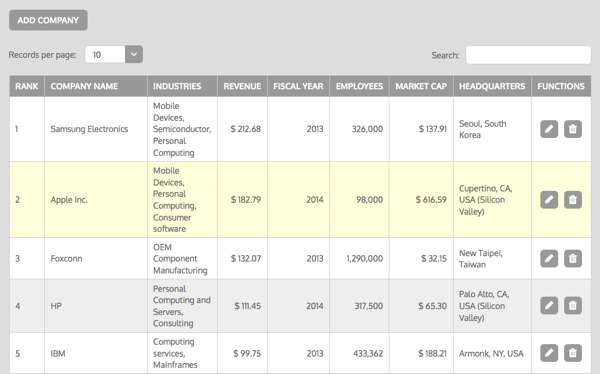
Using the search field in the upper right corner you can search the HTML table. The search results will be shown directly after performing a search. The jQuery DataTables plugin will search every time you enter a character in this search field, so you’ll see the search results as you type. The user can also select the number of records he would like to see on each page. In addition, the jQuery DataTables plugin makes it possible to sort the columns by clicking on the column header: it’ll sort the data in that column from the beginning to the end or vice versa.
When you click on ‘Add company’, a form is shown to add a new company. Client-side validation of the user’s form input is included thanks to the jQuery Validation plugin. For the sake of simplicity, in this article no server side validation is performed. In real world applications the user’s input must always be validated, both on client side and server side. This is done to be sure that only valid and save queries are performed on the database.

The edit function opens the same popup as when adding a new company, but in that case the input fields are populated with the current content of that particular database record.
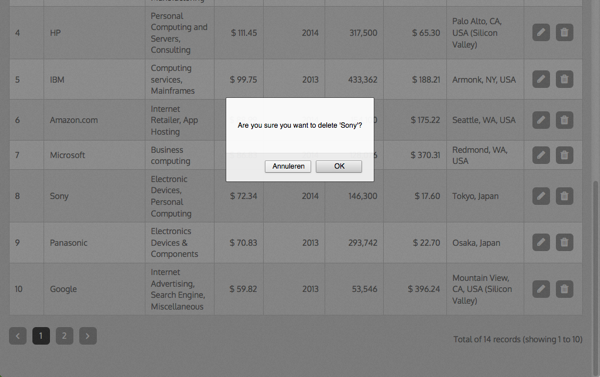
The delete function includes a question dialog which asks the user whether he’s sure to delete the selected company. Only when clicked ‘OK’, the deletion of the company will be executed.
Conclusions
jQuery, JSON, and the DataTables and jQuery Validation plugins give you the possibility to easily create a SCRUD system. Such systems give your users the possibility to search, create, read, update and delete database records in a user-friendly manner. The user doesn’t have to wait until the page refreshes completely every time a task is performed.
The DataTables and jQuery Validation plugins save a lot of development time. They give you functionality right out of the box like pagination, setting the number of results per page, searching the content for a particular term, sorting the column data, and validating the user’s input. Of course you are free to use this application as a starting point for your own online administration panel.
I hope you enjoyed this article. Feel free to leave a comment in the section below.
Frequently Asked Questions (FAQs) about Creating a SCRUD System using jQuery, JSON, and DataTables
What is a SCRUD System?
SCRUD is an acronym that stands for Search, Create, Read, Update, and Delete. These are the basic operations that you can perform on any data. A SCRUD system is a system that allows you to perform these operations. In the context of web development, a SCRUD system is often used to interact with a database. For example, you might use a SCRUD system to create a new user account (Create), view the details of an existing user account (Read), change the details of an existing user account (Update), or delete a user account (Delete).
How does jQuery, JSON, and DataTables work together in a SCRUD system?
jQuery, JSON, and DataTables are all technologies that can be used to build a SCRUD system. jQuery is a JavaScript library that simplifies HTML document traversing, event handling, and Ajax interactions for rapid web development. JSON (JavaScript Object Notation) is a lightweight data-interchange format that is easy for humans to read and write and easy for machines to parse and generate. DataTables is a plug-in for the jQuery Javascript library. It is a highly flexible tool that adds advanced interaction controls to any HTML table.
Why should I use jQuery, JSON, and DataTables for my SCRUD system?
jQuery, JSON, and DataTables each offer unique advantages that make them well-suited for use in a SCRUD system. jQuery simplifies the process of interacting with HTML documents, making it easier to create dynamic, interactive web pages. JSON is a lightweight data-interchange format that is easy for humans to read and write, making it an excellent choice for transmitting data between a server and a web application. DataTables adds advanced interaction controls to any HTML table, making it easier to display, sort, and filter data.
Can I use other technologies to build a SCRUD system?
Yes, there are many other technologies that you can use to build a SCRUD system. The choice of technology will depend on your specific needs and the requirements of your project. Some other popular technologies for building SCRUD systems include PHP, MySQL, and MongoDB.
How can I learn more about jQuery, JSON, and DataTables?
There are many resources available online for learning about jQuery, JSON, and DataTables. The official websites for each of these technologies offer comprehensive documentation and tutorials. In addition, there are many online courses, tutorials, and forums where you can learn more about these technologies and how to use them to build a SCRUD system.
What are some common challenges when building a SCRUD system?
Some common challenges when building a SCRUD system include ensuring data integrity, handling errors, and managing user permissions. It’s important to carefully validate and sanitize all data before it is stored in the database to prevent SQL injection attacks and other security vulnerabilities. Error handling is also crucial to ensure that the system can recover gracefully from unexpected situations. Finally, managing user permissions can be complex, especially in systems with many different user roles and access levels.
How can I ensure that my SCRUD system is secure?
There are several steps you can take to ensure that your SCRUD system is secure. First, always validate and sanitize all data before it is stored in the database. This can help prevent SQL injection attacks and other security vulnerabilities. Second, use secure communication protocols, such as HTTPS, to protect data in transit. Third, implement strong user authentication and access control mechanisms to ensure that only authorized users can perform certain operations.
How can I optimize the performance of my SCRUD system?
There are several strategies for optimizing the performance of a SCRUD system. One strategy is to use efficient database queries. This can help reduce the amount of time it takes to retrieve and update data. Another strategy is to use caching. Caching can help reduce the load on the database by storing frequently accessed data in memory. Finally, you can optimize the performance of your SCRUD system by using efficient code. This can help reduce the amount of time it takes to execute operations.
Can I use a SCRUD system for mobile applications?
Yes, you can use a SCRUD system for mobile applications. In fact, many mobile applications use SCRUD systems to interact with a backend database. The principles of building a SCRUD system for a mobile application are the same as for a web application. However, there may be additional considerations related to the mobile platform, such as handling offline scenarios and optimizing for mobile performance.
What are some best practices for building a SCRUD system?
Some best practices for building a SCRUD system include using a consistent naming convention for database tables and fields, using efficient database queries, implementing strong error handling, and ensuring data integrity. It’s also important to follow security best practices, such as validating and sanitizing all data before it is stored in the database, using secure communication protocols, and implementing strong user authentication and access control mechanisms.