

In a previous article, An Introduction to Product Tours with Intro.js, we discussed the importance of creating product tours and how we can use Intro.js to create awesome product tours. Unfortunately, we configured each step manually – a methodology that is not suitable for users with limited programming knowledge. However, the real power of Intro.js comes from its ability to create product tours on dynamic content without much programming. This tutorial will teach you how to integrate Intro.js into WordPress.
Key Takeaways
- Utilize the Intro.js library to enhance user experience by creating interactive, guided product tours within WordPress, making complex site features more accessible to users.
- Develop a custom WordPress plugin to integrate Intro.js, allowing for dynamic content interaction without extensive programming knowledge, thereby simplifying the process of building and managing product tours.
- Configure and manage tour steps directly from the WordPress admin panel, using a dedicated plugin page for easy addition, deletion, and reordering of steps through a user-friendly interface.
- Leverage WordPress actions and filters, such as ‘admin_enqueue_scripts’ and ‘wp_enqueue_scripts’, to efficiently load necessary JavaScript and CSS files, ensuring that the Intro.js tours are seamlessly integrated and performant across various pages.
- Extend the basic functionality of the Intro.js plugin by adding features such as multi-page tour support, customizable step options, and responsive design adjustments to enhance the accessibility and user engagement on different devices.
Building an Intro.js WordPress Plugin
Plugins are the recommended components for adding custom behavior into WordPress. We will be using a plugin to integrate Intro.js into WordPress. Begin by creating a new folder within the wp-content/plugins folder and name it wpintrojs. Next, create the main plugin file, index.php, and use the following code to define the plugin.
<?php

/*

Plugin Name: Introjs Tours

Plugin URI:

Description: Integrating intro.js powered product tours into WordPress

Author: Your Name

Version: 1.0

Author URI: http://www.innovativephp.com/

*/
Next, login as admin and activate the plugin in the Plugins section.
Creating Product Tour Steps
In the previous tutorial, we configured each step manually by assigning the necessary data-attributes and values. Here, we need a simpler way to configure tour steps, as the content is generated dynamically within WordPress. So, it’s essential to build a plugin specific page to configure the steps. Let’s start by adding new a plugin specific page using the following code.
add_action( 'admin_menu', 'wpintro_menu_page' );
function wpintro_menu_page(){

  add_menu_page( 'Product Tours', 'Product Tours', 'manage_options', 'wpintro_tour', 'wpintro_menu_page_display', plugins_url( 'myplugin/images/icon.png' ), 6 );

  add_submenu_page( 'wpintro_tour', 'Manage Steps', 'Manage Steps', 'manage_options', 'wpintro_tour_steps', 'wpintro_manage_steps_display' );

}
In this code, we have a main admin page as well as a sub menu page. The main menu page is used to configure the steps, while the sub menu page is used to configure the order of the steps within the tour. First, we are going to look at the product step creation page by implementing the wpintro_menu_page_display function used in the previous code block. This function is shown below.
function wpintro_menu_page_display() {

  global $wip_message;

  $pages = get_pages();

  $html = '';
  if ($wip_message != '') {

    $html .= '<div style="background:#9FD09F;padding:5px;">' . $wip_message . '</div>';

  }
  $html .= '<h2>Create Product Tour</h2>';

  $html .= '<form action="" method="post">';

  $html .= '<table class="form-table"><tbody>';

  $html .= '  <tr valign="top">

  <th scope="row"><label>Select Page</label></th>

  <td><select class="regular-text" id="wpi_page" name="wpi_page">';
  foreach ($pages as $page) {

    $html .= '<option value="' . get_page_link($page->ID) . '">';

    $html .= $page->post_title;

    $html .= '</option>';

  }
  $html .= '      </select></td>

</tr>';

  $html .= '  <tr valign="top">

  <th scope="row"><label>Intro Text</label></th>

  <td><textarea class="regular-text" id="wpi_intro_text" name="wpi_intro_text"></textarea></td>

</tr>';

  $html .= '  <tr valign="top">

  <th scope="row"><label>Element ID</label></th>

  <td><input type="text" class="regular-text"  id="wpi_element_id" name="wpi_element_id"/></td>

</tr>';

  $html .= '  <tr valign="top">

  <th scope="row"><label></label></th>

  <td><input type="hidden" class="regular-text"  id="wpi_action" name="wpi_action" value="save_steps" />

  <input type="submit" class="regular-text"  id="wpi_submit" name="wpi_submit" value="Save" /></td>

</tr>';

  $html .= '</tbody></table></form>';

  echo $html;

}
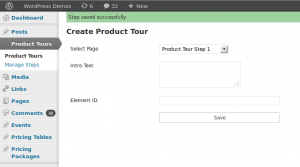
This function is used to display the contents of the menu page. The page consists of a heading and a HTML form for generating steps. The form contains three fields for adding new steps.
- Element ID – This is used to define the ID of the HTML element used for the step.
- Select Page – This is used to select the page containing the assigned Element ID.
- Intro Text – This is used to define the description to be displayed with each step in product tour.
Once implemented, the step creation screen will resemble the following image.
You can use the Product Tour page to add any number of steps to the tour. Next, let’s move into the data saving process.
add_action('init', 'wpintro_save_steps');
function wpintro_save_steps() {

  global $wip_message;
  if (isset($_POST['wpi_action']) && $_POST['wpi_action'] == 'save_steps') {

    $intro_text = $_POST['wpi_intro_text'];

    $page = $_POST['wpi_page'];

    $element_id = $_POST['wpi_element_id'];

    $step_data = get_option('wpi_step_data', '');
    if ($step_data != '') {

      $step_data = unserialize($step_data);

      $step_data["wip" . rand(1000, 1000000)] = array("desc" => $intro_text, "url" => $page, "id" => $element_id);

    } else {

      $step_data = array("wip" . rand(1000, 1000000) => array("desc" => $intro_text, "url" => $page, "id" => $element_id));

    }
    $step_data = serialize($step_data);

    update_option('wpi_step_data', $step_data);

    $wip_message = "Step saved successfully";

  } else {

    $wip_message = "";

  }

}
Here, we have used the init action to define a function called wpintro_save_steps. Generally, the init action is used to intercept user submitted data through $_GET or $_POST. We used a hidden field inside the form to define an action for the saving process. We have to check the action as this function can intercept user submitted data though other forms. Then, we assign the $_POST data into variables.
Next, we check the existing step data from the database using the wpi_step_data key in the wp_options table. Since we are saving the first step, the wpi_step_data key will not be available in the database. Therefore, we assign the values into an array with random unique keys, and save to database as a serialized value. For the remaining steps, we can unserialize the existing values, add the new values, and save the values again as serialized value. Finally, we display a success message to the user.
Up until this point, we looked at how to create and save product steps into database. Next, we are going to look at the sub menu page for ordering steps.
Configuring the Order of Steps
We can add any number of steps using the previous form, and they will be saved in the order of creation by default. Unless you have a very good plan for the product tour, it’s difficult to create the steps in the correct order. And, in some cases you may need to add new steps to the middle of the tour. In such cases, it’s important to have the ability to configure the ordering of the steps. Drag and drop is the easiest way of enabling step reordering. We can use jQuery UI’s sortable functionality to create the sort order for the steps.
Let’s display all the available steps for sorting, within the sub menu page created earlier.
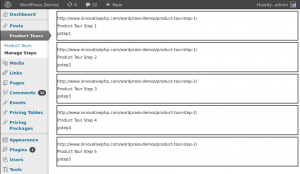
function wpintro_manage_steps_display() {

  $step_data = get_option('wpi_step_data', '');
  if ($step_data != '') {

    $step_data = unserialize($step_data);

  }
  echo "<div id='sortable'>";
  foreach ($step_data as $key => $data) {

    echo "<div class='wip_sort' style='margin:5px; border:2px solid; background: #fff;' data-identifier=" . $key . "  >

<ul>

  <li>" . $data['url'] . "</li>

  <li>" . $data['desc'] . "</li>

  <li>" . $data['id'] . "</li>

</ul>

    </div>";

  }
  echo "</div>";

}
The wpi_step_data option is used to retrieve the existing steps from the database. After unserializing the data, we use div containers to display the steps inside a container with the ID sortable. Your screen should now look similar to the following image.
Next, we have to integrate jQuery UI for enabling drag and drop. Let’s move to the code block for inserting the necessary JavaScript files.
function wpintro_admin_scripts() {

  wp_enqueue_script('jquery-ui-core');

  wp_enqueue_script('jquery-ui-sortable');

  wp_register_script('wpintro_admin', plugin_dir_url(__FILE__) . 'admin.js', array('jquery'));

  wp_enqueue_script('wpintro_admin');
  $config_array = array(

    'ajaxURL' => admin_url('admin-ajax.php'),

  );
  wp_localize_script('wpintro_admin', 'conf', $config_array);

}
add_action('admin_enqueue_scripts', 'wpintro_admin_scripts');
It is good practise to use the admin_enqueue_scripts action hook for assigning scripts and styles required for the admin section. Here, we have used wp_enqueue_script for the jQuery UI core and sortable source files, as they are available by default inside WordPress core. We have to use both the wp_register_script and wp_enqueue_script functions, as admin.js is a custom JavaScript file. Finally, we use the wp_localize_script function for adding necessary configuration data to admin.js.
Let’s look at the admin.js file (shown below) for handling sort order of steps.
jQuery(document).ready(function() {

  jQuery("#sortable").sortable({

    update: function() {

      var selected_ids = "";
      jQuery(".wip_sort").each(function() {

        selected_ids += jQuery(this).attr("data-identifier")+"@";

      });
      jQuery.post(conf.ajaxURL, {

        action: "wpintro_update_step_order",

        data: selected_ids,

      }, function(data) { }, "json");

    }

  });
  jQuery("#sortable").disableSelection();

});
We enable the sortable functionality on the #sortable container. All the main div elements inside the #sortable container will get the drag and drop features. We can move the div elements to setup the correct order of steps. jQuery UI will execute the update function each time we move the elements by drag and drop.
Once the update function is executed, we can get the element order using the random ID’s we assigned earlier. Then, we make an AJAX request to the server with the ID’s. On the server side, we have to rearrange the step data using the order of ID’s received from the AJAX request.
add_action( 'wp_ajax_nopriv_wpintro_update_step_order', 'wpintro_update_step_order');

add_action('wp_ajax_wpintro_update_step_order', 'wpintro_update_step_order');
function wpintro_update_step_order() {

  $step_data = get_option('wpi_step_data', '');

  $step_data = unserialize($step_data);

  $updates_step_order = array();

  $step_order = explode('@', $_POST['data']);

  array_pop($step_order);
  for ($i = 0; $i < count($step_order); $i++) {

    $updates_step_order[$step_order[$i]] = $step_data[$step_order[$i]];

  }
  $step_data = serialize($updates_step_order);

  update_option('wpi_step_data', $step_data);

  echo json_encode($updates_step_order);

  exit;

}
The wpintro_update_step_order function is used to handle AJAX requests on the server side. First, we retrieve the existing step data from the database. Then, we loop through the step ID’s and rearrange the step data according to the updated order. Finally, we save the updated step data into the database.
We have completed the backend functionality of the product tour. At this point, we have all the product step data for implementing the tour. In the next section, we are going to look at the implementation of the product tour on the frontend.
Integrating Step Data with Intro.js
It’s time to build the product tour by using existing step data with Intro.js. First, we must include the JavaScript and CSS files with the configuration data. I assume you have already read the previous tutorial and downloaded the Intro.js related files. Copy the intro.js and introjs.css files into the wpintrojs folder. The following code shows the inclusion of the script files on the frontend.
add_action('wp_enqueue_scripts', 'wpintro_enqueue_script');
function wpintro_enqueue_script() {

  wp_enqueue_script('jquery');

  wp_register_script('introjs', plugin_dir_url(__FILE__) . 'intro.js');

  wp_enqueue_script('introjs');

  wp_register_style('introjscss', plugin_dir_url(__FILE__) . 'introjs.css');

  wp_enqueue_style('introjscss');

  wp_register_script('wpintro_custom', plugin_dir_url(__FILE__) . 'custom.js', array('jquery'));

  wp_enqueue_script('wpintro_custom');

  $step_data = get_option('wpi_step_data', '');

  $step_data = unserialize($step_data);

  $step_data = array_values($step_data);

  $stepdata_array = array(

    'steps' => json_encode($step_data),

  );

  wp_localize_script('wpintro_custom', 'stepData', $stepdata_array);

}
We used admin_enqueue_scripts for the backend script inclusion. wp_enqueue_scripts is the recommended action for including scripts on the frontend. In the last section, we get the step data from the database and assign it to a new JavaScript file called custom.js as a JSON encoded string. Finally, we have to create the custom.js file and include the following code to initialize the product tour.
jQuery(document).ready(function() {

  var currentstep = 0;
  if(QueryString.currentstep){

    currentstep = QueryString.currentstep;

  }
  var steps_json = stepData.steps;

  var wip_index=0;
  steps_json = jQuery.parseJSON(steps_json);
  jQuery.each(steps_json, function(k, v) {

    wip_index++;

    jQuery("#"+v.id).attr("data-step", wip_index).attr("data-intro", v.desc).attr("data-url", v.url);

  });
  jQuery("#flexi_form_start").click(function() {

    introJs().setOption("doneLabel", "Next page").start().oncomplete(function() {

      window.location.href = steps_json[currentstep].url + "?multipage=true¤tstep=" + currentstep;

    }).onbeforechange(function(targetElement) {

      currentstep = jQuery(targetElement).attr("data-step");

    });

  });

});
First, we set the current step to zero. We use a custom function called QueryString to retrieve the query parameters from the URL. You can find the implementation of the QueryString function inside the source codes folder.
Then, we pass the step data through the jQuery.parseJSON function to create a JavaScript object. Next, we have to add the Intro.js specific data attribues to the step elements. While looping through step data, we find the element with the given ID and assign the data attributes using the values in the steps_json object.
Finally, we initialize Intro.js on button click as we did in the previous tutorial. Here, it’s slightly different from the previous tutorial as we are using the product tour across multiple pages instead of a standalone page. Hence, we set the URL of the page with the Intro.js multipage attribute after the completion of the first page. Also, we change the value of currentstep on each step change.
Once the user completes the product tour steps on the first page, he/she will be redirected to the next page with the multipage parameter. Let’s see how to handle the steps of subsequent pages using the following code.
if (RegExp("multipage", "gi").test(window.location.search)) {

  var introObj =  introJs();
  introObj.setOption("doneLabel", "Next page").start().oncomplete(function() {

    if (steps_json[currentstep]) {

      window.location.href = steps_json[currentstep].url + "?multipage=true¤tstep=" + currentstep;

    }

  }).onbeforechange(function(targetElement) {

    currentstep = jQuery(targetElement).attr("data-step");
    if (steps_json.length <= (parseInt(currentstep) + 1)) {

      introObj.setOption("doneLabel", "Done");

    }

  });

}
We have to use regular expressions to filter the multipage attribute as Intro.js depends on this parameter for enabling multipage support. Inside the if statement, we have to use the same code as we did previously to enable recursive page support. We are using the completion button as Next Page. We have to check for the last step of the tour and set the label as Done using the last section of code.
Now it’s time to see the product tour in action. Follow the steps given here to generate the product tour and see it in action.
- Create a few empty pages and assign content.
- On each page create few HTML elements and add ID’s.
- Navigate to the product tour section of the plugin and select the previously created page.
- Repeat the previous steps for all the steps in all the created pages.
- Finally, add the following code to one of the pages and click the link to start the tour
<a id="flexi_form_start">Start Tour</a>
Extending the Plugin
The goal of this tutorial was to introduce you to dynamic implementations of product tours with Intro.js. At this stage, the functionality of this plugin is very basic to match the scope of this tutorial. You can extend the plugin using the following suggestions to make it more effective on your WordPress site.
- Validate step creation with mandatory fields.
- Add step removing capabilities to the step ordering section.
- Enable the ability to create multiple product tours instead of standalone product tour.
- Enable other configuration options of Intro.js like positions, labels, exit functions, etc.
Conclusion
This tutorial has introduced you to dynamic product tours with Intro.js. So, we integrated Intro.js into WordPress for simplifying the dynamic product tour creation process. You can use the following links to download and view the demo.
Let us know your experiences of using Intro.js as well as suggestions for improving the features of this plugin.
Frequently Asked Questions about Creating Intro.js-Powered Tours in WordPress
How can I customize the look and feel of my Intro.js tour in WordPress?
Customizing the look and feel of your Intro.js tour in WordPress can be done by modifying the CSS file of the Intro.js library. You can change the color, size, and style of the tooltips, navigation buttons, and overlay. Remember to always test your changes in a development environment before applying them to your live site to ensure they work as expected.
Can I use Intro.js tours on my WordPress site without coding knowledge?
Yes, you can. There are several WordPress plugins available that integrate Intro.js functionality into your site. These plugins provide a user-friendly interface where you can create and manage your tours without needing to write any code.
How can I add an Intro.js tour to a specific page on my WordPress site?
To add an Intro.js tour to a specific page, you need to include the Intro.js library and your custom script in that page’s template file. Your custom script should define the steps of your tour and initialize it when the page loads.
Can I use Intro.js tours with custom post types in WordPress?
Yes, you can use Intro.js tours with any type of content in WordPress, including custom post types. You just need to include the Intro.js library and your custom script in the template file of your custom post type.
How can I make my Intro.js tour responsive on mobile devices?
Intro.js tours are designed to be responsive by default. However, you may need to adjust the size and position of your tooltips for smaller screens. You can do this by using media queries in your CSS file.
Can I translate my Intro.js tour into different languages?
Yes, you can translate your Intro.js tour into any language. You just need to replace the text in your tour steps with the corresponding translations. You can also use a multilingual plugin to manage your translations more efficiently.
How can I troubleshoot issues with my Intro.js tour in WordPress?
If you’re experiencing issues with your Intro.js tour, you can use the browser’s developer tools to inspect your code and identify any errors. You can also check the console for error messages. If you’re still unable to resolve the issue, you may want to seek help from a professional developer or the Intro.js community.
Can I use Intro.js tours with my WordPress theme?
Yes, Intro.js tours are compatible with any WordPress theme. However, you may need to adjust your CSS to ensure your tour looks and functions correctly with your specific theme.
How can I update the Intro.js library in my WordPress site?
To update the Intro.js library, you need to replace the old Intro.js files in your site’s directory with the new ones. Always backup your site before making any changes to prevent data loss.
Can I use Intro.js tours with other JavaScript libraries in WordPress?
Yes, Intro.js can be used alongside other JavaScript libraries in WordPress. However, you should ensure that there are no conflicts between the libraries that could cause issues with your site’s functionality.