
Technology has come a long way since mankind used rocks to start a fire. There was a time when the Internet was meant to serve Hypertext documents across a few machines. But today, we have reached a complex state where your heart rate is monitored by a device and then transmitted over to your computer. And if the heart rate is not normal, you might even see an Ambulance waiting at the end of your sprint.
This is pretty much how we live these days. And to power such amazing features, we need to have amazing technologies. In this post, we are going to discuss two such bleeding edge technologies, the Ionic Framework and Firebase.
Key Takeaways
- Firebase is a “Server as a Service” that manages data collections and exposes them as RESTful APIs, simplifying backend development.
- Ionic Framework, powered by AngularJS, is ideal for creating hybrid mobile applications due to its efficient handling of RESTful APIs and real-time data synchronization.
- The Bucketlist application example demonstrates user authentication, item creation, and real-time updates, all managed through Firebase without the need for a separate API server.
- Firebase’s authentication API is built-in, enabling easy setup of user management and security features within the application.
- Data structure in Firebase can be customized to link user IDs with specific data entries, enhancing data integrity and security.
- The application architecture leverages Angularfire to synchronize data between Firebase and the Ionic client, ensuring seamless data updates across devices.
- The tutorial provides a comprehensive step-by-step guide to setting up Firebase, designing the data structure, and integrating it within an Ionic project using practical examples.
What is the Ionic Framework?
Ionic is a powerful AngularJS driven mobile web framework that makes building hybrid mobile application easy. Not only does it have the power of two way data-binding, it has an awesome interface for working with RESTful APIs. This makes Ionic a perfect match for developing apps and keeping them in sync across devices.
What is Firebase?
There were times when provisioning a machine to deploy a simple website would take weeks. Then, along came Amazon. You simply tell Amazon what kind of system you want, and it provides a server for you. Next, we have seen the rise of Heroku, which provides a PaaS (Platform As A Service) to host your applications. This allowed developers to focus more on the application, instead of worrying about provisioning and deploying the application. And finally, we have Firebase, which is a self sufficient “Server as a Service” driven by a NoSQL data store. In Firebase, all you need to do is define a collection of data, and Firebase will take care of exposing it as RESTful API for you.
Bucketlist Application
I have written an article named Ionic Restify MongoDB – An End to End Hybrid App, which explains how to build an end to end hybrid app using Restify and MongoDB as the API server and Ionic as the hybrid client. In this post, we will see how we can completely eliminate the API server layer with Firebase.
The Bucketlist application we are going to build will have an authentication layer, allowing the users to register and login. Once authenticated, the user is given the option to create a new bucketlist item.
The primary view of the application shows a list of incomplete items and a secondary view to show the list of completed items. The user will have an option to mark an item as complete or delete it.
Before we start building the application, you should:
- Take a look at the live instance of the app.
- Download the native installer.
- Submit the completed app to PhoneGap Build by forking the repo.
- Take a look at the complete code we are going to build.
Application Architecture
Our application will primarily consist of two layers. The first is the client (in our case, the Ionic App, but this could be any other client that can consume a RESTful API), and the second is the server (Firebase).
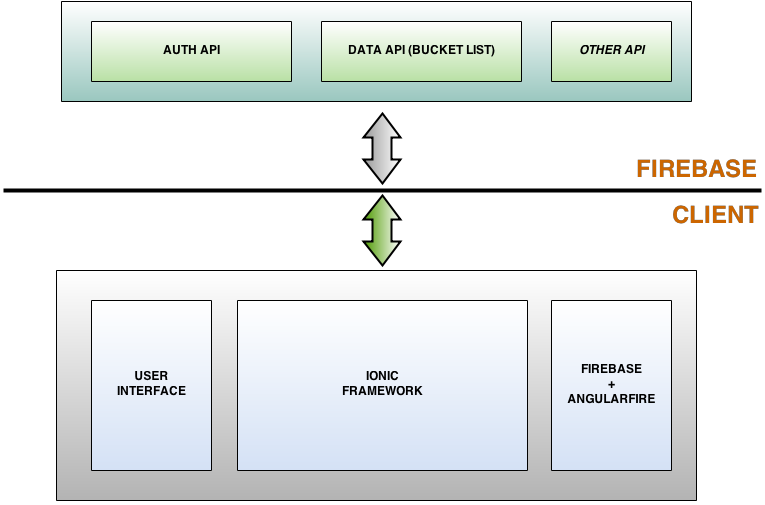
As you can see from the above diagram, on the client side we have an Angularfire layer which interacts with Firebase and acts as a service layer for the Ionic application. It is this layer that gives the power to keep the data in sync between Firebase and our Ionic client.
On the Firebase end, we will configure a simple login to take care of the authentication.
Our Ionic application will have five key controllers:
- Sign up controller
- Sign in controller
- Create new item controller
- Show incomplete items controller
- Show completed items controller
Apart from that, we will have a couple of methods that will take care of marking an item as complete and delete the item.
Designing the Data Structure
Firebase is ideally used for real time data synchronization, where multiple clients across the globe are expected to see the same data at almost the same moment. This is not the case with our app. We are really not looking for a multi-device sync. All we need is for Firebase to take care of managing our bucketlist data for us.
The awesome part of Firebase is that it provides an authentication API out of box. All we need to do is enable it and include the client, and Firebase will take care of the rest for us.
For the bucketlist collection, we need a relation between the user and a bucketlist Item, kind of like a foreign key. This will enable us to show bucketlist items created only by the user.
A sample buckletlist collection is shown below:
"BucketListCollection":

[{

  "item": "test",

  "isCompleted": false,

  "user": "test@bla.com",

  "created": 1400801853144,

  "updated": 1400801853144

}, {

  "item": "tes message",

  "isCompleted": false,

  "user": "test@bla.com",

  "created": 1401008504927,

  "updated": 1401008504927

}, {

  "item": "Just to check",

  "isCompleted": true,

  "user": "test@bla.com",

  "created": 1401008534451,

  "updated": 1401008534451

}, ....]
In the above sample JSON, the user key holds the link between the logged in user and their items. So, when we fetch the data, we fetch the records that match the logged in user. And this is how we represent the query using a RESTful end point:
https://bucketlist-app.firebaseio.com/bucketList/test@bla.com
Unfortunately, there is no easy way to implement this in Firebase.
As per this Stack Overflow post, there are three ways:
- Use location names and priorities intelligently.
- Do client-side querying.
- Run a separate server.
These approaches were kind of an overkill for a simple API. Then, I stumbled across this Stack Overflow post, that mentions how you can flip the data structure to be more user centric than feature centric. So I changed the app data structure as shown below.
"test@bla,com" : [{

  "item": "test",

  "isCompleted": false,

  "created": 1400801853144,

  "updated": 1400801853144

}, {

  "item": "tes message",

  "isCompleted": false,

  "created": 1401008504927,

  "updated": 1401008504927

}....]
"test2@bla,com" : [{

  "item": "test2",

  "isCompleted": false,

  "created": 14008012853144,

  "updated": 14008012853144

}, {

  "item": "tes message2",

  "isCompleted": false,

  "created": 14010028504927,

  "updated": 14010028504927

}....]
Now, every user has their own collection, rather than a common bucketlist collection, which makes more sense in our application. So, we will be using this structure for managing our data. And our URLs will look like this:
https://bucketlist-app.firebaseio.com/test@bla,com
Note: I am not 100% sure if a large user base would affect the overall response time for a single query (more users = more collections ).
Setup Firebase
We have a good idea as to where we are headed to. Our first step would be to setup a Firebase account, create a new Firebase application instance, and configure the authentication for it.
Navigate to Firebase.com and create a new account if you do not have one. Next, navigate to the Accounts page and create a new app. Provide the desired name and URL. Once the app is created, click on the app name to navigate to the data and configuration page. This is a bird’s eye view of the backend. Feel free to browse around before you continue.
Next, we will setup authentication for our application. Click on the Simple Login tab on the left hand side of the page, and in the main content area you will see the available options. Under the Authentication Providers section click on Email and Password and then Check the Enabled checkbox. This will set up the Simple Login for us.
Setup an Ionic Project
Next, we will scaffold a new Ionic application from a blank template using the Ionic command line interface (CLI). Create a new folder named myIonicFireApp and open terminal/prompt here. First we will install Cordova and Ionic. Execute the following command:
$ npm i -g cordova ionic
Next, we will scaffold a new Ionic app. Generally, I like to keep my code organized. Since this is a test app and we are not going to use any version control to manage development and production, we will create two folders, myIonicFireApp/dev and myIonicFireApp/prod. This step is optional and totally a preference. Next, cd into the dev folder (if you have created one) and run the following command:
$ ionic start bucketListApp blank
bucketListApp is the name of the application. This will scaffold the Ionic + PhoneGap template for us. Once the setup is done, the first order of business is to move the config.xml from the bucketListApp folder to www folder (A PhoneGap build requirement).
Next open up config.xml in your favorite editor and update the widget ID, name, description, and author fields. These will be the meta data for your app, when it run through Phonegap Build. The updated file would look like:
<?xml version='1.0' encoding='utf-8'?>

<widget id="com.ionicfire.bucketlist" version="0.0.1" xmlns="https://www.w3.org/ns/widgets" xmlns:cdv="http://cordova.apache.org/ns/1.0">

  <name>BucketList App</name>

  <description>An Awesome App</description>

  <author email="hi@bucketlist.com" href="http://bucketlist.com/">Arvind Ravulavaru</author>

  <content src="index.html" />

  <access origin="*" />

  <preference name="fullscreen" value="true" />

  <preference name="webviewbounce" value="false" />

  <preference name="UIWebViewBounce" value="false" />

  <preference name="DisallowOverscroll" value="true" />

  <!-- Don't store local date in an iCloud backup. Turn this to "cloud" to enable storage

         to be sent to iCloud. Note: enabling this could result in Apple rejecting your app.

  -->

  <preference name="BackupWebStorage" value="none" />

  <feature name="StatusBar">

    <param name="ios-package" value="CDVStatusBar" onload="true" />

  </feature>

</widget>
Refer to PhoneGap 3 CLI Setup on Mac and Windows to completely understand and setup PhoneGap on Windows and Mac.
To add iOS platform support (Mac only), run the following command:
$ ionic platform add ios
To add Android platform support, run the following command:
$ ionic platform add android
Next, we will build the app, by running:
$ ionic platform build ios
or
$ ionic platform build ios
Next, to emulate the app, execute:
$ ionic emulate ios
or
$ ionic emulate android
You can use the above approach to test your code. But, you need to build the code for the respective platforms every time you make changes to the code in www folder.
Given my laziness, I will never do that. The Ionic project come packed with Gulp support. Let us take advantage of that. Back in the terminal, execute the following command:
$ npm install
This will install all the dependencies listed in package.json. Next, install gulp-connect using the command:
$ npm install gulp-connect --save
Then, open up gulfile.js, present at the root of bucketListApp folder and replace it with the following code:
var gulp = require('gulp');

var gutil = require('gulp-util');

var bower = require('bower');

var concat = require('gulp-concat');

var sass = require('gulp-sass');

var minifyCss = require('gulp-minify-css');

var rename = require('gulp-rename');

var sh = require('shelljs');

var connect = require('gulp-connect');
var paths = {

  sass: ['./scss/**/*.scss'],

  www : ['www/**/*.*']

};
gulp.task('default', ['sass']);

gulp.task('serve', ['connect', 'watch']);
gulp.task('sass', function(done) {

  gulp.src('./scss/ionic.app.scss')

    .pipe(sass())

    .pipe(gulp.dest('./www/css/'))

    .pipe(minifyCss({

      keepSpecialComments: 0

    }))

    .pipe(rename({ extname: '.min.css' }))

    .pipe(gulp.dest('./www/css/'))

    .on('end', done);

});
gulp.task('reload', function () {

  return gulp.src(['www/index.html'])

    .pipe(connect.reload());

});
gulp.task('watch', function() {

  // Uncomment below line if you wish to work wit SASS

  //gulp.watch(paths.sass, ['sass']);
  gulp.watch([paths.www], ['reload']);

});
gulp.task('install', ['git-check'], function() {

  return bower.commands.install()

    .on('log', function(data) {

      gutil.log('bower', gutil.colors.cyan(data.id), data.message);

    });

});
gulp.task('git-check', function(done) {

  if (!sh.which('git')) {

    console.log(

      '  ' + gutil.colors.red('Git is not installed.'),

      '\n  Git, the version control system, is required to download Ionic.',

      '\n  Download git here:', gutil.colors.cyan('http://git-scm.com/downloads') + '.',

      '\n  Once git is installed, run \'' + gutil.colors.cyan('gulp install') + '\' again.'

    );

    process.exit(1);

  }

  done();

});
gulp.task('connect', function() {

  connect.server({

    root: 'www',

    port: '1881',

    livereload: true

  });

});
Back in the terminal, run:
$ gulp serve
This will spin up a server. Now, all you need to do is open http://localhost:1881 and observe!.
Note that cordova.js will be a 404 during development. And, since we added live reload support, all you need to do is make changes and switch to your browser to see the changes.
Note: If you are building an app with native plugins like contacts or camera, this approach will not work! You need to deploy the app to the device to test it.
Our Ionic app setup is done. let us get building the actual app.
Ionic and Firebase
The first thing we are going to do is open www/index.html and add the required Firebase, AngularFire and Firebase-simple-login JavaScript references.
<script src="https://cdn.firebase.com/v0/firebase.js"></script>

<script src="https://cdn.firebase.com/libs/angularfire/0.5.0/angularfire.min.js"></script>

<script src="https://cdn.firebase.com/v0/firebase-simple-login.js"></script>
They are pointed to the CDN, but you can download the files and server them locally too. Next update the ng-app directive value on the body tag from starter to bucketList. This will be our module name. Finally, we will add Back button support. Add the following code to the page body:
<ion-nav-bar class="bar-stable nav-title-slide-ios7">

  <ion-nav-back-button class="button-icon icon ion-chevron-left">

    Back

  </ion-nav-back-button>

</ion-nav-bar>
The completed www/index.html will look like:
<!DOCTYPE html>

<html>

  <head>

    <meta charset="utf-8">

    <meta name="viewport" content="initial-scale=1, maximum-scale=1, user-scalable=no, width=device-width">

    <title></title>

    <link href="lib/ionic/css/ionic.css" rel="stylesheet">

    <link href="css/style.css" rel="stylesheet">

    <!-- IF using Sass (run gulp sass first), then uncomment below and remove the CSS includes above

      <link href="css/ionic.app.css" rel="stylesheet">

    -->

    <!-- ionic/angularjs js -->

    <script src="lib/ionic/js/ionic.bundle.js"></script>

    <script src="https://cdn.firebase.com/v0/firebase.js"></script> <!-- firebase -->

    <script src="https://cdn.firebase.com/libs/angularfire/0.5.0/angularfire.min.js"></script> <!-- angularfire -->

    <script src="https://cdn.firebase.com/v0/firebase-simple-login.js"></script> <!-- firebase-simple-login -->

    <!-- cordova script (this will be a 404 during development) -->

    <script src="cordova.js"></script>

    <!-- your app's js -->

    <script src="js/app.js"></script>

    <script src="js/controllers.js"></script>

  </head>

  <body ng-app="bucketList" animation="slide-left-right-ios7">

    <ion-nav-bar class="bar-stable nav-title-slide-ios7">

      <ion-nav-back-button class="button-icon icon ion-chevron-left">

        Back

      </ion-nav-back-button>

    </ion-nav-bar>

    <ion-nav-view></ion-nav-view>

  </body>

</html>
Notice that we have added a reference to controllers.js. We will resolve that in a moment. If you go back to the browser and check the developer console you will see a couple of 404s and an Uncaught object error. The Uncaught object error is because, we have updated the ng-app directive in index.html but not in www/js/app.js. You can kill the gulp task, as we are going to make quite a few changes. Once everything is done, we can relaunch the server.
Open www/js/app.js in your favorite editor. First, let us update the module name. Then we will add a couple of dependencies. Update the existing module declaration with:
angular.module('bucketList', ['ionic', 'firebase', 'bucketList.controllers'])
The primary dependency is ionic, next firebase, and finally the controllers.
To develop our application, we are going use two pairs of ion-tabs component. The first set of tabs will be used to show Login & Register screens and the second set of tabs will be used to show incomplete bucketlist items and completed bucketlist items screens.
We are going to wrap our tabs in another abstract tab to gain more control. This will bring our total routes count to six. Inside the run method, we will inject a couple of variables and methods into the $rootScope variable. That would include the Firebase instance URL, a checkSession, logout and loaders for better UX. The final app.js would be
angular.module('bucketList', ['ionic', 'firebase', 'bucketList.controllers'])
.run(function($ionicPlatform, $rootScope, $firebaseAuth, $firebase, $window, $ionicLoading) {

  $ionicPlatform.ready(function() {

    // Hide the accessory bar by default (remove this to show the accessory bar above the keyboard

    // for form inputs)

    if (window.cordova && window.cordova.plugins.Keyboard) {

      cordova.plugins.Keyboard.hideKeyboardAccessoryBar(true);

    }

    if (window.StatusBar) {

      StatusBar.styleDefault();

    }
    $rootScope.userEmail = null;

    $rootScope.baseUrl = 'https://bucketlist-app.firebaseio.com/';

    var authRef = new Firebase($rootScope.baseUrl);

    $rootScope.auth = $firebaseAuth(authRef);
    $rootScope.show = function(text) {

      $rootScope.loading = $ionicLoading.show({

        content: text ? text : 'Loading..',

        animation: 'fade-in',

        showBackdrop: true,

        maxWidth: 200,

        showDelay: 0

      });

    };
    $rootScope.hide = function() {

      $ionicLoading.hide();

    };
    $rootScope.notify = function(text) {

      $rootScope.show(text);

      $window.setTimeout(function() {

        $rootScope.hide();

      }, 1999);

    };
    $rootScope.logout = function() {

      $rootScope.auth.$logout();

      $rootScope.checkSession();

    };
    $rootScope.checkSession = function() {

      var auth = new FirebaseSimpleLogin(authRef, function(error, user) {

        if (error) {

          // no action yet.. redirect to default route

          $rootScope.userEmail = null;

          $window.location.href = '#/auth/signin';

        } else if (user) {

          // user authenticated with Firebase

          $rootScope.userEmail = user.email;

          $window.location.href = ('#/bucket/list');

        } else {

          // user is logged out

          $rootScope.userEmail = null;

          $window.location.href = '#/auth/signin';

        }

      });

    }

  });

})
.config(function($stateProvider, $urlRouterProvider) {

  $stateProvider

    .state('auth', {

      url: "/auth",

      abstract: true,

      templateUrl: "templates/auth.html"

    })

    .state('auth.signin', {

      url: '/signin',

      views: {

        'auth-signin': {

          templateUrl: 'templates/auth-signin.html',

          controller: 'SignInCtrl'

        }

      }

    })

    .state('auth.signup', {

      url: '/signup',

      views: {

        'auth-signup': {

          templateUrl: 'templates/auth-signup.html',

          controller: 'SignUpCtrl'

        }

      }

    })

    .state('bucket', {

      url: "/bucket",

      abstract: true,

      templateUrl: "templates/bucket.html"

    })

    .state('bucket.list', {

      url: '/list',

      views: {

        'bucket-list': {

          templateUrl: 'templates/bucket-list.html',

          controller: 'myListCtrl'

        }

      }

    })

    .state('bucket.completed', {

      url: '/completed',

      views: {

        'bucket-completed': {

          templateUrl: 'templates/bucket-completed.html',

          controller: 'completedCtrl'

        }

      }

    })

    $urlRouterProvider.otherwise('/auth/signin');

});
Notice that we initialize the Firebase Auth service using this code:
$rootScope.baseUrl = 'https://bucketlist-app.firebaseio.com/';

var authRef = new Firebase($rootScope.baseUrl);

$rootScope.auth = $firebaseAuth(authRef);
Do not forget to replace baseURL with your Firebase Instance
Now, let’s build controllers.js. Create a new file at www/js and name it controllers.js. As the name suggests, this file will hold all the controllers. Next, creat a new folder named templates. We will populate each template as we go along.
First, we have the Signup controller. Let’s create the required templates first. Create a new file named auth.html in the templates folder. This will be the abstract tab for the Signin and Signup tabs. Fill it with the following code:
<ion-tabs class="tabs-icon-top">

  <ion-tab title="Sign In" icon-on="ion-ios7-locked"

    icon-off="ion-ios7-locked-outline" href="#/auth/signin">

    <ion-nav-view name="auth-signin"></ion-nav-view>

  </ion-tab>

  <ion-tab title="Sign Up" icon-on="ion-ios7-personadd"

    icon-off="ion-ios7-personadd-outline" href="#/auth/signup">

    <ion-nav-view name="auth-signup"></ion-nav-view>

  </ion-tab>

</ion-tabs>
Next, let’s add the Signup template. Create a new file named auth-signup.html inside the templates folder and add the following code:
<ion-header-bar class="bar-positive">

  <h1 class="title">Sign Up</h1>

</ion-header-bar>

<ion-content class="has-header padding">

  <div class="list">

    <label class="item item-input">

      <span class="input-label">Email</span>

      <input type="text" ng-model="user.email">

    </label>

    <label class="item item-input">

      <span class="input-label">Password</span>

      <input type="password" ng-model="user.password">

    </label>

    <label class="item item-input">

      <button class="button button-block button-positive" ng-click="createUser()">

        Sign Up

      </button>

    </label>

  </div>

</ion-content>
When the user clicks submit, we call createuser(). The controller looks like this:
angular.module('bucketList.controllers', [])

  .controller('SignUpCtrl', [

    '$scope', '$rootScope', '$firebaseAuth', '$window',

    function ($scope, $rootScope, $firebaseAuth, $window) {

      $scope.user = {

        email: "",

        password: ""

      };

      $scope.createUser = function () {

        var email = this.user.email;

        var password = this.user.password;
        if (!email || !password) {

          $rootScope.notify("Please enter valid credentials");

          return false;

        }
        $rootScope.show('Please wait.. Registering');

        $rootScope.auth.$createUser(email, password, function (error, user) {

          if (!error) {

            $rootScope.hide();

            $rootScope.userEmail = user.email;

            $window.location.href = ('#/bucket/list');

          }

          else {

            $rootScope.hide();

            if (error.code == 'INVALID_EMAIL') {

              $rootScope.notify('Invalid Email Address');

            }

            else if (error.code == 'EMAIL_TAKEN') {

              $rootScope.notify('Email Address already taken');

            }

            else {

              $rootScope.notify('Oops something went wrong. Please try again later');

            }

          }

        });

      }

    }

  ])
Things to notice:
$rootScope.show(),$rootScope.hide(), and$rootScope.notify()are defined in app.js to show the loading overlay.$rootScope.auth.$createUser()is responsible for interacting with Firebase and creating a new user.- Notice the various errors message that is returned by Firebase. You can find the entire list here.
- On successful registration, we will redirect the user to our primary view.
Next up is the Signin controller. Create a new file named auth-signin.html inside the templates folder and add the following markup:
<ion-header-bar class="bar-positive">

  <h1 class="title">Sign In</h1>

</ion-header-bar>

<ion-content class="has-header padding">

  <div class="list">

    <label class="item item-input">

      <span class="input-label">Email</span>

      <input type="text" ng-model="user.email">

    </label>

    <label class="item item-input">

      <span class="input-label">Password</span>

      <input type="password" ng-model="user.password">

    </label>

    <label class="item item-input">

      <button class="button button-block button-positive" ng-click="validateUser()">Sign In</button>

    </label>

  </div>

</ion-content>
When the user clicks submit, we call the validateUser(). The controller would be (continuing from above):
.controller('SignInCtrl', [

  '$scope', '$rootScope', '$firebaseAuth', '$window',

  function ($scope, $rootScope, $firebaseAuth, $window) {

     // check session

     $rootScope.checkSession();

     $scope.user = {

        email: "",

        password: ""

     };

     $scope.validateUser = function () {

        $rootScope.show('Please wait.. Authenticating');

        var email = this.user.email;

        var password = this.user.password;

        if (!email || !password) {

           $rootScope.notify("Please enter valid credentials");

           return false;

        }

        $rootScope.auth.$login('password', {

           email: email,

           password: password

        })

        .then(function (user) {

          $rootScope.hide();

          $rootScope.userEmail = user.email;

          $window.location.href = ('#/bucket/list');

        }, function (error) {

          $rootScope.hide();

          if (error.code == 'INVALID_EMAIL') {

            $rootScope.notify('Invalid Email Address');

          }

          else if (error.code == 'INVALID_PASSWORD') {

            $rootScope.notify('Invalid Password');

          }

          else if (error.code == 'INVALID_USER') {

            $rootScope.notify('Invalid User');

          }

          else {

            $rootScope.notify('Oops something went wrong. Please try again later');

          }

        });

     }

  }

])
Things to notice:
$rootScope.auth.$login()is responsible for the Firebase authentication.$rootScope.auth.$login()returns a promise, which will be resolved once the request is completed.- On successful authentication, we will redirect to our primary view.
Next, let’s build the primary view of the app. Create a new file named bucket.html inside the templates folder and add the following code:
<ion-tabs class="tabs-icon-top">

  <ion-tab title="My List" icon-on="ion-ios7-browsers"

    icon-off="ion-ios7-browsers-outline" href="#/bucket/list">

    <ion-nav-view name="bucket-list"></ion-nav-view>

  </ion-tab>

  <ion-tab title="Completed" icon-on="ion-ios7-checkmark"

    icon-off="ion-ios7-checkmark-outline" href="#/bucket/completed">

    <ion-nav-view name="bucket-completed"></ion-nav-view>

  </ion-tab>

</ion-tabs>
This is the abstract view that holds our bucketlist complete & incomplete views. Next, create a new file named bucket-list.html inside the templates folder and add the following code:
<ion-header-bar class="bar-positive">

  <button class="button button-clear" ng-click="newTask()">New</button>

  <h1 class="title">My Bucket List</h1>

  <button class="button button-clear" ng-click="logout()">Logout</button>

</ion-header-bar>

<ion-content class="has-header padding" has-tabs="true" on-refresh="onRefresh()">

  <div class="card" ng-repeat="item in list" id="{{item.key}}" >

    <div class="item item-text-wrap">

      <span>{{ item.item }}</span>

      <br/>  <br/>

      <p class="actions padding">

        <i class="ion-checkmark-circled icon-actions margin" ng-click="markCompleted('{{item.key}}')"></i>

        <i class="ion-trash-b icon-actions margin" ng-click="deleteItem('{{item.key}}')"></i>

      </p>

    </div>

  </div>

  <div class="card" >

    <div class="item item-text-wrap" ng-show="noData">

      <span>

      No Items in your bucket List. Click  <a href="javascript:" ng-click="newTask()">Here</a> and create one

      </span>

    </div>

  </div>

</ion-content>
Things to notice:
- We have added a New button to the header. This will open a popup, where user can enter the item description and create it.
- The body of the view renders a card that will show the item description and a Delete and Mark as Completed icons.
The controller looks like this:
.controller('myListCtrl', function($rootScope, $scope, $window, $ionicModal, $firebase) {

  $rootScope.show("Please wait... Processing");

  $scope.list = [];

  var bucketListRef = new Firebase($rootScope.baseUrl + escapeEmailAddress($rootScope.userEmail));

  bucketListRef.on('value', function(snapshot) {

    var data = snapshot.val();
    $scope.list = [];
    for (var key in data) {

      if (data.hasOwnProperty(key)) {

        if (data[key].isCompleted == false) {

          data[key].key = key;

          $scope.list.push(data[key]);

        }

      }

    }
    if ($scope.list.length == 0) {

      $scope.noData = true;

    } else {

      $scope.noData = false;

    }

    $rootScope.hide();

  });
  $ionicModal.fromTemplateUrl('templates/newItem.html', function(modal) {

    $scope.newTemplate = modal;

  });
  $scope.newTask = function() {

    $scope.newTemplate.show();

  };
  $scope.markCompleted = function(key) {

    $rootScope.show("Please wait... Updating List");

    var itemRef = new Firebase($rootScope.baseUrl + escapeEmailAddress($rootScope.userEmail) + '/' + key);

    itemRef.update({

      isCompleted: true

    }, function(error) {

      if (error) {

        $rootScope.hide();

        $rootScope.notify('Oops! something went wrong. Try again later');

      } else {

        $rootScope.hide();

        $rootScope.notify('Successfully updated');

      }

    });

  };
  $scope.deleteItem = function(key) {

    $rootScope.show("Please wait... Deleting from List");

    var itemRef = new Firebase($rootScope.baseUrl + escapeEmailAddress($rootScope.userEmail));

    bucketListRef.child(key).remove(function(error) {

      if (error) {

        $rootScope.hide();

        $rootScope.notify('Oops! something went wrong. Try again later');

      } else {

        $rootScope.hide();

        $rootScope.notify('Successfully deleted');

      }

    });

  };

})
Things to notice:
- We will be buiding the Firebase Reference based on the logged in user, as discussed in the
Designing the data structuresection.
var bucketListRef = new Firebase($rootScope.baseUrl + escapeEmailAddress($rootScope.userEmail));
We are creating a collection named after escaping the email address of the user. You can add escapeEmailAddress() definition at the bottom of the controllers.js.
function escapeEmailAddress(email) {

  if (!email) return false

  // Replace '.' (not allowed in a Firebase key) with ','

  email = email.toLowerCase();

  email = email.replace(/\./g, ',');

  return email.trim();

}
- Next, we will use this dynamic reference to pull all the buckelist items using the
onlistener forvalueevent. This will get triggered when ever there is a change in collection (One of the best parts of Firebase). - We check if the item is not completed
data[key].isCompleted == false, and then add it to the list of items to be shown. - We also register the
newTask(), that will open theCreate Newitem popup. $scope.markCompleted()and$scope.deleteItem(), interact with the Firebase API to update theisCompletedvalue to true and delete a piece of data from the collection respectively.
Next, we will add the newCtrl, responsible for creating a new controller. Create a new file named newItem.html inside the templates folder and add the following code:
<div class="modal slide-in-up" ng-controller="newCtrl">

  <header class="bar bar-header bar-secondary">

    <button class="button button-clear button-primary" ng-click="close()">Cancel</button>

    <h1 class="title">New Item</h1>

    <button class="button button-positive" ng-click="createNew()">Done</button>

  </header>

  <ion-content class="padding has-header">

    <input type="text" placeholder="I need to do..." ng-model="data.item">

  </ion-content>

</div>
On clicking Done, we call createUser(). In controller.js append the following code:
.controller('newCtrl', function($rootScope, $scope, $window, $firebase) {

  $scope.data = {

    item: ""

  };
  $scope.close = function() {

    $scope.modal.hide();

  };
  $scope.createNew = function() {

    var item = this.data.item;
    if (!item) return;
    $scope.modal.hide();

    $rootScope.show();

    $rootScope.show("Please wait... Creating new");
    var form = {

      item: item,

      isCompleted: false,

      created: Date.now(),

      updated: Date.now()

    };
    var bucketListRef = new Firebase($rootScope.baseUrl + escapeEmailAddress($rootScope.userEmail));

    $firebase(bucketListRef).$add(form);

    $rootScope.hide();

  };

})
Things to notice:
- We build a form object, that will consists of all the essentials data to create a new bucketlist item.
- We will spawn a new connection to the user’s collection and then using
$firebase(bucketListRef).$add(form);we insert the data into the collection. - Once the data is inserted, Firebase triggers the
valueevent, which will refresh our bucketlist items view.
Finally, let us add the controller to show all the completed bucketlist items. Create a new file named bucket-completed.html inside the templates folder and add the following code:
<ion-header-bar class="bar-positive">

  <h1 class="title">Completed Items</h1>

  <button class="button button-clear" ng-click="logout()">Logout</button>

</ion-header-bar>

<ion-content class="has-header padding" has-tabs="true" on-refresh="onRefresh()">

  <div class="card" ng-repeat="item in list" >

    <div class="item item-text-wrap">

      <span>{{ item.item }}</span>

      <br/>  <br/>

      <p class="actions padding">

        <i class="ion-trash-b icon-actions margin" ng-click="deleteItem('{{item.key}}')"></i>

      </p>

    </div>

  </div>

  <div class="card" >

    <div class="item item-text-wrap" ng-show="noData || incomplete">

      <span ng-show="incomplete">

      You can have not completed any of your Bucket List items yet. Try harder!!

      </span>

      <span ng-show="noData">

      No Items in your bucket List.

      </span>

    </div>

  </div>

</ion-content>
This controller is similar to the incomplete bucketlist controller, except for Create New item and Mark Item Incomplete. You can add them here too if you want. The controller looks like this:
.controller('completedCtrl', function($rootScope, $scope, $window, $firebase) {

  $rootScope.show("Please wait... Processing");

  $scope.list = [];
  var bucketListRef = new Firebase($rootScope.baseUrl + escapeEmailAddress($rootScope.userEmail));

  bucketListRef.on('value', function(snapshot) {

    $scope.list = [];

    var data = snapshot.val();
    for (var key in data) {

      if (data.hasOwnProperty(key)) {

        if (data[key].isCompleted == true) {

          data[key].key = key;

          $scope.list.push(data[key]);

        }

      }

    }

    if ($scope.list.length == 0) {

      $scope.noData = true;

    } else {

      $scope.noData = false;

    }
    $rootScope.hide();

  });
  $scope.deleteItem = function(key) {

    $rootScope.show("Please wait... Deleting from List");

    var itemRef = new Firebase($rootScope.baseUrl + escapeEmailAddress($rootScope.userEmail));

    bucketListRef.child(key).remove(function(error) {

      if (error) {

        $rootScope.hide();

        $rootScope.notify('Oops! something went wrong. Try again later');

      } else {

        $rootScope.hide();

        $rootScope.notify('Successfully deleted');

      }

    });

  };

});
Finally, let’s add a bit of CSS. Open style.css in the www/css folder and add the following code:
.margin {

  margin-left: 9px;

  margin-right: 9px;

}

.icon-actions {

  font-size: 23px;

}

.checkbox {

  vertical-align: middle;

}

.actions {

  float: right;

}

.item-text-wrap {

  overflow: auto;

}

.ion-checkmark-circled.icon-actions.margin{

  margin-right: 35px;

}
We’re done! Let’s run the app and see how it looks. In the terminal, run:
gulp serve
This will start the server. Next, navigate to http://localhost:1881 and you should be greeted with a Signin view. Click on Signup and register for an account. Once the registration is successful, you will be redirected to the bucketlist view. Play around with your new Firebase powered Ionic Application.
Note: You can go to your Firebase app account and check out the data structure there too.
Issue a PhoneGap Build
We have successfully built an app that works fine in the browser. Let’s build a native installer and see how the app works on an actual device.
Note: If you are new to PhoneGap, I would recommend reading the PhoneGap Quick Start before continuing.
Step 1: First, copy the myIonicFireApp/dev/bucketListApp/www folder and its contents to myIonicFireApp/prod. This is all we need to issue a PhoneGap build.
Step 2: Create a new GitHub repo named IonicFirePGInstaller.
Step 3: cd into the myIonicFireApp/prod folder (not inside the www folder) and run the following commands:
$ git init

$ git add -A

$ git commit -am "Initial Commit"

$ git remote add origin git@github.com:sitepoint/IonicFirePGInstaller.git
Make sure you update the repo path to point to the one you have created. Finally, check in the code:
$ git push origin master
This will push the code to GitHub.
Step 4: Navigate to PhoneGap Build and login.
Step 5: Click on + New App and submit the GitHub repo URL (the https one and not the ssh one) under open-source. Now, the PhoneGap service will go to GitHub and fetch the repo. Once the repo is loaded, you will see a Ready to Build button. Click on it to issue a PhoneGap build.
Once the build is completed, you can download the installers for your device and test the app out.
Conclusion
This concludes the article on building a Hybrid app using Firebase and the Ionic framework. Hope you gained a fair idea on how to go about building one of your own.
- You can find the code base we developed on GitHub.
- You can find the
wwwfolder that you can submit to PhoneGap build on GitHub too. - You can download the app installer here.
Thanks for reading!
Frequently Asked Questions on Creating a Firebase-Powered End-to-End Ionic Application
How do I integrate Firebase with my Ionic application?
Integrating Firebase with your Ionic application involves a few steps. First, you need to create a Firebase project from the Firebase console. After creating the project, you will be provided with a configuration object which you need to add to your Ionic application. This object contains unique keys and identifiers that Firebase uses to interact with your application. Once you have added the configuration object to your application, you can then install the Firebase and AngularFire libraries which provide you with the necessary functions to interact with Firebase services.
What are the benefits of using Firebase in my Ionic application?
Firebase offers a variety of benefits for your Ionic application. It provides a real-time database that allows you to sync data across all clients in real time. Firebase also offers user authentication services, which can handle user registration and login without requiring you to write any server-side code. Additionally, Firebase provides cloud storage, which lets you store and serve user-generated content, such as photos or videos.
How do I authenticate users in my Ionic application using Firebase?
Firebase provides several methods for authenticating users in your Ionic application. You can use email and password authentication, where users register with their email address and a password. Firebase also supports social login providers, such as Google, Facebook, and Twitter. Once a user is authenticated, Firebase creates a unique user ID that you can use to manage user data.
How do I store data in Firebase’s real-time database?
Storing data in Firebase’s real-time database involves using the set or push methods provided by the Firebase library. The set method overwrites data at a specified location in the database, while the push method adds new data to a list of data in the database. When you use the push method, Firebase automatically generates a unique key for each new item.
How do I retrieve data from Firebase’s real-time database?
Retrieving data from Firebase’s real-time database involves using the on or once methods provided by the Firebase library. The on method listens for data changes at a specified location in the database and triggers a callback every time the data changes. The once method retrieves data from the database a single time and does not listen for changes.
How do I update data in Firebase’s real-time database?
Updating data in Firebase’s real-time database involves using the update method provided by the Firebase library. The update method takes an object as its parameter, where the object’s properties correspond to the data you want to update.
How do I delete data from Firebase’s real-time database?
Deleting data from Firebase’s real-time database involves using the remove method provided by the Firebase library. The remove method deletes data at a specified location in the database.
How do I handle errors when using Firebase in my Ionic application?
Handling errors when using Firebase in your Ionic application involves using the catch method provided by the Firebase library. The catch method catches any errors that occur when calling Firebase methods and allows you to handle them appropriately.
How do I secure my data in Firebase’s real-time database?
Securing your data in Firebase’s real-time database involves using Firebase’s security rules. These rules determine who has read and write access to your data. You can specify these rules in the Firebase console.
How do I use Firebase’s cloud storage in my Ionic application?
Using Firebase’s cloud storage in your Ionic application involves using the Firebase storage library. This library provides methods for uploading files to cloud storage, downloading files from cloud storage, and managing files in cloud storage.