Create Hollow Type With A Photo Fade In Photoshop

 2. Select the Horizontal Type Mask tool from the toolbar. It’s hidden underneath the normal Type Tool, so hold down your mouse for a second on the Type Tool to see the flyout menu.
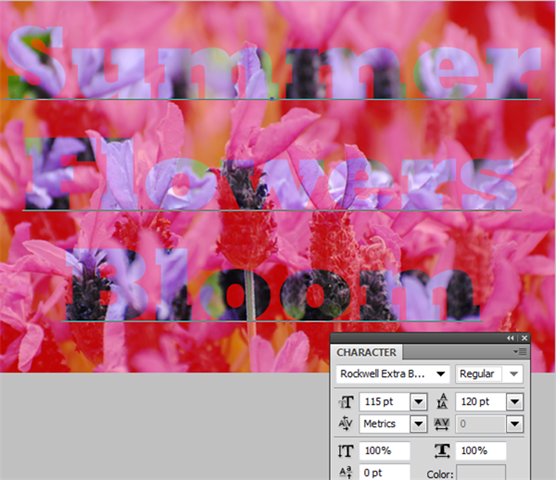
 3. Choose a font from the font family menu on the Options Bar. This works best with a thick, fat font so the selection area will be fairly big. I’ve used RockWell Extra Bold, size 115 pt and Leading 120pt.
Click on your image and you’ll notice the red (or rubylith) appear as a mask. As you type letters they appear see-through. At this stage you can still edit your text as normal by highlighting it and making changes in the Options bar or in the Character palette.
3. Choose a font from the font family menu on the Options Bar. This works best with a thick, fat font so the selection area will be fairly big. I’ve used RockWell Extra Bold, size 115 pt and Leading 120pt.
Click on your image and you’ll notice the red (or rubylith) appear as a mask. As you type letters they appear see-through. At this stage you can still edit your text as normal by highlighting it and making changes in the Options bar or in the Character palette.
 4. When the text looks right, click the black checkmark at the far right of the Options bar to accept the mask, or just press the Enter key on the numeric keypad. This creates a selection of the text and you will see the familiar marching ants. The red overlay disappears.
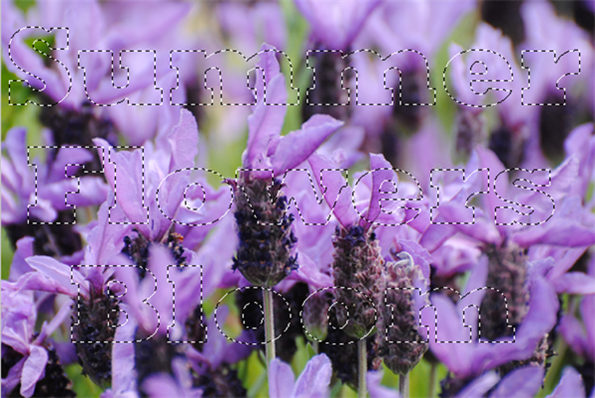 The text is no longer editable and you’ll notice there is no new text layer in the Layers palette. If you decide to edit or reformat the text after accepting the mask, you have to start again.
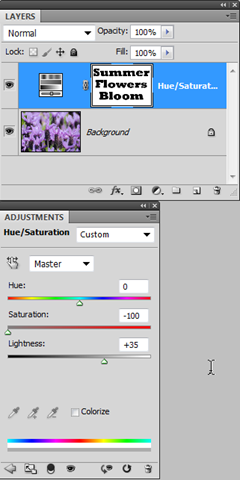
5. For this example, I want to fade out the background around the letters so we’ll invert the selection. Choose Select > Inverse to select everything except the letters.
6. In the Layers panel, click the “Create New Fill or Adjustment Layer” button (the half-black/half-white circle) and choose Hue/Saturation from the popup menu. We’re using an Adjustment layer so that the original photo remains unchanged.
In the Adjustments panel that opens (CS4 and CS5), remove the photo’s color by lowering the saturation to –100. Then drag the Lightness slider to +35 to lighten the photo, making the text more legible.
The text is no longer editable and you’ll notice there is no new text layer in the Layers palette. If you decide to edit or reformat the text after accepting the mask, you have to start again.
5. For this example, I want to fade out the background around the letters so we’ll invert the selection. Choose Select > Inverse to select everything except the letters.
6. In the Layers panel, click the “Create New Fill or Adjustment Layer” button (the half-black/half-white circle) and choose Hue/Saturation from the popup menu. We’re using an Adjustment layer so that the original photo remains unchanged.
In the Adjustments panel that opens (CS4 and CS5), remove the photo’s color by lowering the saturation to –100. Then drag the Lightness slider to +35 to lighten the photo, making the text more legible.
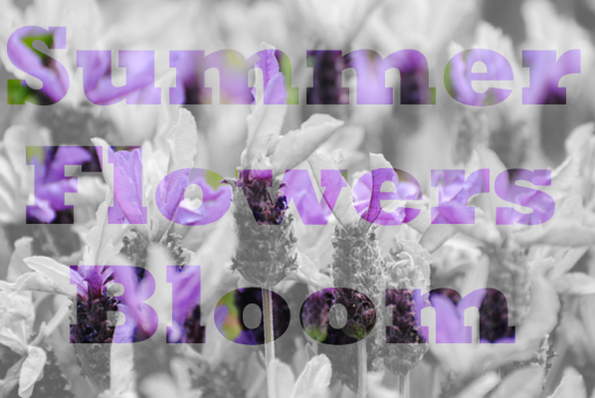
 Your image should look something like this:
 You could stop at this point if you wanted, and that’s all there is to using the Horizontal Type Mask Tool, but I’d like the text to stand out a bit more so I’ll add a layer style.
7. Make sure the masked layer is selected in the Layers panel, then click on the Layer Styles button (Fx) at the bottom of the Layers panel. Choose Inner Shadow from the drop down menu.
I used a deep purple color (#330033) instead of black for the drop shadow. Black can be a bit too severe sometimes. Set the distance to 0, Spread to 30% and Size to 5 pixels.
You could stop at this point if you wanted, and that’s all there is to using the Horizontal Type Mask Tool, but I’d like the text to stand out a bit more so I’ll add a layer style.
7. Make sure the masked layer is selected in the Layers panel, then click on the Layer Styles button (Fx) at the bottom of the Layers panel. Choose Inner Shadow from the drop down menu.
I used a deep purple color (#330033) instead of black for the drop shadow. Black can be a bit too severe sometimes. Set the distance to 0, Spread to 30% and Size to 5 pixels.
 The text should stand out quite nicely now.

Frequently Asked Questions about Creating Hollow Type with a Photo Fade in Photoshop
How can I create a more realistic photo fade effect in Photoshop?
To create a more realistic photo fade effect in Photoshop, you can use the Gradient tool. First, select the layer where you want to apply the fade effect. Then, choose the Gradient tool from the toolbar. In the options bar, select the gradient of your choice. You can adjust the opacity and the gradient style according to your preference. After setting up the gradient, click and drag across your image where you want the fade effect to be. The length and direction of your drag will determine the fade effect.
Can I use other shapes instead of a circle for the hollow type effect?
Yes, you can use any shape for the hollow type effect. The process is the same as using a circle. You just need to select the shape of your choice from the Shape tool in the toolbar. After selecting the shape, you can follow the same steps to create the hollow type effect.
How can I add a different image inside the hollow text?
To add a different image inside the hollow text, you need to place the image layer between the text layer and the background layer. Then, right-click on the image layer and select ‘Create Clipping Mask’. This will clip the image to the text, making it appear inside the hollow text.
What if I want to use a different font for the hollow type effect?
You can use any font for the hollow type effect. Just select the Text tool from the toolbar and choose the font of your choice from the options bar. After selecting the font, you can type your text and follow the same steps to create the hollow type effect.
Can I adjust the opacity of the photo fade effect?
Yes, you can adjust the opacity of the photo fade effect. To do this, select the layer where you applied the fade effect. Then, go to the Layers panel and adjust the Opacity slider. The lower the opacity, the more transparent the layer will be.
How can I save my hollow type design?
To save your hollow type design, go to File > Save As. Choose the location where you want to save the file and enter a name for the file. Then, select the file format of your choice from the ‘Format’ dropdown menu. Click ‘Save’ to save your design.
Can I print my hollow type design?
Yes, you can print your hollow type design. To do this, go to File > Print. Adjust the print settings according to your preference and click ‘Print’.
How can I undo a step in Photoshop?
To undo a step in Photoshop, you can press Ctrl+Z (Windows) or Command+Z (Mac). You can also go to Edit > Undo.
Can I apply the hollow type effect to an existing text layer?
Yes, you can apply the hollow type effect to an existing text layer. Just select the text layer and follow the same steps to create the hollow type effect.
How can I add a border to the hollow text?
To add a border to the hollow text, double-click on the text layer to open the Layer Style dialog box. Then, select ‘Stroke’ from the list of styles. Adjust the size, position, and color of the stroke to create a border around the text. Click ‘OK’ to apply the border.
Jennifer Farley is a designer, illustrator and design instructor based in Ireland. She writes about design and illustration on her blog at Laughing Lion Design.