
Key Guidelines to Continuous Integration and Jenkins CI Server


Key Takeaways
- Continuous Integration (CI) and the Jenkins CI server are essential tools for modern software development, enabling teams to release higher quality software and save time by automating repetitive procedures.
- CI emphasizes test automation, allowing test engineers to focus on exploratory testing and edge cases, while ensuring the quality of each commit on a specific branch within minutes of the developer’s commit.
- Jenkins CI server, an open-source CI tool, allows customization through existing plugins or creation of new ones. It supports parallel builds by distributing tasks across multiple machines, and handles continuous integration for projects in various languages, including Python.
- While Jenkins requires more setup and maintenance, its flexibility, control, and free, open-source nature make it a strong choice over other CI servers. It also integrates well with various version control systems, making it a versatile tool for different projects.

This article was originally published on TestProject — Test Automation Blog.
The following article provides a detailed introduction to Continuous Integration (CI), an imperative practice in software development and Jenkins, the industry standard open-source Continuous Integration tool. By implementing Continuous Integration and the Jenkins CI server, you will discover how Jenkins deployment can assist your development team to release a higher quality software and save precious time.
Looking for more on Jenkins and continuous integration? Check out these great links:
- Screencast: Which Continuous Integration Tools Support Bitbucket?
- Preparing and Building a PHP Project in Jenkins
- Continuous Integration with Jenkins
- Re-Introducing Jenkins: Automated Testing with Pipelines
- Installing and Securing Jenkins
Modern software development practices require deployment of a well functioning software in production as soon or often as possible. For example, agile methodologies directly enforce this behavior by having teams working on small increments and deploying to production after each sprint (read: Test Automation Strategy for Your Agile Project).
Days when the development team would be developing a piece of software for months, then pass it to QA, UAT and all down the line to production, do not longer exist. These days, the emphasis is on having a well-functioning software and never allowing situations which could endanger software quality, such as when essential software changes are introduced at the end of the release cycle. This is where Continuous Integration comes into use.
What is CI?
CI is a practice which enforces frequent integration of tested code to the stable branch of your project.. I would especially emphasize “tested code”, since that means that a feature developed on a separate branch is also tested and as such, is integrated to the stable branch.
Who Is Doing CI?
In general, DevOps engineers are usually assigned to setup the CI pipeline. Nowadays, the role of a DevOps engineer is very similar to a test engineer since both ensure process and software quality. I usually say that QA and production is the closest meeting point with the client. In that sense, CI provides very powerful tools for test engineers to enhance overall process and software quality by actively participating in the following areas:
- Test automation: A couple of years ago, there was a discussion about manual testing vs. automation testing. With CI, test automation becomes indispensable, this will eventually save a lot of precious time to focus on other testing tasks. It is also worth saying that manual testing and automation testing cannot be mutually exclusive.
- Test report: For test reports in CI, we can use existing reporting solutions or build our own reporting module. In both cases, this gives a clear indication on the “health” of our application’s code with each build run. It is important that this information will be accessible to all members of the development team and constant efforts will be invested in order to upgrade code quality.
- Deployment process: Test engineers are more involved in application’s deployment process, which yields additional information about the internal architecture of test automation tools or frameworks in use. This knowledge is of a great importance especially in order to identify “hidden” application issues.
CI Benefits
- CI emphasizes test automation, allowing the test engineer to keep focus on exploratory testing, testing edge cases or even finding new approaches in testing.
- Quality of particular commit on specific branch is visible within minutes of developer’s commit.
- Integration to stable branch is done very carefully after the code has been tested on branch (CI process is supposed to run this). The deployment of an application is executed automatically once properly had been setup, and does not require repetitive commands.
- From the team’s point of view, all these benefits multiply.
Typical CI Scenarios
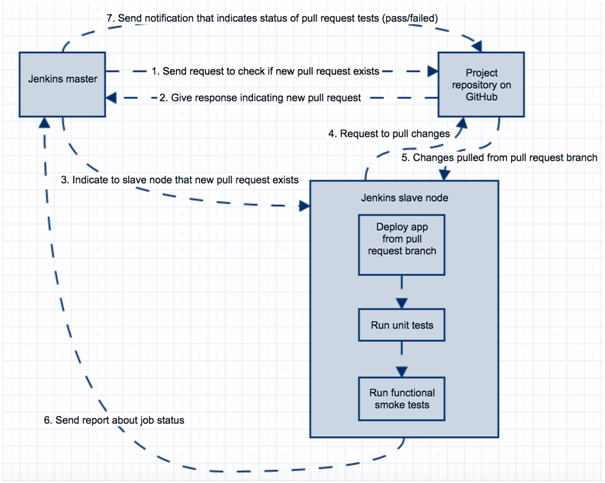
The development team has its own source version control repository where the project exists (nowadays that is usually Github). Stable branch (master) is usually considered as a working branch and development of new features is rarely done directly on the master. Instead, developers create their own branch where developing new features (branch A for feature A). When change is pushed to repository on that particular branch and developers make pull requests, some basic set of tests (smoke tests) should be executed against that branch. From the CI perspective, this usually means the following:
When CI process is completed, from the perspective of test engineers and developers, there are few requirements:
- Tester: re-test once again feature A on branch A
- Developer: peer code review from another developer to make sure that code quality is good enough
- Developer: manually merge code to master and resolve any merge conflicts (if arise).
Smoke tests save considerable amount of time to both developers who will perform code review, as well as to test engineers who need to re-test feature A on pull request branch. If smoke tests fail on pull request, developers who worked on feature A are now responsible to fix smoke test feature and make new pull request (code with issue will not be merged to master until it is fixed).
If this passes and new code for feature A is merged on master from CI perspective, the following occurs:
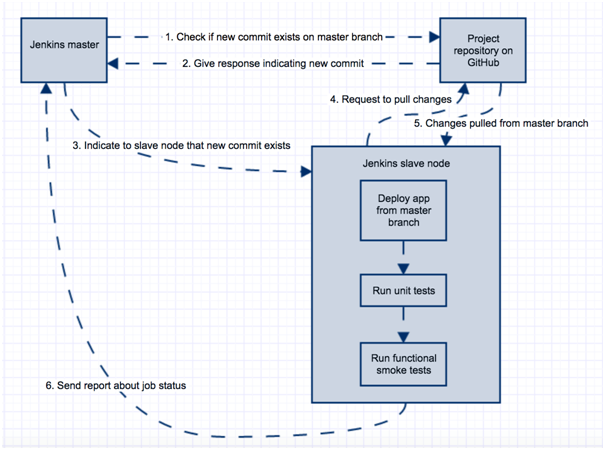
This indicates that the merge was successful, smoke test feature still works and it is now the responsibility of test engineers to re-test feature A once again on master branch (to make sure that the merge did not cause any side effect on feature A). Of course, over time it is a good practice to enhance your test automation suite so that most of the features are covered.
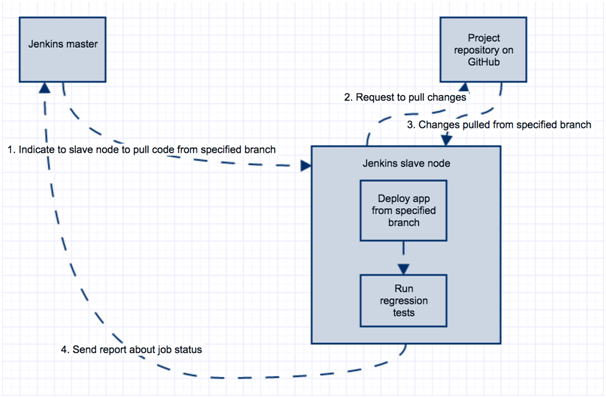
This becomes more and more important in later iterations in the project, when test engineers have more tasks (testing current features as well as all previous features). This is where regression testing becomes handy: from the CI perspective, the execution of regression tests usually happens either when the test engineer explicitly runs regression testing or by using a scheduler (for example: execute regression tests every night). It is a good practice to make this job customized so that we are able to specify against which branch this job will be executed (here you can read more on why and when to perform regression test automation). The procedure can look as follows:
Introduction to Jenkins Tool
Jenkins CI server terminology
Job: Most important “unit” in Jenkins terminology is the job. Job is a single execution unit in Jenkins CI server that must have some outcome (pass/fail). For example: a job can be a deployment job, smoke test job, regression test job, etc. Job consists of multiple areas that are executed in sequential fashion, which will be explained in the next paragraph: Anatomy of Jenkins job.
Plugin: One of the major features of Jenkins test automation is the ability to customize it by either using existing plugins or creating your own. Everything in Jenkins tool, from job configuration parts to Jenkins configuration parts is actually plugin. Since Jenkins’ community is substantial, various Jenkins plugins already exist for the use of the most demanding CI workflow tasks. Meaning, it is very likely that you will encounter a helpful plugin instead of creating a custom solution.
Node: In the simplest setup, Jenkins instance will be running on one machine and all jobs will be executed there. For minor tests and small number of jobs, it makes sense. However, in practice, there are often cases when multiple teams use same Jenkins instance. Since they have large number of jobs, execution on one instance is considered as bad practice for number of reasons: security, disaster recovery, performance, scalability, etc.
Enter master/slave nodes in Jenkins: Jenkins master is used only for job scheduling that will be executed on Jenkins slave machines. This way, Jenkins master machine is not heavily utilized and teams have their own slave machines with the size most suitable for their test automation project. Also, slave nodes are then configured to handle some number of parallel jobs that are executed (number of executors per each node). There is also a possibility to configure on-demand nodes from AWS. That would mean nodes will exist only when job needs to be executed on them. This is very useful, since we want larger machines that will be fully utilized only when regression tests are running. For this particular scenario, larger EC2 instance would be spun up on AWS, job will be executed on this instance and when completed (based on idle time configured), this instance would be alive for some time. After that, it would be determined which is more advantageous when using services paid per hour (e.g. AWS services).
Anatomy of Jenkins Job
In Jenkins CI server, each Jenkins job consists of multiple parts:
-
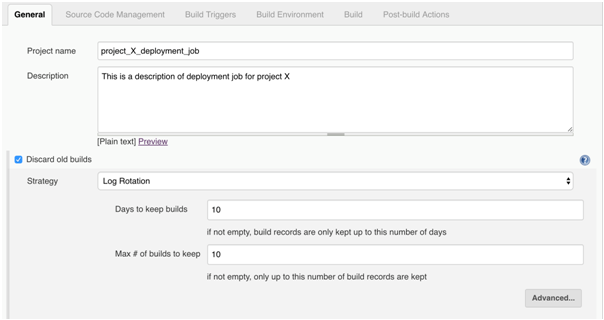
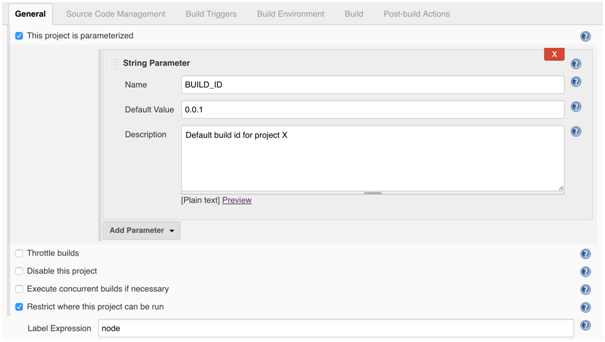
General: This is where we specify project/job name/description, add parameters for jobs if needed, define job log rotation policy, etc. Next screens show how to configure log rotation (you can specify number of days to keep build logs or number of last build logs to keep), how to parameterize job (by adding string BUILD_ID which has default value 0.0.1 but, this value can be specified when job is started) and how to configure where this job will be executed (slave node name):
-
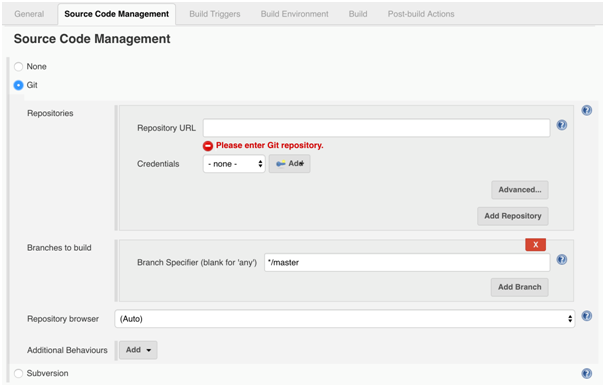
Jenkins Source Code Management: As the name suggests, this is where we define source code repository like GitHub or Subversion in Jenkins CI server:
-
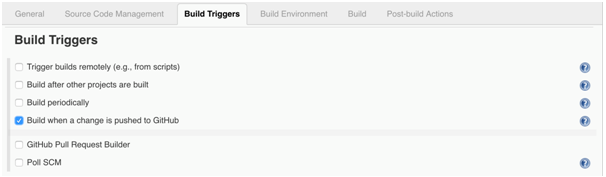
Jenkins Build Triggers: Schedule the time a job will be executed (periodically, after some other job, when GitHub pull request happens, when change is pushed to GitHub, etc.
-
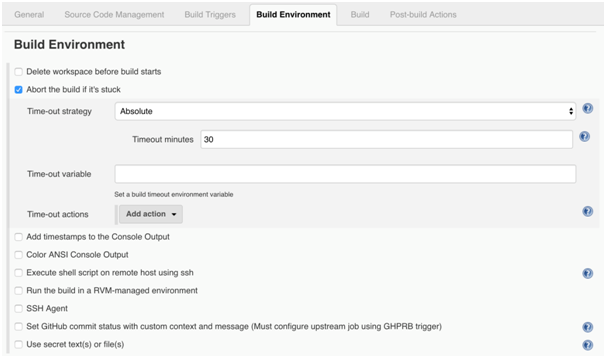
Jenkins Build Environment: This is where we define options related to the environment in which build will be executed (remove workspace every time job is executed, abort job if hangs for some period of time … etc.)
-
Jenkins Build: In Jenkins CI server, this is the most important step of every job. The result of this step impacts the status of the job at the end of execution. Depending on the installed plugins, many options are available, the most used plugins are: Execute shell, Execute Groovy script, Invoke Ant/Maven/Gradle scripts, execute windows batch command, etc.
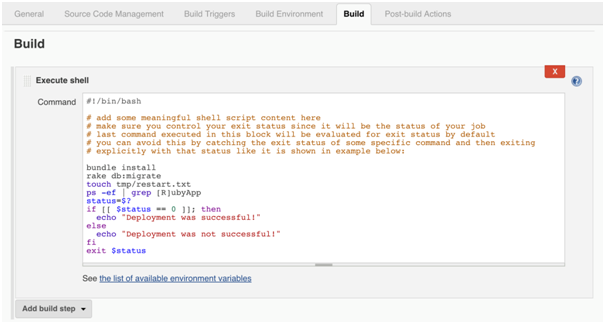
This is an example of frequently used “Execute shell” plugin which gives ability to either write your own shell script inline or execute existing one.
-
Jenkins Post-build actions: This part of the job is used for reporting results of the job or invoking other jobs in Jenkins pipeline. In general, we can send an email with status of job execution, we can publish HTML reports, JUnit results, publish artifacts that were built in build phase to S3, etc.
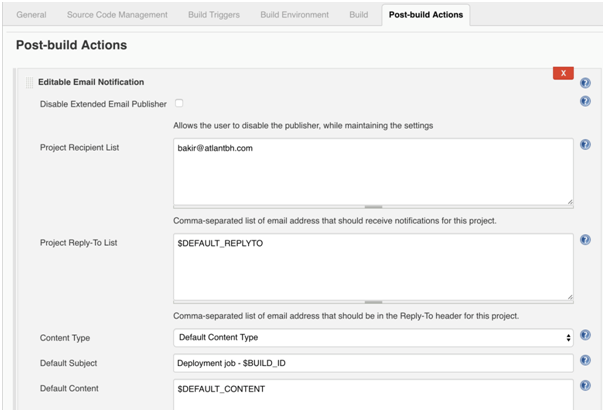
Notice how $BUILD_ID is specified in email’s subject line. Since this job is parameterized, this value is specified when starting this job. This parameter can be used in both Jenkins Build and Post-build action parts of the job.
Conclusion
By now, you are aware of the major advantages of Jenkins CI server and how CI itself adds to the software development process and to a test engineer as well. Same as with every other technology, it takes time to grasp the basics and experience the advantages. I highly recommend investing time into CI, it will definitely be worth it in the long run. Especially, once applying Jenkins CI server, many painful and repetitive procedures will be automated and suddenly you will have more time to focus on product improvements.
Does your team implement Continuous Integration and Jenkins CI server as well? Feel free to share your team’s experiences and ask questions in the comments!
This article was originally published on TestProject — Test Automation Blog.
Frequently Asked Questions on Continuous Integration with Jenkins CI Server
What are the key differences between Jenkins and Travis CI?
Jenkins and Travis CI are both popular tools for continuous integration, but they have some key differences. Jenkins is a self-hosted solution that requires you to manage and maintain your own server. It is highly customizable and can be configured to fit almost any CI/CD workflow. On the other hand, Travis CI is a cloud-based service that is easy to set up and use. It integrates well with GitHub and supports many languages out of the box. However, it may not be as flexible as Jenkins for complex workflows.
How does Jenkins compare to GitLab CI/CD?
Both Jenkins and GitLab CI/CD offer robust continuous integration solutions. Jenkins is known for its flexibility and large plugin ecosystem, while GitLab CI/CD is praised for its seamless integration with the GitLab ecosystem. GitLab CI/CD also offers built-in Docker support, which can be a significant advantage for teams using Docker.
What are the advantages of using Jenkins over other CI servers?
Jenkins offers several advantages over other CI servers. It is open-source and has a large and active community, which means it is continually being improved and updated. It also has a vast plugin ecosystem, allowing you to extend its functionality to fit your specific needs. Additionally, Jenkins supports a wide range of languages and tools, making it a versatile choice for many different projects.
How does Jenkins handle continuous integration for Python projects?
Jenkins is a versatile tool that can handle continuous integration for Python projects. It can automate the building, testing, and deployment of Python applications, and it supports many popular Python testing frameworks. Jenkins also integrates well with version control systems like Git, making it easy to incorporate into your existing workflow.
What are the key considerations when choosing between Jenkins and Travis CI?
When choosing between Jenkins and Travis CI, you should consider factors like your team’s technical expertise, the complexity of your CI/CD workflow, and your budget. Jenkins requires more setup and maintenance but offers more flexibility and control. Travis CI is easier to set up and use but may not be as flexible for complex workflows. It is also a paid service, while Jenkins is free and open-source.
How does Jenkins support the CI/CD pipeline?
Jenkins supports the CI/CD pipeline by automating the stages of code delivery, from integration and testing to deployment. It allows for continuous feedback, as developers can quickly identify and fix issues in the code. Jenkins also integrates with a variety of tools in the CI/CD ecosystem, making it a versatile choice for implementing a CI/CD pipeline.
Can Jenkins be used for projects not hosted on GitHub?
Yes, Jenkins can be used for projects not hosted on GitHub. It supports a wide range of version control systems, including Subversion, Mercurial, and Perforce. This makes Jenkins a versatile choice for teams using different version control systems.
How does Jenkins handle parallel builds?
Jenkins handles parallel builds by distributing tasks across multiple machines or executors. This allows for faster build times and more efficient use of resources. You can configure Jenkins to automatically manage your build infrastructure, or you can manually specify which tasks should run on which machines.
What are some common challenges when setting up Jenkins?
Some common challenges when setting up Jenkins include managing dependencies, configuring build triggers, and setting up secure access. However, Jenkins has a large and active community, so there are many resources available to help you overcome these challenges.
How can I extend the functionality of Jenkins?
You can extend the functionality of Jenkins by installing plugins. Jenkins has a vast plugin ecosystem, with plugins for everything from integrating with different version control systems to improving the user interface. You can also write your own plugins if you need functionality that isn’t provided by existing plugins.
IT professional with 4+ years experience in software automation and testing who is currently employed in AtlantBH. Always willing to learn new technologies and improve my skills as well as improve existing software solutions on which I'm working

Published in
·Debugging & Deployment·Development Environment·Microsoft Tech·PHP·Programming·Web·December 7, 2013

Published in
·automation·Debugging & Deployment·Development Environment·Meta·Patterns & Practices·PHP·December 1, 2014
Published in
·automation·Debugging & Deployment·Development Environment·Meta·Patterns & Practices·PHP·December 4, 2014