Changing Depth of Field in Photoshop
In Photography, the depth of field refers to the area of sharp focus in a photograph. You can create photographs which are fully in focus throughout (large depth of field) or which have a small area sharply focused but the rest is blurred (small depth of field) or photographs which may have a mix of half and half (medium depth of field).
Adjusting the aperture on your camera is one factor which allows you to change the depth of field. However, if your camera is fully automatic it can be difficult to achieve depth of field effects or if you need to change the depth of field on an existing photograph, that’s where Photoshop comes in.
In this quick, simple tutorial, we’ll manipulate a photograph to give a sharp foreground (the face) and a blurred background (the rest of the body).
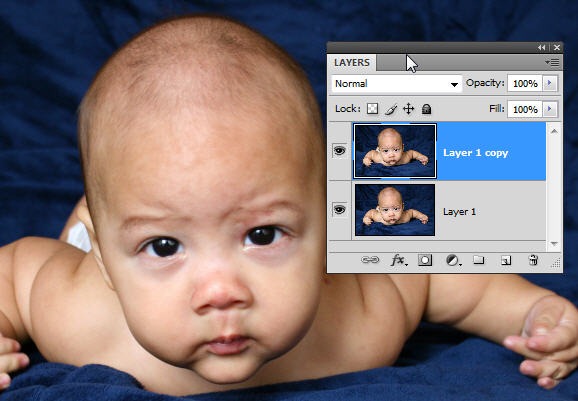
1. Open the photo that you want to apply the effect to. I’m using this gorgeous picture of a baby by coolza on Stock Xchng. (You can download it for free but must give credit.)
2. Duplicate the layer by pressing Ctrl + J (windows) or Cmd + J (mac) in the Layers palette.
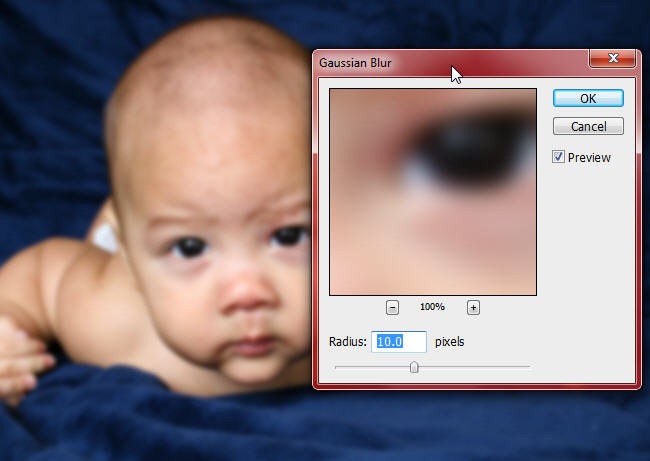
3. Choose Filter > Blur > Gaussian Blur and when the dialog box opens increase the Radius to about 10 pixels so that the entire image is blurred.
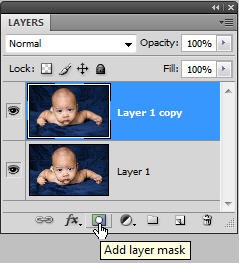
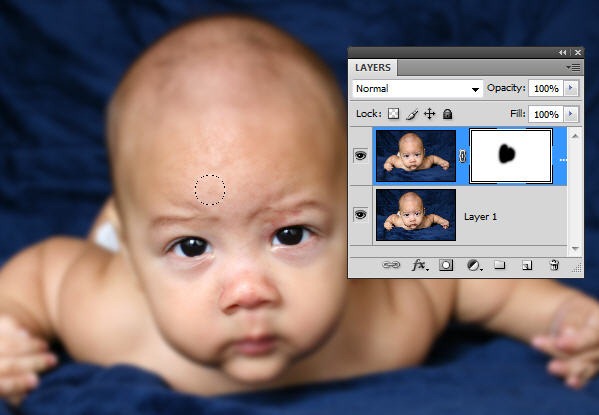
4. Now we can use a Layer Mask to reveal part of the untouched layer at the bottom of the Layer stack. On the Layer palette, click on the Add Layer Mask icon.
When the Layer Mask thumbnail is added, click on it to ensure the Layer Mask is selected rather than the whole layer.
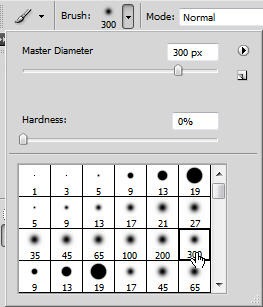
5. In the toolbar, select the Brush Tool, set the Foreground color to black and in the Options bar set it a round tip of 300 pixels and 0% hardness.
6. Start painting on the baby’s face and you will see the Sharpness from the original image.
7. Keep painting until the baby’s head is fully sharp but the rest of it’s body is left blurred. And your final image should look something like this.
Frequently Asked Questions about Changing Depth of Field in Photoshop
How can I create a realistic depth of field effect in Photoshop?
Creating a realistic depth of field effect in Photoshop involves several steps. First, you need to duplicate your background layer and apply a lens blur to the duplicate layer. Then, you need to create a depth map, which is a grayscale image that Photoshop uses to determine the amount of blur at different points in the image. The areas in white will have the most blur, while the areas in black will have the least. You can create a depth map by using the gradient tool and drawing a gradient from white to black. Once you have your depth map, you can apply it to your image using the lens blur filter.
What is the difference between depth of field and focus in Photoshop?
Depth of field and focus are two different concepts in photography and Photoshop. Focus refers to the point in an image where objects are at their sharpest, while depth of field refers to the range of distance in an image where objects appear acceptably sharp. In Photoshop, you can manipulate both focus and depth of field to create different effects. For example, you can use the lens blur filter to create a shallow depth of field effect, or you can use the sharpen tool to enhance the focus of certain areas in your image.
How can I use the gradient tool to create a depth map in Photoshop?
The gradient tool in Photoshop is a powerful tool for creating depth maps. To use it, first create a new layer and fill it with a black and white gradient. The white areas will represent the parts of your image that are in focus, while the black areas will represent the out-of-focus areas. Once you have your gradient, you can use the brush tool to paint in areas of focus and blur. Remember to paint in white for areas of focus and black for areas of blur. Once you’re happy with your depth map, you can apply it to your image using the lens blur filter.
Can I adjust the depth of field in a photo after it has been taken?
Yes, you can adjust the depth of field in a photo after it has been taken using Photoshop. This is done by creating a depth map and applying a lens blur to your image. The depth map allows you to control the amount of blur at different points in your image, effectively allowing you to adjust the depth of field.
How can I use the lens blur filter to create a depth of field effect in Photoshop?
The lens blur filter in Photoshop is a powerful tool for creating depth of field effects. To use it, first duplicate your background layer and apply the lens blur filter to the duplicate layer. Then, create a depth map and apply it to your image using the lens blur filter. The depth map will determine the amount of blur at different points in your image, allowing you to create a realistic depth of field effect.
What is a depth map and how is it used in Photoshop?
A depth map is a grayscale image that Photoshop uses to determine the amount of blur at different points in an image. The areas in white will have the most blur, while the areas in black will have the least. You can create a depth map using the gradient tool in Photoshop, and then apply it to your image using the lens blur filter to create a depth of field effect.
Can I use the depth of field effect to highlight a specific object in my photo?
Yes, you can use the depth of field effect in Photoshop to highlight a specific object in your photo. By creating a depth map and applying a lens blur to your image, you can control the amount of blur at different points in your image. This allows you to keep certain areas in sharp focus while blurring out the rest of the image, effectively highlighting a specific object.
How can I create a shallow depth of field effect in Photoshop?
Creating a shallow depth of field effect in Photoshop involves using the lens blur filter and a depth map. First, duplicate your background layer and apply a lens blur to the duplicate layer. Then, create a depth map with a narrow range of focus. The areas in white will be in focus, while the areas in black will be blurred. Apply the depth map to your image using the lens blur filter to create a shallow depth of field effect.
Can I use the depth of field effect to create a miniature effect in Photoshop?
Yes, you can use the depth of field effect in Photoshop to create a miniature effect, also known as a tilt-shift effect. This is done by applying a lens blur to your image and using a depth map to control the amount of blur at different points in your image. By keeping a narrow strip of your image in focus and blurring out the rest, you can create the illusion of a miniature scene.
How can I enhance the depth of field effect in Photoshop?
There are several ways to enhance the depth of field effect in Photoshop. One way is to use the gradient tool to create a more detailed depth map. By painting in areas of focus and blur with different shades of gray, you can create a more nuanced depth of field effect. Another way is to adjust the radius and threshold settings in the lens blur filter to fine-tune the amount of blur in your image.
Jennifer Farley is a designer, illustrator and design instructor based in Ireland. She writes about design and illustration on her blog at Laughing Lion Design.
Published in
·Databases·Debugging & Deployment·Development Environment·Extensions·PHP·Programming·June 12, 2014

