
In the previous part, we built the basics of our extension, implementing authentication through a custom Foundation-powered settings screen and using Trello’s JavaScript client library. In this part, we’ll finish our extension by adding the exporting logic and UI.
Key Takeaways
- Use the `chrome.extension.sendMessage` API for secure token transfer between the settings page and background page of the Chrome extension.
- Automatically open the extension’s settings page upon initial installation or when a Trello board is visited without authentication.
- Integrate a custom menu option in Trello’s UI to enable list export, using jQuery to handle dynamic DOM changes.
- Retrieve a Trello list ID through a workaround involving the inspection of card elements within the list, necessary due to Trello UI limitations.
- Implement message passing in the background script to fetch list cards from Trello’s API once the list ID is acquired.
- Offer export options in both TXT and JSON formats, using a custom-built modal popup to display export data, circumventing CSS conflicts with Trello’s native styles.
Messaging
When we authenticate with Trello on the settings screen, the Trello token is saved in local storage. However, the settings page is its own page and, effectively, its own environment – ergo, neither the extension’s background page nor the extension’s content scripts have access to it. This is where we need to use message passing.
The chrome.extension.sendMessage API is used to send messages to and from background pages. In our case, we’ll be using it to send the token from the settings page to our background page. Since our settings adventure is done as soon as this is completed, we might as well automatically close the tab, to improve user friendliness.
Update the first part of the init function in settings.js to this:
    // Check if page load is a redirect back from the auth procedure

    if (HashSearch.keyExists('token')) {

        Trello.authorize(

            {

                name: "Trello Helper Extension",

                expiration: "never",

                interactive: false,

                scope: {read: true, write: false},

                success: function () {

                    chrome.extension.sendMessage({

                        command: 'saveToken',

                        token: localStorage.getItem('trello_token')

                    }, function(data) {

                        chrome.tabs.getCurrent(function (tab) {

                            chrome.tabs.remove(tab.id)

                        });

                    });

                },

                error: function () {

                    alert("Failed to authorize with Trello.")

                }

            });

    }
Using this logic, we tell the Trello library to send a message to the extension when authentication completes, and as soon as it receives a return message saying the message was received (that’s the function(data) part), we close the current tab.
Now let’s deal with the background page. First, change the contents of background.html to this:
<!doctype html>

<script type="text/javascript" src="scripts/key.js"></script>

<script type="text/javascript" src="scripts/background.js"></script>

<script type="text/javascript" src="lib/jquery-2.1.1.min.js"></script>

<script type="text/javascript" src="lib/trello_client.js"></script>
We load the app key, the background script which we’ll be using for our logic, and the Trello client as before. Obviously, we need jQuery too – it’s Trello’s dependency.
Then, change scripts/background.js to:
chrome.extension.onMessage.addListener(

    function (request, sender, sendResponse) {

        chrome.pageAction.show(sender.tab.id);
        // Now we have a token saved locally, as fetched from the settings page after authorization.

        if (request.command == 'saveToken') {

            localStorage.setItem('trello_token', request.token);

            sendResponse();

            return true;

        }
    });
This is the part which receives the message from the settings page. It grabs the token out of the request and saves it into localStorage for future use. We use the object formation with command as the main key because we intend to send other commands into the background page later.
Auto-settings
Above the saveToken command, let’s another block:
        if (!request.command && !localStorage.getItem('trello_token')) {

            chrome.tabs.create({url: chrome.extension.getURL('settings/index.html')});

            sendResponse();

            return true;

        }
If we didn’t issue a specific command, and our user is not yet authenticated with Trello, open the settings page in a new tab. This makes sure the settings page is opened immediately after initial installation of the extension, as soon as a Trello board is visited in the browser.
Adding a Menu Option
Trello’s UI is very, very unfriendly to customization. The lists don’t have IDs in their elements, either as data attributes or links of any kind, while cards do. The context menus that get spawned when you click the list options button in the top right corner are all rebuilt from scratch every time they’re called (overkill much?) and all from one box classed as the “pop-over”, which is also summoned if you click on pretty much every other menu in the UI. What’s worse, once you call a list’s popover menu, the menu itself has no identifier of the list it was called on, so you have no idea about its context, making it extra difficult to easily get a list’s ID in order to properly query the Trello API about it and fetch the cards for export. This is why what follows might seem like an awful lot of fishy hackery, but that’s because, well, it is.
To add a menu option to the context menu, we need to edit the main.js content script. Turn it into this:
chrome.extension.sendMessage({}, function (response) {

    var readyStateCheckInterval = setInterval(function () {

        if (document.readyState === "complete") {

            clearInterval(readyStateCheckInterval);
            var popover = $(".pop-over");

            $('.list-header-menu-icon').click(function(event) {

                var popover_summoned_interval = setInterval(function () {

                    if ($(popover).is(':visible')) {

                        clearInterval(popover_summoned_interval);

                        $(".pop-over .content").append('<hr><ul class="pop-over-list"> <li><a class="js-export-list" href="#">Export This List</a></li> </ul>');

                        $(".js-export-list").click(function(e){

                            // EXPORT LIST

                        });

                    }

                }, 50);

            });

        }

    }, 10);

});
Starting with var popover = $(".pop-over");, we set a variable to hold the popover object, just so we don’t have to keep re-fetching it. Then, when the menu button on a list is clicked (.list-header-menu-icon), we summon an interval that constantly watches out for whether or not the popover is visible. Once it becomes visible, the checking stops and a menu option is appended to the bottom of all options, specifically crafted to look like the rest, so it fits in. Finally, a click event handler is bound to this option, so that we can call “export” when the option is clicked. But.. how do we know what we need to export? And which format are we exporting in?
Finding the list ID
Like I said before, Trello’s UI is notoriously developer-unfriendly. It doesn’t offer list IDs with the DOM elements, so finding them is less than straightforward. Why do we need list IDs? To query the Trello API and fetch the cards, so we can export them – we already said we weren’t going to parse the UI due to its instability on large boards, but are going to rely on the API.
Luckily, if we inspect the cards in individual lists, we can see that those actually do have a href attribute, and that it contains the card ID. By knowing the card ID, we can query Trello for its information and grab the ID of its parent list. But.. if the popover menu is not attached to a list, how do we find out which list we’ve clicked on? We can’t just grab the first card we come across, that would be too random.
We can use the event fired by jQuery when the menu button is clicked. This is important! We use the original click on the menu button, instead of the click on the “Export” option because while the original button is bound to the list we’re interested in exporting, the actual menu that gets spawned isn’t and as such, makes it nearly impossible for us to find out which list we’re dealing with. In place of the // EXPORT LIST comment in the code above, add this:
exportList(event);
Then, create the function:
function exportList(event) {
    var first_card_id = findFirstCardId(event);

    if (!first_card_id) {

        alert('No cards found in the list.');

        return false;

    }

}
Finally, create the findFirstCardId function:
/**

 * Uses the menu button on a card to find the first card in that list and get its ID

 * Returns false if not found, or the ID if there is a card

 * @param event

 * @returns bool | string

 */

function findFirstCardId(event) {

    var titles = $(event.currentTarget).parent().parent().find('a.list-card-title:first');

    if (titles[0] === undefined) {

        console.error('List has no cards!');

        return false;

    } else {

        return $(titles[0]).attr('href').split('/')[2];

    }

}
We fetch the grandparent of the event’s target (the list), and find the first card title within it. The title contains the href in this shape:

If no title was found, we alert the user that the list cannot be exported. Otherwise, we extract and return the card’s ID.
Now that our exportList function has the card ID, we can use it to find out the list ID. If we look at the API docs, we can use the URL card/{{ID}} to get what we need. To minimize the amount of data we’re asking Trello to return, we can also limit the query to only the idList property with the fields param. Let’s add a new command into background.js.
        if (request.command == 'getCardListId') {

            trelloInit();

            Trello.rest('GET', 'cards/'+request.id, {fields: "idList"}, function(data){

                sendResponse(data);

            }, function (data) {

                sendResponse(data);

            });

            return true;

        }
We need to define the trelloInit function, too. That’s one we can call every time before a command that interacts with Trello is called, so the token and key are correctly set and we’re 100% certain our requests are authenticated.
function trelloInit() {

    Trello.setKey(APP_KEY);

    Trello.setToken(localStorage.getItem('trello_token'));

}
We are now successfully fetching the list ID.
Fetching the list cards
With a couple more lines of code, back in main.js, we now have an exportList function looking like this:
function exportList(event) {
    var first_card_id = findFirstCardId(event);

    if (!first_card_id) {

        alert('No cards found in the list.');

        return false;

    }
    chrome.extension.sendMessage({

        command: 'getCardListId',

        id: first_card_id

    }, function(data){

        if (data.idList !== undefined) {

            chrome.extension.sendMessage({

                command: 'getListCards',

                id: data.idList

            }, function(data) {

                console.log(data);

            });

        }

    });

}
In “humanese”, this is:
- get the ID of the first card
- if ID is not found, list is obviously empty
- if ID is found, call the background page and tell it to give us the list ID via a call to the Trello API
- if list ID is fine, make another call to the background page getting the list’s cards, and when done, output the result in the console.
Back in the background page, we can now build the getListCards command, as per the API docs:
        if (request.command == 'getListCards') {

            trelloInit();

            Trello.rest('GET', 'lists/'+request.id+'/cards', {}, function(data){

                sendResponse(data);

            }, function (data) {

                sendResponse(data);

            });

            return true;

        }
If you reload and test the extension now, you should be able to not only see the export option appear on your lists, but also the data we’re looking for exported in the console after clicking the option.
Export Formats
For now, we’ll take a simplified approach to exporting, as this tutorial is running a bit long as is. We’ll offer the user a selection of either TXT or JSON, with a shape and form predefined by us. Text output will, for now, look like this:
Topic: Test Card 1

Description:

This is a description
Test Card 2
Test Card 3
Topic: Test Card 4

Description:

This is another description
Test Card 5
while JSON will be content as received from Trello, i.e. this:
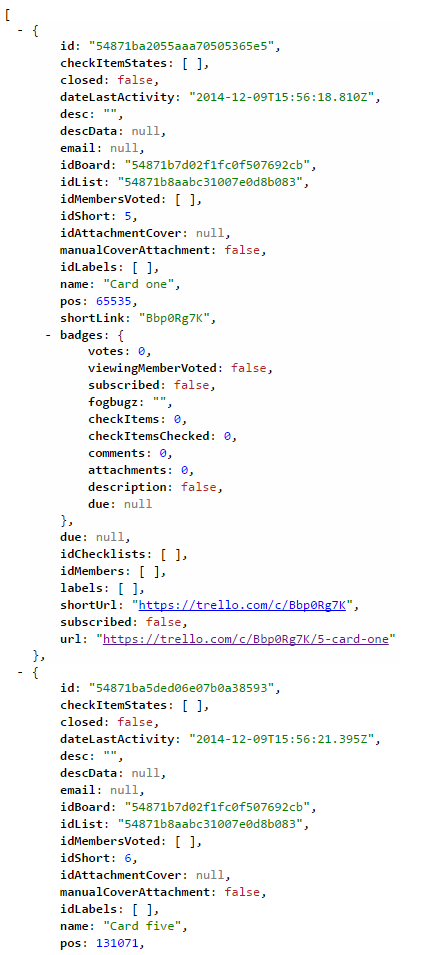
The JSON data will, obviously, produce much more information, but it’s also far easier to edit – just paste it into any IDE or a tool like JSON Editor Online or JSON to CSV and you’re good to go.
To export, we’ll need a modal window into which to paste the data. An appealing option here is the Foundation framework, seeing as we’re already using it for our settings page and it has its own modal popup component, but neither Foundation’s nor Trello’s CSS are properly namespaced, and including Foundation’s CSS in Trello’s causes conflicts. We also have jQuery pre-included, but again, to get a Dialog up and running, we’d need to include jQuery UI and even that wouldn’t be enough – Chrome Extensions don’t support loading images in CSS via relative url() syntax, which is what jQuery UI uses – we’d have to rewrite jQuery UI’s CSS to use local extension URLs or to use base64 encoded images, both unattractive approaches.
Instead, we’ll be crafting our own popup, and using some of Trello’s existing styles, ignoring all conflicts along the way. I’ll put the final code here, and then explain it. Please create lib/TrelloHelper/js/exportPopup.js, and give it the following contents:
var exportPopup;
var TrelloExportPopup = function() {
}
TrelloExportPopup.prototype.init = function() {
    // When run, this makes sure the popup isn't around.

    // If it finds the popup residue, it removes it, paving the way for a fresh one.

    var popoverScan = $('.trello_helper_export_popup');

    if ($(popoverScan).length > 0) {

        $(popoverScan).remove();

    }

    popoverScan = null;
    // Create our new popup, hidden by default

    exportPopup = $('<div class="trello_helper_export_popup" style="display: none"></div>');
    // Create a header area for the popup, which will contain the buttons / tabs

    // Create a body area, which will contain the export data

    var header = $('<div class="trello_helper_export_popup_header"></div>');

    var body = $('<div class="trello_helper_export_popup_body"></div>');
    // Create areas for exporting the data - simple non-editable textareas

    var textarea = $('<textarea class="trello_helper_export_popup_textarea exportarea" readonly="true" style="display: none"></textarea>');

    var jsonarea = $('<textarea class="trello_helper_export_popup_jsonarea exportarea" readonly="true" style="display: none"></textarea>');
    // Create header buttons / tabs

    var textButton = $('<a href="#" class="exporttab button" data-area="text">Text Export</a>');

    var jsonButton = $('<a href="#" class="exporttab button" data-area="json">JSON Export</a>');

    var closeButton = $('<a href="#" class="button right">Close</a>');
    // Have the close button close our tab, and do the same if the user clicks outside the popup

    $(closeButton).click(this.hide);
    // Put everything together

    $(header).append(jsonButton).append(textButton).append(closeButton);

    $(body).append(textarea).append(jsonarea);

    $(exportPopup).append(header).append(body);
    // Add out popup to the Trello page

    $("#content").append(exportPopup);
    // Bind listeners to the buttons / tabs in the header, so we can switch output modes

    $(".exporttab").click(function (e) {

        var area = e.currentTarget.dataset.area;

        $(".exportarea").hide();

        $(".trello_helper_export_popup_" + area + "area").show();

    });
};
TrelloExportPopup.prototype.hide = function() {

    // Execute hiding logic only if the popup is visible

    if ($(".trello_helper_export_popup").is(":visible")) {

        $(exportPopup).hide();

    }

};
TrelloExportPopup.prototype.show = function(data) {
    // Hide all textareas

    $(".exportarea").hide();

    // Show the first one by simulating a click on the first tab

    // This makes sure our export popup always opens in JSON mode

    $(".exporttab")[0].click();
    var text = '';

    var cardCount = data.length;

    var i = 0;

    while (i < cardCount) {

        text += 'Topic: ' + data[i].name;

        if (data[i].desc) {

            text += '\nDescription:\n' + data[i].desc;

        }

        text += '\n\n\n';

        i++;

    }
    $(exportPopup).find('.trello_helper_export_popup_textarea').text(text);

    $(exportPopup).find('.trello_helper_export_popup_jsonarea').text(JSON.stringify(data));

    $(exportPopup).show();

};
I chose to have the popup logic outside the main script so we can easily improve upon it later on. I also opted for an “object oriented” approach, just because I like it. We define a new TrelloExportPopup “class”, with three methods – init, show and hide. Init will be called as soon as the content scripts load. It is the method in charge of building the popup, attaching the right event listeners, and adding the whole thing into the HTML of the Trello board. Adding the .button class onto the buttons in the header of the popup makes sure we get a look that’s consistent with the current Trello UI. The look I’m going for here is a kind of “tabbed” interface – click on Text and the text export shows, click on JSON and JSON is shown.
The hide method will hide the popup, but only if it exists somewhere on the page in a visible form. The show method automatically activates the first (JSON) tab view, and populates the export areas with the required data. The JSON area is a simple stringify dump – an output of the JSON data in string form, while the text area, for now, merely outputs the title and description of the card each on a separate line, with two empty lines between cards – highly “copy-paste friendly”.
All we need to do now is style it a little. Here’s the content of lib/TrelloHelper/css/exportpopup.css:
.trello_helper_export_popup {

    background-color: white;

    z-index: 1000;

    position: absolute;

    left: 50%;

    top: 50%;

    transform: translate(-50%, -50%); /* Yep! */

    width: 48%;

    min-height: 50%;

    border-radius: 3px;

    border: 1px solid #dbdbdb;

    border-bottom-color: #c2c2c2;

    box-shadow: 0 1px 6px rgba(0,0,0,.15);

}
.trello_helper_export_popup_body {

    position: absolute;

    right: 0;

    left: 0;

    bottom: 0;

    top: 55px;

}
.trello_helper_export_popup .button {

    margin: 10px;

}
.trello_helper_export_popup .button .right {

    float: right;

}
.trello_helper_export_popup textarea {

    height: 100%;

}
This makes sure the popup is centered and looks like native Trello popups. It also makes sure the textarea which will be showing us the export contents fills the rest of the popup’s space. Now let’s include these files in our content scripts:
    "content_scripts": [

        {

            "matches": ["https://trello.com/b/*"],

            "css": ["lib/TrelloHelper/css/exportpopup.css"],

            "js": [

                "lib/jquery-2.1.1.min.js",

                "lib/TrelloHelper/js/exportpopup.js",

                "scripts/main.js"

            ],

            "run_at": "document_idle"

        }

    ],
Finally, let’s spice up main.js with the new popup logic. The final version of main.js looks like this:
var tep = new TrelloExportPopup();
chrome.extension.sendMessage({}, function (response) {

    var readyStateCheckInterval = setInterval(function () {

        if (document.readyState === "complete") {

            clearInterval(readyStateCheckInterval);
            var popover = $(".pop-over");
            tep.init();
            $('.list-header-menu-icon').click(function (event) {

                var popover_summoned_interval = setInterval(function () {

                    if ($(popover).is(':visible')) {

                        clearInterval(popover_summoned_interval);

                        $(".pop-over .content").append('<hr><ul class="pop-over-list"> <li><a class="js-export-list" href="#">Export This List</a></li> </ul>');

                        $(".js-export-list").click(function (e) {

                            exportList(event);

                        });

                    }

                }, 50);

            });

        }

    }, 10);

});
function exportList(event) {

    tep.hide();

    var first_card_id = findFirstCardId(event);

    if (!first_card_id) {

        alert('No cards found in the list.');

        return false;

    }
    chrome.extension.sendMessage({

        command: 'getCardListId',

        id: first_card_id

    }, function (data) {

        if (data.idList !== undefined) {

            chrome.extension.sendMessage({

                command: 'getListCards',

                id: data.idList

            }, function (data) {

                tep.show(data);

            });

        }

    });

}
We first “instantiate” the TrelloExportPopup, so we can use its methods in our code. Then, before binding the click event listener to the menu, we initialize our popup with tep.init() so it’s good and ready in our DOM before it’s needed. After the Export link is clicked, we call our exportList function as before.
In the exportList function, we first hide the popup with tep.hide() in case one is open while we’re browsing the menu of another list, and then, once we get the cards from our background page, we show the export popup with tep.show(data). That’s it!
Reload the extension now, refresh the Trello page, and you should have a functioning export option!
Bugs and improvements
I’ve left a few bugs and caveats in on purpose. If there’s enough interest, we’ll be dealing with those in a future post, tweaking and optimizing the extension for fail-safety. Here are some improvements that are still possible:
Caching
To speed things up for future uses, we can use localStorage to remember which board a list belongs to. Note that this might break if you move a list from board to board, so implement this feature carefully – make sure you add another listener for list moves, so you can invalidate the cached data!
Duplicate Export Option Spawns
If you maniacally click on the menu icon while the menu is still open, you’ll keep adding new “Export” options at the bottom of the menu. A failsafe needs to be implemented which checks if the option is already there.
Init Problems
On huge boards with hundreds of boards and members, Trello’s UI becomes abysmally slow. This causes a misfire of the document ready event, and the init portion of our script executes before there are any UI elements on which to bind listeners. As such, the menu sometimes doesn’t have the Export option and doesn’t get it until you refresh.
Changing boards
Changing boards kills the current UI and rebuilds it for the new board. The problem is, however, that the elements with the event listeners get killed too – so our menu no longer summons the Export option. Similar to the above problem, a reinitialization needs to be triggered on board change for everything to work.
Inifinite loop
There’s an astronomically small chance that a popover doesn’t render after a menu click – maybe Trello changed something in their UI, maybe they altered the class, or maybe they just have a UI bug of some kind – in which case the loop checking for its visibility would become infinite, taking up enormous amounts of CPU resources until the tab’s process was killed. A safeguard against that would be nice.
Conclusion
In this short series, we built a simple Chrome extension for Trello which lets us export the cards from a given list as a JSON or TXT list. Use this example to build on it, and create your own Trello extensions – the things you can accomplish are limited only by your imagination (and the features that Trello’s API provides :) ). The authentication has already been solved for you, and the logic templates are in place – start coding!
The code we wrote in this tutorial series is available on Github.
Would you like to see a continuation of this tutorial? More features implemented? Let me know! Feedback appreciated!
Frequently Asked Questions (FAQs) about Exporting Trello Lists
How can I export Trello lists to Excel?
Exporting Trello lists to Excel is a straightforward process. First, you need to install the Chrome extension called “Export for Trello”. Once installed, you can navigate to your Trello board and click on the extension icon. You will see an option to export your Trello lists. Choose the Excel format and your Trello lists will be downloaded as an Excel file. This file will contain all the details of your Trello lists including card names, descriptions, labels, and more.
Can I export Trello lists to PDF?
Yes, you can export Trello lists to PDF. Similar to exporting to Excel, you need to install the “Export for Trello” Chrome extension. Once installed, navigate to your Trello board, click on the extension icon, and choose the PDF format for exporting. Your Trello lists will be downloaded as a PDF file.
Is there a way to export Trello lists to CSV?
Yes, Trello lists can be exported to CSV format. The process is similar to exporting to Excel or PDF. You need to install the “Export for Trello” Chrome extension, navigate to your Trello board, click on the extension icon, and choose the CSV format for exporting. Your Trello lists will be downloaded as a CSV file.
Can I export Trello lists to an image?
Yes, Trello lists can be exported as an image. This can be done using the “Export for Trello” Chrome extension. After installing the extension, navigate to your Trello board, click on the extension icon, and choose the Image format for exporting. Your Trello lists will be downloaded as an image file.
Can I export Trello lists with labels?
Yes, when you export Trello lists using the “Export for Trello” Chrome extension, all the details of your Trello lists including labels are exported. This means you can keep track of your labels even after exporting your Trello lists.
Can I export Trello lists with card descriptions?
Yes, when you export Trello lists using the “Export for Trello” Chrome extension, all the details of your Trello lists including card descriptions are exported. This means you can keep track of your card descriptions even after exporting your Trello lists.
Can I export Trello lists with due dates?
Yes, when you export Trello lists using the “Export for Trello” Chrome extension, all the details of your Trello lists including due dates are exported. This means you can keep track of your due dates even after exporting your Trello lists.
Can I export Trello lists with attachments?
Unfortunately, the “Export for Trello” Chrome extension does not support exporting attachments. However, all other details of your Trello lists including card names, descriptions, labels, and due dates can be exported.
Can I export Trello lists with comments?
Unfortunately, the “Export for Trello” Chrome extension does not support exporting comments. However, all other details of your Trello lists including card names, descriptions, labels, and due dates can be exported.
Can I export Trello lists from multiple boards at once?
The “Export for Trello” Chrome extension allows you to export Trello lists from one board at a time. If you want to export lists from multiple boards, you need to navigate to each board and export the lists separately.