
As you might have realised from our work in the previous chapter, at the heart of ASP.NET is its ability to create dynamic form content. Whether you’re creating a complex shopping cart application, or a simple page to collect user information and send the results out via email, Web Forms have a solution. They allow you to use HTML controls and Web controls to create dynamic pages with which users can interact. In this chapter, you will learn how Web Forms, HTML controls, and Web controls, in conjunction with VB.NET and C# code, should change the way you look at, and develop for, the Web. In this chapter I’ll introduce you to the following concepts:
- HTML controls
- Web Forms
- Web controls
- Handling page navigation
- Formatting controls with CSS
Toward the end of the chapter, you’ll put all of these concepts to work into a real world application! I’ll introduce the Dorknozzle Intranet Application that you’ll be building throughout this book, and see how what you learned in this chapter can be applied to some of the pages for the project. Keep in mind that you can download these chapters in PDF format if you’d rather print them out and read them offline.
Working with HTML Controls
HTML controls are outwardly identical to plain old HTML 4.0 tags, but employ the runat="server" attribute. For each of HTML’s most common tags, a corresponding server-side HTML control exists, although Microsoft has added a few tags and some extra properties for each. Creating HTML controls is easy – we simply stick a runat="server" attribute on the end of a normal HTML tag to create the HTML control version of that tag. The complete list of current HTML control classes and their associated tags is given in Table 4.1.
These HTML control classes are all contained within the System.Web.UI.HtmlControls namespace.
Because HTML controls are processed on the server side by the ASP.NET runtime, we can easily access their properties through code elsewhere in the page. If you’re familiar with JavaScript, HTML, and CSS, then you’ll know that manipulating text within HTML tags, or even manipulating inline styles within an HTML tag, can be cumbersome and error-prone. HTML controls aim to solve this by allowing you to manipulate the page easily with your choice of .NET language, for instance, using VB.NET or C#. We’ll start by looking at the HTML controls library, then we’ll explore in more detail the properties exposed by the controls when we process a simple form containing HTML controls and code.
Table 4.1. HTML Control Classes
HtmlAnchor
The HtmlAnchor control creates a server-side HTML <a href="..."> tag.
<a href="somepage.aspx" runat="server">Click Here</a>This line would create a new hyperlink with the text “Click Here.” Once the link is clicked, the user would be redirected to somepage.aspx as given by the href attribute.
HtmlButton
The HtmlButton control creates a server-side HTML <button> tag.
<button id="myButton" OnServerClick="Click" runat="server">Click

Here</button>
Notice that we’re using events here. On HTML controls, we need to use OnServerClick to specify the ASP.NET handler for clicks on the button, because onclick is reserved for handling clicks with JavaScript on the client side. In this example, the handler subroutine is called Click, and would be declared in a script block with the same form as the Click handlers we looked at for <asp:Button> tags previously:
<script runat="server" language="VB">

Sub Click(s As Object, e As EventArgs)

  Response.Write(myButton.ID)

End Sub

</script>

<script runat="server" language="C#">

void Click(Object s, EventArgs e) {

  Response.Write(myButton.ID);

}

</script>
In this case, when the user clicks the button, the ServerClick event is raised, the Click() subroutine is called to handle it, and the ID of the HtmlButton control is written onto the screen with Response.Write() (the Write() method of the Response object).
HtmlForm
The HtmlForm control creates a server-side <form> tag. Most HTML controls, Web controls, etc., must be placed inside an HtmlForm control.
<form runat="server">

<!-- ASP.NET controls in here -->

</form>
HtmlImage
The HtmlImage control creates a server-side <img> tag. The following code shows how we might place an HtmlImage control on a page, along with an HtmlButton:
<img id="myimage" src="arrow.gif" runat="server" />

<button id="myButton" runat="server" OnServerClick="Click">Click

Here</button>
The user could change this image dynamically by pressing the button if we add code as follows:
<script runat="server" language="VB">

Sub Click(s As Object, e As EventArgs)

  myimage.Src = "welcome.gif"

End Sub

</script>

<script runat="server" language="C#">

void Click(Object s, EventArgs e) {

  myimage.Src = "welcome.gif";

}

</script>
What will happen if these controls are placed on a page along with the script block? First of all, the image arrow.gif will appear. When the HtmlButton control is clicked, it changes to welcome.gif. Behind the scenes, the ServerClick event is raised when the button is clicked, thus the Click() subroutine is called, and the Src property of the HtmlImage control is changed from arrow.gif to welcome.gif.
HtmlGenericControl
The HtmlGenericControl creates a server-side control for HTML tags that do not have an HTML control associated with them. Perfect examples of this are the <span> and <div> tags. The following example illustrates how you can modify text within a <span> tag to change the content from I like ASP.NET to Why would anyone need PHP? dynamically.
<span id="myGenericControl" runat="server">I like ASP.NET</span>

<br />

<button id="myButton" runat="server" OnServerClick="Click">Click

Here</button>
We simply add the following code to respond to the ServerClick event and change the text:
<script runat="server" language="VB">

Sub Click(s As Object, e As EventArgs)

  myGenericControl.InnerText = "Why would anyone need PHP?"

End Sub

</script>

<script runat="server" language="C#">

void Click(Object s, EventArgs e) {

  myGenericControl.InnerText = "Why would anyone need PHP?";

}

</script>
HtmlInputButton
The HtmlInputButton control creates a server-side <input type="submit">, <input type="reset">, or <input type="button"> HTML tag.
<input type="submit" value="Click Here" runat="server" />

<input type="reset" value="Click Here" runat="server" />

<input type="button" value="Click Here" runat="server" />
As with HtmlButton, you can assign a server-side event handler to controls of this type with the OnServerClick attribute.
HtmlInputCheckBox
The HtmlInputCheckBox control creates a server-side <input type="checkbox"> HTML tag.
<input type="checkbox" id="cb1" value="ASP.NET" runat="server"

  />ASP.NET<br />

<input type="checkbox" id="cb2" value="PHP" runat="server"

  />PHP<br />

<input type="checkbox" id="cb3" value="JSP" runat="server"

  />JSP<br />

<input type="checkbox" id="cb4" value="CGI" runat="server"

  />CGI<br />

<input type="checkbox" id="cb5" value="Coldfusion" runat="server"

  />Coldfusion<br>
The HtmlInputCheckBox control is the perfect choice when you want to allow your users to select multiple items from a list.
HtmlInputFile
The HtmlInputFile control creates a server-side <input type="file"> tag in the HTML. This displays a text box and Browse button to allow users to upload files from ASP.NET pages. There is no Web control equivalent for this tag, so it’s typically required when working with file uploads – even with Web Forms (which we’ll discuss shortly).
<input type="file" id="fileUpload" runat="server" />HtmlInputHidden
The HtmlInputHidden control creates a server-side <input type="hidden"> tag.
<input type="hidden" id="hiddenField" runat="server" />Try viewing the source of any one of your ASP.NET pages from your browser, and you’re likely to find this tag being used to store view state information.
HtmlInputImage
The HtmlInputImage control creates a server-side <input type="image"> tag.
<input type="image" id="imgMap" runat="server"

  src="ButtonImage.jpg" />
This tag provides an alternative to the HtmlInputButton control. They both function in the same way; the difference is that the HtmlInputImage control uses a custom image rather than the beveled gray Windows-style button. The mouse coordinates are also sent along with the form submission when the user clicks a control of this type.
HtmlInputRadioButton
The HtmlInputRadioButton control creates a server-side radio button. The following code, for instance, offers a choice of Male or Female:
Gender?<br />

<input type="radio" id="radio1" runat="server" />Male<br />

<input type="radio" id="radio2" runat="server" />Female
Similar to the HtmlInputCheckBox control, the HtmlInputRadioButton control creates a list of items for users to choose from. The difference, however, is that the user is only able to select one item at a time.
HtmlInputText
The HtmlInputText control creates a server-side <input type="text"> or <input type="password"> tag.
Please Login<br />

Username:<br />

<input type="text" id="username" runat="server" /><br />

Password:<br />

<input type="password" id="password" runat="server" />
The preceding code creates a typical login screen layout.
HtmlSelect
The HtmlSelect control creates a server-side version of the <select> tag for creating drop-down lists or list boxes. The following code creates a drop-down menu:
Select your favorite movie:<br />

<select id="selectMovie" runat="server">

<option>Star Wars</option>

<option>Spider Man</option>

<option>The Godfather</option>

<option>Lord of the Rings</option>

</select>
The following code creates a multiple-selection list box:
Which of these movies do you like?<br />

<select id="selectMovie" runat="server" multiple="true" size="4">

<option>Star Wars</option>

<option>Spider Man</option>

<option>The Godfather</option>

<option>Lord of the Rings</option>

</select>
You’ll notice the <option> tag within the main <select> tag; this is used to denote each item to appear in the list box or drop-down menu.
HtmlTable, HtmlTableRow and HtmlTableCell
The HtmlTable, HtmlTableRow, and HtmlTableCell controls create server-side versions of the <table>, <tr>, <td>, and <th> tags. The following code creates a server-side table:
<table id="myTable" border="1" cellspacing="0" cellpadding="0"

runat="server">

<tr runat="server" id="row1">

<td runat="server" id="cell1">Table Data 1</td>

<td runat="server" id="cell2">Table Data 2</td>

</tr>

<tr runat="server" id="row2">

<td runat="server" id="cell3">Table Data 3</td>

<td runat="server" id="cell4">Table Data 4</td>

</tr>

</table>

<button id="myButton" OnServerClick="Click" runat="server">Click

Here</button>
You could add the following code to respond to the Click event raised by the HtmlButton control and change the content of the first cell to read “Hello World.”
<script runat="server" language="VB">

Sub Click(s As Object, e As EventArgs)

  cell1.InnerText = "Hello World"

End Sub

</script>

<script runat="server" language="C#">

void Click(Object s, EventArgs e) {

  cell1.InnerText = "Hello World";

}

</script>
HtmlTextArea
The HtmlTextArea control creates a server-side version of the <textarea> tag.
<textarea cols="60" rows="10" runat="server"></textarea>We’ve glanced only briefly over the HTML controls, as they should all be fairly familiar from your experience with HTML. But if you’d like more information on the HTML controls including the properties, methods, and events for each, see Appendix A, HTML Control Reference.
Processing a Simple Form
Now that you have a basic understanding of ASP.NET page structure, the languages VB.NET and C#, and HTML controls, let’s put everything together and create a simple ASP.NET application. The application that we will create, in VB.NET and C#, will be a simple survey form that uses the following HTML controls:
HtmlFormHtmlButtonHtmlInputTextHtmlSelect
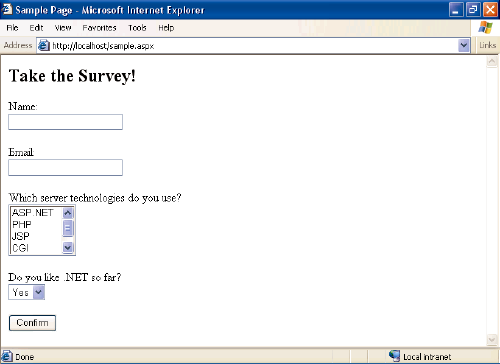
Let’s begin by creating a new file within your favorite code editor. The following code creates the visual interface for the survey:
Example 4.1. SimpleForm.aspx (excerpt)
<html>

<head>

...

</head>


<body>

<form runat="server">

  <h2>Take the Survey!</h2>

  <p>Name:<br />

  <input type="text" id="txtName" runat="server" /></p>

  <p>Email:<br />

  <input type="text" id="txtEmail" runat="server" /></p>

  <p>Which server technologies do you use?<br />

  <select id="servermodel" runat="server" multiple="true">

    <option>ASP.NET</option>

    <option>PHP</option>

    <option>JSP</option>

    <option>CGI</option>

    <option>Coldfusion</option>

  </select></p>

  <p>Do you like .NET so far?<br />

  <select id="likedotnet" runat="server">

    <option selected>Yes</option>

    <option>No</option>

  </select></p>

  <p><button id="myButton" OnServerClick="Click" runat="server">

  Confirm</button></p>

</form>

</body>

</html>
From what we’ve already covered on HTML controls, you should have a good idea of what this page will look like. All we’ve done is place some HtmlInputText controls, an HtmlButton control, and an HtmlSelect control inside the obligatory HtmlForm control. Remember, HTML controls are essentially just HTML tags with the runat="server" attribute. When it’s complete, the interface will resemble Figure 4.1.
Figure 4.1. Create the interface of the ASP.NET page using HTML controls.
When users click the button, we’ll simply display their responses in their browsers. In a real application, we’d probably be more likely to save this to a database and perhaps show the results as a chart. Whatever the case, we’d access the properties of the HTML controls as shown in the following code:
Example 4.2. SimpleForm.aspx (excerpt)
<script runat="server" language="VB">

Sub Click(s As Object, e As EventArgs)

  Response.Write("Your name is: " & txtName.value & "<br />")

  Response.Write("Your email is: " & txtEmail.value & "<br />")

  Response.Write("You like to work with: " & servermodel.value & _

    "<br />")

  Response.Write("You like .NET: " & likedotnet.value)

End Sub

</script>
Example 4.3. SimpleForm.aspx (excerpt)
<script runat="server" language="C#">

void Click(Object s, EventArgs e) {

  Response.Write("Your name is: " + txtName.Value + "<br />");

  Response.Write("Your email is: " + txtEmail.Value + "<br />");

  Response.Write("You like to work with: " + servermodel.Value +

    "<br />");

  Response.Write("You like .NET: " + likedotnet.Value);

}

</script>
Just as you’ve seen with examples from previous chapters, we place our VB.NET and C# code inside a server-side script block within the <head> part of the page. Next, we create a new Click event handler which takes the two usual parameters. Finally, we use the Response object’s Write() method to print out the user’s responses within the page.
Once you’ve written the code, you can save your work and test the results from your browser. Enter some information and click the button. What you type in should appear at the top of the page when the button is clicked.
Introduction to Web Forms
With the inception of new technologies, there’s always new terminology to master. ASP.NET is no different. With ASP.NET, even the simplest terms that were previously used to describe a Web page have changed to reflect the processes that occur within them. Before we begin to describe the process followed by Web Forms, let’s discuss the foundation concept of Web pages.
On the most basic level, a Web page is a text file that contains markup. Web pages are meant to be viewed from a browser window, which parses the file containing markup to present the information to the user in the layout envisaged by the developer. Web pages can include text, video, sound, animations, graphics, and even chunks of “code” from a variety of technologies.
An HTML form, as you learned in the previous sections, is a page that contains one or more form elements grouped together within an HTML <form> tag. Users interact with the various form elements to make certain choices, or provide certain information; this information is then sent to the server for processing upon the click of a submit button. This is useful to us as ASP.NET developers because regular HTML forms have a built-in mechanism that allows forms to be submitted to the server. Once the form has been submitted, some kind of extra technology – in this case, ASP.NET – needs to be present on the server to perform the actual form processing.
In ASP.NET, we call Web pages Web Forms; they contain presentational elements (ASP.NET Web controls) in an HTML form, as well as any code (the processing logic) we’ve added for the page’s dynamic features.
A typical Web Form is shown in Figure 4.2.
Figure 4.2. A Web Form contains code for processing logic and Web controls for presentational purposes.
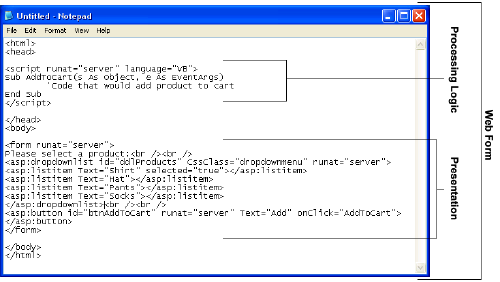
The next section looks at the various Web controls and how they may be used within your Web Forms. They’re very similar in appearance to HTML, so you shouldn’t have any trouble coming to grips with them.
Introduction to Web Controls
As we’ve just seen, Web Forms allow users to interact with our site using Web controls. With Web controls, Microsoft basically reinvented HTML from scratch. For example, it created two different Web controls that correspond to the two different versions of the HTML <select> tag: a DropDownList control and a ListBox control. This means there isn’t a direct one-to-one correspondence between the Web controls and standard HTML tags, as there is with HTML controls. Web controls follow the same basic pattern as HTML tags, but the tag name is preceded by asp: and the name is capitalized using “CamelCasing.” Consider the HTML <input> tag, which creates an input text box on screen:
<input type="text" name="username" size="30" />The equivalent Web control is the TextBox control, and it would look like this:
<asp:TextBox id="username" Columns="30" runat="server">

</asp:TextBox>
Note that, unlike many HTML tags, Web controls always require a closing tag (the </asp:TextBox> part above). We can also use the shorthand /> syntax if our Web control tag doesn’t contain anything between its opening and closing tags. So, we could also write this TextBox like so:
<asp:TextBox id="username" Columns="30" runat="server" />To sum up, the key points to remember when working with Web controls are:
- All Web controls must be placed within a
<form runat="server">/#epc#/ tag to function properly. - All Web controls require
idandrunat="server"properties to function properly. - All Web controls follow the same pattern, but different properties (attributes) are available to different controls.
- They all start with the
aspprefix, followed by a colon.
There are more Web controls than HTML controls, and some offer advanced features that simply aren’t available in HTML alone. Controls that we’ll discuss in this and future chapters are as follows:
- basic Web controls (Chapter 4, Web Forms and Web Controls)
- validation Web controls (Chapter 5, Validation Controls)
- data controls (Chapter 9, The DataGrid and DataList Controls)
- user controls (Chapter 16, Rich Controls and User Controls)
- rich controls (Chapter 16, Rich Controls and User Controls)
Basic Web Controls
The basic Web controls perform the on-screen layout of a Web page, and mirror in many ways the HTML controls that are based on regular HTML. However, they offer some new refinements and enhancements, and should be used in place of HTML whenever possible. In this section, we’ll look at the controls in this group, namely:
LabelTextBoxButtonImageImageButtonLinkButtonHyperLinkRadioButtonRadioButtonListCheckBoxCheckBoxListDropDownListListBoxPanelPlaceHolder
Label
The easiest way to display static text on your page is simply to add the text to the body of the page without enclosing it in any tag. However, if you want to modify the text displayed on a page from ASP.NET code, you can display your text within a Label control. Here’s a typical example:
<asp:Label id="lblMessage" Text="" runat="server" />The following code sets the Text property of the Label control to display the text “Hello World”:
Public Sub Page_Load()

  lblMessage.Text = "Hello World"

End Sub

public void Page_Load() {

  lblMessage.Text = "Hello World";

}
Reading this Page_Load() handler code, we can see that when the page first loads, the Text property of the Label control with the ID of lblMessage will be set to “Hello World.”
TextBox
The TextBox control is used to create on screen a box in which the user can type or read standard text. This Web control can be set to display a standard HTML text input field, an HTML password field, or an HTML text area, using the TextMode property. The following code shows how we might use it in a simple login page:
<p>Username:

<asp:TextBox id="txtUser" TextMode="SingleLine" Columns="30"

    runat="server" /></p>


<p>Password:

<asp:TextBox id="txtPassword" TextMode="Password" Columns="30"

    runat="server" /></p>


<p>Comments:

<asp:TextBox id="txtComments" TextMode="MultiLine" Columns="30"

    Rows="10" runat="server" /></p>
In each of the three instances above, the attribute TextMode dictates the kind of text box to render.
Button
By default, the Button control renders the same form submit button that’s rendered by the HTML <input type="Submit"> tag. When a button is clicked, the form containing the button is submitted to the server for processing, and both click and command events are raised. The following code displays a Button control and a Label:
<asp:Button id="btnSubmit" Text="Submit" runat="server"

    OnClick="WriteText" />

<asp:Label id="lblMessage" runat="server" />
Notice the OnClick attribute on the control. Unlike the HtmlButton HTML control, OnClick assigns a server-side event handler – there is no need to remember to use OnServerClick. When the button is clicked, the Click event is raised and the WriteText() subroutine is called. The WriteText() subroutine will contain the code that performs the intended function for this button, such as displaying a message for the user:
Public Sub WriteText(s As Object, e As EventArgs)

  lblMessage.Text = "Hello World"

End Sub

public void WriteText(Object s, EventArgs e) {

  lblMessage.Text = "Hello World";

}
It’s important to realize that most Web controls have events associated with them, and the basic idea and techniques are the same as for the Click event of the Button control.
Image
An Image control places on the page an image that can be accessed dynamically from code; it equates to the <img> tag in HTML. Here’s an example:
<asp:Image id="myImage" ImageUrl="mygif.gif" runat="server"

    AlternateText="description" />
ImageButton
An ImageButton control is similar to a Button control, but it uses an image you supply in place of the typical gray Windows-style button. For example:
<asp:ImageButton id="myImgButton" ImageUrl="myButton.gif"

    runat="server" />
LinkButton
A LinkButton control renders a hyperlink on your page. From the point of view of ASP.NET code, LinkButtons can be treated in much the same way as buttons, hence the name.
<asp:LinkButton id="myLinkButon" Text="Click Here" runat="server"

    />
HyperLink
The HyperLink control, which is similar to the LinkButton control, creates a hyperlink on your page. It’s simpler and faster to process than LinkButton, but, unlike the LinkButton control, which offers features such as Click events and validation, HyperLink can be used only to click and navigate from one page to the next.
<asp:HyperLink id="myLink" NavigateUrl="http://www.example.com/"

    ImageUrl="myButton.gif" runat="server">My Link</asp:HyperLink>
The ImageUrl attribute, if specified, causes the control to display a linked image instead of the text provided.
RadioButton
You can add individual radio buttons to your page one by one, using the RadioButton control. Radio buttons are grouped together using the GroupName property. Only one RadioButton control from each group can be selected at a time.
<asp:RadioButton id="radSanDiego" GroupName="City"

    Text="San Diego" runat="server" />

<asp:RadioButton id="radBoston" GroupName="City" Text="Boston"

    runat="server" />

<asp:RadioButton id="radPhoenix" GroupName="City" Text="Phoenix"

    runat="server" />

<asp:RadioButton id="radSeattle" GroupName="City" Text="Seattle"

    runat="Server" />
The main event associated with RadioButtons is the CheckChanged event; which can be handled with the OnCheckChanged attribute.
RadioButtonList
Like the RadioButton control, the RadioButtonList control represents radio buttons. However, the RadioButtonList control represents a list of radio buttons and uses more compact syntax. Here’s an example:
<asp:RadioButtonList id="radlFavColor" runat="server">

  <asp:ListItem Text="Red" Value="red" />

  <asp:ListItem Text="Blue" Value="blue" />

  <asp:ListItem Text="Green" Value="green" />

</asp:RadioButtonList>
One of the great features of the RadioButtonList is its ability to bind to a data source. For instance, imagine you have a list of employees in a database. You could create a page that binds a selection from that database to the RadioButtonList control, to list dynamically certain employees within the control. The user would then be able to select one (and only one) employee from that list, and our code could determine the choice.
The most useful event produced by RadioButtonList is the SelectedIndexChanged event, to which you can assign a handler with the OnSelectedIndexChanged attribute.
CheckBox
You can use a CheckBox control to represent a choice that can be only a yes (checked) or no (unchecked) value.
<asp:CheckBox id="chkQuestion" Text="I like .NET!" runat="server"

  />
As with the RadioButton control, he main event associated with a CheckBox is the CheckChanged event; which can be handled with the OnCheckChanged attribute.
CheckBoxList
As you may have guessed, the CheckBoxList control represents a group of check boxes; it’s equivalent to using several CheckBox controls in row:
<asp:CheckBoxList id="chklFavDrinks" runat="server">

  <asp:ListItem Text="Pizza" Value="pizza" />

  <asp:ListItem Text="Tacos" Value="tacos" />

  <asp:ListItem Text="Pasta" Value="pasta" />

</asp:CheckBoxList>
Like the RadioButtonList control, the CheckBoxList control has the capability to bind to a data source, and produces a SelectedIndexChanged event that you can handle with OnSelectedIndexChanged.
DropDownList
A DropDownList control is similar to the HTML <select> tag. The DropDownList control allows you to select one item from a list using a drop-down menu.
<asp:DropDownList id="ddlFavColor" runat="server">

  <asp:ListItem Text="Red" value="red" />

  <asp:ListItem Text="Blue" value="blue" />

  <asp:ListItem Text="Green" value="green" />

</asp:DropDownList>
As is the case with other collection-based controls, such as the CheckBoxList and RadioButtonList controls, the DropDownList control can be bound to a database, thus allowing you to extract dynamic content into a drop-down menu. The main event produced by this control, as you might expect, is SelectedIndexChanged, handled with OnSelectedIndexChanged.
ListBox
A ListBox control equates to the HTML <select> tag with the size attribute set to 2 or more. The ListBox control allows you to select items from a multiline menu. If you set the SelectionMode attribute to Multiple, the user will be able to select more than one item from the list, as in this example:
<asp:ListBox id="listTechnologies" runat="server"

    SelectionMode="Multiple">

  <asp:ListItem Text="ASP.NET" Value="aspnet" />

  <asp:ListItem Text="JSP" Value="jsp" />

  <asp:ListItem Text="PHP" Value="php" />

  <asp:ListItem Text="CGI" Value="cgi" />

  <asp:ListItem Text="Coldfusion" Value="cf" />

</asp:ListBox>
Again, because the ListBox control is a collection-based control, it can be dynamically bound to a data source. The most useful event that this control provides is – you guessed it – SelectedIndexChanged, with the corresponding OnSelectedIndexChanged attribute.
Panel
The Panel control functions similarly to the <div> tag in HTML, in that the set of items that resides within the tag can be manipulated as a group. For instance, the Panel could be made visible or hidden by a Button's Click event:
<asp:Panel id="pnlMyPanel" runat="server">

  <p>Username:

    <asp:TextBox id="txtUsername" Columns="30" runat="server" />

  </p>

  <p>Password:

    <asp:TextBox id="txtPassword" TextMode="Password"

        Columns="30" runat="server" /></p>

</asp:Panel>


<asp:Button id="btnHide" Text="Hide Panel" OnClick="HidePanel"

    runat="server" />
The code above creates two TextBox controls within a Panel control. The Button control is outside of the panel. The HidePanel() subroutine would then control the Panel‘s visibility by setting its Visible property to False:
Public Sub HidePanel(s As Object, e As EventArgs)

  pnlMyPanel.Visible = False

End Sub

public void HidePanel(Object s, EventArgs e) {

  pnlMyPanel.Visible = false;

}
In this case, when the user clicks the button, the Click event is raised and the HidePanel() subroutine is called, which sets the Visible property of the Panel control to False.
PlaceHolder
The PlaceHolder control lets us add elements at a particular place on a page at any time, dynamically, through code.
<asp:PlaceHolder id="phMyPlaceHolder" runat="server" />The following code dynamically adds a new HtmlButton control within the place holder.
Public Sub Page_Load()

  Dim btnButton As HtmlButton = New HtmlButton()

  btnButton.InnerText = "My New Button"

  phMyPlaceHolder.Controls.Add(btnButton)

End Sub

public void Page_Load() {

  HtmlButton btnButton = new HtmlButton();

  btnButton.InnerText = "My New Button";

  phMyPlaceHolder.Controls.Add(btnButton);

}
That’s it for our quick tour of the basic Web controls. For more information on Web controls, including the properties, methods, and events for each, have a look at Appendix B, Web Control Reference.
Handling Page Navigation
Links from page to page are what drives the Web. Without linking, the Web would be little more than a simple page-based information source. Links enable us to move effortlessly from page to page with a single click; they bridge the gaps between related ideas, regardless of the boundaries imposed by geography and politics. This section focuses on page navigability using:
- the
HyperLinkcontrol - navigation objects and their methods
Suppose for a minute that you have created a Website that allows your users to choose from a selection of items on one page. You could call this page viewcatalog.aspx. Imagine that you have a second page, called viewcart.aspx. Once users select an item from viewcatalog.aspx, you’d probably want to link them directly to viewcart.aspx so that they can keep track of their orders. To achieve this, we clearly must pass the information from the viewcatalog.aspx page over to the viewcart.aspx page.
Using The HyperLink Control
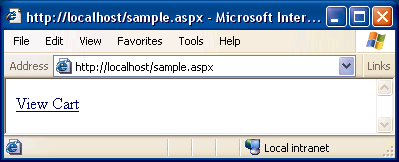
The HyperLink control creates a simple HTML hyperlink on a page. Once it’s clicked, the user is redirected to the page specified by the NavigateUrl property. For instance:
<asp:HyperLink id="hlAddToCart" NavigateUrl="viewcart.aspx"

    runat="server" Text="View Cart" />
Here, the NavigateUrl property specifies that this link leads to the page called viewcart.aspx. Figure 4.3 shows how the HyperLink control is rendered in the browser.
Figure 4.3. The HyperLink control renders similar to the anchor tag in the browser.
However, once we’ve arrived at the new page, it has no way of accessing the information from the first page. If we need to provide the user some continuity of information, we need something else.
Navigation Objects And Their Methods
The previous example rendered a simple control similar to the HTML anchor tag. Once the link is followed, however, we have no record of the previous page or any data it contained (the Web is a stateless technology).
If we wish to pass information from one page to the next, we can use one of the three methods listed below to create the link between the pages:
Response.Redirect()Navigates to a second page from code. This is equivalent to using the HyperLink control, but allows us to set parameters on the query string dynamically.
Server.Transfer()Ends the current Web Form and begins executing a new Web Form. This method only works when the user is navigating to a new Web Form page (.aspx).
Server.Execute()Begins executing a new Web Form while displaying the current Web Form. The contents of both forms are combined in the response sent to the browser. Again, this method only works when the user is navigating to a Web Forms page (.aspx).
The easiest and quickest way to redirect your users from the viewcatalog.aspx page to the viewcart.aspx page would be using Reponse.Redirect():
Sub linkClk(s As Object, e As EventArgs)

  Response.Redirect("viewcart.aspx")

End Sub

void linkClk(Object s, EventArgs e) {

  Response.Redirect("viewcart.aspx");

}
You could then use the LinkButton control to call this subroutine as follows:
<asp:LinkButton id="lbAddToCart" Text="Add To Cart"

    OnClick="linkClk" runat="server"/>
This time, when you click the LinkButton control, the Click event is raised, the subroutine is called, and Response.Redirect() is called with the name of the page we want to link to as a parameter. In this way, we’re redirecting to the new page directly from the code, rather than by using a particular tag. This enables us to pass information to the new page in the query string.
The query string is a list of variables and their respective values that we can append to a page’s URL, allowing us to retrieve those variables and values from that page’s code.
As an illustration, imagine you have a drop-down list that contains the following product information:
<p><asp:DropDownList id="ddlProducts" runat="server">

  <asp:ListItem Text="Pants" />

  <asp:ListItem Text="Shirt" />

  <asp:ListItem Text="Hat" />

  <asp:ListItem Text="Socks" />

</asp:DropDownList></p>


<p><asp:LinkButton id="lbAddToCart" Text="Add To Cart"

    OnClick="linkClk" runat="server" /></p>
The code you use to handle link clicks will need to find the item selected in the drop-down list and append it to the query string of the URL to which the user is to be redirected, as follows:
Sub linkClk(s As Object, e As EventArgs)

  Dim strQueryStr As String = "?Product=" & _

    Server.UrlEncode(ddlProducts.SelectedItem.Text)

  Response.Redirect("viewcart.aspx" & strQueryStr)

End Sub

void linkClk(Object s, EventArgs e) {

  string strQueryStr = "?Product=" +

    Server.UrlEncode(ddlProducts.SelectedItem.Text);

  Response.Redirect("viewcart.aspx" + strQueryStr);

}
Note the use of the Server.UrlEncode() method, which converts characters not allowed in query string values (e.g. &) to URL-safe character codes (e.g. %26) that the browser will understand. You should always use this method when adding arbitrary values to query strings.
When a user selects an item from the drop-down list and clicks the LinkButton control, the viewcart.aspx page is opened with the selected product appended as a parameter of the query string. This is illustrated in Figure 4.4.
Figure 4.4. Append the selected item to the query string.
![]()
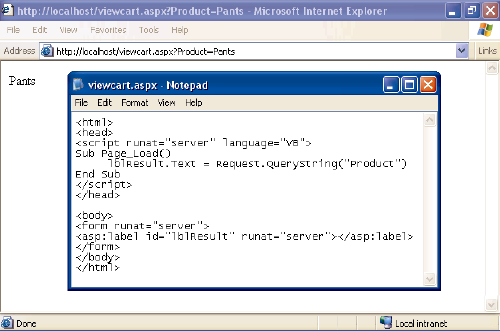
Now that you’ve passed the product to the viewcart.aspx page, you have to grab it from the query string in the new page. We get hold of variables from the query string by accessing the Request.QueryString collection, like so:
Sub Page_Load()

  lblResult.Text = Request.QueryString("Product")

End Sub

void Page_Load() {

  lblResult.Text = Request.QueryString["Product"];

}
Here, we simply display the value of the Product query string parameter, as we see in Figure 4.5.
Figure 4.5. Set the text property of the label control within a Page_Load event handler to accept the new parameter value.
Now, when you select a product and add it to the cart, the result is displayed in the redirected page on a label with an id of lblResult. Now sure, a real product catalog and shopping cart has a lot more to it, but in this section we’ve uncovered an important building block.
Postback
Postback can be confusing to newcomers because, while most ASP.NET developers know what it is, they can’t seem to explain it clearly. The topics we’ve covered so far, like subroutines, functions, and events, are not new to most Web developers. HTML, in combination with client-side JavaScript, has been doing all that for years. ASP.NET is different to this model, though, because it is a server-side, not client-side, technology – events that occur on a page are handled by code running on the server. For this to work, ASP.NET uses the mechanism of postback.
When an event is triggered, for instance, a button is clicked, or an item in a grid is selected, the page is submitted back to the server for processing, along with information about the event and any preexisting data on the page (via view state). We say the page “posts back” to the server. This is a powerful concept to grasp because it is postback that lets us run code on the server rather than on the client’s browser, and it is postback that lets our server code know which items within a drop-down list were selected, or what information a user typed into a text box.
But what would happen if you had multiple DropDownList controls that were populated with database data? Users could interact with those DropDownList controls and, in turn, we could set certain options within the page based on what they selected from the drop-down menus. Although this seems like a common task, with traditional ASP it incurred considerable overhead. The problem is that while the data that’s bound to the drop-down menu from the database never changes, every time the user selects an item from the drop-down menu and a postback has to be done, the database must be accessed again to rebuild the contents of each drop-down list on the page. However, this is not a problem in ASP.NET.
In ASP.NET we can check for postback with the IsPostBack property, and thus avoid performing any time consuming tasks unnecessarily. IsPostBack is a page-level property – meaning that it’s a property of the page itself – and we’d most commonly use it in the Page_Load() event handler to execute code only when the page is first loaded. Consider the following example:
Example 4.4. PostBack.aspx
<html>

<head>

<script runat="server" language="VB">

Sub Page_Load(s As Object, e As EventArgs)

  lblMessage1.Text = Now()

  If Not IsPostBack Then

    lblMessage2.Text = Now()

  End If

End Sub

</script>

</head>


<body>

<form runat="server">

  <p>Not Checking for postback:<br />

    <asp:Label id="lblMessage1" runat="server" /></p>

  <p>Checking for postback:<br />

    <asp:Label id="lblMessage2" runat="server" /></p>

  <p><asp:Button id="btnClick" Text="Click Me" runat="server" />

  </p>

</form>

</body>

</html>
Example 4.5. PostBack.aspx
<html>

<head>

<script runat="server" language="C#">

void Page_Load(Object s, EventArgs e) {

  lblMessage1.Text = Convert.ToString(DateTime.Now);

  if (!IsPostBack) {

    lblMessage2.Text = Convert.ToString(DateTime.Now);

  }

}

</script>

</head>


<body>

<form runat="server">

  <p>Not Checking for postback:<br />

    <asp:Label id="lblMessage1" runat="server" /></p>

  <p>Checking for postback:<br />

    <asp:Label id="lblMessage2" runat="server" /></p>

  <p><asp:Button id="btnClick" Text="Click Me" runat="server" />

  </p>

</form>

</body>

</html>
The result will look similar to Figure 4.6.
Figure 4.6. The IsPostBack property checks to make sure the user isn’t resubmitting the page.
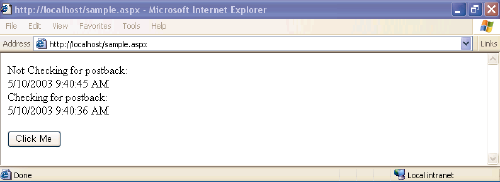
In this example, the IsPostBack check means that the second label doesn’t refresh when the Button control is clicked. Similarly, we could use IsPostBack within the Page_Load() subroutine to set up database-driven drop-down menus just once within each user’s session, making the online experience smoother, and making our application more scalable. Don’t worry if postback seems a bit confusing now – we’ll use it more in upcoming chapters, so if it doesn’t yet, it should make sense after a few more practical examples.
Formatting Controls with CSS
HTML was deliberately designed to pay little attention to the specifics of how particular items on a page were rendered. It is left up to the individual browser to work out these intricacies, and tailor the output to the limitations and strengths of the user’s machine. While we can change font styles, sizes, colors, and so on using HTML tags, this is a practice that can lead to verbose code and pages that are very hard to restyle at a later date.
The Cascading Style Sheets (CSS) language aims to provide the degree of control, flexibility, and pizzazz that modern Web designers seek. It’s a standard that’s widely supported by all the popular browsers, in its oldest version (CSS1) at the very least.
CSS is a powerful tool for Web developers because it gives us the power to create one set of styles in a single sheet, and apply those styles to all the pages in our Website. All the pages then use the same fonts, colors, and sizes for the same sections, giving the site a consistent feel throughout. Regardless of whether our site contains three pages or three hundred, when we alter the styles in the style sheet, those changes are immediately applied to all pages based on that style sheet.
Types of Styles and Style Sheets
There are three different ways of associating styles to elements of a particular Web page. I’ve already mentioned the first, and usually the best, which is an external file:
External File
By placing your style rules in an external style sheet, you can link this one file to any Web pages where you want those styles to be used. This makes updating a Website’s overall look a cakewalk.
Document Wide
Rather than having an external sheet, you can place style rules for a page within a <style> tag inside that page’s head element. The problem is that we can’t then use those styles in another page without typing them in again, which makes global changes to the entire site difficult to manage.
Inline
Inline styles allow us to set styles for a single tag using the style attribute. For instance, we might create a text box in regular HTML with a style attribute that draws a border around the text box like so:
<input type="text"

    style="border-style:groove" />
CSS style rules create styles that are applied to elements of a page in one of two ways (This is, to some extent, a simplified view of how CSS works. For the complete story, refer to HTML Utopia: Designing Without Tables Using CSS (SitePoint, ISBN 0-9579218-2-9).
Classes
Arguably the most popular way to use styles within your pages, classes allow you to set up a custom style that will be applied to any tag or control that has a class attribute that matches the name of your custom style.
Tag Redefinition
Redefining a tag affects the appearance of certain standard HTML tags. For instance, the <hr> tag is generally given a width of 100% by default, but you could redefine the tag in CSS to have a width of 50%.
Whether you’re building external, document-wide, or inline style sheets, properties for classes and tag redefinitions use the same syntax. To create a class within an external style sheet file, you’d use the following syntax:
.myClass {

  font-family: arial;

  font-size: 10pt;

  color: red;

}
This would then be saved in a file with a .css extension, such as styles.css, and linked into the Web Form with the following line in the <head> tag of your document:
<link href="styles.css" rel="stylesheet" />Similarly, to define a class within a document-wide style sheet, you would use the following syntax:
<head>

<style type="text/css">

  .myClass {

    font-family: arial;

    font-size: 10pt;

    color: red;

  }

</style>

</head>
When you’re using inline styles, use the following syntax:
<span style="font-family: arial; font-size: 10pt; color: red;">My

Stylized Text</span>
For inline styles, simply add all properties to the tag in question with the style attribute. Above, we’ve used the <span> tag, but the principle remains the same for the other tags.
Now that you have a basic understanding of some of the fundamental concepts behind CSS, let’s look at the different types of styles that can be used within our ASP.NET applications.
Style Properties
There are many different types of properties that you can modify using style sheets. Below is a list of the common types:
Font
This category provides you with the ability to format text level elements, including their font face, size, decoration, weight, color, etc.
Background
This category allows you to customize backgrounds for objects and text. Modifying these values gives you control over the color, image, and whether or not you want to repeat an image.
Block
This category allows you to modify the spacing between paragraphs, lines of text, and spaces between text and words.
Box
The box category provides changes and customizations for tables. If you need to modify borders, padding, spacing, and colors on a table, row, or cell, you can modify elements within this category.
Border
This category lets you draw boxes of different colors, styles and thicknesses around page elements.
List
This category allows you to customize the way ordered and unordered lists are created.
Positioning
Modifying positioning allows you to move and position tags and controls freely.
These categories provide a list of what can generally be modified using CSS. As we progress through the book, the many types of properties will become evident.
The CssClass Property
Once you have defined a class in a style sheet (be it external or internal), you’ll want to begin associating that class with elements in your Web Forms. You can associate classes with ASP.Nco
As you might have realised from our work in the previous chapter, at the heart of ASP.NET is its ability to create dynamic form content. Whether you’re creating a complex shopping cart application, or a simple page to collect user information and send the results out via email, Web Forms have a solution. They allow you to use HTML controls and Web controls to create dynamic pages with which users can interact. In this chapter, you will learn how Web Forms, HTML controls, and Web controls, in conjunction with VB.NET and C# code, should change the way you look at, and develop for, the Web. In this chapter I’ll introduce you to the following concepts:
- HTML controls
- Web Forms
- Web controls
- Handling page navigation
- Formatting controls with CSS
Toward the end of the chapter, you’ll put all of these concepts to work into a real world application! I’ll introduce the Dorknozzle Intranet Application that you’ll be building throughout this book, and see how what you learned in this chapter can be applied to some of the pages for the project. Keep in mind that you can download these chapters in PDF format if you’d rather print them out and read them offline.
Working with HTML Controls
HTML controls are outwardly identical to plain old HTML 4.0 tags, but employ the runat="server" attribute. For each of HTML’s most common tags, a corresponding server-side HTML control exists, although Microsoft has added a few tags and some extra properties for each. Creating HTML controls is easy – we simply stick a runat="server" attribute on the end of a normal HTML tag to create the HTML control version of that tag. The complete list of current HTML control classes and their associated tags is given in Table 4.1.
These HTML control classes are all contained within the System.Web.UI.HtmlControls namespace.
Because HTML controls are processed on the server side by the ASP.NET runtime, we can easily access their properties through code elsewhere in the page. If you’re familiar with JavaScript, HTML, and CSS, then you’ll know that manipulating text within HTML tags, or even manipulating inline styles within an HTML tag, can be cumbersome and error-prone. HTML controls aim to solve this by allowing you to manipulate the page easily with your choice of .NET language, for instance, using VB.NET or C#. We’ll start by looking at the HTML controls library, then we’ll explore in more detail the properties exposed by the controls when we process a simple form containing HTML controls and code.
Table 4.1. HTML Control Classes
HtmlAnchor
The HtmlAnchor control creates a server-side HTML <a href="..."> tag.
<a href="somepage.aspx" runat="server">Click Here</a>This line would create a new hyperlink with the text “Click Here.” Once the link is clicked, the user would be redirected to somepage.aspx as given by the href attribute.
HtmlButton
The HtmlButton control creates a server-side HTML <button> tag.
<button id="myButton" OnServerClick="Click" runat="server">Click

Here</button>
Notice that we’re using events here. On HTML controls, we need to use OnServerClick to specify the ASP.NET handler for clicks on the button, because onclick is reserved for handling clicks with JavaScript on the client side. In this example, the handler subroutine is called Click, and would be declared in a script block with the same form as the Click handlers we looked at for <asp:Button> tags previously:
<script runat="server" language="VB">

Sub Click(s As Object, e As EventArgs)

  Response.Write(myButton.ID)

End Sub

</script>

<script runat="server" language="C#">

void Click(Object s, EventArgs e) {

  Response.Write(myButton.ID);

}

</script>
In this case, when the user clicks the button, the ServerClick event is raised, the Click() subroutine is called to handle it, and the ID of the HtmlButton control is written onto the screen with Response.Write() (the Write() method of the Response object).
HtmlForm
The HtmlForm control creates a server-side <form> tag. Most HTML controls, Web controls, etc., must be placed inside an HtmlForm control.
<form runat="server">

<!-- ASP.NET controls in here -->

</form>
HtmlImage
The HtmlImage control creates a server-side <img> tag. The following code shows how we might place an HtmlImage control on a page, along with an HtmlButton:
<img id="myimage" src="arrow.gif" runat="server" />

<button id="myButton" runat="server" OnServerClick="Click">Click

Here</button>
The user could change this image dynamically by pressing the button if we add code as follows:
<script runat="server" language="VB">

Sub Click(s As Object, e As EventArgs)

  myimage.Src = "welcome.gif"

End Sub

</script>

<script runat="server" language="C#">

void Click(Object s, EventArgs e) {

  myimage.Src = "welcome.gif";

}

</script>
What will happen if these controls are placed on a page along with the script block? First of all, the image arrow.gif will appear. When the HtmlButton control is clicked, it changes to welcome.gif. Behind the scenes, the ServerClick event is raised when the button is clicked, thus the Click() subroutine is called, and the Src property of the HtmlImage control is changed from arrow.gif to welcome.gif.
HtmlGenericControl
The HtmlGenericControl creates a server-side control for HTML tags that do not have an HTML control associated with them. Perfect examples of this are the <span> and <div> tags. The following example illustrates how you can modify text within a <span> tag to change the content from I like ASP.NET to Why would anyone need PHP? dynamically.
<span id="myGenericControl" runat="server">I like ASP.NET</span>

<br />

<button id="myButton" runat="server" OnServerClick="Click">Click

Here</button>
We simply add the following code to respond to the ServerClick event and change the text:
<script runat="server" language="VB">

Sub Click(s As Object, e As EventArgs)

  myGenericControl.InnerText = "Why would anyone need PHP?"

End Sub

</script>

<script runat="server" language="C#">

void Click(Object s, EventArgs e) {

  myGenericControl.InnerText = "Why would anyone need PHP?";

}

</script>
HtmlInputButton
The HtmlInputButton control creates a server-side <input type="submit">, <input type="reset">, or <input type="button"> HTML tag.
<input type="submit" value="Click Here" runat="server" />

<input type="reset" value="Click Here" runat="server" />

<input type="button" value="Click Here" runat="server" />
As with HtmlButton, you can assign a server-side event handler to controls of this type with the OnServerClick attribute.
HtmlInputCheckBox
The HtmlInputCheckBox control creates a server-side <input type="checkbox"> HTML tag.
<input type="checkbox" id="cb1" value="ASP.NET" runat="server"

  />ASP.NET<br />

<input type="checkbox" id="cb2" value="PHP" runat="server"

  />PHP<br />

<input type="checkbox" id="cb3" value="JSP" runat="server"

  />JSP<br />

<input type="checkbox" id="cb4" value="CGI" runat="server"

  />CGI<br />

<input type="checkbox" id="cb5" value="Coldfusion" runat="server"

  />Coldfusion<br>
The HtmlInputCheckBox control is the perfect choice when you want to allow your users to select multiple items from a list.
HtmlInputFile
The HtmlInputFile control creates a server-side <input type="file"> tag in the HTML. This displays a text box and Browse button to allow users to upload files from ASP.NET pages. There is no Web control equivalent for this tag, so it’s typically required when working with file uploads – even with Web Forms (which we’ll discuss shortly).
<input type="file" id="fileUpload" runat="server" />HtmlInputHidden
The HtmlInputHidden control creates a server-side <input type="hidden"> tag.
<input type="hidden" id="hiddenField" runat="server" />Try viewing the source of any one of your ASP.NET pages from your browser, and you’re likely to find this tag being used to store view state information.
HtmlInputImage
The HtmlInputImage control creates a server-side <input type="image"> tag.
<input type="image" id="imgMap" runat="server"

  src="ButtonImage.jpg" />
This tag provides an alternative to the HtmlInputButton control. They both function in the same way; the difference is that the HtmlInputImage control uses a custom image rather than the beveled gray Windows-style button. The mouse coordinates are also sent along with the form submission when the user clicks a control of this type.
HtmlInputRadioButton
The HtmlInputRadioButton control creates a server-side radio button. The following code, for instance, offers a choice of Male or Female:
Gender?<br />

<input type="radio" id="radio1" runat="server" />Male<br />

<input type="radio" id="radio2" runat="server" />Female
Similar to the HtmlInputCheckBox control, the HtmlInputRadioButton control creates a list of items for users to choose from. The difference, however, is that the user is only able to select one item at a time.
HtmlInputText
The HtmlInputText control creates a server-side <input type="text"> or <input type="password"> tag.
Please Login<br />

Username:<br />

<input type="text" id="username" runat="server" /><br />

Password:<br />

<input type="password" id="password" runat="server" />
The preceding code creates a typical login screen layout.
HtmlSelect
The HtmlSelect control creates a server-side version of the <select> tag for creating drop-down lists or list boxes. The following code creates a drop-down menu:
Select your favorite movie:<br />

<select id="selectMovie" runat="server">

<option>Star Wars</option>

<option>Spider Man</option>

<option>The Godfather</option>

<option>Lord of the Rings</option>

</select>
The following code creates a multiple-selection list box:
Which of these movies do you like?<br />

<select id="selectMovie" runat="server" multiple="true" size="4">

<option>Star Wars</option>

<option>Spider Man</option>

<option>The Godfather</option>

<option>Lord of the Rings</option>

</select>
You’ll notice the <option> tag within the main <select> tag; this is used to denote each item to appear in the list box or drop-down menu.
HtmlTable, HtmlTableRow and HtmlTableCell
The HtmlTable, HtmlTableRow, and HtmlTableCell controls create server-side versions of the <table>, <tr>, <td>, and <th> tags. The following code creates a server-side table:
<table id="myTable" border="1" cellspacing="0" cellpadding="0"

runat="server">

<tr runat="server" id="row1">

<td runat="server" id="cell1">Table Data 1</td>

<td runat="server" id="cell2">Table Data 2</td>

</tr>

<tr runat="server" id="row2">

<td runat="server" id="cell3">Table Data 3</td>

<td runat="server" id="cell4">Table Data 4</td>

</tr>

</table>

<button id="myButton" OnServerClick="Click" runat="server">Click

Here</button>
You could add the following code to respond to the Click event raised by the HtmlButton control and change the content of the first cell to read “Hello World.”
<script runat="server" language="VB">

Sub Click(s As Object, e As EventArgs)

  cell1.InnerText = "Hello World"

End Sub

</script>

<script runat="server" language="C#">

void Click(Object s, EventArgs e) {

  cell1.InnerText = "Hello World";

}

</script>
HtmlTextArea
The HtmlTextArea control creates a server-side version of the <textarea> tag.
<textarea cols="60" rows="10" runat="server"></textarea>We’ve glanced only briefly over the HTML controls, as they should all be fairly familiar from your experience with HTML. But if you’d like more information on the HTML controls including the properties, methods, and events for each, see Appendix A, HTML Control Reference.
Processing a Simple Form
Now that you have a basic understanding of ASP.NET page structure, the languages VB.NET and C#, and HTML controls, let’s put everything together and create a simple ASP.NET application. The application that we will create, in VB.NET and C#, will be a simple survey form that uses the following HTML controls:
HtmlFormHtmlButtonHtmlInputTextHtmlSelect
Let’s begin by creating a new file within your favorite code editor. The following code creates the visual interface for the survey:
Example 4.1. SimpleForm.aspx (excerpt)
<html>

<head>

...

</head>


<body>

<form runat="server">

  <h2>Take the Survey!</h2>

  <p>Name:<br />

  <input type="text" id="txtName" runat="server" /></p>

  <p>Email:<br />

  <input type="text" id="txtEmail" runat="server" /></p>

  <p>Which server technologies do you use?<br />

  <select id="servermodel" runat="server" multiple="true">

    <option>ASP.NET</option>

    <option>PHP</option>

    <option>JSP</option>

    <option>CGI</option>

    <option>Coldfusion</option>

  </select></p>

  <p>Do you like .NET so far?<br />

  <select id="likedotnet" runat="server">

    <option selected>Yes</option>

    <option>No</option>

  </select></p>

  <p><button id="myButton" OnServerClick="Click" runat="server">

  Confirm</button></p>

</form>

</body>

</html>
From what we’ve already covered on HTML controls, you should have a good idea of what this page will look like. All we’ve done is place some HtmlInputText controls, an HtmlButton control, and an HtmlSelect control inside the obligatory HtmlForm control. Remember, HTML controls are essentially just HTML tags with the runat="server" attribute. When it’s complete, the interface will resemble Figure 4.1.
Figure 4.1. Create the interface of the ASP.NET page using HTML controls.
When users click the button, we’ll simply display their responses in their browsers. In a real application, we’d probably be more likely to save this to a database and perhaps show the results as a chart. Whatever the case, we’d access the properties of the HTML controls as shown in the following code:
Example 4.2. SimpleForm.aspx (excerpt)
<script runat="server" language="VB">

Sub Click(s As Object, e As EventArgs)

  Response.Write("Your name is: " & txtName.value & "<br />")

  Response.Write("Your email is: " & txtEmail.value & "<br />")

  Response.Write("You like to work with: " & servermodel.value & _

    "<br />")

  Response.Write("You like .NET: " & likedotnet.value)

End Sub

</script>
Example 4.3. SimpleForm.aspx (excerpt)
<script runat="server" language="C#">

void Click(Object s, EventArgs e) {

  Response.Write("Your name is: " + txtName.Value + "<br />");

  Response.Write("Your email is: " + txtEmail.Value + "<br />");

  Response.Write("You like to work with: " + servermodel.Value +

    "<br />");

  Response.Write("You like .NET: " + likedotnet.Value);

}

</script>
Just as you’ve seen with examples from previous chapters, we place our VB.NET and C# code inside a server-side script block within the <head> part of the page. Next, we create a new Click event handler which takes the two usual parameters. Finally, we use the Response object’s Write() method to print out the user’s responses within the page.
Once you’ve written the code, you can save your work and test the results from your browser. Enter some information and click the button. What you type in should appear at the top of the page when the button is clicked.
Introduction to Web Forms
With the inception of new technologies, there’s always new terminology to master. ASP.NET is no different. With ASP.NET, even the simplest terms that were previously used to describe a Web page have changed to reflect the processes that occur within them. Before we begin to describe the process followed by Web Forms, let’s discuss the foundation concept of Web pages.
On the most basic level, a Web page is a text file that contains markup. Web pages are meant to be viewed from a browser window, which parses the file containing markup to present the information to the user in the layout envisaged by the developer. Web pages can include text, video, sound, animations, graphics, and even chunks of “code” from a variety of technologies.
An HTML form, as you learned in the previous sections, is a page that contains one or more form elements grouped together within an HTML <form> tag. Users interact with the various form elements to make certain choices, or provide certain information; this information is then sent to the server for processing upon the click of a submit button. This is useful to us as ASP.NET developers because regular HTML forms have a built-in mechanism that allows forms to be submitted to the server. Once the form has been submitted, some kind of extra technology – in this case, ASP.NET – needs to be present on the server to perform the actual form processing.
In ASP.NET, we call Web pages Web Forms; they contain presentational elements (ASP.NET Web controls) in an HTML form, as well as any code (the processing logic) we’ve added for the page’s dynamic features.
A typical Web Form is shown in Figure 4.2.
Figure 4.2. A Web Form contains code for processing logic and Web controls for presentational purposes.
The next section looks at the various Web controls and how they may be used within your Web Forms. They’re very similar in appearance to HTML, so you shouldn’t have any trouble coming to grips with them.
Introduction to Web Controls
As we’ve just seen, Web Forms allow users to interact with our site using Web controls. With Web controls, Microsoft basically reinvented HTML from scratch. For example, it created two different Web controls that correspond to the two different versions of the HTML <select> tag: a DropDownList control and a ListBox control. This means there isn’t a direct one-to-one correspondence between the Web controls and standard HTML tags, as there is with HTML controls. Web controls follow the same basic pattern as HTML tags, but the tag name is preceded by asp: and the name is capitalized using “CamelCasing.” Consider the HTML <input> tag, which creates an input text box on screen:
<input type="text" name="username" size="30" />The equivalent Web control is the TextBox control, and it would look like this:
<asp:TextBox id="username" Columns="30" runat="server">

</asp:TextBox>
Note that, unlike many HTML tags, Web controls always require a closing tag (the </asp:TextBox> part above). We can also use the shorthand /> syntax if our Web control tag doesn’t contain anything between its opening and closing tags. So, we could also write this TextBox like so:
<asp:TextBox id="username" Columns="30" runat="server" />To sum up, the key points to remember when working with Web controls are:
- All Web controls must be placed within a
<form runat="server">/#epc#/ tag to function properly. - All Web controls require
idandrunat="server"properties to function properly. - All Web controls follow the same pattern, but different properties (attributes) are available to different controls.
- They all start with the
aspprefix, followed by a colon.
There are more Web controls than HTML controls, and some offer advanced features that simply aren’t available in HTML alone. Controls that we’ll discuss in this and future chapters are as follows:
- basic Web controls (Chapter 4, Web Forms and Web Controls)
- validation Web controls (Chapter 5, Validation Controls)
- data controls (Chapter 9, The DataGrid and DataList Controls)
- user controls (Chapter 16, Rich Controls and User Controls)
- rich controls (Chapter 16, Rich Controls and User Controls)
Basic Web Controls
The basic Web controls perform the on-screen layout of a Web page, and mirror in many ways the HTML controls that are based on regular HTML. However, they offer some new refinements and enhancements, and should be used in place of HTML whenever possible. In this section, we’ll look at the controls in this group, namely:
LabelTextBoxButtonImageImageButtonLinkButtonHyperLinkRadioButtonRadioButtonListCheckBoxCheckBoxListDropDownListListBoxPanelPlaceHolder
Label
The easiest way to display static text on your page is simply to add the text to the body of the page without enclosing it in any tag. However, if you want to modify the text displayed on a page from ASP.NET code, you can display your text within a Label control. Here’s a typical example:
<asp:Label id="lblMessage" Text="" runat="server" />The following code sets the Text property of the Label control to display the text “Hello World”:
Public Sub Page_Load()

  lblMessage.Text = "Hello World"

End Sub

public void Page_Load() {

  lblMessage.Text = "Hello World";

}
Reading this Page_Load() handler code, we can see that when the page first loads, the Text property of the Label control with the ID of lblMessage will be set to “Hello World.”
TextBox
The TextBox control is used to create on screen a box in which the user can type or read standard text. This Web control can be set to display a standard HTML text input field, an HTML password field, or an HTML text area, using the TextMode property. The following code shows how we might use it in a simple login page:
<p>Username:

<asp:TextBox id="txtUser" TextMode="SingleLine" Columns="30"

    runat="server" /></p>


<p>Password:

<asp:TextBox id="txtPassword" TextMode="Password" Columns="30"

    runat="server" /></p>


<p>Comments:

<asp:TextBox id="txtComments" TextMode="MultiLine" Columns="30"

    Rows="10" runat="server" /></p>
In each of the three instances above, the attribute TextMode dictates the kind of text box to render.
Button
By default, the Button control renders the same form submit button that’s rendered by the HTML <input type="Submit"> tag. When a button is clicked, the form containing the button is submitted to the server for processing, and both click and command events are raised. The following code displays a Button control and a Label:
<asp:Button id="btnSubmit" Text="Submit" runat="server"

    OnClick="WriteText" />

<asp:Label id="lblMessage" runat="server" />
Notice the OnClick attribute on the control. Unlike the HtmlButton HTML control, OnClick assigns a server-side event handler – there is no need to remember to use OnServerClick. When the button is clicked, the Click event is raised and the WriteText() subroutine is called. The WriteText() subroutine will contain the code that performs the intended function for this button, such as displaying a message for the user:
Public Sub WriteText(s As Object, e As EventArgs)

  lblMessage.Text = "Hello World"

End Sub

public void WriteText(Object s, EventArgs e) {

  lblMessage.Text = "Hello World";

}
It’s important to realize that most Web controls have events associated with them, and the basic idea and techniques are the same as for the Click event of the Button control.
Image
An Image control places on the page an image that can be accessed dynamically from code; it equates to the <img> tag in HTML. Here’s an example:
<asp:Image id="myImage" ImageUrl="mygif.gif" runat="server"

    AlternateText="description" />
ImageButton
An ImageButton control is similar to a Button control, but it uses an image you supply in place of the typical gray Windows-style button. For example:
<asp:ImageButton id="myImgButton" ImageUrl="myButton.gif"

    runat="server" />
LinkButton
A LinkButton control renders a hyperlink on your page. From the point of view of ASP.NET code, LinkButtons can be treated in much the same way as buttons, hence the name.
<asp:LinkButton id="myLinkButon" Text="Click Here" runat="server"

    />
HyperLink
The HyperLink control, which is similar to the LinkButton control, creates a hyperlink on your page. It’s simpler and faster to process than LinkButton, but, unlike the LinkButton control, which offers features such as Click events and validation, HyperLink can be used only to click and navigate from one page to the next.
<asp:HyperLink id="myLink" NavigateUrl="http://www.example.com/"

    ImageUrl="myButton.gif" runat="server">My Link</asp:HyperLink>
The ImageUrl attribute, if specified, causes the control to display a linked image instead of the text provided.
RadioButton
You can add individual radio buttons to your page one by one, using the RadioButton control. Radio buttons are grouped together using the GroupName property. Only one RadioButton control from each group can be selected at a time.
<asp:RadioButton id="radSanDiego" GroupName="City"

    Text="San Diego" runat="server" />

<asp:RadioButton id="radBoston" GroupName="City" Text="Boston"

    runat="server" />

<asp:RadioButton id="radPhoenix" GroupName="City" Text="Phoenix"

    runat="server" />

<asp:RadioButton id="radSeattle" GroupName="City" Text="Seattle"

    runat="Server" />
The main event associated with RadioButtons is the CheckChanged event; which can be handled with the OnCheckChanged attribute.
RadioButtonList
Like the RadioButton control, the RadioButtonList control represents radio buttons. However, the RadioButtonList control represents a list of radio buttons and uses more compact syntax. Here’s an example:
<asp:RadioButtonList id="radlFavColor" runat="server">

  <asp:ListItem Text="Red" Value="red" />

  <asp:ListItem Text="Blue" Value="blue" />

  <asp:ListItem Text="Green" Value="green" />

</asp:RadioButtonList>
One of the great features of the RadioButtonList is its ability to bind to a data source. For instance, imagine you have a list of employees in a database. You could create a page that binds a selection from that database to the RadioButtonList control, to list dynamically certain employees within the control. The user would then be able to select one (and only one) employee from that list, and our code could determine the choice.
The most useful event produced by RadioButtonList is the SelectedIndexChanged event, to which you can assign a handler with the OnSelectedIndexChanged attribute.
CheckBox
You can use a CheckBox control to represent a choice that can be only a yes (checked) or no (unchecked) value.
<asp:CheckBox id="chkQuestion" Text="I like .NET!" runat="server"

  />
As with the RadioButton control, he main event associated with a CheckBox is the CheckChanged event; which can be handled with the OnCheckChanged attribute.
CheckBoxList
As you may have guessed, the CheckBoxList control represents a group of check boxes; it’s equivalent to using several CheckBox controls in row:
<asp:CheckBoxList id="chklFavDrinks" runat="server">

  <asp:ListItem Text="Pizza" Value="pizza" />

  <asp:ListItem Text="Tacos" Value="tacos" />

  <asp:ListItem Text="Pasta" Value="pasta" />

</asp:CheckBoxList>
Like the RadioButtonList control, the CheckBoxList control has the capability to bind to a data source, and produces a SelectedIndexChanged event that you can handle with OnSelectedIndexChanged.
DropDownList
A DropDownList control is similar to the HTML <select> tag. The DropDownList control allows you to select one item from a list using a drop-down menu.
<asp:DropDownList id="ddlFavColor" runat="server">

  <asp:ListItem Text="Red" value="red" />

  <asp:ListItem Text="Blue" value="blue" />

  <asp:ListItem Text="Green" value="green" />

</asp:DropDownList>
As is the case with other collection-based controls, such as the CheckBoxList and RadioButtonList controls, the DropDownList control can be bound to a database, thus allowing you to extract dynamic content into a drop-down menu. The main event produced by this control, as you might expect, is SelectedIndexChanged, handled with OnSelectedIndexChanged.
ListBox
A ListBox control equates to the HTML <select> tag with the size attribute set to 2 or more. The ListBox control allows you to select items from a multiline menu. If you set the SelectionMode attribute to Multiple, the user will be able to select more than one item from the list, as in this example:
<asp:ListBox id="listTechnologies" runat="server"

    SelectionMode="Multiple">

  <asp:ListItem Text="ASP.NET" Value="aspnet" />

  <asp:ListItem Text="JSP" Value="jsp" />

  <asp:ListItem Text="PHP" Value="php" />

  <asp:ListItem Text="CGI" Value="cgi" />

  <asp:ListItem Text="Coldfusion" Value="cf" />

</asp:ListBox>
Again, because the ListBox control is a collection-based control, it can be dynamically bound to a data source. The most useful event that this control provides is – you guessed it – SelectedIndexChanged, with the corresponding OnSelectedIndexChanged attribute.
Panel
The Panel control functions similarly to the <div> tag in HTML, in that the set of items that resides within the tag can be manipulated as a group. For instance, the Panel could be made visible or hidden by a Button's Click event:
<asp:Panel id="pnlMyPanel" runat="server">

  <p>Username:

    <asp:TextBox id="txtUsername" Columns="30" runat="server" />

  </p>

  <p>Password:

    <asp:TextBox id="txtPassword" TextMode="Password"

        Columns="30" runat="server" /></p>

</asp:Panel>


<asp:Button id="btnHide" Text="Hide Panel" OnClick="HidePanel"

    runat="server" />
The code above creates two TextBox controls within a Panel control. The Button control is outside of the panel. The HidePanel() subroutine would then control the Panel‘s visibility by setting its Visible property to False:
Public Sub HidePanel(s As Object, e As EventArgs)

  pnlMyPanel.Visible = False

End Sub

public void HidePanel(Object s, EventArgs e) {

  pnlMyPanel.Visible = false;

}
In this case, when the user clicks the button, the Click event is raised and the HidePanel() subroutine is called, which sets the Visible property of the Panel control to False.
PlaceHolder
The PlaceHolder control lets us add elements at a particular place on a page at any time, dynamically, through code.
<asp:PlaceHolder id="phMyPlaceHolder" runat="server" />The following code dynamically adds a new HtmlButton control within the place holder.
Public Sub Page_Load()

  Dim btnButton As HtmlButton = New HtmlButton()

  btnButton.InnerText = "My New Button"

  phMyPlaceHolder.Controls.Add(btnButton)

End Sub

public void Page_Load() {

  HtmlButton btnButton = new HtmlButton();

  btnButton.InnerText = "My New Button";

  phMyPlaceHolder.Controls.Add(btnButton);

}
That’s it for our quick tour of the basic Web controls. For more information on Web controls, including the properties, methods, and events for each, have a look at Appendix B, Web Control Reference.
Handling Page Navigation
Links from page to page are what drives the Web. Without linking, the Web would be little more than a simple page-based information source. Links enable us to move effortlessly from page to page with a single click; they bridge the gaps between related ideas, regardless of the boundaries imposed by geography and politics. This section focuses on page navigability using:
- the
HyperLinkcontrol - navigation objects and their methods
Suppose for a minute that you have created a Website that allows your users to choose from a selection of items on one page. You could call this page viewcatalog.aspx. Imagine that you have a second page, called viewcart.aspx. Once users select an item from viewcatalog.aspx, you’d probably want to link them directly to viewcart.aspx so that they can keep track of their orders. To achieve this, we clearly must pass the information from the viewcatalog.aspx page over to the viewcart.aspx page.
Using The HyperLink Control
The HyperLink control creates a simple HTML hyperlink on a page. Once it’s clicked, the user is redirected to the page specified by the NavigateUrl property. For instance:
<asp:HyperLink id="hlAddToCart" NavigateUrl="viewcart.aspx"

    runat="server" Text="View Cart" />
Here, the NavigateUrl property specifies that this link leads to the page called viewcart.aspx. Figure 4.3 shows how the HyperLink control is rendered in the browser.
Figure 4.3. The HyperLink control renders similar to the anchor tag in the browser.
However, once we’ve arrived at the new page, it has no way of accessing the information from the first page. If we need to provide the user some continuity of information, we need something else.
Navigation Objects And Their Methods
The previous example rendered a simple control similar to the HTML anchor tag. Once the link is followed, however, we have no record of the previous page or any data it contained (the Web is a stateless technology).
If we wish to pass information from one page to the next, we can use one of the three methods listed below to create the link between the pages:
Response.Redirect()Navigates to a second page from code. This is equivalent to using the HyperLink control, but allows us to set parameters on the query string dynamically.
Server.Transfer()Ends the current Web Form and begins executing a new Web Form. This method only works when the user is navigating to a new Web Form page (.aspx).
Server.Execute()Begins executing a new Web Form while displaying the current Web Form. The contents of both forms are combined in the response sent to the browser. Again, this method only works when the user is navigating to a Web Forms page (.aspx).
The easiest and quickest way to redirect your users from the viewcatalog.aspx page to the viewcart.aspx page would be using Reponse.Redirect():
Sub linkClk(s As Object, e As EventArgs)

  Response.Redirect("viewcart.aspx")

End Sub

void linkClk(Object s, EventArgs e) {

  Response.Redirect("viewcart.aspx");

}
You could then use the LinkButton control to call this subroutine as follows:
<asp:LinkButton id="lbAddToCart" Text="Add To Cart"

    OnClick="linkClk" runat="server"/>
This time, when you click the LinkButton control, the Click event is raised, the subroutine is called, and Response.Redirect() is called with the name of the page we want to link to as a parameter. In this way, we’re redirecting to the new page directly from the code, rather than by using a particular tag. This enables us to pass information to the new page in the query string.
The query string is a list of variables and their respective values that we can append to a page’s URL, allowing us to retrieve those variables and values from that page’s code.
As an illustration, imagine you have a drop-down list that contains the following product information:
<p><asp:DropDownList id="ddlProducts" runat="server">

  <asp:ListItem Text="Pants" />

  <asp:ListItem Text="Shirt" />

  <asp:ListItem Text="Hat" />

  <asp:ListItem Text="Socks" />

</asp:DropDownList></p>


<p><asp:LinkButton id="lbAddToCart" Text="Add To Cart"

    OnClick="linkClk" runat="server" /></p>
The code you use to handle link clicks will need to find the item selected in the drop-down list and append it to the query string of the URL to which the user is to be redirected, as follows:
Sub linkClk(s As Object, e As EventArgs)

  Dim strQueryStr As String = "?Product=" & _

    Server.UrlEncode(ddlProducts.SelectedItem.Text)

  Response.Redirect("viewcart.aspx" & strQueryStr)

End Sub

void linkClk(Object s, EventArgs e) {

  string strQueryStr = "?Product=" +

    Server.UrlEncode(ddlProducts.SelectedItem.Text);

  Response.Redirect("viewcart.aspx" + strQueryStr);

}
Note the use of the Server.UrlEncode() method, which converts characters not allowed in query string values (e.g. &) to URL-safe character codes (e.g. %26) that the browser will understand. You should always use this method when adding arbitrary values to query strings.
When a user selects an item from the drop-down list and clicks the LinkButton control, the viewcart.aspx page is opened with the selected product appended as a parameter of the query string. This is illustrated in Figure 4.4.
Figure 4.4. Append the selected item to the query string.
![]()
Now that you’ve passed the product to the viewcart.aspx page, you have to grab it from the query string in the new page. We get hold of variables from the query string by accessing the Request.QueryString collection, like so:
Sub Page_Load()

  lblResult.Text = Request.QueryString("Product")

End Sub

void Page_Load() {

  lblResult.Text = Request.QueryString["Product"];

}
Here, we simply display the value of the Product query string parameter, as we see in Figure 4.5.
Figure 4.5. Set the text property of the label control within a Page_Load event handler to accept the new parameter value.
Now, when you select a product and add it to the cart, the result is displayed in the redirected page on a label with an id of lblResult. Now sure, a real product catalog and shopping cart has a lot more to it, but in this section we’ve uncovered an important building block.
Postback
Postback can be confusing to newcomers because, while most ASP.NET developers know what it is, they can’t seem to explain it clearly. The topics we’ve covered so far, like subroutines, functions, and events, are not new to most Web developers. HTML, in combination with client-side JavaScript, has been doing all that for years. ASP.NET is different to this model, though, because it is a server-side, not client-side, technology – events that occur on a page are handled by code running on the server. For this to work, ASP.NET uses the mechanism of postback.
When an event is triggered, for instance, a button is clicked, or an item in a grid is selected, the page is submitted back to the server for processing, along with information about the event and any preexisting data on the page (via view state). We say the page “posts back” to the server. This is a powerful concept to grasp because it is postback that lets us run code on the server rather than on the client’s browser, and it is postback that lets our server code know which items within a drop-down list were selected, or what information a user typed into a text box.
But what would happen if you had multiple DropDownList controls that were populated with database data? Users could interact with those DropDownList controls and, in turn, we could set certain options within the page based on what they selected from the drop-down menus. Although this seems like a common task, with traditional ASP it incurred considerable overhead. The problem is that while the data that’s bound to the drop-down menu from the database never changes, every time the user selects an item from the drop-down menu and a postback has to be done, the database must be accessed again to rebuild the contents of each drop-down list on the page. However, this is not a problem in ASP.NET.
In ASP.NET we can check for postback with the IsPostBack property, and thus avoid performing any time consuming tasks unnecessarily. IsPostBack is a page-level property – meaning that it’s a property of the page itself – and we’d most commonly use it in the Page_Load() event handler to execute code only when the page is first loaded. Consider the following example:
Example 4.4. PostBack.aspx
<html>

<head>

<script runat="server" language="VB">

Sub Page_Load(s As Object, e As EventArgs)

  lblMessage1.Text = Now()

  If Not IsPostBack Then

    lblMessage2.Text = Now()

  End If

End Sub

</script>

</head>


<body>

<form runat="server">

  <p>Not Checking for postback:<br />

    <asp:Label id="lblMessage1" runat="server" /></p>

  <p>Checking for postback:<br />

    <asp:Label id="lblMessage2" runat="server" /></p>

  <p><asp:Button id="btnClick" Text="Click Me" runat="server" />

  </p>

</form>

</body>

</html>
Example 4.5. PostBack.aspx
<html>

<head>

<script runat="server" language="C#">

void Page_Load(Object s, EventArgs e) {

  lblMessage1.Text = Convert.ToString(DateTime.Now);

  if (!IsPostBack) {

    lblMessage2.Text = Convert.ToString(DateTime.Now);

  }

}

</script>

</head>


<body>

<form runat="server">

  <p>Not Checking for postback:<br />

    <asp:Label id="lblMessage1" runat="server" /></p>

  <p>Checking for postback:<br />

    <asp:Label id="lblMessage2" runat="server" /></p>

  <p><asp:Button id="btnClick" Text="Click Me" runat="server" />

  </p>

</form>

</body>

</html>
The result will look similar to Figure 4.6.
Figure 4.6. The IsPostBack property checks to make sure the user isn’t resubmitting the page.
In this example, the IsPostBack check means that the second label doesn’t refresh when the Button control is clicked. Similarly, we could use IsPostBack within the Page_Load() subroutine to set up database-driven drop-down menus just once within each user’s session, making the online experience smoother, and making our application more scalable. Don’t worry if postback seems a bit confusing now – we’ll use it more in upcoming chapters, so if it doesn’t yet, it should make sense after a few more practical examples.
Formatting Controls with CSS
HTML was deliberately designed to pay little attention to the specifics of how particular items on a page were rendered. It is left up to the individual browser to work out these intricacies, and tailor the output to the limitations and strengths of the user’s machine. While we can change font styles, sizes, colors, and so on using HTML tags, this is a practice that can lead to verbose code and pages that are very hard to restyle at a later date.
The Cascading Style Sheets (CSS) language aims to provide the degree of control, flexibility, and pizzazz that modern Web designers seek. It’s a standard that’s widely supported by all the popular browsers, in its oldest version (CSS1) at the very least.
CSS is a powerful tool for Web developers because it gives us the power to create one set of styles in a single sheet, and apply those styles to all the pages in our Website. All the pages then use the same fonts, colors, and sizes for the same sections, giving the site a consistent feel throughout. Regardless of whether our site contains three pages or three hundred, when we alter the styles in the style sheet, those changes are immediately applied to all pages based on that style sheet.
Types of Styles and Style Sheets
There are three different ways of associating styles to elements of a particular Web page. I’ve already mentioned the first, and usually the best, which is an external file:
External File
By placing your style rules in an external style sheet, you can link this one file to any Web pages where you want those styles to be used. This makes updating a Website’s overall look a cakewalk.
Document Wide
Rather than having an external sheet, you can place style rules for a page within a <style> tag inside that page’s head element. The problem is that we can’t then use those styles in another page without typing them in again, which makes global changes to the entire site difficult to manage.
Inline
Inline styles allow us to set styles for a single tag using the style attribute. For instance, we might create a text box in regular HTML with a style attribute that draws a border around the text box like so:
<input type="text"

    style="border-style:groove" />
CSS style rules create styles that are applied to elements of a page in one of two ways (This is, to some extent, a simplified view of how CSS works. For the complete story, refer to HTML Utopia: Designing Without Tables Using CSS (SitePoint, ISBN 0-9579218-2-9).
Classes
Arguably the most popular way to use styles within your pages, classes allow you to set up a custom style that will be applied to any tag or control that has a class attribute that matches the name of your custom style.
Tag Redefinition
Redefining a tag affects the appearance of certain standard HTML tags. For instance, the <hr> tag is generally given a width of 100% by default, but you could redefine the tag in CSS to have a width of 50%.
Whether you’re building external, document-wide, or inline style sheets, properties for classes and tag redefinitions use the same syntax. To create a class within an external style sheet file, you’d use the following syntax:
.myClass {

  font-family: arial;

  font-size: 10pt;

  color: red;

}
This would then be saved in a file with a .css extension, such as styles.css, and linked into the Web Form with the following line in the <head> tag of your document:
<link href="styles.css" rel="stylesheet" />Similarly, to define a class within a document-wide style sheet, you would use the following syntax:
<head>

<style type="text/css">

  .myClass {

    font-family: arial;

    font-size: 10pt;

    color: red;

  }

</style>

</head>
When you’re using inline styles, use the following syntax:
<span style="font-family: arial; font-size: 10pt; color: red;">My

Stylized Text</span>
For inline styles, simply add all properties to the tag in question with the style attribute. Above, we’ve used the <span> tag, but the principle remains the same for the other tags.
Now that you have a basic understanding of some of the fundamental concepts behind CSS, let’s look at the different types of styles that can be used within our ASP.NET applications.
Style Properties
There are many different types of properties that you can modify using style sheets. Below is a list of the common types:
Font
This category provides you with the ability to format text level elements, including their font face, size, decoration, weight, color, etc.
Background
This category allows you to customize backgrounds for objects and text. Modifying these values gives you control over the color, image, and whether or not you want to repeat an image.
Block
This category allows you to modify the spacing between paragraphs, lines of text, and spaces between text and words.
Box
The box category provides changes and customizations for tables. If you need to modify borders, padding, spacing, and colors on a table, row, or cell, you can modify elements within this category.
Border
This category lets you draw boxes of different colors, styles and thicknesses around page elements.
List
This category allows you to customize the way ordered and unordered lists are created.
Positioning
Modifying positioning allows you to move and position tags and controls freely.
These categories provide a list of what can generally be modified using CSS. As we progress through the book, the many types of properties will become evident.
The CssClass Property
Once you have defined a class in a style sheet (be it external or internal), you’ll want to begin associating that class with elements in your Web Forms. You can associate classes with ASP.NET Web controls using the CssClass property. The following example uses classes defined within a document-wide style sheet:
<html>

<head>

<style type="text/css">

  .dropdownmenu {

    font-family: Arial;

    background-color: #0099FF;

  }

  .textbox {

    font-family: Arial;

    background-color: #0099FF;

    border: 1px solid;

  }

  .button {

    font-family: Arial;

    background-color: #0099FF;

    border: 1px solid;

  }

  .text {

    font-family: Arial, Helvetica, sans-serif;

    font-size: 10px;

  }

</style>

</head>


<body>

<form runat="server">

<p class="text">Please select a product:</p>

<p><asp:DropDownList id="ddlProducts" CssClass="dropdownmenu"

    runat="server">

  <asp:ListItem Text="Shirt" selected="true" />

  <asp:ListItem Text="Hat" />

  <asp:Listitem Text="Pants" />

  <asp:ListItem Text="Socks" />

</asp:DropDownList></p>

<p><asp:TextBox id="txtQuantity" CssClass="textbox" runat="server"

    /></p>

<p><asp:Button id="btnAddToCart" CssClass="button" runat="server"

    Text="Add To Cart" /></p>

</form>

</body>

</html>
A Navigation Menu and Web Form for the Intranet Application
Now that you have a solid foundation in HTML controls, Web Forms, Web controls, Page Interaction, Navigation, and Style Sheets, you’re ready to begin working on the project that we’ll build on throughout the remainder of this book. With the Dorknozzle Intranet Application, I hope to introduce you to real world development in simple stages, as we work through the following chapters together.
Introducing the Dorknozzle Intranet Application
While most books give you a series of simple, isolated examples to illustrate particular techniques, this book is a little different. Many of the examples provided in these pages will involve work on a single project – an intranet application for the fictional Dorknozzle company.
We’ll build on this application as we go along, illustrating the many different concepts that are important to developers of any type of Web application. The intranet application we’ll develop will offer the following functionality:
Welcome
Displays company event information to the user of the Web application.
Helpdesk
Allows any Dorknozzle employees to submit a problem as a helpdesk ticket to an IT administrator regarding issues they experience with software, hardware, or their computer.
Employee Store
Employee stores boost company morale. By building an online store, we’ll allow Dorknozzle employees to buy life-enriching items such as mugs, shirts, and mouse pads. All will proudly bear the Dorknozzle logo, of course!
Newsletter Archive
Another way to improve morale is to keep employees informed of company events and news. Each month, the Dorknozzle HR Manager will send out a company newsletter to all employees.
Employee Directory
Employees will likely want to call each other to discuss important, company-related affairs… such as last night’s television viewing! The employee directory should let employees find other staff members’ details.
Address Book
While the employee directory houses handy information for use by staff, the purpose of the address book is to provide more detailed information about all of the employees within the company
Admin Tools
Administrators will need a way to modify closed helpdesk tickets, delete the records of fired employees, create newly hired employees’ profiles, modify information on current employees, and more. The admin tools section will provide the interface for this.
Before we can begin creating all these smaller applications, we must build the framework that will act as a template across the site. In this section, we’ll accomplish the following introductory tasks for the development of our intranet application:
- Build the navigation menu.
- Create the style sheet.
- Design the template and Web Form for the helpdesk application.
Building the Navigation Menu
Once it’s complete, our fictitious intranet application will have modules for an IT helpdesk, employee store, newsletter archive, employee directory, address book, and admin console. Obviously, we’re going to need some kind of navigation menu to make those sub-applications simple to find. Throughout this chapter, we’ve studied numerous ways of navigating from page to page, and we could use any of these methods here. We’ve discussed controls such as the Button control, HyperLink control, and LinkButton control, and we’ve explored various objects and methods for navigating from code. Although all these would work to a certain degree, in this case, only one makes the most sense in terms of performance and practicality.
Before we begin, you’ll want to obtain the necessary files from the code archive for this book. The files for this chapter include a starting template that you can use for this project, as well as the complete version in case you run into problems.
Because we’re not submitting any data for processing, we can eliminate the Button and LinkButton controls; each involves extra work from the server in order to process the Click event it raises. As we only want to link from one page to the next, and don’t care about performing any tasks programmatically, we can use the simpler HyperLink control instead. Remember, we add a HyperLink control to the page by inserting the following code inside the form:
<asp:HyperLink NavigateUrl="index.aspx" runat="server"

    Text="Home" />
This would add a link that showed the text “Home.”
Open up your text editor and create a new file with the standard HTML tags required by ASP.NET pages, including an empty form with a runat="server" attribute. Inside this form, add the HyperLink controls for helpdesk, employee store, newsletter archive, employee directory, address book, and admin tools, like so:
Example 4.6. index.aspx (excerpt)
<!-- HyperLink controls for navigation -->

<img src="Images/book_closed.gif" width="16" height="16" alt="+"

    />

<asp:HyperLink NavigateUrl="index.aspx" runat="server" Text="Home"

    />

<br />

<img src="Images/book_closed.gif" width="16" height="16" alt="+"

    />

<asp:HyperLink NavigateUrl="helpdesk.aspx" runat="server"

    Text="HelpDesk" />

<br />

<img src="Images/book_closed.gif" width="16" height="16" alt="+"

    />

<asp:HyperLink NavigateUrl="employeestore.aspx" runat="server"

    Text="Employee Store" />

<br />

<img src="Images/book_closed.gif" width="16" height="16" alt="+"

    />

<asp:HyperLink NavigateUrl="newsletterarchive.aspx" runat="server"

    Text="Newsletter Archive" />

<br />

<img src="Images/book_closed.gif" width="16" height="16" alt="+"

    />

<asp:HyperLink NavigateUrl="employeedirectory.aspx" runat="server"

    Text="Employee Directory" />

<br />

<img src="Images/book_closed.gif" width="16" height="16" alt="+"

    />

<asp:HyperLink NavigateUrl="addressbook.aspx" runat="server"

    Text="Address Book" />

<br /><br />

<img src="Images/book_closed.gif" width="16" height="16" alt="+"

    />

<asp:HyperLink NavigateUrl="admintools.aspx" runat="server"

    Text="Admin Tools" />

<!-- End HyperLink controls -->
Once the links have been added to the page and you’ve placed the book_closed.gif file in a subdirectory called Images, you could save your work (as index.aspx) and view the results in your browser. At this stage, however, it would look fairly bland. What we need is a few pretty graphics to provide visual appeal! Although modern Web design practices would have us use CSS for our page layout and visual design, we’ll resort to HTML tables here in order to stay focused on the server-side aspects of our application.
Open index.aspx and create the following two regular (i.e. not server-side) HTML tables at the very start of the page body:
Example 4.7. index.aspx (excerpt)
<body>

<form runat="server">


<table width="100%" border="0" cellspacing="0" cellpadding="0"

    background="Images/header_bg.gif">

  <tr>

    <td><img src="Images/header_top.gif" width="450" height="142"

        alt="the official dorknozzle company intranet"

        /></td>

  </tr>

</table>


<table width="100%" border="0" cellspacing="0" cellpadding="0">

  <tr>

    <td width="157"><img src="Images/header_bottom.gif"

        width="157" height="37" alt="" /></td>

    <td></td>

  </tr>

</table>
We’ll want to place our links in a table too. While we’re there, we’ll add some news items to the main index page. Open up index.aspx once more, and place the following HTML table around the links we’ve already added:
Example 4.8. index.aspx (excerpt)
<table width="100%" border="0" cellspacing="0" cellpadding="10">

  <tr>

    <td valign="top" width="160">

      <!-- HyperLink controls for navigation -->

      ...

      <!-- End HyperLink controls -->

    </td>

    <td valign="top">

      <h1>Company News:</h1>

      <p>We'll add some news later.</p>

      <h1>Company Events:</h1>

      <p>We'll add company events later.</p>

    </td>

  </tr>

</table>


</form>

</body>

</html>
The result will look similar to Figure 4.7.
Figure 4.7. Add HyperLink controls for the Intranet navigation menu.
Isn’t it amazing the difference some well-chosen graphics can make? Don’t forget to place the pictures from the download in the Images subdirectory. You can, of course, find the completed source in the code archive, although I do recommend you type the code in yourself as we progress, for practice value.
Create the Corporate Style Sheet
If you don’t mind the ordinary look of standard Web pages, then you can skip this section. If, however, you don’t like standard blue hyperlinks, black, Times New Roman text, and beveled form controls, this section is for you.
As you’ve already read, style sheets provide developers with flexibility and control over the “look” of Web applications. In this section, we’ll explore the addition of a customizable style sheet to our fictitious intranet application. We will define styles for the following elements within our application:
- Hyperlinks
- Text (including body text and headings)
- Boxed controls (including text boxes and drop-down menus)
You can start by creating the CSS file that the styles will reside in. I’ve opened Notepad and immediately saved the file as styles.css within the root directory of the application, as shown in Figure 4.8.
Figure 4.8. Open Notepad and save the file as styles.css within the root directory of the application folder.
Now, let’s apply some style properties to the following tags:
bodyph1a:linka:hover
You’ll notice the a:link and a:hover items in this list, which are not strictly-speaking tags. In the world of CSS, these are known as a pseudo-elements. a:link narrows the selection to <a> tags that are links (as opposed to <a name="..."> tags, which are targets). Assigning properties to a:hover will apply those properties only to links over which the user is hovering the mouse.
We’ll also define a few classes for certain Web controls that don’t map directly to a particular HTML tag:
.textboxFor <asp:TextBox> controls, which become <input type="text"> and <textarea> tags when sent to the browser.
.buttonFor <asp:Button> controls, which become <input type="button">, <input type="submit">, and <input type="reset"> tags.
.dropdownmenuFor <asp:DropDownList> controls, which become <select> tags.
Below is the code for the CSS rules that will apply the desired basic formatting to our site. Type the following just as it appears into your styles.css file:
body {

  background: #FFFFFF;

  color: #000000;

  margin: 0;

  padding: 0;

}

p {

  font-family: Arial;

  font-size: 12px;

}

h1 {

  font-family: Arial;

  font-size: 14px;

  color: #000000;

}

a:link {

  font-family: Arial;

  font-size: 12px;

  color: #000000;

}

a:hover {

  font-family: Arial;

  font-size: 12px;

  color: #FF0000;

}

.textbox {

  font-family: Arial;

  font-size: 12px;

  border: 1px solid black;

}

.button {

  font-family: Arial;

  border: 1px solid black;

  background-color: #CCCCCC;

}

.dropdownmenu {

  font-family: Arial;

  font-size: 12px;

  background-color: #CCCCCC;

}
Now that the style sheet file has been created, we can link the style sheet file to index.aspx by inserting the following line into the <head> tag of the document:
<link href="styles.css" rel="stylesheet" />We’ll need to assign the CSS classes we have defined (textbox, button, and dropdownmenu) to relevant controls as we create them, but for now our simple HTML template will automatically benefit from the tags we have redefined.
Remember, we’re not limited to these styles. If, throughout the development of our application, we decide to add more styles, we’ll simply need to open the styles.css file and add them as necessary.
You can save your work at this point, and view it in the browser.
Design the Web Form for the Helpdesk Application
The last part of the project is to add the employee Helpdesk request Web Form. This will be a Web page that allows our fictitious employees to report hardware, software, and workstation problems. The Web Form will be arranged as a series of simple steps that users can follow to report their problems:
- Pick from a predefined category of potential problem areas. (
DropDownListcontrol) - Pick from predefined subjects within the categories. (
DropDownListcontrol) - Type a description of the problem. (Multiline
TextBoxcontrol) - Submit the request. (
Buttoncontrol)
Rather than creating a new, blank page and retyping all the code, you can simply copy index.aspx and rename it helpdesk.aspx (or save a copy with the new name if it’s already open in your editor). The only portion of the code that will change to accommodate the HelpDesk interface is the last table in the body – the one that contains the news items on index.aspx. Everything else stays the same, because we want to have a single look for all our pages (We’ll see better ways to do this in later chapters…). Change the final column in the table to create two drop-down lists, a multiline text box, and a button, as shown:
<!-- End HyperLink controls -->

    </td>

    <td valign="top">

      <h1>Employee HelpDesk Request</h1>

      <p>Problem Category:<br />

        <asp:DropDownList id="ddlCategory" CssClass="dropdownmenu"

            runat="server" /></p>

      <p>Problem Subject:<br />

        <asp:DropDownList id="ddlSubject" CssClass="dropdownmenu"

            runat="server" /></p>

      <p>Problem Description:<br />

        <asp:TextBox id="txtDescription" CssClass="textbox"

            Columns="40" Rows="4" TextMode="MultiLine"

            runat="server" /></p>

      <p><asp:Button id="btnSubmit" CssClass="button"

            Text="Submit Request" runat="server" /></p>

    </td>
Notice how we’ve applied our CSS classes to the appropriate controls here.
Don’t worry that the DropDownList controls don’t have items associated with them – the categories and subjects will be predefined within database tables. Later, we’ll bind these database tables to their respective controls.
When you’re finished, save your work and view it in a browser.
Summary
In this chapter, we discussed HTML controls, Web Forms, and Web controls. We also explored how to link between pages, and how to add style to controls. You even built your first project, putting together the information you’ve learned in this and previous chapters.
Your Web application efforts will focus predominantly on Web controls. In the next chapter, we’ll learn how to check user input on those Web controls through the use of the ASP.NET validation controls…
That’s it for the first four chapters of SitePoint’s Build Your Own ASP.NET Website Using C# & VB.NET. This complete guide to building your very own ASP.NET Website is available now. Click here for more information.
The book contains not only the four chapters you just read, but thirteen more chapters that cover Web forms, validation controls, database design, ADO.NET, building a shopping cart, error handling, security and authentication, XML Web services, and more. The book also includes a fantastic set of references that make it an indispensible desk reference as you pursue Web development in ASP.NET. For more information, see the book page.
angelists who spread word about your products, thus increasing your brand awareness.
The ‘repeat visit’ flavour of stickiness is an added bonus for eCommerce sites. It lets you up-sell your customer another product, probably a costlier one with a higher profit margin. Having once ordered from you and experienced your exceptional customer service — it is exceptional, isn’t it? — the returning visitor is more inclined to order again.
HOW TO MAKE YOUR SITE STICKY?
There is no single answer to this question. Here are some tips that might work for you:
- Make sure you have excellent content on your site
- Break up long articles into multi-page features
- End each page with a ‘teaser’ that entices the user to click to another section of your site
- Invite visitors to bookmark your page for future visits
- Offer visitors a free subscription to a newsletter or announcement list
- Add a chat room or bulletin board to promote interactivity and generate a feeling of community that keeps visitors returning for more
- Run contests or polls or surveys, so visitors return to view results
- Conduct a quiz and provide answers after some time
- Refresh content on the site regularly to keep visitors entertained and informed
- Announce discount sales or special offers to existing customers
- Invite visitors to become registered members
- Allow people to personalize your site to their needs
In the final analysis, stickiness will depend on the relationship you build with your audience, and the desired result you wish to achieve out of each visitor. If you offer your site visitors the kind of value propositions and an enjoyable experience that keep them coming back for more, it is only a matter of time before you can maximize your revenues from either advertisements or eCommerce.
Success online is all about building sticky relationships.
ET Web controls using the CssClass property. The following example uses classes defined within a document-wide style sheet:
<html>

<head>

<style type="text/css">

  .dropdownmenu {

    font-family: Arial;

    background-color: #0099FF;

  }

  .textbox {

    font-family: Arial;

    background-color: #0099FF;

    border: 1px solid;

  }

  .button {

    font-family: Arial;

    background-color: #0099FF;

    border: 1px solid;

  }

  .text {

    font-family: Arial, Helvetica, sans-serif;

    font-size: 10px;

  }

</style>

</head>


<body>

<form runat="server">

<p class="text">Please select a product:</p>

<p><asp:DropDownList id="ddlProducts" CssClass="dropdownmenu"

    runat="server">

  <asp:ListItem Text="Shirt" selected="true" />

  <asp:ListItem Text="Hat" />

  <asp:Listitem Text="Pants" />

  <asp:ListItem Text="Socks" />

</asp:DropDownList></p>

<p><asp:TextBox id="txtQuantity" CssClass="textbox" runat="server"

    /></p>

<p><asp:Button id="btnAddToCart" CssClass="button" runat="server"

    Text="Add To Cart" /></p>

</form>

</body>

</html>
A Navigation Menu and Web Form for the Intranet Application
Now that you have a solid foundation in HTML controls, Web Forms, Web controls, Page Interaction, Navigation, and Style Sheets, you’re ready to begin working on the project that we’ll build on throughout the remainder of this book. With the Dorknozzle Intranet Application, I hope to introduce you to real world development in simple stages, as we work through the following chapters together.
Introducing the Dorknozzle Intranet Application
While most books give you a series of simple, isolated examples to illustrate particular techniques, this book is a little different. Many of the examples provided in these pages will involve work on a single project – an intranet application for the fictional Dorknozzle company.
We’ll build on this application as we go along, illustrating the many different concepts that are important to developers of any type of Web application. The intranet application we’ll develop will offer the following functionality:
Welcome
Displays company event information to the user of the Web application.
Helpdesk
Allows any Dorknozzle employees to submit a problem as a helpdesk ticket to an IT administrator regarding issues they experience with software, hardware, or their computer.
Employee Store
Employee stores boost company morale. By building an online store, we’ll allow Dorknozzle employees to buy life-enriching items such as mugs, shirts, and mouse pads. All will proudly bear the Dorknozzle logo, of course!
Newsletter Archive
Another way to improve morale is to keep employees informed of company events and news. Each month, the Dorknozzle HR Manager will send out a company newsletter to all employees.
Employee Directory
Employees will likely want to call each other to discuss important, company-related affairs… such as last night’s television viewing! The employee directory should let employees find other staff members’ details.
Address Book
While the employee directory houses handy information for use by staff, the purpose of the address book is to provide more detailed information about all of the employees within the company
Admin Tools
Administrators will need a way to modify closed helpdesk tickets, delete the records of fired employees, create newly hired employees’ profiles, modify information on current employees, and more. The admin tools section will provide the interface for this.
Before we can begin creating all these smaller applications, we must build the framework that will act as a template across the site. In this section, we’ll accomplish the following introductory tasks for the development of our intranet application:
- Build the navigation menu.
- Create the style sheet.
- Design the template and Web Form for the helpdesk application.
Building the Navigation Menu
Once it’s complete, our fictitious intranet application will have modules for an IT helpdesk, employee store, newsletter archive, employee directory, address book, and admin console. Obviously, we’re going to need some kind of navigation menu to make those sub-applications simple to find. Throughout this chapter, we’ve studied numerous ways of navigating from page to page, and we could use any of these methods here. We’ve discussed controls such as the Button control, HyperLink control, and LinkButton control, and we’ve explored various objects and methods for navigating from code. Although all these would work to a certain degree, in this case, only one makes the most sense in terms of performance and practicality.
Before we begin, you’ll want to obtain the necessary files from the code archive for this book. The files for this chapter include a starting template that you can use for this project, as well as the complete version in case you run into problems.
Because we’re not submitting any data for processing, we can eliminate the Button and LinkButton controls; each involves extra work from the server in order to process the Click event it raises. As we only want to link from one page to the next, and don’t care about performing any tasks programmatically, we can use the simpler HyperLink control instead. Remember, we add a HyperLink control to the page by inserting the following code inside the form:
<asp:HyperLink NavigateUrl="index.aspx" runat="server"

    Text="Home" />
This would add a link that showed the text “Home.”
Open up your text editor and create a new file with the standard HTML tags required by ASP.NET pages, including an empty form with a runat="server" attribute. Inside this form, add the HyperLink controls for helpdesk, employee store, newsletter archive, employee directory, address book, and admin tools, like so:
Example 4.6. index.aspx (excerpt)
<!-- HyperLink controls for navigation -->

<img src="Images/book_closed.gif" width="16" height="16" alt="+"

    />

<asp:HyperLink NavigateUrl="index.aspx" runat="server" Text="Home"

    />

<br />

<img src="Images/book_closed.gif" width="16" height="16" alt="+"

    />

<asp:HyperLink NavigateUrl="helpdesk.aspx" runat="server"

    Text="HelpDesk" />

<br />

<img src="Images/book_closed.gif" width="16" height="16" alt="+"

    />

<asp:HyperLink NavigateUrl="employeestore.aspx" runat="server"

    Text="Employee Store" />

<br />

<img src="Images/book_closed.gif" width="16" height="16" alt="+"

    />

<asp:HyperLink NavigateUrl="newsletterarchive.aspx" runat="server"

    Text="Newsletter Archive" />

<br />

<img src="Images/book_closed.gif" width="16" height="16" alt="+"

    />

<asp:HyperLink NavigateUrl="employeedirectory.aspx" runat="server"

    Text="Employee Directory" />

<br />

<img src="Images/book_closed.gif" width="16" height="16" alt="+"

    />

<asp:HyperLink NavigateUrl="addressbook.aspx" runat="server"

    Text="Address Book" />

<br /><br />

<img src="Images/book_closed.gif" width="16" height="16" alt="+"

    />

<asp:HyperLink NavigateUrl="admintools.aspx" runat="server"

    Text="Admin Tools" />

<!-- End HyperLink controls -->
Once the links have been added to the page and you’ve placed the book_closed.gif file in a subdirectory called Images, you could save your work (as index.aspx) and view the results in your browser. At this stage, however, it would look fairly bland. What we need is a few pretty graphics to provide visual appeal! Although modern Web design practices would have us use CSS for our page layout and visual design, we’ll resort to HTML tables here in order to stay focused on the server-side aspects of our application.
Open index.aspx and create the following two regular (i.e. not server-side) HTML tables at the very start of the page body:
Example 4.7. index.aspx (excerpt)
<body>

<form runat="server">


<table width="100%" border="0" cellspacing="0" cellpadding="0"

    background="Images/header_bg.gif">

  <tr>

    <td><img src="Images/header_top.gif" width="450" height="142"

        alt="the official dorknozzle company intranet"

        /></td>

  </tr>

</table>


<table width="100%" border="0" cellspacing="0" cellpadding="0">

  <tr>

    <td width="157"><img src="Images/header_bottom.gif"

        width="157" height="37" alt="" /></td>

    <td></td>

  </tr>

</table>
We’ll want to place our links in a table too. While we’re there, we’ll add some news items to the main index page. Open up index.aspx once more, and place the following HTML table around the links we’ve already added:
Example 4.8. index.aspx (excerpt)
<table width="100%" border="0" cellspacing="0" cellpadding="10">

  <tr>

    <td valign="top" width="160">

      <!-- HyperLink controls for navigation -->

      ...

      <!-- End HyperLink controls -->

    </td>

    <td valign="top">

      <h1>Company News:</h1>

      <p>We'll add some news later.</p>

      <h1>Company Events:</h1>

      <p>We'll add company events later.</p>

    </td>

  </tr>

</table>


</form>

</body>

</html>
The result will look similar to Figure 4.7.
Figure 4.7. Add HyperLink controls for the Intranet navigation menu.
Isn’t it amazing the difference some well-chosen graphics can make? Don’t forget to place the pictures from the download in the Images subdirectory. You can, of course, find the completed source in the code archive, although I do recommend you type the code in yourself as we progress, for practice value.
Create the Corporate Style Sheet
If you don’t mind the ordinary look of standard Web pages, then you can skip this section. If, however, you don’t like standard blue hyperlinks, black, Times New Roman text, and beveled form controls, this section is for you.
As you’ve already read, style sheets provide developers with flexibility and control over the “look” of Web applications. In this section, we’ll explore the addition of a customizable style sheet to our fictitious intranet application. We will define styles for the following elements within our application:
- Hyperlinks
- Text (including body text and headings)
- Boxed controls (including text boxes and drop-down menus)
You can start by creating the CSS file that the styles will reside in. I’ve opened Notepad and immediately saved the file as styles.css within the root directory of the application, as shown in Figure 4.8.
Figure 4.8. Open Notepad and save the file as styles.css within the root directory of the application folder.
Now, let’s apply some style properties to the following tags:
bodyph1a:linka:hover
You’ll notice the a:link and a:hover items in this list, which are not strictly-speaking tags. In the world of CSS, these are known as a pseudo-elements. a:link narrows the selection to <a> tags that are links (as opposed to <a name="..."> tags, which are targets). Assigning properties to a:hover will apply those properties only to links over which the user is hovering the mouse.
We’ll also define a few classes for certain Web controls that don’t map directly to a particular HTML tag:
.textboxFor <asp:TextBox> controls, which become <input type="text"> and <textarea> tags when sent to the browser.
.buttonFor <asp:Button> controls, which become <input type="button">, <input type="submit">, and <input type="reset"> tags.
.dropdownmenuFor <asp:DropDownList> controls, which become <select> tags.
Below is the code for the CSS rules that will apply the desired basic formatting to our site. Type the following just as it appears into your styles.css file:
body {

  background: #FFFFFF;

  color: #000000;

  margin: 0;

  padding: 0;

}

p {

  font-family: Arial;

  font-size: 12px;

}

h1 {

  font-family: Arial;

  font-size: 14px;

  color: #000000;

}

a:link {

  font-family: Arial;

  font-size: 12px;

  color: #000000;

}

a:hover {

  font-family: Arial;

  font-size: 12px;

  color: #FF0000;

}

.textbox {

  font-family: Arial;

  font-size: 12px;

  border: 1px solid black;

}

.button {

  font-family: Arial;

  border: 1px solid black;

  background-color: #CCCCCC;

}

.dropdownmenu {

  font-family: Arial;

  font-size: 12px;

  background-color: #CCCCCC;

}
Now that the style sheet file has been created, we can link the style sheet file to index.aspx by inserting the following line into the <head> tag of the document:
<link href="styles.css" rel="stylesheet" />We’ll need to assign the CSS classes we have defined (textbox, button, and dropdownmenu) to relevant controls as we create them, but for now our simple HTML template will automatically benefit from the tags we have redefined.
Remember, we’re not limited to these styles. If, throughout the development of our application, we decide to add more styles, we’ll simply need to open the styles.css file and add them as necessary.
You can save your work at this point, and view it in the browser.
Design the Web Form for the Helpdesk Application
The last part of the project is to add the employee Helpdesk request Web Form. This will be a Web page that allows our fictitious employees to report hardware, software, and workstation problems. The Web Form will be arranged as a series of simple steps that users can follow to report their problems:
- Pick from a predefined category of potential problem areas. (
DropDownListcontrol) - Pick from predefined subjects within the categories. (
DropDownListcontrol) - Type a description of the problem. (Multiline
TextBoxcontrol) - Submit the request. (
Buttoncontrol)
Rather than creating a new, blank page and retyping all the code, you can simply copy index.aspx and rename it helpdesk.aspx (or save a copy with the new name if it’s already open in your editor). The only portion of the code that will change to accommodate the HelpDesk interface is the last table in the body – the one that contains the news items on index.aspx. Everything else stays the same, because we want to have a single look for all our pages (We’ll see better ways to do this in later chapters…). Change the final column in the table to create two drop-down lists, a multiline text box, and a button, as shown:
<!-- End HyperLink controls -->

    </td>

    <td valign="top">

      <h1>Employee HelpDesk Request</h1>

      <p>Problem Category:<br />

        <asp:DropDownList id="ddlCategory" CssClass="dropdownmenu"

            runat="server" /></p>

      <p>Problem Subject:<br />

        <asp:DropDownList id="ddlSubject" CssClass="dropdownmenu"

            runat="server" /></p>

      <p>Problem Description:<br />

        <asp:TextBox id="txtDescription" CssClass="textbox"

            Columns="40" Rows="4" TextMode="MultiLine"

            runat="server" /></p>

      <p><asp:Button id="btnSubmit" CssClass="button"

            Text="Submit Request" runat="server" /></p>

    </td>
Notice how we’ve applied our CSS classes to the appropriate controls here.
Don’t worry that the DropDownList controls don’t have items associated with them – the categories and subjects will be predefined within database tables. Later, we’ll bind these database tables to their respective controls.
When you’re finished, save your work and view it in a browser.
Summary
In this chapter, we discussed HTML controls, Web Forms, and Web controls. We also explored how to link between pages, and how to add style to controls. You even built your first project, putting together the information you’ve learned in this and previous chapters.
Your Web application efforts will focus predominantly on Web controls. In the next chapter, we’ll learn how to check user input on those Web controls through the use of the ASP.NET validation controls…
That’s it for the first four chapters of SitePoint’s Build Your Own ASP.NET Website Using C# & VB.NET. This complete guide to building your very own ASP.NET Website is available now. Click here for more information.
The book contains not only the four chapters you just read, but thirteen more chapters that cover Web forms, validation controls, database design, ADO.NET, building a shopping cart, error handling, security and authentication, XML Web services, and more. The book also includes a fantastic set of references that make it an indispensible desk reference as you pursue Web development in ASP.NET. For more information, see the book page.
Frequently Asked Questions about ASP.NET Web Forms and Web Controls
What are the basic components of ASP.NET Web Forms?
ASP.NET Web Forms are made up of two main components: the visual part, which is the form itself, and the code-behind, which is the logic that drives the form’s behavior. The visual part is typically an .aspx file, which contains the HTML and server controls that make up the form. The code-behind is a separate .aspx.cs or .aspx.vb file, which contains the C# or VB.NET code that handles events and controls the form’s behavior.
How do server controls differ from HTML controls in ASP.NET Web Forms?
Server controls are special controls in ASP.NET that run on the server rather than the client. They have a runat=”server” attribute, which tells ASP.NET to process them on the server. This allows them to have more complex behavior and functionality than standard HTML controls. For example, a server control can automatically maintain its state across postbacks, while an HTML control cannot.
How can I handle events in ASP.NET Web Forms?
Events in ASP.NET Web Forms are handled in the code-behind file. Each server control can raise various events, such as Click for a Button control or SelectedIndexChanged for a DropDownList control. To handle an event, you write a method in the code-behind file with the correct signature, and then associate it with the event using the control’s properties in the .aspx file.
What is ViewState in ASP.NET Web Forms and how does it work?
ViewState is a feature of ASP.NET Web Forms that allows server controls to automatically maintain their state across postbacks. It works by storing the state of the controls in a hidden field in the form, which is then sent back to the server with each postback. The server can then use this information to restore the state of the controls before processing the postback.
How can I use validation controls in ASP.NET Web Forms?
Validation controls are a special type of server control in ASP.NET Web Forms that allow you to validate user input. There are several types of validation controls, including RequiredFieldValidator, RangeValidator, and RegularExpressionValidator. To use a validation control, you add it to your form and set its properties to specify what kind of validation you want to perform.
What is the difference between a user control and a custom control in ASP.NET Web Forms?
User controls and custom controls are both ways to create reusable components in ASP.NET Web Forms. A user control is a kind of mini-page that can contain other controls, while a custom control is a single control that you write from scratch. User controls are easier to create, but custom controls are more flexible and powerful.
How can I use data binding in ASP.NET Web Forms?
Data binding is a feature of ASP.NET Web Forms that allows you to bind data from a data source to controls on your form. This can be done declaratively using the DataSource and DataBind properties of the controls, or programmatically in the code-behind file. Data binding can be used with many types of data sources, including databases, XML files, and collections of objects.
What is the Page Lifecycle in ASP.NET Web Forms?
The Page Lifecycle in ASP.NET Web Forms is the series of steps that ASP.NET goes through to process a page request. It includes stages such as initialization, loading, rendering, and unloading. Understanding the Page Lifecycle is important for writing effective ASP.NET Web Forms code, as it determines when and how you can interact with the controls on your form.
How can I handle errors in ASP.NET Web Forms?
Errors in ASP.NET Web Forms can be handled using a combination of try-catch blocks in the code-behind file and the customErrors section in the web.config file. The try-catch blocks allow you to catch and handle specific exceptions, while the customErrors section allows you to specify how to handle uncaught exceptions.
How can I improve the performance of my ASP.NET Web Forms application?
There are many ways to improve the performance of an ASP.NET Web Forms application. Some common techniques include optimizing your database queries, using caching to reduce the load on your server, minimizing the use of ViewState, and using asynchronous methods to avoid blocking the main thread.