
The most powerful aspect of server-side scripting languages such as ASP is their almost magical ability to turn the Web – a medium originally crafted to serve one static document after another – into a platform that delivers rich, interactive experiences. These experiences come in the form of online applications that respond differently to different users in different situations.
To make this transformation possible, ASP must not only be able to produce dynamically-generated Web pages in response to requests. It must also have the ability to track information that’s specific to the users of a set of related ASP scripts (e.g. an online discussion forum), and permit those scripts to share information with each other.
In this, the fourth article in SitePoint’s series on ASP, I’ll be describing the features of ASP that make the above possible: Applications and Sessions. To start, I’ll take you through the steps required to create a Web Application in Microsoft Internet Information Server (IIS), and I’ll explain how applications and sessions fill the need for persistent data. I’ll then introduce you to the Application and Session objects in ASP that are the center of the magic, and also explain the role of the global.asa file. Finally, I’ll take you through the code of a complete example that deals with tracking the number of users on your site at any given time.
This article assumes that you’re familiar with the concepts covered in the previous articles in this series, beginning with Getting Started with ASP. If you haven’t read them, and you’re approaching ASP for the first time, I would suggest at least skimming through those previous articles before you jump into this one.
Here we go!
Key Takeaways
- ASP transforms static web pages into interactive experiences by dynamically generating content and tracking user-specific information across sessions and applications.
- Web applications in ASP are essentially directories on a server with ASP files that interact to provide services like forums or stores, and are managed via IIS by setting up a virtual directory.
- Persistent data in ASP is crucial for maintaining information across user sessions and application instances, using objects like Application and Session to store and retrieve data.
- The Application object is shared across all sessions, allowing data such as hit counts to be stored and accessed by any user, with methods to manage and secure data integrity.
- The Session object stores data specific to each user’s session, useful for personalized experiences like individual shopping carts or user-specific settings.
- The global.asa file handles events at the application and session levels, enabling initialization and cleanup tasks, and managing user sessions effectively.
Web Applications in IIS
A Web application is a lot like any other software application that you’d run on your computer, except that the interface is provided by a set of Web pages, and the code of the application runs mainly on the Web server from which you fetch those pages. Examples of common Web applications today include discussion forums, book stores, and custom news feeds.
From the point of view of an ASP developer, however, a Web application is just a collection of ASP files that work together to provide this kind of service. This group of ASP files is generally stored in a single directory, and possibly a number of subdirectories. The first step in taking advantage of the features that ASP provides to support the development of Web applications is to identify that ‘application root directory’ to IIS.
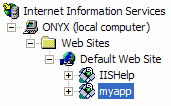
I’ll assume for the moment that you have administrator-level access to the IIS server that you’re using for ASP development. In this case, your first task is to define a Web application on your server. Create a directory anywhere on the server (I chose c:MyApplication) that you’ll use for the examples in this article. Open Control Panel, Administrative Tools, and Internet Information Services, then navigate to the Default Web Site. Right-click on it and select New, Virtual Directory. When prompted by the wizard, type an alias for the directory as it will appear in the URL (e.g. a virtual directory with the alias myapp will be accessible as http://localhost/myapp/ from your computer and as http://your.host.name/myapp/ from other computers on your network), and then browse to the directory you just created. For the access permissions, leave the default options (Read and Run Scripts) selected. When you’ve completed the wizard, the new virtual directory should appear in the tree view as shown here:
You’ve now defined a Web application on your server. All the ASP files contained in that directory (or its subdirectories) will be considered a part of the myapp application (or whatever you chose to call it). Before we explore further the features of ASP that take advantage of this, let’s stop and examine what we need a Web application for.
The Need for Persistent Data
As we’ve seen in previous articles in this series, you can store values in ASP variables and display them as part of a dynamic Web page. One limitation of variables, however, is that they only exist for as long as the particular ASP script that created them runs. Once an ASP script has ended, and the last of the Web page has been sent to the requesting browser, all the variables that were created during the course of the script’s execution are destroyed to free up memory, to enable later page requests to be processed.
There are many situations where it would be handy to have a variable that stayed in memory at the end of one ASP script so that the value stored within it could be picked up and used again by another script later on. In the last article, we saw how we could pass information from one page to another, either through a form submission or with a URL query string; however, these methods are not always adequate.
For instance, take the example we looked at in that article. Here we prompted the user for his or her name with an HTML form that appeared on the first page requested when they entered the site. We then passed that name on to each additional page with a query string that contained the name the user entered. Imagine the implications of putting this example to practical use on a site the size of SitePoint.com. Every single link in every single page would have to be individually coded to pass the username variable on to the next page. Plain HTML pages could not be used even when it wasn’t necessary to display any dynamic data on a given page, because an HTML page would not be able to pass on the username to subsequent pages.
As you can see, when your goal is to create a variable that you can use throughout your site, passing it from one page to the next is rarely a practical solution. Fortunately, ASP Web Applications were designed with just this sort of thing in mind. You’ll also recall from our last article that ASP has a number of built-in objects – Request and Response being prime examples of these. Two other objects that all ASP scripts have access to are Application and Session, and it is these special objects that let us store data that will be accessible by all ASP scripts in the current Web application.
The Application Object
Whereas every page request gets its own Request and Response objects, all requests for ASP pages in a Web application share the same Application object. This object is created the first time an ASP page is requested from the application after the Web server starts up, and is destroyed when the Web server shuts down, or when the Web application is unloaded manually in the IIS management console. Because this object persists from one page request to another, it can be used to store data that you want to share with all other pages in your application.
To store a value in the application object, simply use the following syntax:
Application("varName") = valueYou can then access that stored value as you would a regular variable, except as Application("varName"). A simple use of the Application object would be for a hit counter. You could record the number of hits your Website has received as Application("hits"), and increment that value with each page request. Here’s the basic code involved:
1  <% Option Explicit %>

2  <html>

3  <head>

4  <title> Simple counter </title>

5  </head>

6  <body>

7  <p>Page requests: <%

8    Application("hits") = Application("hits") + 1

9    Response.Write(Application("hits"))

10 %></p>

11 </body>

12 </html>
Line 8 adds 1 to the value of Application("hits"), and line 9 then prints out the updated value. Save the above code in an ASP file (e.g. counter.asp) in your application directory, and then load it repeatedly into your browser (e.g. http://localhost/myapp/counter.asp). Watch as the count increases by 1 with each page request. By including this code fragment on each page of your site, you can count the total number of page requests, as all of your pages will share the same Application("hits") value.
While the above method of value storage and retrieval represents the way you’ll use the Application object 90% of the time, this object does have a few more methods you should be aware of.
First of all, Application("hits") is actually just a shortcut. The hits variable is actually a member of a collection called Contents, which is a property of Applications. Thus, the longhand version is Application.Contents("hits"). There’s no reason for you to use this longer version when accessing stored values, but you must use it when you remove a stored value from the application. To do this, call the Remove method of the Contents collection, as follows:
Application.Contents.Remove("hits")This code would delete the "hits" stored value from the application. To remove all stored values from the application, you can use the RemoveAll method:
Application.Contents.RemoveAllTo understand the purpose of the remaining two methods of the Application object, Lock and Unlock, we must first take a close look at Line 8 from the hit counter example above:
8 Application("hits") = Application("hits") + 1As you can see, this line actually accesses the stored application value twice. The first time (on the right of the equals sign), it retrieves the stored value. Then, after adding 1 to the retrieved value, it accesses the stored value a second time (on the left of the equals sign) to record the updated value over the top of the existing value.
What’s important to understand is that the three steps described above do not necessarily occur as an uninterrupted sequence of events. If two Web browsers were to access your site at the same time, the events for each browser could intermingle, producing a sequence like this:
If you look at this sequence closely, you’ll realize that the two hits that should have been recorded only resulted in an increase of 1 to the stored “hit” value! To avoid this happening, your code should “lock” the Application object before undertaking a series of events like this that should occur in an uninterrupted sequence. Thus, Line 8 above should be replaced with these three lines:
8    Application.Lock

9    Application("hits") = Application("hits") + 1

10   Application.Unlock
The call to Application.Lock on Line 8 waits for any other processes to finish accessing the Application object, before locking access to it. This forces other clients to wait until the call to Application.Unlock on Line 10 before they can read or write the stored values again. This effectively prevents the occurrence of mix-ups like the one above, as ‘browser 2’ would have to wait for ‘browser 1’ to read and then store its updated value before it could read the value and update it itself.
The Session Object
The Session object is very similar to the Application object, as it allows you to store values that are shared between all the pages of your site. The main difference between the two is that, where a single Application object is shared by all pages and all clients that access your site, each client (browser) is assigned its own Session object.
Thus, a Session object must be created for each user session that occurs on your Website. Here’s an updated version of the hit counter example we saw in the previous section:
1  <% Option Explicit %>

2  <html>

3  <head>

4  <title> Simple counter </title>

5  </head>

6  <body>

7  <p>Your page requests: <%

8    Session("hits") = Session("hits") + 1

9    Response.Write(Session("hits"))

10 %></p>

11 <p>Total page requests: <%

12   Application.Lock

13   Application("hits") = Application("hits") + 1

14   Application.Unlock

15   Response.Write(Application("hits"))

16 %></p>

17 </body>

18 </html>
Save this page and open two copies of your Web browser. It’s important that you actually launch your browser application twice – opening it once and then opening a new window will make the two windows part of the same session, whereas actually opening two separate copies of your browser will cause them each to be assigned separate Session objects on your server. Load the above page into both browsers, and refresh it a few times in each. Observe that the counter stored in the Session object only counts the hits from each browser, while the counter stored in the Application object stores the total page request count.
A typical use of the Session object is to store a user’s shopping cart on an online shopping site. Obviously it doesn’t make sense for all your users to share a single shopping cart, so the fact that each user gets a Session object of his or her own fits the bill precisely.
As for the Application object, Session("hits") is actually just shorthand for Session.Contents("hits"). Session.Contents.Remove("hits") can be used to delete a single stored value, while Session.Contents.RemoveAll will delete all values stored in the current session.
Every user that connects to your site is assigned his or her own Session object for the duration of his or her visit, so there must be some mechanism in place to prevent old Session objects from adding up and consuming all the memory on your server. By default, a Session object will expire and be deleted from your server if the client that corresponds to that session doesn’t request a page from your server for 10 minutes. In most cases, this means that the user has closed the browser or has moved on to another Website. If your application has a typical ‘time between page requests’ of more than 10 minutes, this default timeout value will prevent your application from working properly. To specify your own session timeout interval, set the Timeout property of the Session object:
Session.Timeout = 30  ' The current session will end after

                      ' 30 minutes of inactivity
You can also end the current session immediately, for instance, if you wanted to ‘log out’ the current user from your Web application:
Session.AbandonThe global.asa File
global.asais a special file that you can create in the root directory of your Web application. It specifies the actions to be taken in response to four events:
(Application_OnStart)
(Application_OnEnd)
(Session_OnStart)
(Session_OnEnd)
Application_OnStartcan be used to set up initial values for application variables, or perhaps to restore some saved information from the last time the Web server was run, by loading it from a file or database.Application_OnEnd, meanwhile, is generally used to clean up any open resources, and save information that will be needed the next time the Web application is started.Session_OnStartandSession_OnEndperform similar functions for user sessions.Let's create a simple
global.asafile to see these events in action. Open Notepad (or your text editor of choice) and create a file calledglobal.asain the directory that houses your Web application. Type the following as the contents of this file:
1  <script language="VBScript" runat="Server">

2  Sub Application_OnStart

3    ' Commands to be run at startup

4  End Sub

5

6  Sub Application_OnEnd

7    ' Commands to be run at shutdown

8  End Sub

9

10 Sub Session_OnStart

11   ' Commands to be run at session start

12 End Sub

13

14 Sub Session_OnEnd

15   ' Commands to be run at session end

16 End Sub

17 </script>
This is the basic structure of a global.asa file. Let’s say, just for fun, that we wanted to start the count of our global (Application) hit counter at 1000. The code for the /Application_OnStart section (lines 2-4) might look like this:
2  Sub Application_OnStart

3    Application("hits") = 1000  ' Pad the numbers :)

4  End Sub
In a more practical example, you might use Application_OnEnd to save the current hit count into a text file when the server is shut down, and Application_OnStart to load that value when the server starts up again.
Putting it All Together
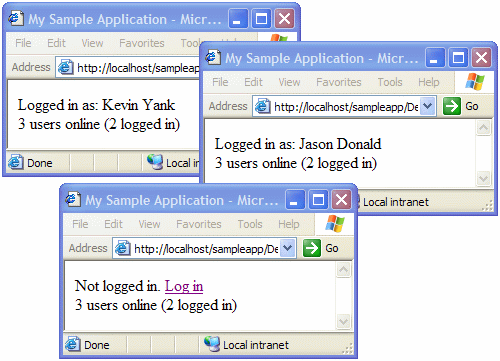
To demonstrate the use of Application, Session, and global.asa together in a single system, let’s create a more practical and interesting version of the example we saw last time. In this example, users were prompted for their name, and were then welcomed by a personalized message at the top of each page they visited. This time, we’ll use the Session object to track each user’s name, instead of having to code every link on our site to pass the variable onto the next page. We’ll also use the Application object to track the number of users on our site (and how many of those have given us their name).
To start, create a new global.asa file with the following contents:
1  <script language="VBScript" runat="Server">

2  Sub Application_OnStart

3    Application("users") = 0

4    Application("namedUsers") = 0

5  End Sub
When our application starts up, we set the two variables (the first of which tracks the number of users, while the second variable tracks users who have logged in by providing their names [named users]), to zero.
6  Sub Session_OnStart

7    Session.Timeout = 5 ' minutes

8    Session("name") = ""

9    Application.Lock

10   Application("users") = Application("users") + 1

11   Application.Unlock

12 End Sub
When a new user connects to our site (starting a new session), we set a Session.Timeout value of 5 (minutes) – the session will end after 5 minutes of inactivity (instead of the usual 10). We then create a variable to store the user’s name (which he or she may eventually provide), and set it to “” (the empty string), which indicates that the user is as yet unnamed. We then Lock the Application object while we increase the number of users by one.
13 Sub Session_OnEnd

14   Application.Lock

15   Application("users") = Application("users") - 1

16   If Len(Session("name")) > 0 Then

17     Application("namedUsers") = Application("namedUsers") - 1

18   End If

19   Application.Unlock

20 End Sub

21 </script>
When a user leaves the site, and their session times out after the requisite 5 minutes’ inactivity, we again Lock the Application in preparation for the changes we’re about to make, and decrease the user count by 1. Next, we check the length of the string that’s stored in Session("name") with the help of the built-in Len() function. If the string is longer than zero characters (i.e. “”), we know that the user has logged in by providing a name, so we also decrease the namedUsers count by 1.
Now we need to create a sample page on our site. Name the file default.asp and type the following code:
1  <% Option Explicit %>

2  <!-- #include FILE="login.asp" -->

3  <html>

4  <head>

5  <title>My Sample Application</title>

6  </head>

7  <body bgcolor="#FFFFFF" text="#000000">

8  <p><!-- #include FILE="welcome.asp" --></p>

9  </body>

10 </html>
The magic is in the <!-- #include ... --> tags. As there’ll be a significant chunk of code involved in handling both the login process, and in displaying the tally of users, and since this is something we’ll presumably want to handle on every page of our site, we’re going to place the code for each of these functions in separate files (login.asp and welcome.asp respectively). This means we’ll only have to type this code once in order to have all pages on our site share the same code. This <!-- #include ... --> tag basically inserts the contents of the specified file at the location of the tag, before the ASP code in the file is processed.
So our next task, obviously, is to create the login.asp and welcome.asp files. We’ll start with welcome.asp:
1  <%

2  ' Displays welcome message or login prompt

3  If Len(Session("name")) > 0 Then

4    Response.Write("Logged in as: " + Session("name"))

5  Else

6    Response.Write("Not logged in. <a href=""")

7    Response.Write(Request.ServerVariables("SCRIPT_NAME"))

8    Response.Write("?login=1"">Log in</a>")

9  End If
We start by checking the length of the Session("name") variable to see if the user has logged in. If they have, we display the message /”Logged in as: name“. Otherwise, we display “Not logged in”, followed by a link for the user to log in. The code for this link may seem a little complicated at first, but bear with me as I explain it.
First we print out the start of the link tag (<a href="). Because we’re already using quotes to tell Response.Write where the string that’s to be sent to the browser begins and ends, we use double quotes (“”) for the quotes that appear in this bit of code. The third quote is the one that marks the end of the string, as usual. Next, we output the "SCRIPT_NAME" server variable. As we have seen before, this will make the link point back to the very same page that is currently being processed. Finally, we tack ?login=1 onto the end of the URL, to signal the user’s intent to log in (login.asp will watch for this, as we’ll see in a moment). Next, we print out the tally of users (and how many are logged in) by simply outputting the appropriate Application variables.
10  ' Display tally of users

11 Response.Write("<br>" & Application("users") & " users online")

12 Response.Write(" (" & Application("namedUsers") & " logged in)")

13 %>
That’s all there is to welcome.asp; now here’s login.asp:
1  <%

2  ' User wishes to log in

3  If Request.QueryString("login").Count > 0 Then

4    %>

5    <html>

6    <head>

7      <title> Log In </title>

8    </head>

9    <body>

10   <form action="<%=Request.ServerVariables("SCRIPT_NAME")%>"

11         method="POST">

12     <p>Enter your name:

13     <input type="text" name="name">

14     <input type="submit" value="OK"></p>

15   </form>

16   </body>

17   </html>

18   <%

19   Response.End

20 End If
First, we catch page requests that result from the user clicking the “Log In” link generated by welcome.asp above. As we saw in the previous article, we spot this by checking if Request.QueryString("login").Count is greater than zero. When such a request is found, we display a simple page that prompts the user for his or her name. The form submits to Request.ServerVariables("SCRIPT_NAME"), so our next task in this script is to process submissions of this form, which will be marked by Request.Form("name").Count greater than zero:
21 ' User is logging in

22 If Request.Form("name").Count > 0 Then

23   Session("name") = Request.Form("name")

24   Application.Lock

25   Application("namedUsers") = Application("namedUsers") + 1

26   Application.Unlock

27   Response.Redirect(Request.ServerVariables("SCRIPT_NAME"))

28   Response.End

29 End If

42 %>
This code begins by taking the name submitted in the form (Request.Form("name")) and storing it in Session("name"). Then we Lock the Application and increase the number of named users by 1. Finally, we redirect the user to the page that was originally requested.
With all these files in place, load default.asp (e.g. http://localhost/myapp/default.asp) in a few instances of your browser, and you should see the system in action!
Summary
In this article we explored the primary mechanisms provided by ASP to support persistent data. With the Application object, we can store data values that are shared by all pages and all users on our site, such as the simple hit counter that we looked at. The Session object, meanwhile, gives the power to associate persistent data with each active user on our site. In our final example, we used this to store the name of each user and display it at the top of each page.
In a public Web forum, this stored value could save the user from having to type his or her name to post a message. Used in combination with a database that stored a list of authorized users and their passwords, the system we developed in this article could be expanded to act as an access control system.
In the next article in this series, we’ll look at how ASP interfaces with a relational database such as Microsoft Access. This very powerful combination of ASP with a backend database is what drives many of the hottest sites on the Internet today.
Frequently Asked Questions (FAQs) about ASP Sessions and Applications
What is the difference between ASP Sessions and Applications?
ASP Sessions and Applications are both state management techniques used in ASP.NET. A Session is a unique instance that is created for each user when they visit a website. It is used to store and retrieve values for that user. It is available as long as the user is active or until the session times out. On the other hand, an Application is a global storage mechanism that is accessible to all users, regardless of the session. It is used to store and retrieve values that are shared across all sessions.
How can I set a default page in ASP.NET?
Setting a default page in ASP.NET can be done through the Web.config file. You can specify the default page using the
How can I manage session state in ASP.NET?
Session state in ASP.NET can be managed in several ways. You can use the Session object to store and retrieve values for a user. You can also configure session state settings in the Web.config file, such as the session timeout period and the session state mode (InProc, StateServer, or SQLServer).
What is the purpose of the Application object in ASP.NET?
The Application object in ASP.NET is used to store and retrieve values that are shared across all sessions. It is a global storage mechanism that is accessible to all users, regardless of the session. It is useful for storing information that needs to be accessed by multiple users or sessions, such as application-wide settings or global variables.
How can I use the Session object to store and retrieve values?
You can use the Session object in ASP.NET to store and retrieve values for a user. To store a value, you can use the following syntax: Session[“key”] = value; To retrieve a value, you can use the following syntax: var value = Session[“key”]; If the key does not exist in the Session, it will return null.
How can I configure session state settings in the Web.config file?
You can configure session state settings in the Web.config file in ASP.NET. You can specify the session timeout period and the session state mode. The session timeout period is specified in minutes and determines how long a session will remain active if there is no activity. The session state mode determines where session state is stored (InProc, StateServer, or SQLServer).
How can I use the Application object to store and retrieve values?
You can use the Application object in ASP.NET to store and retrieve values that are shared across all sessions. To store a value, you can use the following syntax: Application[“key”] = value; To retrieve a value, you can use the following syntax: var value = Application[“key”]; If the key does not exist in the Application, it will return null.
What is the difference between InProc, StateServer, and SQLServer session state modes?
InProc, StateServer, and SQLServer are different modes for storing session state in ASP.NET. InProc stores session state in the memory of the ASP.NET worker process. This is the fastest method, but the session state is lost if the process is recycled or crashes. StateServer stores session state in a separate process called the ASP.NET state service. This is slower than InProc, but the session state is not lost if the ASP.NET worker process is recycled or crashes. SQLServer stores session state in a SQL Server database. This is the slowest method, but it allows the session state to be shared across multiple web servers in a web farm.
How can I handle session timeout in ASP.NET?
You can handle session timeout in ASP.NET by configuring the session timeout period in the Web.config file. You can also handle the Session_End event in the Global.asax file to perform any cleanup operations when a session ends. Additionally, you can check if a session is still active by checking if the Session object is null.
How can I share data between different sessions in ASP.NET?
You can share data between different sessions in ASP.NET by using the Application object. The Application object is a global storage mechanism that is accessible to all users, regardless of the session. You can store and retrieve values that are shared across all sessions using the Application object.