How to Inject OSGi Dependencies in Custom Portlets in Liferay 7


This article was created in partnership with Ktree. Thank you for supporting the partners who make SitePoint possible.
Liferay 7/DXP leverages the OSGi framework to provide a development environment for modular applications. Recently we used this feature to inject Liferay standard module functionality into our custom portlet.
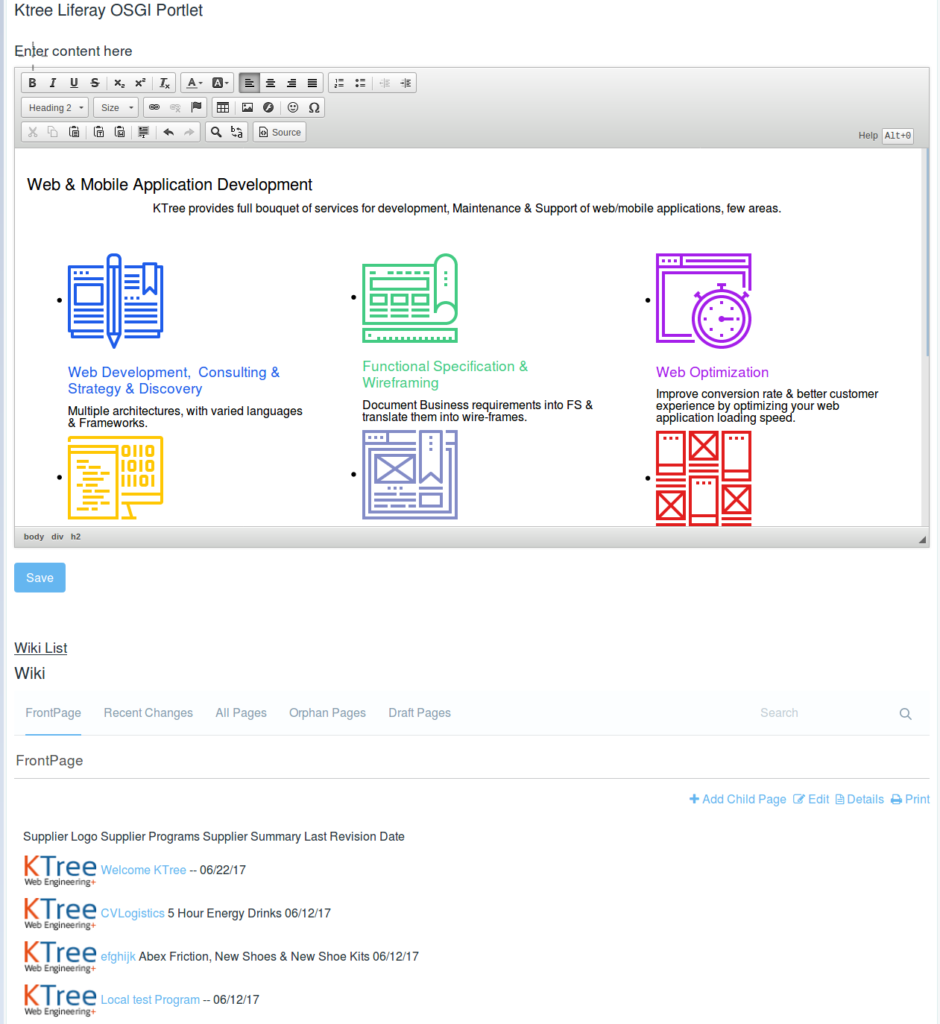
We achieved this by injecting wiki assets as a dependency into our custom portlet. For this article’s purposes we will use one sample custom module which displays one field text area, and below we will inject wiki assets onto the screen.
Let’s go through few concepts before we start the actual program.
Key Takeaways
- Liferay 7/DXP uses the OSGi (Open Services Gateway Initiative) framework allowing for modular application development and easy management of cross-dependencies between modules.
- The process of injecting OSGi dependencies in custom portlets in Liferay 7 involves defining the service interface, implementing the service interface in the service provider component, and injecting the service into the consumer component using the @Reference annotation.
- The Declarative Services (DS) component in Liferay 7 automatically injects the required service when it is needed, eliminating the need for manual coding to look up services.
- The OSGi console in Liferay 7 can be used to check the status of all OSGi components and their dependencies, ensuring that dependencies have been correctly injected.
Brief About OSGI
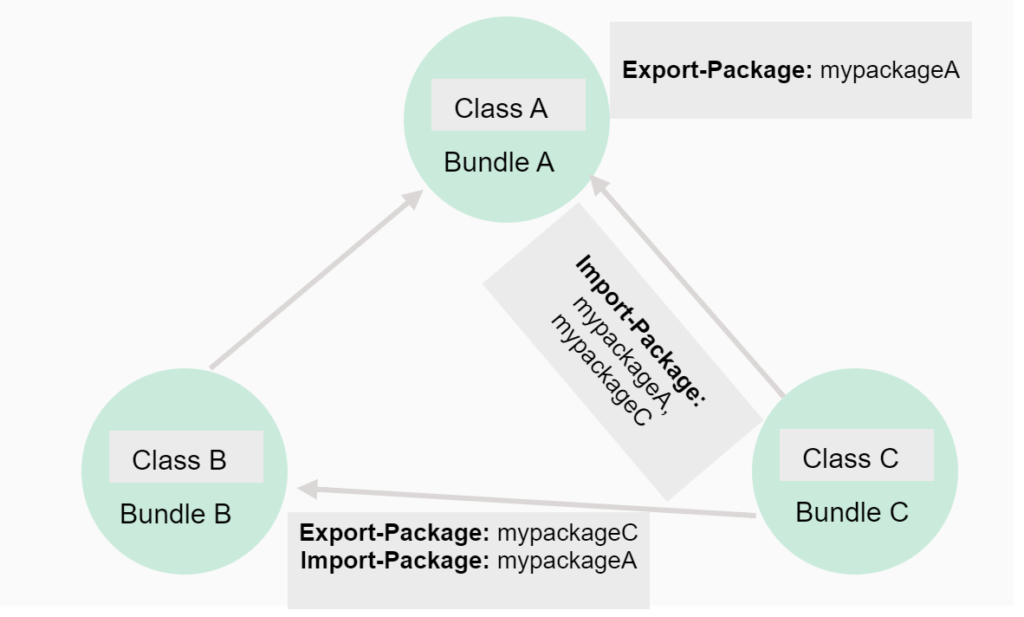
OSGi (Open Services Gateway Initiative) allows you to divide your application into multiple modules, and thus more easily manage cross-dependencies between them. Liferay uses the OSGi container implementation of Equinox.
The main advantages of OSGi:
- You can install, uninstall, start, and stop different modules of your application dynamically without restarting the container.
- Your application can have more than one version of a particular module running at the same time.
- OSGi provides very good infrastructure for developing service-oriented applications, as well as embedded, mobile, and rich internet apps.
For more info about OSGi, check out these articles:
Liferay 7/DXP supports these types of dependency currently. This is something you need to specify in your build.gradle file, which you will doing in Step 1. This tutorial focuses only on ‘Compile’ and ‘CompileOnly’.
Compile
The dependencies required to compile the production source of the project. As you can see in the later part of this article, for this dependency you need to configure it in both build.gradle and bnd.bnd.
CompileOnly
Dependencies required at compile time, but never required at runtime. As the wiki assets are already in the OSGi container, we will use this option. Adding this to build.gradle is sufficient.
RunTime
The dependencies required by the production classes at runtime. By default, also includes the compile time dependencies.
Provided
A dependency in the provided scope that is needed for compilation of a project, but it should not be distributed with it.
Along with dependency type, we need to specify a few more parameters which are described below.
- group – typically, this is your organization name or the project name.
- name – the project name.
- version – the version number.
- fileTree – to provide dependencies from the local file system.
With these concepts under our belts, we are ready to write some code, so let’s fire up your Eclipse Liferay IDE.
Step 1: Create the Liferay Workspace Project
Create your Liferay Workspace project by following this link.
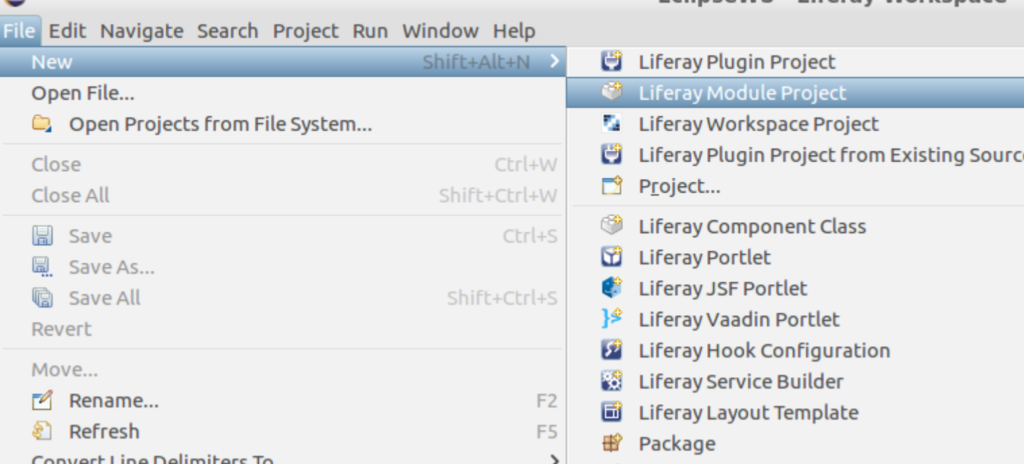
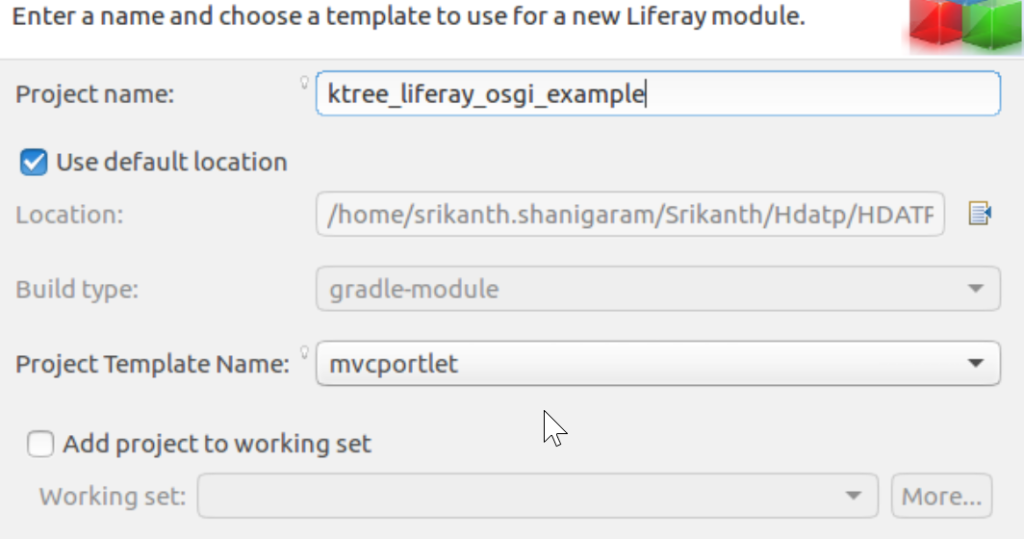
Step 2: Create Liferay Module
This builds the build.gradle file. Edit build.gradle by adding the dependencies for our development purposes. See the example code.
To create a Liferay Module in the IDE, select File > New > Liferay Module Project.
Example: The build.gradle file
dependencies {
compileOnly group: "com.liferay", name: "com.liferay.wiki.api", version: "2.1.0"
compile group: 'org.jsoup', name: 'jsoup', version: '1.8.3'
compile group: 'commons-io', name: 'commons-io', version: '2.0.1'
compile group: "velocity-tools", name: "velocity-tools", version: "1.4"
compile group: "org.apache.velocity", name: "velocity", version: "1.6.4"
compile fileTree(dir:"lib",include:"*.jar")
}
Note: Since this package (com.liferay.wiki.api) is already loaded in the container, so we have to use the option of CompileOnly.
Step 3: Edit bnd.bnd
Edit the bnd.bnd file by adding the dependencies for Compile dependencies. Eclipse would have generated this file automatically.
Example: bnd.bnd file
We can include the jar in two different ways, both options are given below.
Option 1:
* -includeresource:
This header is used to add external dependencies into our module. The following syntax extracts the jar and adds packages to our module.
-includeresource: \
@jsoup-1.8.3.jar,\
@opencsv-2.2.jar,\
@commons-io-2.0.1.jar,\
@velocity-[0-9]*.jar,\
@velocity-tools-[0-9]*.jar
Option 2:
The following syntax adds the jars to our module:
-includeresource: \
lib/jsoup.jar=jsoup-1.8.3.jar,\
lib/opencsv.jar=opencsv-2.2.jar,\
lib/velocity.jar=velocity-[0-9]*.jar,\
lib/velocity-tools.jar=velocity-tools-[0-9]*.jar
Since we have made com.liferay.wiki.api in the .gradle file CompileOnly, we have to import these packages by adding these two lines in the bnd.bnd file. If you don’t add them, bndtool will scan the project and add to the manifest file.
com.liferay.wiki.model;version="[1.0,2)",
com.liferay.wiki.service;version="[1.1,2)"
Step 4: Run Eclipse Build
Now run Eclipse Build using the path eclipse->Gradle Module ->. Eclipse used Bndtools for generating the manifest. Sample manifest as below.
Navigate to the Gradle Task view. It lists all the modules available in the workspace project. Go to Expand project > Build > Build.
These are the directives or settings in the bnd header that are added automatically to manifest.mf.
Example generated manifest.mf file
Manifest-Version: 1.0
Bnd-LastModified: 1496664974738
Bundle-ManifestVersion: 2
Bundle-Name: ktree_liferay_osgi_example
Bundle-SymbolicName: ktree_liferay_osgi_example
Bundle-Version: 1.0.0
Created-By: 1.8.0_131 (Oracle Corporation)
Import-Package: com.liferay.portal.kernel.exception;version="[7.0,8)",
 com.liferay.portal.kernel.portlet.bridges.mvc;version="[1.0,2)",com.l
 iferay.portal.kernel.service;version="[1.0,2)",com.liferay.portal.ker
 nel.theme;version="[1.0,2)",com.liferay.portal.kernel.util;version="[
 7.0,8)",com.liferay.wiki.model;version="[1.0,2)",com.liferay.wiki.ser
 vice;version="[1.1,2)",javax.portlet;version="[2.0,3)",javax.servlet,
 javax.servlet.http
Javac-Debug: on
Javac-Deprecation: off
Javac-Encoding: UTF-8
Private-Package: com.ktree.portlet,content
Provide-Capability: osgi.service;objectClass:List<String>="javax.portl
 et.Portlet",liferay.resource.bundle;bundle.symbolic.name=ktree_lifera
 y_osgi_example;resource.bundle.base.name="content.Language"
Require-Capability: osgi.extender;filter:="(&(osgi.extender=jsp.taglib
 )(uri=http://java.sun.com/portlet_2_0))",osgi.extender;filter:="(&(os
 gi.extender=jsp.taglib)(uri=http://liferay.com/tld/aui))",osgi.extend
 er;filter:="(&(osgi.extender=jsp.taglib)(uri=http://liferay.com/tld/p
 ortlet))",osgi.extender;filter:="(&(osgi.extender=jsp.taglib)(uri=htt
 p://liferay.com/tld/theme))",osgi.extender;filter:="(&(osgi.extender=
 jsp.taglib)(uri=http://liferay.com/tld/ui))",osgi.ee;filter:="(&(osgi
 .ee=JavaSE)(version=1.8))"
Service-Component: OSGI-INF/com.ktree.portlet.KtreeLiferayOsgiPortlet.
 xml
Tool: Bnd-3.2.0.201605172007

Import-Package:
com.liferay.portal.kernel.exception;version="[7.0,8)",
com.liferay.portal.kernel.portlet.bridges.mvc;version="[1.0,2)",
com.liferay.portal.kernel.service;version="[1.0,2)",
com.liferay.portal.kernel.theme;version="[1.0,2)",
com.liferay.portal.kernel.util;version="[7.0,8)",
javax.portlet;version="[2.0,3)",
javax.servlet,
javax.servlet.http,
com.liferay.wiki.model;version="[1.0,2)",
com.liferay.wiki.service;version="[1.1,2)"
Export-Package: This directive in the bnd header exports the packages to the OSGi container, which can be accessed by other modules. For example:
Export-Package: com.audit.esprocessor
If the package is already exported, we don’t need to do it again — we can immediately use the option CompileOnly instead of Compile in build.gradle.
Import-Package:
- This bnd header imports the specified package at runtime into our module.
- Whenever we are importing a package it must be exported by some other module.
Import-Package: \
com.audit.esprocessor;version="1.0.0",\
In the import package we have two resolutions, namely:
- Mandatory
- Optional
Mandatory
- This is the default resolution (when resolution is not specified for the import).
- The module will be in an active state if the imported package is available in the container, otherwise the module will be in an installed state.
Optional
- The module will go to active state without depending on import package availability.
- It throws an exception at runtime if the imported package is not available in the container.
Import-Package: \
com.audit.esprocessor;version="1.0.0",\
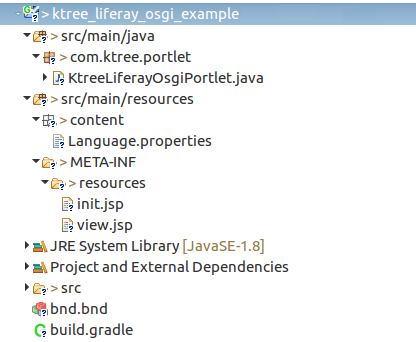
Step 5: Create Liferay MVC Portlet
The final step is to create a normal Liferay MVC portlet and start using the dependencies.
As we have defined the dependencies in Eclipse, we should be able to choose our class, which we have binded.
WikiPageLocalServiceUtil.addPage(themeDisplay.getUserId(), 123, "First Wiki", 1.0, htmlContent, "", false, "html", true, "FrontPage", "", new ServiceContext());
Please refer to the source for KtreeLiferayOsgiPortlet-> addContentToWiki.
public class KtreeLiferayOsgiPortlet extends MVCPortlet {
    @ProcessAction(name="addContentToWiki")
    public void addContentToWiki(ActionRequest actionRequest,ActionResponse actionResponse) throws PortalException{
        String htmlContent = ParamUtil.getString(actionRequest, "wikiEditor");
        ThemeDisplay themeDisplay = (ThemeDisplay) actionRequest.getAttribute(WebKeys.THEME_DISPLAY);
        WikiPageLocalServiceUtil.addPage(themeDisplay.getUserId(), 123, "First Wiki", 1.0, htmlContent, "", false, "html", true, "FrontPage", "", new ServiceContext());
        System.out.println(WikiPageLocalServiceUtil.getWikiPagesCount());

    }
}
Sample Liferay OSGi Module:
-
Added the wiki api as a compile time dependency with compileOnly
-
The UI is built with
auicomponents. -
The UI has options to create a wiki page and also shows the list of wiki pages.
Example init.jsp
<%@ taglib uri="http://java.sun.com/jsp/jstl/core" prefix="c" %>

<%@ taglib uri="http://java.sun.com/portlet_2_0" prefix="portlet" %>

<%@ taglib uri="http://liferay.com/tld/aui" prefix="aui" %>
<%@ taglib uri="http://liferay.com/tld/portlet" prefix="liferay-portlet" %>
<%@ taglib uri="http://liferay.com/tld/theme" prefix="liferay-theme" %>
<%@ taglib uri="http://liferay.com/tld/ui" prefix="liferay-ui" %>

<liferay-theme:defineObjects />

<portlet:defineObjects />
<portlet:actionURL name="addContentToWiki" var="addContentToWikiUrl">
</portlet:actionURL>
Example View.jsp
<%@include file="init.jsp" %>
<aui:form action="${addContentToWikiUrl}" name="wikiform">
<h3>Enter content here</h3>
    <liferay-ui:input-editor name="wikiEditor" placeholder="Enter content here"></liferay-ui:input-editor>
    <aui:button-row>
        <aui:button type="submit"></aui:button>
    </aui:button-row>
    <br/>
    <h3><u>Wiki List</u></h3>
    <liferay-portlet:runtime portletName="com_liferay_wiki_web_portlet_WikiPortlet"/>
</aui:form>
Example Controller – KtreeLiferayOsgiPortlet.java
@Component(
    immediate = true,
    property = {
        "com.liferay.portlet.display-category=KTree",
        "com.liferay.portlet.instanceable=true",
        "javax.portlet.display-name=Ktree Liferay OSGI Portlet",
        "javax.portlet.init-param.template-path=/",
        "javax.portlet.init-param.view-template=/view.jsp",
        "javax.portlet.resource-bundle=content.Language",
        "javax.portlet.security-role-ref=power-user,user"
    },
    service = Portlet.class
)
public class KtreeLiferayOsgiPortlet extends MVCPortlet {
    @ProcessAction(name="addContentToWikiUrl")


    public void addHtmlToWikiPage(ActionRequest actionRequest,ActionResponse actionResponse) throws PortalException{


        //add logic here to add wikipage
    }
}
Frequently Asked Questions (FAQs) about Injecting OSGi Dependencies in Custom Portlets in Liferay 7
What is the significance of OSGi in Liferay 7?
OSGi (Open Service Gateway Initiative) is a crucial component in Liferay 7. It is a framework that allows for the modular development of applications. This means that developers can create applications as separate modules, each with its own functionality, and then combine them to form a complete application. This modular approach makes it easier to manage, maintain, and update applications. It also promotes reusability of modules across different applications, thereby saving development time and effort.
How does injecting OSGi dependencies work in Liferay 7?
In Liferay 7, OSGi dependencies are injected into custom portlets using the Declarative Services (DS) component. DS is a set of specifications in OSGi that allows for the dynamic injection of dependencies. This means that when a service is needed, it is automatically injected into the portlet. This eliminates the need for manual coding to look up services, thereby simplifying the development process.
What are the steps to inject OSGi dependencies in custom portlets in Liferay 7?
Injecting OSGi dependencies in custom portlets in Liferay 7 involves several steps. First, you need to define the service interface. This is done in the OSGi component that provides the service. Next, you need to implement the service interface in the service provider component. Finally, you need to inject the service into the consumer component using the @Reference annotation. The DS component takes care of the rest, automatically injecting the service when it is needed.
What is the role of the @Reference annotation in injecting OSGi dependencies?
The @Reference annotation plays a crucial role in injecting OSGi dependencies in Liferay 7. It is used to mark a field or method in the consumer component that requires a service. When the DS component sees this annotation, it automatically injects the required service into the field or method. This eliminates the need for manual coding to look up services.
Can I inject multiple OSGi dependencies in a single custom portlet?
Yes, you can inject multiple OSGi dependencies in a single custom portlet in Liferay 7. Each dependency is injected into its own field or method, marked with the @Reference annotation. The DS component takes care of injecting each dependency when it is needed.
What happens if an OSGi dependency is not available when it is needed?
If an OSGi dependency is not available when it is needed, the DS component will not inject it into the consumer component. Instead, it will wait until the dependency becomes available. This ensures that the consumer component always has access to the services it needs, even if they are not available at the time of injection.
How can I ensure that my OSGi dependencies are injected correctly?
To ensure that your OSGi dependencies are injected correctly, you can use the OSGi console in Liferay 7. This console allows you to view the status of all OSGi components, including their dependencies. By checking the status of your components, you can verify that your dependencies have been injected correctly.
Can I inject OSGi dependencies in custom portlets developed in languages other than Java?
OSGi is a Java-based framework, and the DS component used to inject dependencies in Liferay 7 is also Java-based. Therefore, you can only inject OSGi dependencies in custom portlets developed in Java.
What are the benefits of injecting OSGi dependencies in custom portlets?
Injecting OSGi dependencies in custom portlets has several benefits. It simplifies the development process by eliminating the need for manual coding to look up services. It also ensures that the consumer component always has access to the services it needs, even if they are not available at the time of injection. This makes the application more robust and reliable.
Can I inject OSGi dependencies in custom portlets in versions of Liferay other than 7?
The ability to inject OSGi dependencies in custom portlets is a feature of Liferay 7 and later versions. Earlier versions of Liferay do not support this feature. Therefore, if you are using an earlier version of Liferay, you will need to upgrade to Liferay 7 or a later version to use this feature.
Ismail is CEO of KTree.com with two decades of experience in Information technology. Initial work experience in SAP helped him hone his development and functionality skills. Now Ismail works is to architect solutions using web development technologies ranging from PHP, Java, JavaScript, Linux and AWS Cloud Development and which is what KTree excels in. He mainly focuses on Performance Optimization on the web, reducing page load time being his favourite. He loves to do cycling and play badminton in his free time.