
ASP.NET is one of the most exciting web development technologies on offer today. When Microsoft released the first version a few years ago, many web developers thought all their dreams had come true. Here was a powerful platform with lots of built-in functionality, astonishing performance levels, and one of the best IDEs (Integrated Development Environments) around: Visual Studio. What more could anyone want? Indeed, ASP.NET showed the way for the faster, easier, and more disciplined development of dynamic web sites, and the results were impressive.
Time has passed, and ASP.NET has grown. ASP.NET 2.0 comes with extraordinary new features as well as an expanded and more powerful underlying framework. Not only that, but the basic versions of all development tools, including Visual Web Developer 2005 Express Edition and SQL Server 2005 Express Edition, are free!
This book–SitePoint’s Build Your Own ASP.NET Web Site Using VB and C#, Second Edition–shows you how to use all these technologies together in order to produce fantastic results. It’ll take you step by step through each task, showing you how to get the most out of each technology and tool. Developers who have already worked with earlier versions of ASP.NET will find that the latest version has changed so much that entire chapters of this book are devoted to ASP.NET 2.0-specific features.
In this excerpt, which contains the first four chapters of the book, we’ll start out by setting up your system for .NET development. In Chapter 2, we’ll step through the basics of ASP.NET, and learn about the parts of the page, view state and directives, and the ASP.NET languages. Chapter 3 introduces VB and C# programming basics, from control and page events to namespaces and code-behind files. The final chapter in this excerpt, Chapter 4, pulls together all the practical information we’ve discussed as we build web forms, and put Web and HTML server controls, web user controls, master pages and Cascading Style Sheets into action!
We’re going to cover a lot of ground in the coming pages, so if you like, feel free to download and read these chapters offline.
Let’s begin!
What is ASP.NET?
For years, the Active Server Pages (ASP) technology was arguably the leading choice for web developers building dynamic web sites on Windows web servers, as it offered flexible yet powerful scripting capabilities. Early in 2002, Microsoft released a new technology for Internet development called ASP.NET. ASP.NET represents a leap forward from ASP both in its sophistication and the productivity gains it achieves for developers. It continues to offer flexibility in terms of language support, but rather than a range of simple scripting languages, several fully-fledged programming languages are now at the fingertips of ASP.NET developers. Development in ASP.NET requires not only an understanding of HTML and web design, but also a firm grasp of the concepts of object oriented programming and development.
In the next few sections, we’ll introduce you to the basics of ASP.NET. We’ll walk through the process of installing it on your web server, and step through a simple example that demonstrates how ASP.NET pages are constructed. But first, let’s define what ASP.NET actually is.
ASP.NET is a server-side technology for developing web applications based on the Microsoft .NET Framework. Let’s break that jargon-filled sentence down.
ASP.NET is a server-side technology; that is, it runs on the web server. Most web designers start their careers learning client-side technologies like HTML, JavaScript, and Cascading Style Sheets (CSS). When a web browser requests a web page created with only client-side technologies, the web server simply grabs the files that the browser (or client) requests and sends them down the line. The client is entirely responsible for reading the markup in those files and interpreting that markup to display the page on the screen.
Server-side technologies, like ASP.NET, are different. Instead of being interpreted by the client, server-side code (for example, the code in an ASP.NET page) is interpreted by the web server. In the case of ASP.NET, the code in the page is read by the server and used to generate HTML, JavaScript, and CSS that is then sent to the browser. Since the processing of the ASP.NET code occurs on the server, it’s called a server-side technology. As Figure 1.1 shows, the client only sees the HTML, JavaScript, and CSS. The server is entirely responsible for processing the server-side code.
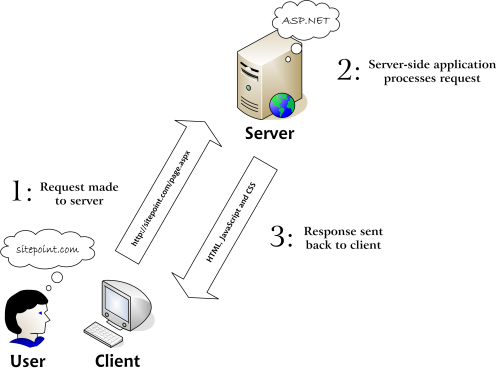
Figure 1.1. A user interacting with a web application
Note the three roles involved in such a transaction:
- user – Never forget that there’s a real person at the end (or beginning) of the line.
- web client – This is the software program that the person uses to interact to the web application. The client is usually a web browser, such as Internet Explorer or Firefox.
- web server – This is the software program located on the server. It processes requests made by the web client.
ASP.NET is a technology for developing web applications. A web application is just a fancy name for a dynamic web site. Web applications usually (but not always) store information in a database, and allow visitors to the site to access and change that information. Many different programming technologies and supported languages have been developed to create web applications; PHP, JSP, Ruby on Rails, CGI, and ColdFusion are just a few of the more popular ones. However, rather than tying you to a specific technology and language, ASP.NET lets you write web applications using a variety of familiar programming languages.
ASP.NET uses the Microsoft .NET Framework. The .NET Framework collects all the technologies needed for building Windows desktop applications, web applications, web services, and so on, into a single package, and makes them available to more than 40 programming languages.
Even with all the jargon explained, you’re probably still wondering what makes ASP.NET so good. The truth is that there are many server-side technologies around, each of which has its own strengths and weaknesses. Yet ASP.NET has a few features that really are unique:
- ASP.NET lets you use your favorite programming language, or at least one that’s close to it. The .NET Framework currently supports over 40 languages, and many of these may be used to build ASP.NET web sites. The most popular choices are C# (pronounced “C sharp”) and Visual Basic (or VB), which are the ones we’ll cover in this book.
- ASP.NET pages are compiled, not interpreted. In ASP.NET’s predecessor, ASP, pages were interpreted: every time a user requested a page, the server would read the page’s code into memory, figure out how to execute the code (that is, interpret the code), and execute it. In ASP.NET, the server need only figure out how to execute the code once. The code is compiled into efficient binary files, which can be run very quickly, again and again, without the overhead involved in re-reading the page each time. This represents a big jump in performance from the old days of ASP.
- ASP.NET has full access to the functionality of the .NET Framework. Support for XML, web services, database interaction, email, regular expressions, and many other technologies are built right into .NET, which saves you from having to reinvent the wheel.
- ASP.NET allows you to separate the server-side code in your pages from the HTML layout. When you’re working with a team composed of programmers and design specialists, this separation is a great help, as it lets programmers modify the server-side code without stepping on the designers’ carefully crafted HTML?and vice versa.
- ASP.NET makes it easy to reuse common User Interface elements in many web forms, as it allows us to save those components as independent web user controls. During the course of this book, you’ll learn how to add powerful features to your web site, and to reuse them in many places with a minimum of effort.
- You can get excellent tools that assist in developing ASP.NET web applications. Visual Web Developer 2005 is a free, powerful visual editor that includes features such as code autocompletion, code formatting, database integration functionality, a visual HTML editor, debugging, and more. In the course of this book, you’ll learn how to use this tool to build the examples we discuss.
- The .NET Framework was first available only to the Windows platform, but thanks to projects such as Mono, it’s since been ported to other operating systems.
Still with me? Great! It’s time to gather our tools and start building!
Installing the Required Software
If you’re going to learn ASP.NET, you first need to make sure you have all the necessary software components installed and working on your system. Let’s take care of this before we move on.
- Internet Information Services (IIS) or Cassini – IIS is the web server of choice for running ASP.NET web applications. You’ll need your copy of the Windows CD to install and configure it. Unfortunately, some versions of Windows (such as Windows XP Home Edition) don’t support IIS. If you’re one of those users, there’s Cassini. Cassini is a small web server designed for hobbyists who are looking to build ASP.NET web sites. It isn’t as robust, powerful, or user-friendly as IIS, but it will be sufficient for our purposes. When we come to use Visual Web Developer in Chapter 5, Building Web Applications, we’ll be making use of that product’s built-in development web server, so not having access to IIS on your system won’t be a problem.
- a modern web browser – Throughout this book, we’ll be using Internet Explorer 6, but you can use other browsers during development if you wish. Any modern browser will do.
- .NET Framework 2.0 – As we’ve already discussed, the .NET Framework drives ASP.NET. When you install the .NET Framework, you’ll automatically install the files necessary to run ASP.NET. You’re likely to have the .NET Framework already, as it installs automatically through the Windows Update service.
- .NET Framework Software Development Kit (SDK) – The .NET Framework 2.0 Software Development Kit (SDK) is a free download that contains the necessary Web Application development tools, a debugger for error correcting, and a suite of samples and documentation.
We’re also going to need a database. In this book, we’ll use the following:
- Microsoft SQL Server 2005 Express Edition – This is the free, but still fully functional, version of SQL Server 2005. If you worked with previous versions of these technologies, you should know that SQL Server 2005 Express is a replacement for the previous Microsoft SQL Data Engine (MSDE). You can read more on the differences between various SQL Server 2005 editions at the Microsoft site.
- SQL Server Management Studio Express – Because the Express Edition of SQL Server doesn’t ship with any visual management tools, you can use this free tool, also developed by Microsoft, to access your SQL Server 2005 databases.
Installing the Web Server
Installing Internet Information Services (IIS)
IIS comes with most versions of server-capable Windows operating systems–including Windows 2000 Professional, Server, and Advanced Server; Windows XP Professional; Windows XP Media Center Edition; and Windows Server 2003–but it’s not installed automatically in all versions, which is why it may not be present on your computer. IIS isn’t available for Home editions of these operating systems, such as Windows XP Home Edition. If you run this, you’ll need to rely on Cassini, which we discuss below.
To see whether you have IIS installed and running, simply locate your Administrative Tools folder (sometimes it’s a menu option; sometimes it’s a folder in the Control Panel (To see this folder, you’ll need to view the Control Panel in “classic view.”) and check whether or not it contains a shortcut to Internet Information Services. If the shortcut isn’t visible, then it’s not installed. To install IIS, simply follow these steps:
- In the Control Panel, select Add or Remove Programs.
- Choose Add/Remove Windows Components. The list of components will become visible within a few seconds.
- In the list of components, check Internet Information Services (IIS), as shown in Figure 1.2. The default installation options are enough for ASP.NET development, but you may want to click Details… to view the extra options you could add.
- Click Next. Windows may prompt you to insert the Windows CD.
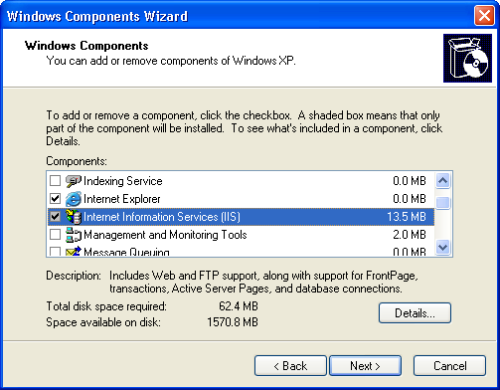
Figure 1.2. Installing IIS
Add Administrative Tools to the Start Menu
Here’s how to add Administrative Tools to the Windows XP Start menu:
- Right-click on the Start button and select Properties to bring up the Taskbar and Start Menu Properties dialog.
- Click the Customize… button to bring up the Customize Start Menu dialog.
- If you’re using the classic Start menu, check Display Administrative Tools, then click OK.
- If you’re using the Windows XP-style Start menu, click the Advanced tab, scroll through the Start menu items list until you get to System Administrative Tools, and select from Display on the All Programs menu or Display in the All Programs menu and the Start menu.
Once IIS is installed, close the Add or Remove Programs dialog. To check that IIS has installed correctly, see if you can find the Internet Information Services short cut in Administrative Tools. If you can, IIS is installed. Open the link to make first contact with the IIS management console, which is shown in Figure 1.3. In the left pane, you’ll initially see the name of your computer, whose nodes you can expand.
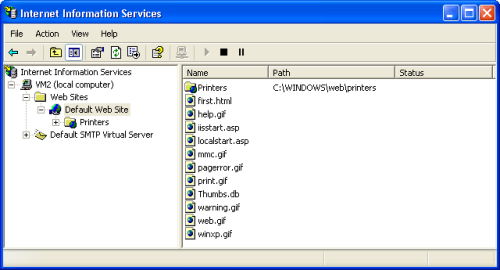
Figure 1.3. The IIS administration tool
You can close this tool for now; you’ll meet it again later.
You are now ready to host web applications. Although we won’t cover the configuration of IIS for external use, we will show you how to configure IIS to support local development of ASP.NET applications in order that they may be uploaded to your external web hosting provider later.
Installing Cassini
If you’re unable to install IIS, you’ll need to download and install Cassini:
- Go to the Cassini download page.
- Download the Cassini installer executable (cassini.exe).
- Run cassini.exe and follow the steps presented by the installer, accepting the default options.
If the process went to plan, everything you need to run Cassini can be found in the folder C:Cassini. Double-click CassiniWebServer.exe in that folder to start its management console, which is shown in Figure 1.4.

Figure 1.4. The Cassini management console
We’ll need to do some more work to get Cassini up and running properly, but we’ll need to install the .NET Framework and the Software Development Kit first.
Installing the .NET Framework and the SDK
To begin creating ASP.NET applications, you’ll need to install the .NET Framework and the Software Development Kit (SDK). The .NET Framework includes the files necessary to run and view ASP.NET pages, while the SDK includes samples, documentation, and a variety of free tools.
Installing the .NET Framework
The best method of acquiring the .NET Framework is to download and install it directly from the Web. Note that it is also delivered through Windows Update, so you may already have it installed on your system. To check, open the folder C:WINDOWSMicrosoft.NETFramework (if your copy of Windows is installed somewhere other than C:WINDOWS, change this path accordingly). If this folder doesn’t exist, you definitely don’t have the .NET Framework installed. If it does exist, you should find inside it at least one folder with a name like v1.1.4322. Each of these kinds of folders holds a different version of the .NET Framework you have installed. If at least one of these folders’ names doesn’t start with v2 or higher, you’ll need to install the latest version of the .NET Framework.
To install the latest version of the .NET Framework, simply follow the steps outlined below:
- Go to the ASP.NET support site and click the Download the .NET Framework link.
- Under the .NET Framework Version 2.0 Redistributable Package heading, click the appropriate download link for your hardware. Remember, we’ll install the redistributable package first, then the SDK. The link will advance you to a download page.
- Choose the language and version of the installation you want, and click Download.
- Save the file to a local directory. After the download is complete, double-click the executable to begin the installation.
- Follow the steps presented by the wizard until installation completes.
Installing the SDK
Now that you’ve installed the redistributable package, you need to install the Software Development Kit (SDK):
- Go back to the ASP.NET support site and follow the Download the .NET Framework link again.
- This time, click the appropriate download link under the .NET Framework Version 2.0 Software Development Kit heading. The link will advance you to a download page.
- Choose the language version of the installation you want to use and click Download, as you did to download the redistributable package.
- When prompted to do so, save the file to a local directory.
- After the download is complete, double-click the executable to begin the installation. Before you do so, I strongly recommend that you close all other programs to ensure the install proceeds smoothly.
- Follow the steps outlined by the .NET Setup Wizard until installation completes. When asked for setup options, it’s safe to use the default values.
The SDK will take slightly longer to install than the framework.
A Big Download!
The .NET Framework SDK weighs in at about 350MB, so it will probably take a while to download.
Configuring the Web Server
Configuring IIS
After installing the .NET Framework and the SDK manually, you will need to configure IIS to make it aware of ASP.NET. To do this, you need to follow a few simple steps:
Open the command prompt by selecting Start > All Programs > Microsoft .NET Frameworks SDK v2.0 > SDK Command Prompt.
Type the following command to install ASP.NET:
C:Program Files...SDKv2.0>aspnet_regiis.exe -i

Start installing ASP.NET (2.0.50727).

.........

Finished installing ASP.NET (2.0.50727).
Once ASP.NET is installed, close the command prompt and check again to confirm that ASP.NET installed correctly.
Running aspnet_regiis.exe
Depending on the circumstances, ASP.NET may already have been installed for you, but running aspnet_regiis.exe can’t hurt. Also, remember that you need to run this utility again in case you reinstall IIS.
Configuring Cassini
If you’ve installed Cassini, you’ll need to get under the hood of the .NET Framework to coerce Cassini into working as it should.
Open the command prompt by selecting Start > All Programs > Microsoft .NET Frameworks SDK v2.0 > SDK Command Prompt.
Enter the following command at the prompt:
C:Program Files...SDKv2.0>gacutil /i C:CassiniCassini.dll

Microsoft (R) .NET Global Assembly Cache Utility. Version 2.0...

Copyright (c) Microsoft Corporation.  All rights reserved.


Assembly successfully added to the cache
Cassini is now ready to go.
Where do I Put my Files?
IIS Recommended
From here on in, the instructions we provide will be centered around IIS, as Cassini isn’t suitable for production environments. Many of the concepts we’ll discuss do not apply to Cassini, as it’s much simpler and lacks many of IIS’s features. Where needed, Cassini instructions will be given, but IIS will receive the bulk of the discussion.
Now that you have ASP.NET up and running, let’s find out where the files for your web applications are kept on the computer. You can readily set IIS to look for web applications in any folder, including the My Documents folder, or even a network share. By default, IIS maps the C:Inetpubwwwroot folder of your disk to your web site’s root directory, which is generally considered a good repository for storing and managing your web applications.
If you open this wwwroot folder in Windows Explorer, and compare its contents with the files that appear in the Default Web Site in the IIS administration tool, as shown in Figure 1.5, you’ll notice that the files and folders are the same (some extra items will be listed in IIS; we’ll look at these shortly). You need to use the IIS administration tool to set up the behavior of these files and folders under IIS. We’ll see more on this soon.
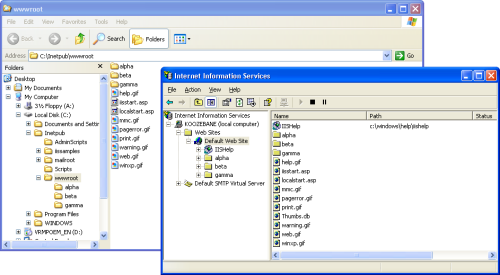
Figure 1.5. Folders inside wwwroot also appear inside IIS
Using localhost
By putting your files within C:Inetpubwwwroot, you give your web server access to them. If you’ve been developing web pages for a long time, habit may drive you to open files directly in your browser by double-clicking on the HTML files. However, because ASP.NET is a server-side language, your web server needs to have a crack at the file before it’s sent to your browser for display. If the server doesn’t get this opportunity, the ASP.NET code won’t be converted into HTML that your browser can understand. For this reason, ASP.NET files can’t be opened directly from the disk using Windows Explorer.
Your local web server can be accessed through a special web address that indicates the current computer: https://localhost/. If you try this now, IIS will open up a default help page (although this behavior will vary depending on the settings of your Windows installation; for example, if you get an error instead of the default help page, don’t worry).
What you need to keep in mind, though, is that the address you’ll use to access local web applications will always start with https://localhost/, and that, by default, this root address points to the folder on your disk.
To see this in practice, create a new file named index.htm inside C:Inetpubwwwroot, with the following contents (note that all of the code and images used in this book are available for download from sitepoint.com. See the Preface for more information):
Example 1.1. index.htm


<!DOCTYPE html PUBLIC "-//W3C//DTD XHTML 1.0 Strict//EN"

    "https://www.w3.org/TR/xhtml1/DTD/xhtml1-strict.dtd">

<html>

  <head>

    <title>Simple HTML Page</title>

  </head>

  <body>

    <P>This is a simple HTML page.

  </body>

</html>
Now, load this page through https://localhost/index.htm, as shown in Figure 1.6.
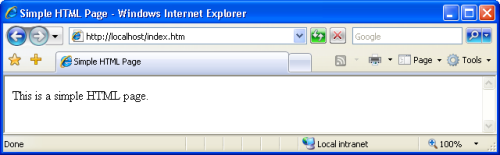
Figure 1.6. Testing IIS
Experiencing an Error?
If the page doesn’t load as illustrated in Figure 1.6, your IIS installation has problems. You might want to double-check that you correctly followed the steps for installing it, and re-check the IIS configuration procedure.
This localhost name is equivalent to the so-called loopback IP address, 127.0.0.1, so you can get the same results by entering https://127.0.0.1/index.htm into your browser. If you know them, you can also use the name or IP address of your machine to the same end.
Note that if you do try any of these equivalents, a dialog will appear before the page is opened, to ask you for your network credentials. This occurs because you’re no longer using your local authentication, which is implicit with localhost.
Stopping and Starting IIS
Now that we have IIS up and running, and ASP.NET installed, let’s look at how you can start, stop, and restart IIS if the need arises. For the most part, you’ll always want to have IIS running; however, if you want to shut it down temporarily for any reason (such as security concerns), you can. Also, some external programs may stop IIS upon launch because of potential security vulnerabilities, so you’ll need to start it again yourself. If you want to stop IIS when it’s not being used, simply open the Internet Information Services management console, right-click on Default Web Site and select Stop. Alternatively, after selecting Default Web Site, you can use the Stop, Pause, and Play icons from the toolbar.
Virtual Directories
As we saw in the section called “Where do I Put my Files?”, physical sub-folders of C:Inetpubwwwroot also become subdirectories of the web site. For instance, imagine your company has a web server that serves documents from C:Inetpubwwwroot. Your users can access these documents through https://www.example.com/. If you create a subfolder of wwwroot, named about, files in that directory can be accessed via https://www.example.com/about/.
You could also set up another subdirectory in your web site, but serve files from a different location on the disk. If, for instance, you were developing another web application, you could store the files for it in C:devOrderSystem. You could then create within IIS a new virtual directory called, say, order, which mapped to this location. This new site would then be accessible through the URL https://www.example.com/order/. As this application is in development, you would probably want to set IIS to hide this virtual directory from the public until the project is complete; your existing web site would still be visible.
By default, a virtual directory, called IISHelp, is preconfigured in IIS; it maps to c:windowshelpiishelp. You can see in Figure 1.7 that IISHelp contains subdirectories called common and iis–these are physical folders inside c:windowshelpiishelp.
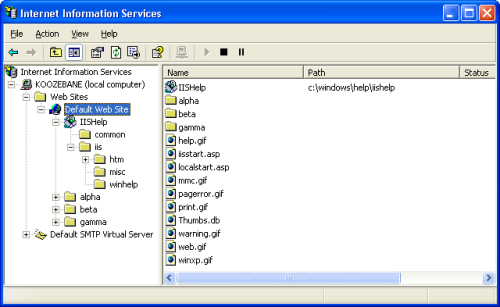
Figure 1.7. The IISHelp virtual directory
Let’s create a virtual directory on your server, and test it with a simple page:
First, you need to create on your disk a folder to which your virtual directory will be mapped. Create a folder called WebDocs in an easily accessible location on your disk, such as C:, and create a folder named Learning inside that folder. We’ll use this folder, C:WebDocsLearning, for various exercises in this book.
Copy the index.htm file you created earlier into your newly created Learning folder.
In the Internet Information Services management console, right-click Default Web Site and select New > Virtual Directory. The Virtual Directory Creation Wizard will appear. Click Next.
You need to choose an alias for your virtual directory: enter Learning, then click Next.
Browse and select the Learning folder you created at step 1, or enter its full path (C:WebDocsLearning). Click Next.
In the next screen, you can select permissions settings for your directory. Typically, you’ll want to leave the default options (Read and Run scripts) checked. Click Next.
Click Finish. You’ll see your new virtual directory as a child of Default Web Site, as Figure 1.8 illustrates.
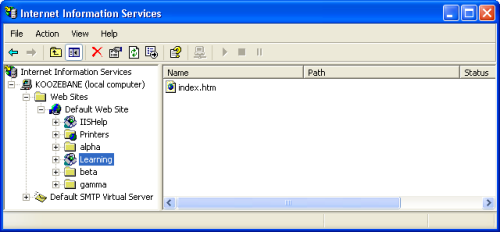
Figure 1.8. Creating a new virtual directory
Load this link by entering https://localhost/Learning/index.htm into the address bar of your browser. If everything went well, you should see your little HTML page load, as has the one in Figure 1.9.
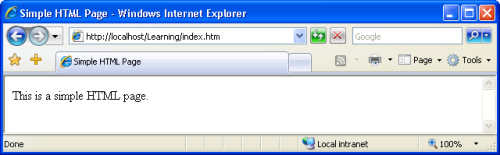
Figure 1.9. Testing your new virtual directory
Note that by loading the page through the HTTP protocol, your request goes through IIS. Since index.htm is a simple HTML page that doesn’t need any server-side processing, you can also load it directly from the disk. However, this won’t be the case with the ASP.NET scripts you’ll see through the rest of this book.
Once your new virtual directory has been created, you can see and configure it through the Internet Information Services management console shown in Figure 1.8. You can see the folder’s contents in the right-hand panel.
As index.htm is one of the default document names, you can access that page just by entering https://localhost/Learning/ into your browser’s address bar. To see and edit the default document names for a virtual directory (or any directory, for that matter), you can right-click the directory’s name in the IIS management console, click Properties, and select the Documents tab. You’ll see the dialog displayed in Figure 1.10.

Figure 1.10. Default document types for the Learning virtual directory
By default, when we request a directory without specifying a filename, IIS looks for a page with the name of one of the default documents, such as index.htm or default.htm. If there is no index page, IIS assumes we want to see the contents of the requested location. This operation is allowed only if the Directory Browsing option is selected for the directory in question. You’ll find that option in the Directory tab of the Properties window.
Directory Browsing
Enabling directory browsing is not something you’d usually want to do. Allowing visitors to freely see and access all the files and directories that make up your web page is not only a little messy and unprofessional, but also increases the potential for security issues (you don’t want any hackers to stick their nose into your code, do you?). So, by default, IIS won’t allow directory browsing when a directory is requested: if a default file such as index.htm isn’t there, ready to be served to the visitor, a message reading “Directory Listing Denied” will be served instead.
To change your virtual directory’s options, you have to right-click the virtual directory (Learning, in our case) in the IIS console, and choose Properties. The Properties dialog that we’ve just used lets us configure various useful properties, including:
- Virtual Directory – This option allows you to configure directory-level properties, including path information, the virtual directory name, access permissions, etc. Everything that was set up through the wizard is modifiable through this tab.
- Documents – This option allows you to configure a default page that displays when the user types in a full URL. For instance, because
default.aspxis listed as a default page, the user need only enterhttps://www.mysite.com/, rather thanhttps://www.mysite.com/default.aspx, into the browser’s address bar. You can easily change and remove these default pages by selecting the appropriate button to the right of the menu. - Directory Security – This option provides you with security configuration settings for the virtual directory.
- HTTP Headers – This option gives you the ability to forcefully control page caching on the server, add custom HTTP Headers, Edit Ratings (this helps identify the content your site provides to users), and create MIME types. Don’t worry about this for now.
- Custom Errors – This option allows you to define your own custom error pages. Rather than presenting the standard error messages that appear within Internet Explorer, you can customize error messages with your company’s logo and messages of your choice.
- ASP.NET – This tab allows you to configure the options for the ASP.NET applications stored in that folder.
One thing to note at this point is that we can set properties for the Default Web Site node, and choose to have them “propagate” down to all the virtual directories we’ve created.
Using Cassini
If you’re stuck using a version of Windows that doesn’t support IIS, you’ll need to make use of Cassini to get your simple ASP.NET web applications up and running. Cassini doesn’t support virtual directories, security settings, or any of IIS’s other fancy features; it’s just a very simple web server that gives you the basics you need to get up and running.
To get started using Cassini:
- Create a directory called
C:WebDocsLearning, just like the one we created in the section called “Virtual Directories”. - Copy index.htm into this folder. We first saw index.htm in the section called “Using localhost”.
- Start Cassini by opening
C:Cassini(or, if you chose to install Cassini somewhere else, open that folder), then double-click on the fileCassiniWebServer.exe. - Cassini has just three configuration options:
- Application Directory – It’s here that your application’s files are stored. Enter C:WebDocsLearning into this field.
- Server Port – Web servers almost always operate on port 80, so we won’t touch this setting.
- Virtual Root – This is similar to IIS’s virtual directories feature, though it’s nowhere near as flexible. By default, it’s set to
/, meaning that you can access the fileC:WebDocsLearningindex.htmby entering the addresshttps://localhost/index.htm. However, to match our IIS virtual directory configuration, we want to make this file’s addresshttps://localhost/Learning/index.htm. To create this effect, enter/Learning/into this field.
- Once you have filled in the Application Directory and Virtual Root fields, click the Start button to start the web server.
- After clicking Start, a link to the web site that’s being served will appear toward the bottom of the window, as shown in Figure 1.11.
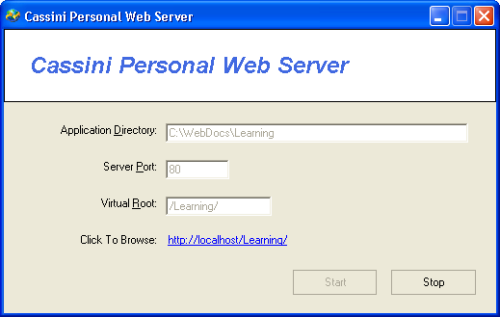
Figure 1.11. Cassini serving a web site
When you browse open this site in Cassini, you won’t see index.htm straight away–you’ll be presented with a list of files instead. Cassini only recognizes files named default.htm or default.aspx as default documents, and it doesn’t allow you to configure this feature as IIS does.
Installing SQL Server 2005 Express Edition
After making sure IIS, the .NET Framework, and the SDK are installed correctly, it’s time to move forward and install the next piece of software that you’ll be using as we work through this book: SQL Server 2005 Express Edition.
SQL Server 2005 is Microsoft’s database solution for medium to large companies and enterprises. SQL Server 2005 can be quite expensive, it generally requires its own dedicated database server machine, and, at times, it necessitates that a certified database administrator (DBA) be employed to ensure its maintenance; yet it does offer a robust and scalable solution for larger web applications.
For the examples in this book, we’ll use SQL Server 2005 Express Edition, which is free and sufficiently powerful for our needs. Unlike the expensive versions, SQL Server 2005 Express Edition doesn’t ship with visual management utilities, but you can use another free tool from Microsoft–SQL Server Management Studio Express, which we’ll install next)–for these purposes.
You can install SQL Server 2005 Express Edition as follows:
- Navigate to https://msdn.microsoft.com/vstudio/express/sql/, and click the Download Now link.
- In the next page, you can choose between SQL Server 2005 Express Edition, and SQL Server 2005 Express Edition with Advanced Services. The former will be fine for our purposes. Your system should meet the necessary requirements, so go ahead and click Download.
- Once the download has completed, double-click the downloaded executable file, and follow the steps to install the product. It’s safe to use the default options all the way through, though it is a rather long process.
Provided that everything goes well, SQL Server 2005 Express Edition will be up and running at the end of the process. Like IIS, SQL Server runs as a service in the background, accepting connections to databases instead of web pages. The SQL Server is accessible at the address (local)SqlExpress.
Installing SQL Server Management Studio Express
In order to use your SQL Server 2005 install effectively, you’ll need some sort of administration tool that will allow you to work with your databases. SQL Server Management Studio Express is a free tool provided by Microsoft to allow you to manage your installation of SQL Server 2005.
To install SQL Server Management Studio Express, follow these steps:
- Navigate again to https://msdn.microsoft.com/vstudio/express/sql/, and click the Download Now link.
- This time, download the SQL Server Management Studio Express edition that corresponds to the SQL Server 2005 version that you installed previously.
- After the download completes, execute the file and follow the steps to install the product.
Once it’s installed, SQL Server Manager Express can be accessed from Start > All Programs > Microsoft SQL Server 2005 > SQL Server Management Studio Express. When executed, it will first ask for your credentials, as Figure 1.12 illustrates.
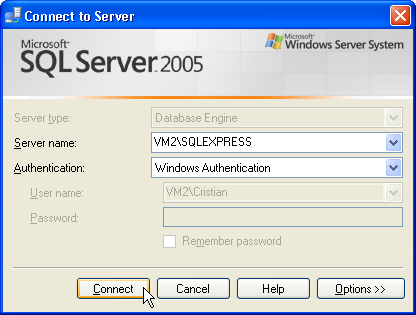
Figure 1.12. Connecting to SQL Server
By default, when installed, SQL Server 2005 Express Edition will only accept connections that use Windows Authentication, which means that you’ll use your Windows user account to log in to the SQL Server. Because you’re the user that installed SQL Server 2005, you’ll already have full privileges to the SQL Server. Click Connect to connect to your SQL Server 2005 instance.
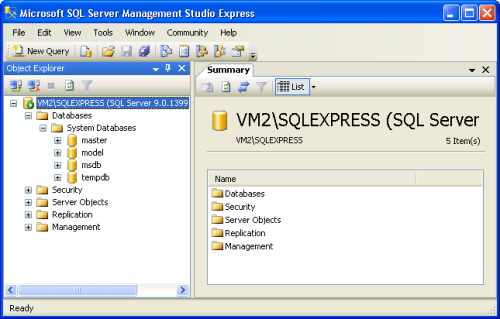
Figure 1.13. Managing your database server
After you’re authenticated, you’ll be shown the interface in Figure 1.13, which gives you many ways to interact with, and manage, your SQL Server 2005 instance.
SQL Server Management Studio lets you browse through the objects inside your SQL Server, and even modify their settings. For example, you can change the security settings of your server by right-clicking the COMPUTERSQLEXPRESS (where COMPUTER is the name of your computer), choosing Properties, and selecting Security from the panel, as shown in Figure 1.14.
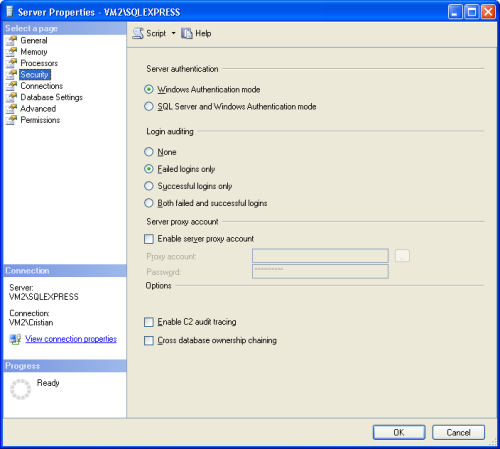
Figure 1.14. Changing server settings with SQL Server Management Studio
SQL Server and Instances
You can run multiple SQL Servers on the one computer simultaneously?each SQL Server is called an instance of SQL Server. How is this useful? Imagine you have a production server that runs two applications with two separate databases on the same instance of SQL Server. If, for some reason, we need to restart SQL Server for the first application, the second application’s database will become unavailable while the restart is taking place. If the second application’s database was operating on a second instance of SQL Server, we wouldn’t have such a problem–the second application would continue working without missing a beat.
Each instance of SQL Server requires a name. The default instance name for SQL Server 2005 Express Edition is SQLEXPRESS. When connecting to your database server, you must specify both the name of the computer and the name of the SQL Server instance in the form ComputerName/InstanceName. You can see this specification back in Figure 1.12 and Figure 1.13, where we’re connecting to an instance called SQLEXPRESS on a computer called VM2.
Installing Visual Web Developer 2005
Visual Web Developer automates many of the tasks that you’d need to complete yourself in other environments, and includes many powerful features. For the first exercises in this book, we’ll recommend you use a simple text editor such as Notepad, but you’ll gradually learn how to use Visual Web Developer to ease some of the tasks we’ll tackle.
So let’s install this tool to make sure we’ll have it ready when we need it.
- Go to https://msdn.microsoft.com/vstudio/express/vwd/ and click the Download link.
- Execute the downloaded file.
- Accept the default options. At one point, you’ll be asked about installing Microsoft MSDN 2005 Express Edition, which is the product’s documentation. It wouldn’t hurt to install it, but you need to be patient, because it’s quite big. (Note that you’ve already installed the .NET Framework 2.0 documentation, together with the SDK.)
Bonus!
If you’ve already installed the .NET Framework 2.0 SDK, you’ve already installed Microsoft MSDN 2005 Express Edition.
In this book, we’ll start using Visual Web Developer to build real web applications in Chapter 5, Building Web Applications. Until then, we’ll create examples using Notepad (or another simple text editor) so you’re prepared to take full advantage of the features offered by Visual Web Developer when the time comes to use it.
Writing your First ASP.NET Page
For your first ASP.NET exercise, we’ll create the simple example shown in Figure 1.15.
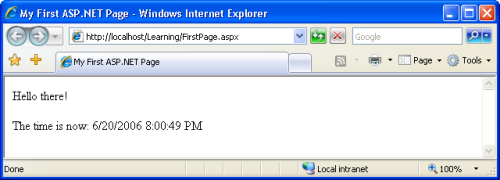
Figure 1.15. Your first ASP.NET page
Let’s get started! Open your text editor (Notepad is fine). If you have software that creates ASP.NET pages automatically, such as Visual Studio .NET or Visual Web Developer 2005 Express Edition, please don’t use it yet?while these are great tools that allow you to get up and running quickly, they do assume that you already understand how ASP.NET works.
So, open your text editor, and create a new file named FirstPage.aspx in the Learning folder you created earlier. Start editing FirstPage.aspx by entering the HTML for our page, shown below:
Example 1.2. FirstPage.aspx (excerpt)


<!DOCTYPE html PUBLIC "-//W3C//DTD XHTML 1.0 Strict//EN"

    "https://www.w3.org/TR/xhtml1/DTD/xhtml1-strict.dtd">

<html>

  <head>

    <title>My First ASP.NET 2.0 Page</title>

  </head>

  <body>

    <p>Hello there!</p>

    <p>The time is now: </p>

  </body>

</html>
So far, so good, right? Now, let’s add some ASP.NET code that will create the dynamic elements of the page, starting with the time.
Example 1.3. FirstPage.aspx (excerpt)


<!DOCTYPE html PUBLIC "-//W3C//DTD XHTML 1.0 Strict//EN"

    "https://www.w3.org/TR/xhtml1/DTD/xhtml1-strict.dtd">

<html>

  <head>

    <title>My First ASP.NET 2.0 Page</title>

  </head>

  <body>

    <p>Hello there!</p>

    <p>The time is now:

        <asp:Label runat="server" id="timeLabel" /></p>

  </body>

</html>
We’ve added an <asp:Label/> tag to the document. This is a special tag that lets us insert dynamic content into the page. The asp: part of the tag name identifies it as a built-in ASP.NET tag. ASP.NET comes with numerous built-in tags; <asp:Label/> is one of the simplest.
The runat="server" attribute identifies the tag as something that needs to be handled on the server. In other words, the web browser will never see the <asp:Label/> tag; when the page is requested by the client, ASP.NET sees it and converts it to regular HTML tags before the page is sent to the browser. It’s up to us to write the code that will tell ASP.NET to replace this particular tag with the current time.
To do this, we must add some script to our page. ASP.NET gives you the choice of a number of different languages to use in your scripts. The two most common languages are VB and C#. Let’s take a look at examples using both. Here’s a version of the page in VB:
Example 1.4. FirstPage.aspx (excerpt)


<!DOCTYPE html PUBLIC "-//W3C//DTD XHTML 1.0 Strict//EN"

    "https://www.w3.org/TR/xhtml1/DTD/xhtml1-strict.dtd">

<html>

  <head>

    <title>My First ASP.NET Page</title>

    <script runat="server" language="VB">

      Sub Page_Load(sender As Object, e As EventArgs)

        timeLabel.Text = DateTime.Now.ToString()

      End Sub

    </script>

  </head>

  <body>

    <p>Hello there!</p>

    <p>The time is now:

       <asp:Label runat="server" id="timeLabel" /></p>

  </body>

</html>
Here’s the same page written in C#:
Example 1.5. FirstPage.aspx (excerpt)


<!DOCTYPE html PUBLIC "-//W3C//DTD XHTML 1.0 Strict//EN"

    "https://www.w3.org/TR/xhtml1/DTD/xhtml1-strict.dtd">

<html>

  <head>

    <title>My First ASP.NET Page</title>

      <script runat="server" language="C#">

        protected void Page_Load(object sender, EventArgs e)

        {

          timeLabel.Text = DateTime.Now.ToString();

        }

    </script>

  </head>

  <body>

    <p>Hello there!</p>

    <p>The time is now:

       <asp:Label runat="server" id="timeLabel" /></p>

  </body>

</html>
Clues for Case Sensitivity
Note that C#, unlike VB, is case-sensitive. If you type the case of a letter incorrectly, the page won’t load. If these languages look complicated, don’t worry: you’ll learn more about them in Chapter 3, VB and C# Programming Basics.
Both versions of the page achieve exactly the same thing. You can even save them both, giving each a different filename, and test them separately. If you’ve never done any server-side programming before, the code may look a little scary. But before we analyze it in detail, let’s load the page and test that it works. Using your web browser, load https://localhost/Learning/FirstPage.aspx. Whether you load the C# version or the VB version, the output should look like Figure 1.15.
No Time?
If the time isn’t displayed in the page, chances are that you opened the file directly in your browser instead of loading it through your web server. Because ASP.NET is a server-side language, your web server needs to process the file before it’s sent to your browser for display. If it doesn’t get access to the file, the ASP.NET code is never converted into HTML that your browser can understand, so make sure you load the page by entering an actual HTTP URL (such as https://localhost/Learning/FirstPage.aspx), not a local path and filename (such as C:WebDocsLearningFirstPage.aspx).
What happens there? Let’s break down the new elements of this page.
Example 1.6. FirstPage.aspx (excerpt)


<script runat="server">
This tag marks the start of server-side code, or the code declaration block. Like the <asp:Label/> tag, this <script> tag uses the runat="server" attribute to let ASP.NET know that the tag should be processed before sending the page to the browser.
Example 1.7. FirstPage.aspx (excerpt)


Sub Page_Load(sender As Object, e As EventArgs)
Example 1.8. FirstPage.aspx (excerpt)
protected void Page_Load(object sender, EventArgs e)
{I won’t go into too much detail here. For now, all you need to know is that you can write script fragments that are run in response to different events, such as a button being clicked or an item being selected from a drop-down list. What the first line of code basically says is, “execute the following script whenever the page is loaded.” Note that C# groups code into blocks with curly braces ({ and }), while Visual Basic uses statements such as End Sub to mark the end of a particular sequence. So, the curly brace in the C# code above ({) marks the start of the script that will be executed when the page loads for the first time.
Finally, here’s the line that actually displays the time on the page:
Example 1.9. FirstPage.aspx (excerpt)


  timeLabel.Text = DateTime.Now.ToString()
Example 1.10. FirstPage.aspx (excerpt)
timeLabel.Text = DateTime.Now.ToString();As you can see, these .NET languages have much in common, because they’re both built on the .NET Framework. In fact, the only difference between the ways the two languages handle the above line is that C# ends lines of code with a semicolon (;). In plain English, here’s what this line says:
Set the Text of timeLabel to the current date and time, expressed as text.
Note that timeLabel is the value we gave for the id attribute of the <asp:Label/> tag where we want to show the time. So, timeLabel.Text, or the Tex property of timeLabel, refers to the text that will be displayed by the tag. DateTime is a class that’s built into the .NET Framework; it lets you perform all sorts of useful functions with dates and times. The .NET Framework has thousands of these classes, which do countless handy things. The classes are collectively known as the .NET Framework Class Library.
The DateTime class has a property called Now, which returns the current date and time. This Now property has a method called ToString, which expresses that date and time as text (a segment of text is called a string in programming circles). Classes, properties, and methods: these are all important words in the vocabulary of any programmer, and we’ll discuss them in more detail a little later in the book. For now, all you need to take away from this discussion is that DateTime.Now.ToString() will give you the current date and time as a text string, which you can then tell your <asp:Label/> tag to display. The rest of the script block simply ties up loose ends:
Example 1.11. FirstPage.aspx (excerpt)


End Sub

</script>
Example 1.12. FirstPage.aspx (excerpt)
}
</script>The End Sub in the VB code, and the } in the C# code, mark the end of the script that’s to be run when the page is loaded, and the </script> tag marks the end of the script block.
One final thing that’s worth investigating is the code that ASP.NET generated for you. It’s clear by now that your web browser receives only HTML (no server-side code!), so what kind of HTML was generated for that label? The answer is easy to find! With the page displayed in your browser, you can use the browser’s View Source feature to view the page’s HTML code. Here’s what you’ll see:
<!DOCTYPE html PUBLIC "-//W3C//DTD XHTML 1.0 Strict//EN"

    "https://www.w3.org/TR/xhtml1/DTD/xhtml1-strict.dtd">

<html>

  <head>

    <title>My First ASP.NET Page</title>

  </head>

  <body>

    <p>Hello there!</p>

    <p>The time is now:

       <span id="timeLabel">6/20/2006 8:00:49 PM</span></p>

  </body>

</html>
Notice that all the ASP.NET code has gone! Even the script block has been completely removed, and the <asp:Label/> tag has been replaced by a <span> tag (which has the same id attribute as the <asp:Label/> tag we used) that contains the date and time.
That’s how ASP.NET works. From the web browser’s point of view, there’s nothing special about an ASP.NET page; it’s just plain HTML like any other. All the ASP.NET code is run by your web server and converted to plain HTML that’s sent to the browser. So far, so good: the example above was fairly simple. The next chapter will get a bit more challenging as we investigate some valuable programming concepts.
Getting Help
As you develop ASP.NET web applications, you will undoubtedly have questions that need answers, and problems that need to be solved. The ASP.NET support web site was developed by Microsoft as a portal for the ASP.NET community to answer the questions and solve the problems that developers encounter while using ASP.NET. The support web site provides useful information, such as news, downloads, articles, and discussion forums. You can also ask questions of the experienced community members in the SitePoint Forums.
Summary
In this chapter, you learned about .NET. You also learned of the benefits of ASP.NET and that it’s a part of the .NET Framework.
First, you learned about the components of ASP.NET and how to locate and install the .NET Framework. Then, we explored the software that’s required not only to use this book, but also in order for you or your company to progress with ASP.NET development.
You’ve gained a solid foundation in the world of ASP.NET! The next chapter will build on this knowledge as we begin to introduce you to ASP.NET in more detail, covering page structure, the languages that you can use, various programming concepts, and the finer points of form processing.
Chapter 2. ASP.NET Basics
So far, you’ve learned what ASP.NET is, and what it can do. You’ve installed the software you need to get going, and, having been introduced to some very simple form processing techniques, you even know how to create a simple ASP.NET page. Don’t worry if it all seems a little bewildering right now, because, as this book progresses, you’ll learn how to use ASP.NET at more advanced levels.
As the next few chapters unfold, we’ll explore some more advanced topics, including the use of controls, and various programming techniques. But before you can begin to develop applications with ASP.NET, you’ll need to understand the inner workings of a typical ASP.NET page–with this knowledge, you’ll be able to identify the parts of the ASP.NET page referenced in the examples we’ll discuss throughout this book. So, in this chapter, we’ll talk about some key mechanisms of an ASP.NET page, specifically:
- page structure
- view state
- namespaces
- directives
We’ll also cover two of the “built-in” languages supported by the .NET Framework: VB and C#. As this section progresses, we’ll explore the differences and similarities between these two languages, and get a clear idea of the power that they provide to those creating ASP.NET applications.
So, what exactly makes up an ASP.NET page? The next few sections will give you an in-depth understanding of the constructs of a typical ASP.NET page.
ASP.NET Page Structure
ASP.NET pages are simply text files that have the .aspx file name extension, and can be placed on any web server equipped with ASP.NET.
When a client requests an ASP.NET page, the web server passes the page to the ASP.NET runtime, a program that runs on the web server that’s responsible for reading the page and compiling it into a .NET class. This class is then used to produce the HTML that’s sent back to the user. Each subsequent request for this page avoids the compilation process: the .NET class can respond directly to the request, producing the page’s HTML and sending it to the client, until such time as the .aspx file changes. This process is illustrated in Figure 2.1.
An ASP.NET page consists of the following elements:
- directives
- code declaration blocks
- code render blocks
- ASP.NET server controls
- server-side comments
- literal text and HTML tags
Figure 2.2 illustrates the various parts of a simple ASP.NET page.
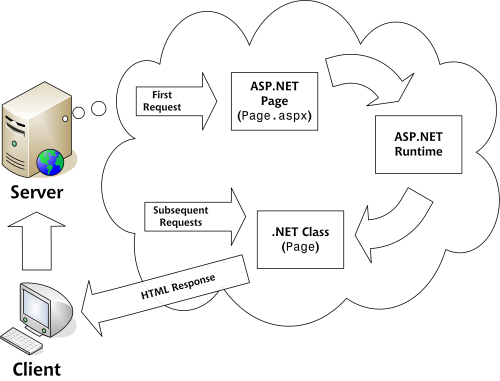
Figure 2.1. The life cycle of the ASP.NET page
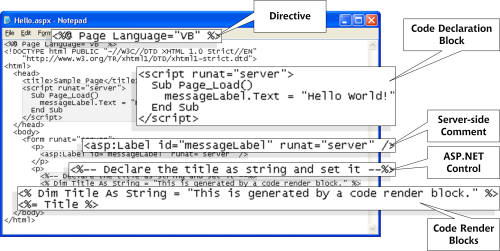
Figure 2.2. The parts of an ASP.NET page
To make sure we’re on the same page and that the code works, save this piece of code in a file named Hello.aspx within the Learning virtual directory you created in Chapter 1. Loading the file through https://localhost/Learning/Hello.aspx should render the result shown in Figure 2.3.
Frequently Asked Questions (FAQs) about Getting Started with ASP.NET
What is the difference between ASP.NET and ASP.NET Core?
ASP.NET is a framework for building web applications, while ASP.NET Core is a redesign of ASP.NET that is cross-platform, supporting Windows, MacOS, and Linux. ASP.NET Core is also modular, meaning you can include only the necessary libraries for your application, making it lightweight and efficient.
How can I create my first ASP.NET application?
To create your first ASP.NET application, you need to install Visual Studio, which is the development environment for ASP.NET. Once installed, you can create a new project, select the ASP.NET Web Application template, and follow the prompts to set up your application.
What are the prerequisites for learning ASP.NET?
Before learning ASP.NET, it’s recommended that you have a basic understanding of HTML, CSS, and C#. Knowledge of JavaScript can also be beneficial as it’s often used for client-side scripting in ASP.NET applications.
How can I debug my ASP.NET application?
Debugging in ASP.NET can be done using the debugging tools provided in Visual Studio. You can set breakpoints in your code, run your application, and then inspect the state of your application when it hits the breakpoint.
What is the role of the .NET Framework in ASP.NET?
The .NET Framework provides a runtime environment for ASP.NET applications. It includes a large class library called Framework Class Library (FCL) and provides language interoperability across several programming languages.
How can I handle errors in ASP.NET?
ASP.NET provides several ways to handle errors, including try-catch blocks, custom error pages, and logging. The best method to use depends on the specific requirements of your application.
What is MVC in ASP.NET?
MVC stands for Model-View-Controller. It’s a design pattern that separates an application into three main components: the model (data), the view (user interface), and the controller (processes that handle input). This separation allows for more efficient code organization and easier testing.
How can I secure my ASP.NET application?
ASP.NET provides several security mechanisms, including authentication, authorization, and data protection. You can also use HTTPS to secure the data transmitted between your application and its users.
What is Web API in ASP.NET?
Web API is a framework for building HTTP services that can be accessed from any client including browsers and mobile devices. It’s an ideal platform for building RESTful applications on the .NET Framework.
How can I deploy my ASP.NET application?
You can deploy your ASP.NET application in several ways, including using Visual Studio’s built-in deployment tools, using a hosting provider, or manually copying your application’s files to a server. The best method depends on your specific requirements and resources.