

Since Material design was introduced, the Floating Action Button (FAB) has become one of the simplest components to implement, becoming a fast and essential favorite amongst designers and developers.
In this tutorial I will show you how to make your apps FAB interactive and how to make your own animations. But let’s start simple, adding the Floating Action Button to an Android project.
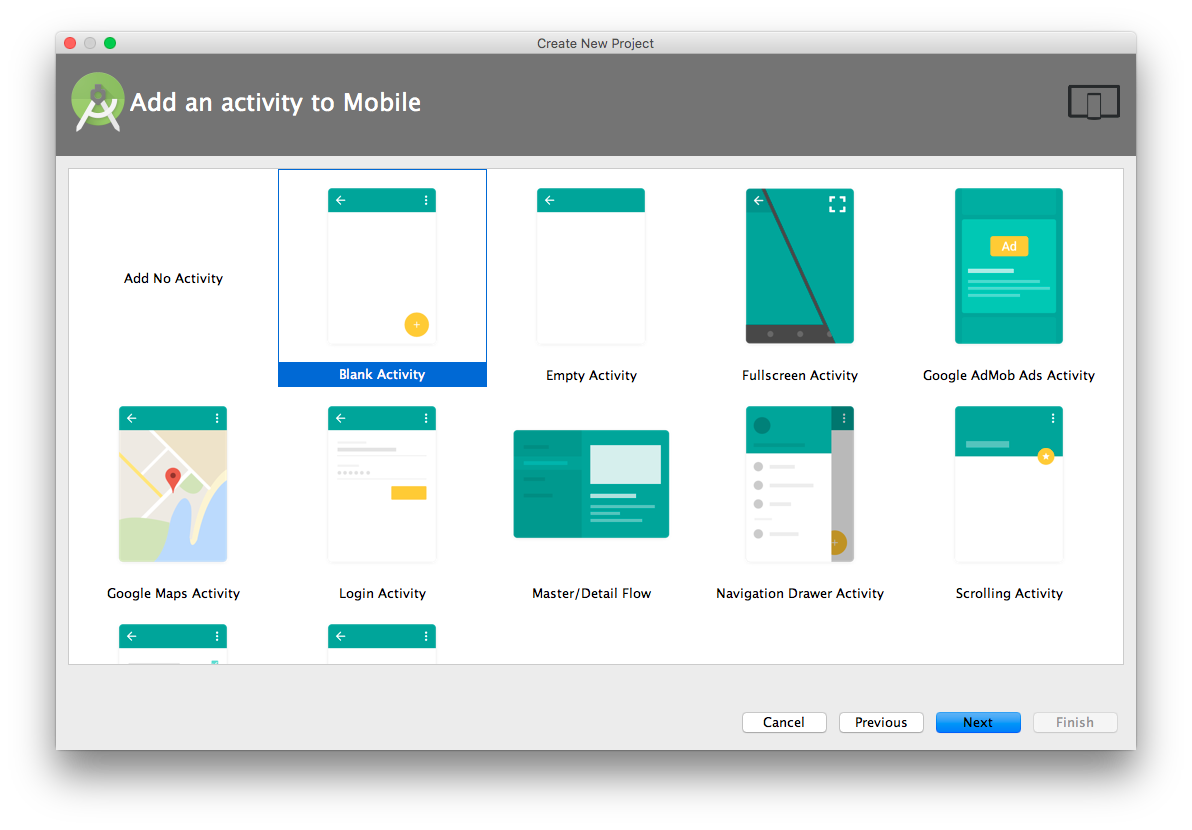
The Floating Action Button looks something like this in a layout file and will be auto generated if create an Android Studio project with a Blank Activity:
<android.support.design.widget.FloatingActionButton
    android:id="@+id/fab"
    android:layout_width="wrap_content"
    android:layout_height="wrap_content"
    android:layout_gravity="bottom|end"
    android:layout_margin="@dimen/fab_margin"
    android:src="@android:drawable/ic_menu_help"
    />
Key Takeaways
- Implementing a Floating Action Button (FAB) in Android is straightforward and can be customized to react to various user interactions such as scrolling, using the FloatingActionButton.Behavior class.
- To create a menu of FABs, invisible mini FABs can be animated to appear from under a primary FAB, adjusting their layout parameters dynamically for interaction accuracy.
- Advanced animations, such as the circular reveal, require API level 21 (Lollipop) or higher and involve manipulating the visibility and transformation properties of the FAB and associated views.
- For simpler animations, like hiding the FAB on scroll, modifying the visibility based on scroll events can be achieved with few lines of code by extending FloatingActionButton.Behavior.
- The tutorial provides comprehensive guidance on creating interactive and visually appealing FABs, including both basic behaviors and complex animations, enhancing user experience in Android applications.
Floating Action Button
Floating action buttons can be one of two sizes. The default (56dp) and mini (40dp). For further discussion on the design principles of using a FAB, I recommend you read Google’s official guidelines.
In most recent Android apps, the FAB reacts to the scrolling of a list of elements and in my opinion, should be hidden whilst scrolling. Here is what I mean:
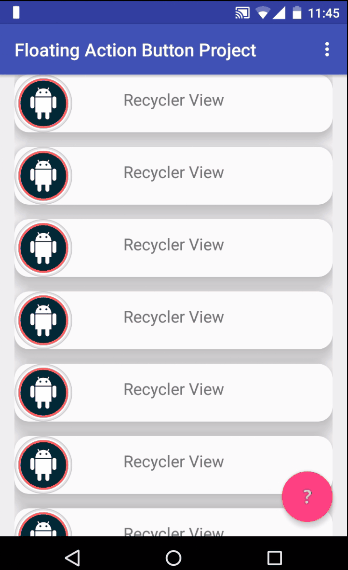
To show this animation I created a recyclerView so the FAB can react to scrolling.
There are a lot a libraries that can help achieve this in 1 or 2 lines of code, but for those who are curious, here is an example:
public class FAB_Hide_on_Scroll extends FloatingActionButton.Behavior {

    public FAB_Hide_on_Scroll(Context context, AttributeSet attrs) {
        super();
    }

    @Override
    public void onNestedScroll(CoordinatorLayout coordinatorLayout, FloatingActionButton child, View target, int dxConsumed, int dyConsumed, int dxUnconsumed, int dyUnconsumed) {
        super.onNestedScroll(coordinatorLayout, child, target, dxConsumed, dyConsumed, dxUnconsumed, dyUnconsumed);

        //child -> Floating Action Button
        if (child.getVisibility() == View.VISIBLE && dyConsumed > 0) {
            child.hide();
        } else if (child.getVisibility() == View.GONE && dyConsumed < 0) {
            child.show();
        }
    }

    @Override
    public boolean onStartNestedScroll(CoordinatorLayout coordinatorLayout, FloatingActionButton child, View directTargetChild, View target, int nestedScrollAxes) {
        return nestedScrollAxes == ViewCompat.SCROLL_AXIS_VERTICAL;
    }
}
I’m using the FloatingActionButton.Behavior() class which according to the official documentation, its main function is to move FloatingActionButton views so that any displayed Snackbars do not cover them. But in our case this class is extended so that we can implement our own behavior.
Let’s get into more detail about this behavior class. Its intention is that whenever a scroll is initiated, the onStartNestedScroll() method will return true if the scroll is vertical and from there the onNestedScroll() method will hide or show the Floating Action Button, depending on its current visibility status.
The constructor of this class is an important part of this view’s behavior, making this inflatable from the XML file
    public FAB_Hide_on_Scroll(Context context, AttributeSet attrs) {
        super();
    }
To use this behavior, add the layout_behavior attribute to the Floating Action Button. The attribute contains the package name, plus the class name at the end or to put it differently differently, the exact location of this class in the project. In my case it looks like this:
app:layout_behavior="com.valdio.valdioveliu.floatingactionbuttonproject.Scrolling_Floating_Action_Button.FAB_Hide_on_Scroll"
This animation looks cool, but it could be better. I personally prefer floating the FAB out of the screen while I scroll through the apps content, it’s more realistic. Here’s what I mean:
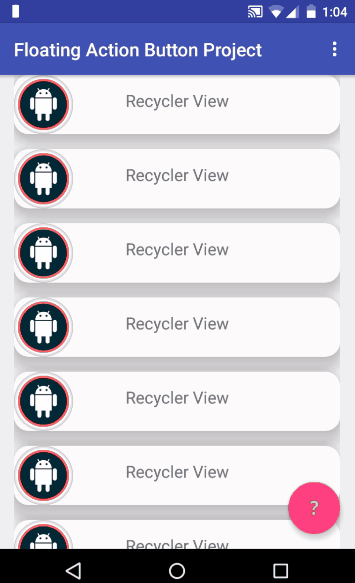
The same logic as previously is applied, only the way the FAB hides changes.
The animation is simple. The FAB floats off the screen vertically using a LinearInterpolator. The FAB floats a distance down calculated by its height plus bottom margin to remove it completely of the screen and is floated back to its original position on scroll up.
If you take a closer look at the code, I removed the View.VISIBLE and the View.GONE checks in the if statements because the view doesn’t hide in this case, just floats off screen.
public class FAB_Float_on_Scroll extends FloatingActionButton.Behavior {

    public FAB_Float_on_Scroll(Context context, AttributeSet attrs) {
        super();
    }

    @Override
    public void onNestedScroll(CoordinatorLayout coordinatorLayout, FloatingActionButton child, View target, int dxConsumed, int dyConsumed, int dxUnconsumed, int dyUnconsumed) {
        super.onNestedScroll(coordinatorLayout, child, target, dxConsumed, dyConsumed, dxUnconsumed, dyUnconsumed);

        //child -> Floating Action Button
        if (dyConsumed > 0) {
            CoordinatorLayout.LayoutParams layoutParams = (CoordinatorLayout.LayoutParams) child.getLayoutParams();
            int fab_bottomMargin = layoutParams.bottomMargin;
            child.animate().translationY(child.getHeight() + fab_bottomMargin).setInterpolator(new LinearInterpolator()).start();
        } else if (dyConsumed < 0) {
            child.animate().translationY(0).setInterpolator(new LinearInterpolator()).start();
        }
    }

    @Override
    public boolean onStartNestedScroll(CoordinatorLayout coordinatorLayout, FloatingActionButton child, View directTargetChild, View target, int nestedScrollAxes) {
        return nestedScrollAxes == ViewCompat.SCROLL_AXIS_VERTICAL;
    }
}
Making a menu of Floating Action Buttons
I’ve seen many Android apps making impressive Floating Action Button menus that look and work well. Here is an example:
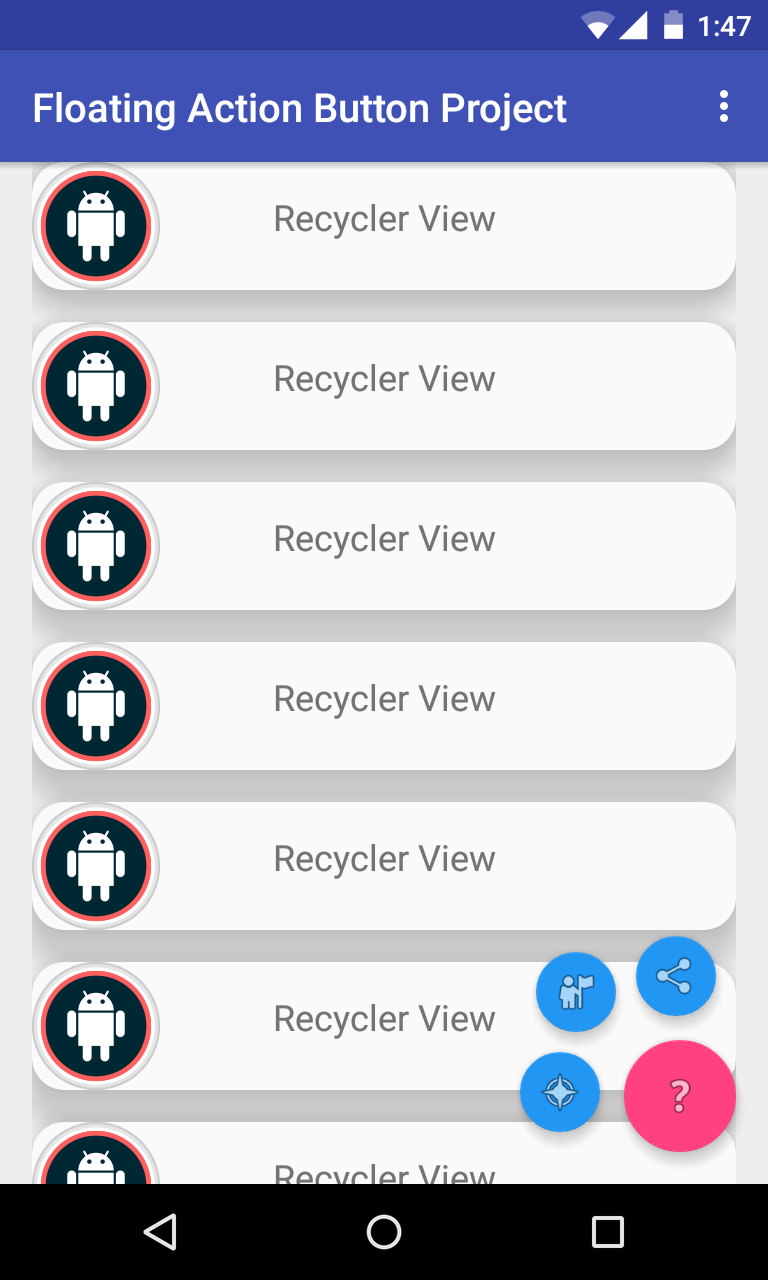
Now you have an idea of what we’re making, let’s start building.
The first step into building this menu is the layout containing the 3 small buttons.
All the small buttons are invisible and are located at the bottom of the layout, under the primary FAB.
Inside fab_layout.xml
<FrameLayout xmlns:android="http://schemas.android.com/apk/res/android"
    xmlns:app="http://schemas.android.com/apk/res-auto"
    android:layout_width="match_parent"
    android:layout_height="match_parent">

    <android.support.design.widget.FloatingActionButton
        android:id="@+id/fab_1"
        android:layout_width="wrap_content"
        android:layout_height="wrap_content"
        android:layout_gravity="bottom|end"
        android:layout_margin="@dimen/fab_margin"
        android:src="@android:drawable/ic_menu_compass"
        android:visibility="invisible"
        app:backgroundTint="@color/colorFAB"
        app:fabSize="mini" />

    <android.support.design.widget.FloatingActionButton
        android:id="@+id/fab_2"
        android:layout_width="wrap_content"
        android:layout_height="wrap_content"
        android:layout_gravity="bottom|end"
        android:layout_margin="@dimen/fab_margin"
        android:src="@android:drawable/ic_menu_myplaces"
        android:visibility="invisible"
        app:backgroundTint="@color/colorFAB"
        app:fabSize="mini" />

    <android.support.design.widget.FloatingActionButton
        android:id="@+id/fab_3"
        android:layout_width="wrap_content"
        android:layout_height="wrap_content"
        android:layout_gravity="bottom|end"
        android:layout_margin="@dimen/fab_margin"
        android:src="@android:drawable/ic_menu_share"
        android:visibility="invisible"
        app:backgroundTint="@color/colorFAB"
        app:fabSize="mini" />
</FrameLayout>
Include this layout in the activity’s layout, under the primary FAB.
<include layout="@layout/fab_layout" />
Now that the layout is set, the next step is making the animations to show and hide each of the small FABs.
Caution!
While creating these animations I encountered the issue of touch events and small FABs. When the animation finishes the actual position of the small FABs does not change, only the view appears in the new position so you can’t actually perform touch events on the correct position. What I did to fix this issue was to set the layout parameters of each FAB to its new location and then perform the animation of pulling the view to the new position.
In the rest of this tutorial I will show the process of animating one of the small FABs. The process is the same for the others but with different relocation parameters.
Display Floating Action Button menu
  FrameLayout.LayoutParams layoutParams = (FrameLayout.LayoutParams) fab1.getLayoutParams();
  layoutParams.rightMargin += (int) (fab1.getWidth() * 1.7);
  layoutParams.bottomMargin += (int) (fab1.getHeight() * 0.25);
  fab1.setLayoutParams(layoutParams);
  fab1.startAnimation(show_fab_1);
  fab1.setClickable(true);
Here I relocate fab1 by adding right and bottom margins to its layoutParams and starting the animation.
Hide Floating Action Button menu
  FrameLayout.LayoutParams layoutParams = (FrameLayout.LayoutParams) fab1.getLayoutParams();
  layoutParams.rightMargin -= (int) (fab1.getWidth() * 1.7);
  layoutParams.bottomMargin -= (int) (fab1.getHeight() * 0.25);
  fab1.setLayoutParams(layoutParams);
  fab1.startAnimation(hide_fab_1);
  fab1.setClickable(false);
The process of hiding is the reverse of the previous animation.
The animations used on this FAB are:
  //Animations
  Animation show_fab_1 = AnimationUtils.loadAnimation(getApplication(), R.anim.fab1_show);
  Animation hide_fab_1 = AnimationUtils.loadAnimation(getApplication(), R.anim.fab1_hide);
Now all that remains are the animations. Inside the res/anim/ folder I created files for all the animations. There’s not much to these, but if you need help understanding what each tag or attribute does, read the official documentation.
Inside fab1_show.xml:
<?xml version="1.0" encoding="utf-8"?>
<set xmlns:android="http://schemas.android.com/apk/res/android"
    android:fillAfter="true">

    <!-- Rotate -->
    <rotate
        android:duration="500"
        android:fromDegrees="30"
        android:interpolator="@android:anim/linear_interpolator"
        android:pivotX="50%"
        android:pivotY="50%"
        android:repeatCount="4"
        android:repeatMode="reverse"
        android:toDegrees="0"></rotate>

    <!--Move-->
    <translate
        android:duration="1000"
        android:fromXDelta="170%"
        android:fromYDelta="25%"
        android:interpolator="@android:anim/linear_interpolator"
        android:toXDelta="0%"
        android:toYDelta="0%"></translate>

    <!--Fade In-->
    <alpha
        android:duration="2000"
        android:fromAlpha="0.0"
        android:interpolator="@android:anim/decelerate_interpolator"
        android:toAlpha="1.0"></alpha>

</set>
Inside fab1_hide.xml:
<?xml version="1.0" encoding="utf-8"?>
<set xmlns:android="http://schemas.android.com/apk/res/android"
    android:fillAfter="true">

    <!--Move-->
    <translate
        android:duration="1000"
        android:fromXDelta="-170%"
        android:fromYDelta="-25%"
        android:interpolator="@android:anim/linear_interpolator"
        android:toXDelta="0%"
        android:toYDelta="0%"></translate>

    <!--Fade Out-->
    <alpha
        android:duration="2000"
        android:fromAlpha="1.0"
        android:interpolator="@android:anim/accelerate_interpolator"
        android:toAlpha="0.0"></alpha>

</set>
Finally, if you look at the translate tag, responsible for moving the view, the factor by which I have relocated the FAB (170% and 25%) correspond to the factors with the margins are added and subtracted in the java code.
The same process applies to both the other FABs, but with relocation factors of (150% and 150%) fab2 and (25% and 170%) fab3.
The final project looks like this:

A new circular animation
If you are looking to make some special animation with FABs you can make use of the ViewAnimationUtils class to make reveal animations on views.
The rest of this article will be focused specifically on this class and how to build reveal animations with it. Unfortunately, this class is only available for API versions 21 (LOLLIPOP) and higher.
Create a new Activity
Since the rest of this article’s code sample is decoupled from the previous example I used a new Activity. If you decide to follow on, create a new Blank Activity named RevealActivity. Make sure this activity’s layout file has a Floating Action Button, as we will utilize it to fire up our animation. In my example, this FAB has the android:id="@+id/fab".
Build the Reveal UI
To make a reveal animation on a view you will need a layout to show after the animation is performed.
The layout depends on the view you like to show in the app, but to keep it simple I built an example layout to “animate-show”.
In the layouts folder create a new file, fab_reveal_layout.xml and insert the following code.
<?xml version="1.0" encoding="utf-8"?>
<LinearLayout xmlns:android="http://schemas.android.com/apk/res/android"
    xmlns:app="http://schemas.android.com/apk/res-auto"
    android:layout_width="match_parent"
    android:layout_height="match_parent"
    android:id="@+id/fabContainerLayout"
    android:layout_gravity="center_vertical|center_horizontal"
    android:background="@color/colorPrimary"
    android:gravity="center"
    android:visibility="gone"
    android:orientation="horizontal">

    <FrameLayout
        android:layout_width="wrap_content"
        android:layout_height="wrap_content">

        <android.support.design.widget.FloatingActionButton
            android:id="@+id/f2"
            android:layout_width="wrap_content"
            android:layout_height="wrap_content"
            android:layout_marginLeft="@dimen/fab_margin"
            android:layout_marginRight="@dimen/fab_margin"
            android:src="@android:drawable/ic_dialog_email"
            app:backgroundTint="@color/colorFAB" />


        <TextView
            android:layout_width="wrap_content"
            android:layout_height="wrap_content"
            android:layout_gravity="right"
            android:elevation="8dp"
            android:text="Fab2"
            android:textColor="#fff" />
    </FrameLayout>

    <LinearLayout
        android:layout_width="wrap_content"
        android:layout_height="wrap_content"
        android:orientation="vertical">

        <FrameLayout
            android:layout_width="wrap_content"
            android:layout_height="wrap_content"
            android:layout_marginBottom="@dimen/fab_margin"
            android:layout_marginTop="@dimen/fab_margin">

            <android.support.design.widget.FloatingActionButton xmlns:app="http://schemas.android.com/apk/res-auto"
                android:id="@+id/f1"
                android:layout_width="wrap_content"
                android:layout_height="wrap_content"
                android:layout_marginLeft="@dimen/fab_margin"
                android:layout_marginRight="@dimen/fab_margin"
                android:elevation="0dp"
                android:src="@android:drawable/ic_dialog_map"
                app:backgroundTint="@color/colorFAB"
                app:borderWidth="0dp"
                app:fabSize="normal" />

            <TextView
                android:layout_width="wrap_content"
                android:layout_height="wrap_content"
                android:layout_gravity="right"
                android:elevation="8dp"
                android:text="Fab1"
                android:textColor="#fff" />
        </FrameLayout>

        <FrameLayout
            android:layout_width="wrap_content"
            android:layout_height="wrap_content"
            android:layout_marginBottom="@dimen/fab_margin"
            android:layout_marginTop="@dimen/fab_margin">

            <android.support.design.widget.FloatingActionButton
                android:id="@+id/f4"
                android:layout_width="wrap_content"
                android:layout_height="wrap_content"
                android:layout_marginLeft="@dimen/fab_margin"
                android:layout_marginRight="@dimen/fab_margin"
                android:src="@android:drawable/ic_dialog_alert"
                app:backgroundTint="@color/colorFAB" />

            <TextView
                android:layout_width="wrap_content"
                android:layout_height="wrap_content"
                android:layout_gravity="right"
                android:elevation="8dp"
                android:text="Fab4"
                android:textColor="#fff" />
        </FrameLayout>
    </LinearLayout>


    <FrameLayout
        android:layout_width="wrap_content"
        android:layout_height="wrap_content">

        <android.support.design.widget.FloatingActionButton
            android:id="@+id/f3"
            android:layout_width="wrap_content"
            android:layout_height="wrap_content"
            android:layout_marginLeft="@dimen/fab_margin"
            android:layout_marginRight="@dimen/fab_margin"
            android:src="@android:drawable/ic_dialog_dialer"
            app:backgroundTint="@color/colorFAB" />

        <TextView
            android:layout_width="wrap_content"
            android:layout_height="wrap_content"
            android:layout_gravity="right"
            android:elevation="8dp"
            android:text="Fab3"
            android:textColor="#fff" />
    </FrameLayout>
</LinearLayout>
Actually, the container LinearLayout in this file has a visibility attribute visibility="gone" so nothing will be visible when you insert this code in your file. To check out this layout, remove the visibility attribute from the LinearLayout or take a look at the following image.

After creating this file, include it in the activity’s layout file.
activity_reveal.xml
<?xml version="1.0" encoding="utf-8"?>
<android.support.design.widget.CoordinatorLayout xmlns:android="http://schemas.android.com/apk/res/android"
    //...>

    //...
    <include layout="@layout/content_reveal" />

    <include layout="@layout/fab_reveal_layout" />

    <android.support.design.widget.FloatingActionButton
        android:id="@+id/fab"
        android:layout_width="wrap_content"
        android:layout_height="wrap_content"
        android:layout_gravity="bottom|end"
        android:layout_margin="@dimen/fab_margin"
        android:src="@drawable/ic_add" />

</android.support.design.widget.CoordinatorLayout>
Setup the RevealActivity
After including the fab layout in the Activity’s layout we need to setup the CircularReveal animation.
In the RevealActivity class create the following global instances of the Floating Action Button, a boolean to keep track of the animation status and the fab_reveal_layout container layout.
    private LinearLayout fabContainer;
    private FloatingActionButton fab;
    private boolean fabMenuOpen = false;
Next, in the RevealActivity‘s onCreate() method to find the FAB’s view references and add a click listener. I only initiated the Activity’s FAB because that is all needed to fire up the animation.
    @Override
    protected void onCreate(Bundle savedInstanceState) {
        super.onCreate(savedInstanceState);
        //...

        fabContainer = (LinearLayout) findViewById(R.id.fabContainerLayout);

        fab = (FloatingActionButton) findViewById(R.id.fab);
        fab.setOnClickListener(new View.OnClickListener() {
            @Override
            public void onClick(View view) {
                toggleFabMenu();
            }
        });
    }
The toggleFabMenu() function is used create and fire up the reveal animation. Just add the following code in the RevealActivity class and I will describe in details what it does.
    @TargetApi(Build.VERSION_CODES.LOLLIPOP)
    private void toggleFabMenu() {
        if (!fabMenuOpen) {
            fab.setImageResource(R.drawable.ic_close);
            int centerX = fabContainer.getWidth() / 2;
            int centerY = fabContainer.getHeight() / 2;
            int startRadius = 0;
            int endRadius = (int) Math.hypot(fabContainer.getWidth(), fabContainer.getHeight()) / 2;

            fabContainer.setVisibility(View.VISIBLE);
            ViewAnimationUtils
                    .createCircularReveal(
                            fabContainer,
                            centerX,
                            centerY,
                            startRadius,
                            endRadius
                    )
                    .setDuration(1000)
                    .start();
        } else {
            fab.setImageResource(R.drawable.ic_add);
            int centerX = fabContainer.getWidth() / 2;
            int centerY = fabContainer.getHeight() / 2;
            int startRadius = (int) Math.hypot(fabContainer.getWidth(), fabContainer.getHeight()) / 2;
            int endRadius = 0;

            Animator animator = ViewAnimationUtils
                    .createCircularReveal(
                            fabContainer,
                            centerX,
                            centerY,
                            startRadius,
                            endRadius
                    );
            animator.setDuration(1000);
            animator.addListener(new Animator.AnimatorListener() {
                @Override
                public void onAnimationStart(Animator animation) {
                }

                @Override
                public void onAnimationEnd(Animator animation) {
                    fabContainer.setVisibility(View.GONE);
                }

                @Override
                public void onAnimationCancel(Animator animation) {
                }

                @Override
                public void onAnimationRepeat(Animator animation) {
                }
            });
            animator.start();
        }
        fabMenuOpen = !fabMenuOpen;
    }
As I mentioned earlier, the createCircularReveal() method only works on LOLLIPOP and newer Android version, so this function has a TargetApi for build version LOLLIPOP. This means this function will not be called when fired up in a pre-LOLLIPOP device.
The first thing this function does is to checks whether the animation view is visible using the fabMenuOpen Boolean values.
In this function, I change the image of the fab using the setImageResource() method. If you add this function in your class make sure you add the missing images in the drawable folder, or just comment out this lines of code from the function.
If you run the project now it will work properly, as shown in the following GIF, but if you are interested in learning how the createCircularReveal() works check out the next section of this article.

The ViewAnimationUtils.createCircularReveal() method
The createCircularReveal() method is used to setup the animation. It takes five parameters based on which it creates an animation on the view.
The first parameter is a reference to the view that will be shown by the animating circle.
The next two parameters are the X and Y coordinates of the screen where the animation will start. These coordinates are related to the view that is reveal animated.
Since the animation is a circle reveal it needs the radius of the circle it is drawing, so the next two parameters are the starting and the end radius of the animation.
Relating to the example of this article, as shown by the GIF the animation will start at the center of the view with a start radius of “0” and the end radius is calculated by the Math.hypot() method. To reverse the animation just change the values of the start and end radius with each other.
The tricky part of the circular-reveal animation is finding the animation start coordinated related to the view that is reveal animated.
For example, I calculated as the X and Y coordinates of the animation, respectively the width/2 and the height/2 of the view in order to find the center of the view to start the animation.
Take a look at the following image to find out how to determine the coordinates of your own animations.

What’s next?
I hope I’ve given you an idea of how to animate Floating Action Buttons in your own project. From here you should read Android’s Animation Resources and create your own animations for your apps. You can find the final code for this project on GitHub and I welcome any questions or comments you may have.
Frequently Asked Questions (FAQs) about Animating Android Floating Action Button
What is the purpose of a Floating Action Button (FAB) in Android?
A Floating Action Button (FAB) is a circular button that triggers the primary action in your app’s user interface. It’s a part of the Material Design guidelines developed by Google, which offers a simple yet attractive design for user interaction. The FAB is usually placed in a fixed position on the screen, and it can animate into related actions upon interaction. For instance, it can change shape, rotate, or animate into a series of smaller buttons.
How can I animate a FAB in Android?
Animating a FAB in Android involves using Android’s animation APIs. You can use ObjectAnimator for simple animations or AnimatorSet for complex animations involving multiple properties. You can also use the animate() method of the View class for simple animations. The animation can be triggered by user interaction, such as clicking on the FAB.
Can I use a FAB for multiple actions?
Yes, a FAB can animate into a series of smaller buttons, each representing a different action. This is known as a FAB menu or a speed dial menu. Each smaller button can have its own icon and label, and it can animate back into the main FAB when clicked.
How can I customize the appearance of a FAB?
You can customize the appearance of a FAB by setting its background color, icon, and size. You can also add a shadow to the FAB for a 3D effect. The FAB should be easily noticeable, but it should also blend well with your app’s overall design.
How can I handle FAB clicks in Android?
You can handle FAB clicks by setting an OnClickListener for the FAB. In the onClick() method, you can perform the desired action or start an animation. If the FAB has multiple actions, you can use a switch statement or if-else conditions to handle different actions.
Can I use a FAB in a Fragment?
Yes, you can use a FAB in a Fragment. You can add the FAB in the Fragment’s layout XML file, and handle its clicks in the Fragment’s Java or Kotlin file. The FAB will be visible only when the Fragment is visible.
How can I animate a FAB into a dialog or a bottom sheet?
You can animate a FAB into a dialog or a bottom sheet by using a shared element transition. The FAB will morph into the dialog or bottom sheet, providing a smooth transition between the two UI elements.
How can I add a ripple effect to a FAB?
You can add a ripple effect to a FAB by setting its background to a RippleDrawable. The ripple effect will be triggered when the FAB is clicked, providing a visual feedback to the user.
How can I test FAB animations in Android?
You can test FAB animations by using Android’s testing frameworks, such as Espresso and UI Automator. You can write test cases to check if the animations are working correctly and if the FAB is performing the correct actions.
Can I use third-party libraries for FAB animations?
Yes, there are several third-party libraries available for FAB animations, such as FloatingActionButton by Clans and Material-Animations by lgvalle. These libraries provide pre-built animations and easy-to-use APIs, saving you the time and effort of writing your own animations. However, they may not offer the same level of customization as Android’s native APIs.