


This article was created in partnership with OnlyOffice. Thank you for supporting the partners who make SitePoint possible.
Whenever we find ourselves trying to add any complex functionality to an app, the question arises, “should I roll my own?” And unless your goal is to build that functionality, the answer is almost always a straight “no”.
What you need is something to help you get to an MVP as quickly as possible, and the best way to achieve that is to use a complete out-of-the-box solution that can help you save time, which, in turn, translates into saving on development costs.
I’ll assume that you’re still here because the above resonates with you. So, now that we’re in sync, what I want to show you in this article is how easy it is to integrate OnlyOffice in your web app.
Key Takeaways
- OnlyOffice provides a comprehensive office suite highly compatible with Microsoft Office and OpenDocument formats, which can be integrated directly into web applications for document, spreadsheet, and presentation management.
- The Developer Edition of OnlyOffice allows for extensive customization and integration into apps, offering a “White Label” option for branding the editors as your own.
- Setting up OnlyOffice involves installing the OnlyOffice Docs (Document Server) locally and implementing API requests to manage documents within your app, with support for multiple programming languages.
- OnlyOffice integration enables the creation, editing, deletion, and tracking of documents directly within your web app, enhancing user interaction and productivity without the need for external applications.
- Real-time collaboration is supported in OnlyOffice, allowing multiple users to edit documents simultaneously and see each other’s changes live.
- The integration process is designed to be straightforward, aiming to help developers achieve a minimum viable product (MVP) quickly and cost-effectively, with ample documentation and community support available for assistance.
What is OnlyOffice?
From their website:
OnlyOffice offers the most feature-rich office suite available, highly compatible with Microsoft Office and OpenDocument file formats. View, edit and collaboratively work with documents, spreadsheets and presentations directly from your web application.
The office suite has several editions. In this article we are going to use Developer Edition, because we want to integrate the editors into the app which will later be delivered to many users as a cloud service or on-premise installation.
If you want to use OnlyOffice within an existing sync & share solution, you should check out Enterprise Edition. A list of integrations is here.
Developer Edition
The Developer Edition not only gives you enough freedom to integrate the editors within your app, but it also comes with a “White Label” option which lets you fully customize the editors to use them under your own brand.
Document Server Integration
To integrate with your web app, you first need to download the OnlyOffice Docs (packaged as Document Server) and set it up on your local server.
After you’ve installed it you can start implementing the requests to handle documents on your server. OnlyOffice provides some very nice examples for .NET, Java, Node.js, PHP, Python and Ruby.
You can download the Document Server and your preferred example and try it straight away on your machine.
I’ll demonstrate how you can go about starting to integrate into your app. For this purpose, we’ll use a very simple example with Node.js and Express. I won’t go into much detail on the implementation, I’ll lay out the bare bone essentials and let you fill in the blanks to build a robust and scalable system.
I have an app with the following structure:
- node_modules
- public
    - backups
    - css
        - main.css
    - documents
        - sample.docx
    - javascript
        - main.js
    - samples
        - new.docx
        - new.xlsx
        - new.pptx
- app.js
- index.html
- package.json
We’ll use the public/documents folder to store the documents. The app.js file is where our Express app code is, and index.html is where we’ll show our documents. I’ve dropped a sample.docx file in the documents folder for testing purposes.
The tree files inside public/samples/ are the blank files that we’ll copy when “creating” new files.
The backups folder, as you’ll see later, will not only help us keep backups of previous versions but also assist us in generating the unique identifier for our documents after modifying them.
The public/css/main.css and public/javascript/main.js files will be used by the index.html. We’ll look into that later.
Let’s take a look at the app.js file:
const express = require('express');
const bodyParser = require("body-parser");
const path = require('path');
const fs = require('fs');
const syncRequest = require('sync-request');

const app = express();

app.use(bodyParser.json());
app.use(bodyParser.urlencoded({ extended: false }));

app.use(express.static("public"));

app.get("/", (req, res) => {
  res.sendFile(path.join(__dirname, "/index.html"));
});

const port = process.env.PORT || 3000;
app.listen(port, () => console.log(`App listening on http://localhost:${port}`));
What we’re doing is serving the files as localhost:3000/documents/filename.
I’ve also gotten ahead of myself and added syncRequest, fs, and bodyParser. These are not relevant right now but we’ll use them later.
Fetch documents
To show the available documents we’ll need to get a list of all the filenames and send them to the client. We’ll create the /documents route for this:
app.get("/documents", (req, res) => {
  const docsPath = path.join(__dirname, "public/documents");
  const docsPaths = fs.readdirSync(docsPath);

  const fileNames = [];

  docsPaths.forEach(filePath => {
    const fileName = path.basename(filePath);
    fileNames.push(fileName);
  });

  res.send(fileNames);
});
Create documents
At the beginning we’ll just have a sample document, but that’s no fun at all. Let’s add a /create route to assist us with adding some files. We’ll simply take a fileName and copy the corresponding template into the public/documents folder with its new name:
app.post("/create", async (req, res) => {
  const ext = path.extname(req.query.fileName);
  const fileName = req.query.fileName;

  const samplePath = path.join(__dirname, "public/samples", "new" + ext);
  const newFilePath = path.join(__dirname, "public/documents", fileName);

  // Copy the sample file to the documents folder with its new name.
  try {
    fs.copyFileSync(samplePath, newFilePath);
    res.sendStatus(200);
  } catch (e) {
    res.sendStatus(400);
  }
});
Delete documents
We also need a way to delete documents. Let’s create a the /delete route:
app.delete("/delete", (req, res) => {
  const fileName = req.query.fileName;
  const filePath = path.join(__dirname, "public/documents", fileName);

  try {
    fs.unlinkSync(filePath);
    res.sendStatus(200);
  } catch (e) {
    res.sendStatus(400);
  }
});
This one’s super simple. We’ll delete the file and send a 200 status code to let the user know it all went fine. Otherwise, they’ll get a 400 status code.
Save documents
So far, we can open our documents for editing, but we have no way of saving our changes. Let’s do that now. We’ll add a /track route to save our files:
app.post("/track", async (req, res) => {
  const fileName = req.query.fileName;

  const backupFile = filePath => {
    const time = new Date().getTime();
    const ext = path.extname(filePath);
    const backupFolder = path.join(__dirname, "public/backups", fileName + "-history");

    // Create the backups folder if it doesn't exist
    !fs.existsSync(backupFolder) && fs.mkdirSync(backupFolder);

    // Remove previous backup if any
    const previousBackup = fs.readdirSync(backupFolder)[0];
    previousBackup && fs.unlinkSync(path.join(backupFolder, previousBackup));

    const backupPath = path.join(backupFolder, time + ext);

    fs.copyFileSync(filePath, backupPath);
  }

  const updateFile = async (response, body, path) => {
    if (body.status == 2) {
      backupFile(path);
      const file = syncRequest("GET", body.url);
      fs.writeFileSync(path, file.getBody());
    }

    response.write("{\"error\":0}");
    response.end();
  }

  const readbody = (request, response, path) => {
    const content = "";
    request.on("data", function (data) {
      content += data;
    });
    request.on("end", function () {
      const body = JSON.parse(content);
      updateFile(response, body, path);
    });
  }

  if (req.body.hasOwnProperty("status")) {
    const filePath = path.join(__dirname, "public/documents", fileName);
    updateFile(res, req.body, filePath);
  } else {
    readbody(req, res, filePath);
  }
});
This is a tricky one, since it’s going to be used by the Document Server when the file is saved by the editor. As you can see, we’re returning "{\"error\":0}", which tells the server that it’s all good.
When the editor is closed, the current version of the file will be backed up in public/backups/fileName-history/ with the current time in milliseconds as the file’s name. We’ll use the file’s name later in the front end, as you’ll see.
In this example, we’re replacing the previous backup every time we save a new one. How would you go about keeping more backups?
Fetching backups
We’ll need a way to get the backups for a particular file, so we’re adding a /backups route to handle this:
app.get("/backups", (req, res) => {
  const fileName = req.query.fileName;
  const backupsPath = path.join(__dirname, "public/backups", fileName + "-history");

  if (!fs.existsSync(backupsPath)) {
    return res.send([]);
  }

  const backupsPaths = fs.readdirSync(backupsPath);

  const fileNames = [];

  backupsPaths.forEach(filePath => {
    const fileName = path.basename(filePath);
    fileNames.push(fileName);
  });

  res.send(fileNames);
});
Here we’re making sure that the backup folder for that file exists, and returning an array of all the backup files in that folder. Yes, this will help you in your task of keeping more backups for a single file. I can’t keep doing all the work for you!
Opening a Document in the Browser
We’ll see how we can go about opening our documents to edit directly in the browser using OnlyOffice Docs.
First, we’ll create a simple HTML file:
<!DOCTYPE html>
<html>
<head>
<title>OnlyOffice Example</title>
<meta name="viewport" content="width=device-width, initial-scale=1.0, maximum-scale=1.0, user-scalable=0"/>
<link rel="stylesheet" href="/public/css/main.css">
</head>
<body>
<div id="placeholder"></div>
<div id="documents">
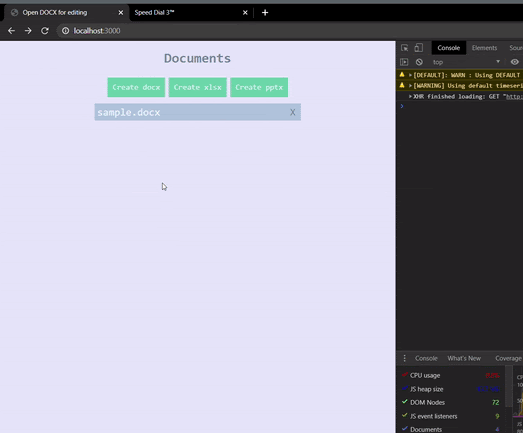
<h1>Documents</h1>
<div id="document-controls">
<div onclick="createDocument('.docx')">Create docx</div>
<div onclick="createDocument('.xlsx')">Create xlsx</div>
<div onclick="createDocument('.pptx')">Create pptx</div>
</div>
</div>
<script type="text/javascript" src="http://localhost:8080/web-apps/apps/api/documents/api.js"></script>
<script type="text/javascript" src="/public/javascript/main.js"></script>
</body>
</html>
As you can see, there’s not much to this file. We have the placeholder div where the editor will be attached. Then there’s the documents div, which contains the controls to create documents and a container for the list of file names.
Below that, we have the script with the JavaScript API for the Document Server. Keep in mind that you might have to replace the host with the location of your Document Server. If you installed it with the Docker command I gave you, you should be good to go.
Last but not least, there’s the script tag, where we import our front-end JavaScript, and the main.js file, where we’ll have global access to the DocsAPI object.
CSS
Before we get to coding, let’s wrap up the layout with some CSS to make our app more usable and less ugly. Add the following to main.css:
html,
body {
  font-family: monospace;
  height: 100%;
  margin: 0;
  background-color: lavender;
  color: aliceblue;
}

h1 {
  color: lightslategray;
  display: inline-block;
}

#placeholder {
  height: 100%;
}

#documents {
  text-align: center;
}

#document-controls {
  text-align: center;
  margin: 5px;
}

#document-controls>div {
  display: inline-block;
  font-size: 15px;
  cursor: pointer;
  padding: 10px;
  background: mediumaquamarine;
}

#documents-list {
  padding: 5px;
  max-width: 400px;
  margin: auto;
}

.document {
  cursor: pointer;
  font-size: 20px;
  text-align: left;
  padding: 5px;
  margin: 2px;
  background-color: lightsteelblue;
}

.delete-doc {
  color: lightslategray;
  float: right;
  margin: 0 5px 0 5px;
}
Showing available documents
With that out of the way, we’re ready to start coding the front end. We’ll start by listing the files in the documents folder. Go to the main.js and add the following code:
const params = new URLSearchParams(window.location.search);
const fileName = params.get("fileName");

if (fileName) {
  editDocument(fileName);
} else {
  listDocuments();
}

function listDocuments() {
  // Hide the editor placeholder
  document.getElementById("placeholder").style.display = "none";
  // Remove old list
  const oldList = document.getElementById("documents-list");
  oldList && oldList.remove();
  // Create new container
  const documentsHtml = document.getElementById("documents");
  const docsListHtml = document.createElement("div");
  docsListHtml.id = "documents-list";

  documentsHtml.appendChild(docsListHtml);

  const req = new XMLHttpRequest();

  req.addEventListener("load", function (evt) {
    const docs = JSON.parse(this.response);

    docs.forEach(doc => {
      addDocumentHtml(doc);
    });
  });

  req.open("GET", "/documents");
  req.send();
}

function addDocumentHtml(fileName) {
  const docsListHtml = document.getElementById("documents-list");

  const docElement = document.createElement("div");
  docElement.id = fileName;
  docElement.textContent = fileName;
  docElement.setAttribute("class", "document");

  docElement.onclick = () => {
    openDocument(fileName);
  }

  const deleteElement = document.createElement("span");
  deleteElement.textContent = "X";
  deleteElement.setAttribute("class", "delete-doc");

  deleteElement.onclick = evt => {
    evt.stopPropagation();
    evt.preventDefault();
    deleteDocument(fileName);
  }

  docElement.appendChild(deleteElement);
  docsListHtml.appendChild(docElement);
}

function openDocument(fileName) {
  const url = "/?fileName=" + fileName;
  open(url, "_blank");
}
Here at the top, we’re getting the query parameters to find out if we’re opening a file or not. If we are, we’ll call the editDocument function. Don’t worry, we’ll create that one later.
If we’re not opening a file, we want to show a list of the available files and the controls to create more. In listDocuments, we first make sure that we hide the placeholder and clear up the list to make sure we create it anew. Then we call the /documents route we created earlier to get all the files, iterate through them, and create the corresponding elements. We’ll identify each element with the filename as the ID. This way we can easily retrieve them later.
Notice that we’re calling the addDocumentHtml function, which we’ll reuse later to add new files.
For each of these documents, we’re also calling the openDocument, which we defined at the bottom, and on the cross symbol we’re calling the deleteDocument, which we’ll define next.
Deleting documents
To delete our documents, we’ll prompt the user if they’re sure before we go ahead and call the /delete route and go nuclear on that file. Instead of wasting another call to our API, we’re checking that the returned status is 200 to delete the DOM elements directly:
function deleteDocument(fileName) {
  const canContinue = confirm("Are you sure you want to delete " + fileName + "?");

  if (!canContinue) {
    return;
  }

  const req = new XMLHttpRequest();

  req.addEventListener("load", function (evt) {
    if (this.status === 200) {
      return removeDocumentHtml(fileName);
    }

    alert("Could not delete " + fileName);
  });

  req.open("DELETE", "/delete?fileName=" + fileName);
  req.send();
}

function removeDocumentHtml(fileName) {
  const el = document.getElementById(fileName);
  el && el.remove();
}
Create documents
Remember that function we were calling in the onclick of the document creation controls? Here you go:
function createDocument(extension) {
  const name = prompt("What's the name of your new document?");
  const fileName = name + "." + extension;

  const req = new XMLHttpRequest();

  req.addEventListener("load", function (evt) {
    if (this.status === 200) {
      addDocumentHtml(fileName);
      return;
    }

    alert("Could not create " + fileName);
  });

  req.open("POST", "/create?fileName=" + fileName);
  req.send();
}
Very simple. We prompt the name, call the /create route with that as the fileName parameter, and if the status comes back as 200 we call the addDocumentHtml to add the DOM elements directly.
Opening documents in OnlyOffice Docs
Now we need to define the editDocument function. Add the following code to main.js:
async function editDocument(fileName) {
  document.getElementById("documents").style.display = "none";

  const extension = fileName.substring(fileName.lastIndexOf(".") + 1);
  const documentType = getDocumentType(extension);
  const documentKey = await generateKey(fileName);

  console.log(documentKey);

  new DocsAPI.DocEditor("placeholder", {
    document: {
      fileType: extension,
      key: documentKey,
      title: fileName,
      url: "http://192.168.0.7:3000/documents/" + fileName,
    },
    documentType,
    editorConfig: {
      callbackUrl: "http://192.168.0.7:3000/track?fileName=" + fileName,
    },
    height: "100%",
    width: "100%",
  });
}

function generateKey(fileName) {
  return new Promise(resolve => {
    const req = new XMLHttpRequest();

    req.addEventListener("load", function (evt) {
      const backups = JSON.parse(this.response);
      const backupName = backups[0];
      const key = backupName ? backupName.substring(0, backupName.indexOf(".")) : new Date().getTime();
      resolve(String(key));
    });

    req.open("GET", "/backups?fileName=" + fileName);
    req.send();
  });
}

function getDocumentType(extension) {
  const documentTypes = {
    text: ["doc", "docx", "docm", "dot", "dotx", "dotm", "odt", "fodt", "ott", "rtf", "txt", "html", "htm", "mht", "pdf", "djvu", "fb2", "epub", "xps"],
    spreadsheet: ["xls", "xlsx", "xlsm", "xlt", "xltx", "xltm", "ods", "fods", "ots", "csv"],
    presentation: ["pps", "ppsx", "ppsm", "ppt", "pptx", "pptm", "pot", "potx", "potm", "odp", "fodp", "otp"],
  }

  if (documentTypes.text.indexOf(extension) >= 0) {
    return "text";
  }
  if (documentTypes.spreadsheet.indexOf(extension) >= 0) {
    return "spreadsheet";
  }
  if (documentTypes.presentation.indexOf(extension) >= 0) {
    return "presentation";
  }
}
So, we’ve added three functions. Let’s focus on the last two first. (We’ll talk about editDocument in a moment.)
The generateKey will also assist us by generating the key. This is a unique document identifier used for document recognition by the service. It can have a maximum length of 20 and no special characters. And here’s the trick: it has to be regenerated every time the document is saved. Do you see where this is going? Exactly! We’re going to profit from our backup file names to generate our keys.
As you can see, to generate the key we’re retrieving our only backup (if any) and using its name or otherwise simple getting the current time in milliseconds if there are none.
What would have to change in that function if you were to support more backups? [Runs away]
The getDocumentType will return either text, spreadsheet or presentation. OnlyOffice needs this to know which editor to open.
The editDocument is what we’re here for. This is what you’ve been waiting for all along. Here we instantiate the DocEditor object passing the ID of our placeholder div and an object with a bunch of configurations.
DocEditor configuration
What I’ve shown you so far are the minimum required options to instantiate the DocEditor. You should check out the Advanced Parameters section in the docs to see how you can profit from all the different options. In the meantime, let me take you through the fundamentals.
At the top, we have the document field which takes an object containing the information regarding the document that we want to open.
Then we have the documentType, which, as we saw earlier, can be either text, spreadsheet, or presentation.
Right below that is the editorConfig object, which lets you set things like spellcheck, unit and zoom, among other things. In this case, we’re just using the callbackUrl, which is the URL to the /track route that the Document Server will use to save the file.
Conclusion
We’ve reached the end, and you’ve hopefully learned how to set up and integrate OnlyOffice Docs with your web app. There’s a lot we’re leaving out, like permissions, sharing, customization and a lot of other things that you can do with OnlyOffice.
I hope you’ve got enough information to keep improving your product, or maybe even inspiration to start a new project from scratch. There’s no time like the present.
Alright, I’ll see you in the next one. In the meantime, keep coding and remember to have fun while you’re at it!
Frequently Asked Questions (FAQs) about Adding Office Functionality to Your Web App with ONLYOFFICE
How can I integrate ONLYOFFICE into my existing web application?
Integrating ONLYOFFICE into your existing web application involves a few steps. First, you need to install the ONLYOFFICE Document Server, which is the core of ONLYOFFICE. This can be done using Docker, which is the recommended method, or manually. Once the Document Server is installed, you can use the ONLYOFFICE API to integrate it into your web application. The API provides a set of methods for working with documents, spreadsheets, and presentations. You can use these methods to open, edit, and save documents in your web application.
What are the benefits of using ONLYOFFICE in my web application?
ONLYOFFICE provides several benefits for web applications. It allows users to create, view, and edit documents directly in the application, without needing to download them or use a separate program. This can greatly improve the user experience and productivity. ONLYOFFICE also supports real-time collaboration, allowing multiple users to work on the same document simultaneously. Furthermore, ONLYOFFICE supports a wide range of document formats, including Microsoft Office formats and OpenDocument formats.
Can I use ONLYOFFICE with React?
Yes, ONLYOFFICE can be used with React. The ONLYOFFICE API provides a React component that you can use to integrate ONLYOFFICE into your React application. This component provides a set of props and methods for working with documents. You can use these props and methods to open, edit, and save documents in your React application.
How can I customize the ONLYOFFICE interface?
The ONLYOFFICE interface can be customized using the customization object provided by the ONLYOFFICE API. This object allows you to change the appearance and behavior of the ONLYOFFICE interface. For example, you can change the color scheme, hide or show certain buttons, and enable or disable certain features.
Is ONLYOFFICE secure?
Yes, ONLYOFFICE is designed with security in mind. It uses SSL encryption to protect data in transit, and it allows you to control who has access to your documents. Furthermore, ONLYOFFICE is open source, which means its code is publicly available for review and scrutiny.
Does ONLYOFFICE support real-time collaboration?
Yes, ONLYOFFICE supports real-time collaboration. This means that multiple users can work on the same document simultaneously, seeing each other’s changes in real time. This can greatly improve teamwork and productivity.
Can I use ONLYOFFICE with other JavaScript frameworks?
Yes, ONLYOFFICE can be used with other JavaScript frameworks, such as Angular and Vue. The ONLYOFFICE API provides components for these frameworks, allowing you to integrate ONLYOFFICE into your Angular or Vue application.
What types of documents can I work with in ONLYOFFICE?
ONLYOFFICE supports a wide range of document formats, including Microsoft Office formats (such as .docx, .xlsx, and .pptx) and OpenDocument formats (such as .odt, .ods, and .odp). It also supports other formats, such as .txt and .csv.
Can I use ONLYOFFICE on mobile devices?
Yes, ONLYOFFICE is responsive and can be used on mobile devices. This means that users can create, view, and edit documents on their smartphones or tablets, providing a seamless experience across devices.
Is there a community for ONLYOFFICE developers?
Yes, there is a community for ONLYOFFICE developers. This community provides a forum for developers to ask questions, share tips and tricks, and collaborate on projects. It’s a great resource for anyone developing with ONLYOFFICE.