7 Photoshop Master Tips to Boost Your Productivity

Key Takeaways
- Maximizing the performance and usability of Photoshop involves tweaking preferences, using different workspaces for various tasks, customizing default menus, and organizing layers effectively.
- Layer Comps can be used to version files, allowing multiple versions of a document to be maintained in a single file. This is especially useful for managing alternative layouts or different design states.
- Always work in a nondestructive way to ensure changes can be made while keeping the original image data intact. This can be achieved through the use of Adjustment Layers and Smart Objects.
- Utilize Photoshop presets to save time and ensure consistency, such as Document Presets for frequently used document types, Tool and Brush Presets for specific tool options, Swatches for color libraries, and Styles for layer effects.
There are literally millions of Photoshop users out there, but how many of them use the application at its full potential? Maybe 10%? Less that 5%?
Lots of users learn enough Photoshop to get by and never go beyond that limit. Even sometimes after years of working with the program, they still work like hobbyists. Once they’re used to work in such a way, it’s hard for the bad habits to be broken.
If you want to master Photoshop, it helps to establish good habits and good processes as early as possible. The tips below are designed to help you in this undertaking. Most of them do require initial extra time and efforts, but the benefits you’ll gain in the long run are definitely worth it.
For the sake of brevity, I’ll mostly talk about broad approaches to working more efficiently with Photoshop, rather than detailed instructions. For step-by-step breakdowns of each task, consult the Photoshop’s documentation or you can search the Web for practical solutions and tutorials.
1. Tweak Your Preferences for Maximum Performance and Usability
Taking ownership of Photoshop’s preferences is a boring but indispensable job if you plan to use the program optimally. Photoshop demands an enormous amount of computer resources, especially when working on large documents or you have opened multiple files.
If the program is poorly optimized, your workflow will be drastically slowed down. In contrast, properly set Photoshop preferences lead to faster performance, which means that you’ll accomplish your tasks with a greater speed and less headache.
Let’s see what the most crucial performance preferences are and how to adjust them:
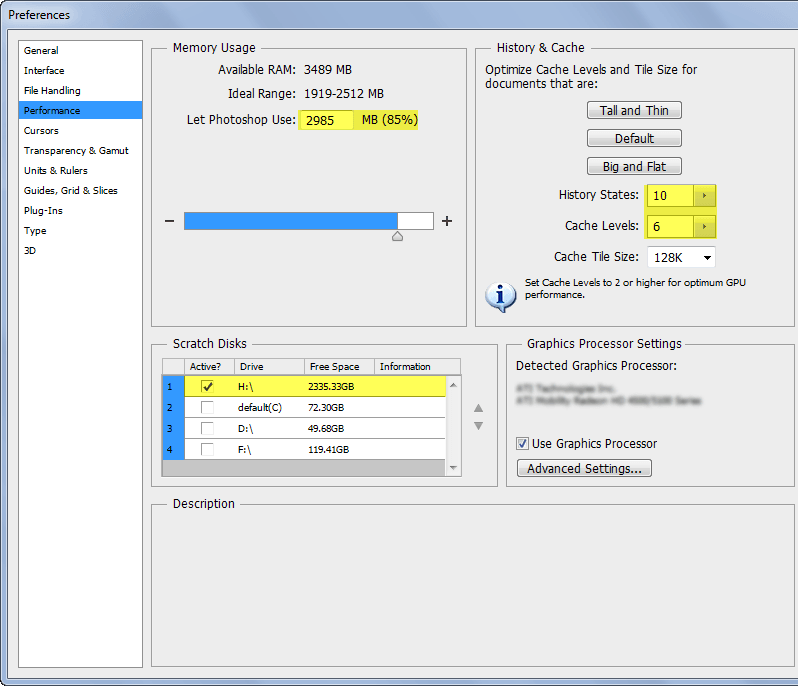
- Reduce the number of History States. History States designate for how many undos are available. Having many undo states might be good for you but it slow down the application performance. Increasing the number of History States means Photoshop uses bigger amount of RAM to manage the History panel.
- Tweak the number of Cache Levels. Image caching helps Photoshop to redraw heavy, high-resolution images faster. It uses low-resolution versions of images to update the image more quickly. When you’re working on high-resolution images or large documents, more Cache Levels (6 is good) will speed up the redraw process. On the other hand, when you’re working on smaller documents you might need lowering the Cache Levels (2 is good), thus freeing more RAM and making Photoshop operates faster.
- Set the proper Scratch Disks. I already told you that Photoshop is a resources eating beast. It uses not only the available RAM but also the free space on any available hard drive referred to as a Scratch Disk. By default Photoshop uses your primary hard drive as a scratch disk. But if you have additional drives you can use them instead. This will prevent damaging your boot drive and will increase the processing speed of Photoshop. For the best results, you should select a hard drive different from the one containing the image file you’re working on and with plenty of free space.
- Give Photoshop more RAM to operate on. Photoshop’s favorite meal is RAM and its main motto: “The more RAM, the better.” You can satisfy these Photoshop needs by increasing the amount of RAM the application is allowed to use. If you don’t use too many programs opened you can safely set higher value (for example, 85%). But if you use Photoshop along with other applications (browser, word processor, Skype, etc.) make sure there is enough memory for them too. After all they are also hungry.
To insure that all of the above settings have taken affect you must restart Photoshop.
The performance is the first thing you should improve but there are also many usability preferences, which you can tweak to make using the program more comfortable. Bear in mind that not everyone agrees with the same usability settings, so you’ll need to customize them to satisfy your own taste. This will make your workflow smoother and enjoyable.
2. Use Different Workspaces for Different Types of Tasks
Specific tasks require specific workspaces. Using one and the same workspace for every task you perform is simply not productive. Professional photographers have many different lenses and filters for use in different situations. They might still get the job done shooting with just one lens but the quality of the final result will suffer.
In the case of Photoshop, the quality may well be the same, but the amount of time spent by you will be way much longer.
Instead of re-designing your workspace every time you switch to a different task or project, it’s far better to create your own specific task-oriented workspaces to use when needed.
Photoshop provides several default workspaces, such as Painting, Photography, and Typography. They are good for a quick start, but customizing workspaces to fit your personal and project needs can further improve and speed up your workflow.
A productive workspace should have all tools and panels you are likely to use while working on a particular task. All unnecessary or distracting stuff should be removed.
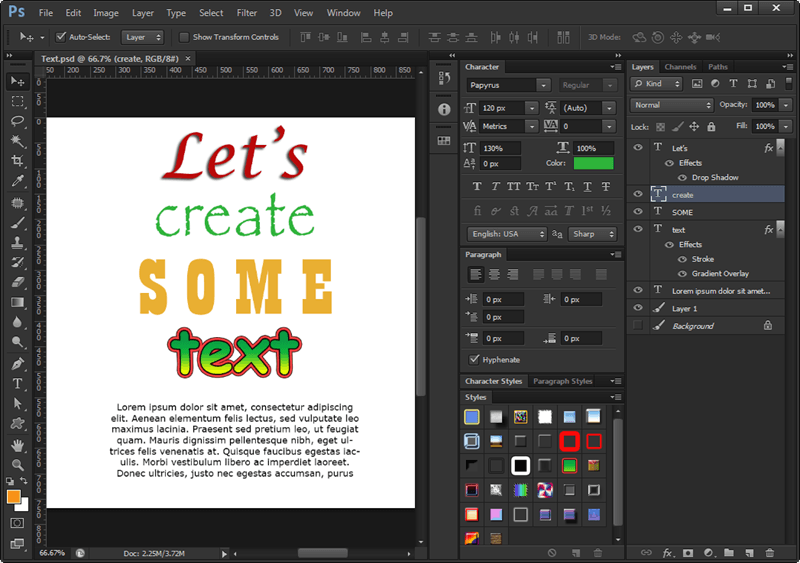
For example, if you design a lot of text-heavy illustrations, you would need the Character and Paragraph panels, but you’re far less likely to need the Histogram panel. Here is an example of a workspace fine-tuned for text editing:
3. Customize Photoshop’s Default Menus
In his 2004 book “The Paradox of Choice”, Barry Schwartz shows us how having too many ‘choices’ becomes debilitating–even paralyzing–to shoppers. A similar effect applies to Photoshop users.
Customizing Photoshop’s default menus may not seems a big deal, but if your aim is maximum performance and usability you should do it. There are hundreds of options in the menus and it costs time to navigate through them.
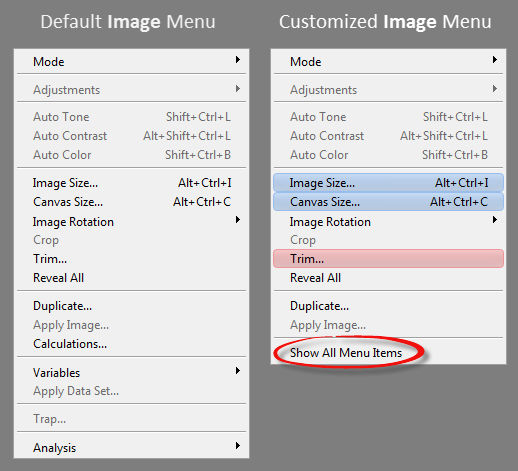
So, if you don’t want or need to see certain menu items for particular workspace, you can turn their visibility off, thus making the menus more compact.
For quicker navigation you can also highlight certain menu items with specific color. A colored menu item is far easier to spot, rather than a regular one.
4. Get the Habit to Name and Organize Your Layers Properly
Layers are the “soul” of Photoshop and every other graphics editor–in fact it’s hard to imagine the product without layers. As such it’s important to master good layer management.
We’ve all had that friend who allows hundreds of files to accumulate on their desktop. Don’t be that guy with Photoshop layers, and instead get into the habit of naming and organizing files as soon as you create them.
Even with Photoshop’s improved layers searching capability don’t get you off the hook. The searching and filtering options only work if your layers are sensibly named and organized.
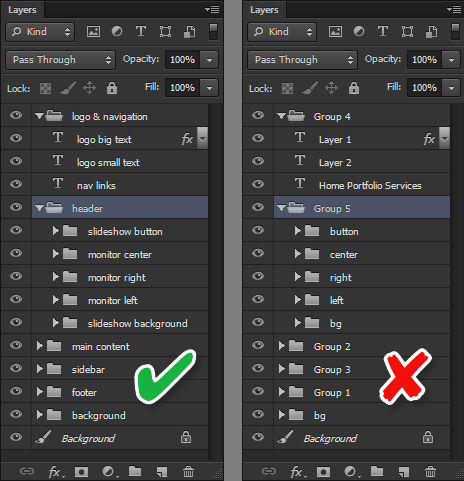
You can think of layers panel as a tree representing a file system. Layers are files, and layer groups are folders. To keep everything in order, group related layers, thus making easier to find and manage them.
Also always give meaningful names to both layers and layer groups. Unless you have mind-readers as work colleagues, no-one else will be able to guess what ‘Layer 1’ or ‘Group 3’ means.
For example, when designing a website, you can put its different sections, such as ‘header’, ‘sidebar’, ‘footer’, and so on, in their own layer group. This allows for quick navigation between the website sections and gives you control over all layers within a particular group at once.
When you select a group you can manipulate all containing layers as one unit. Layer groups can also be nested which further facilitate their management.
5. Versioning Your Files with Layer Comps
A ‘Layer Comp’ is a snapshot of the current state of the Layers panel. Layer comps allow you to maintain multiple “versions” of your document in a single file. This is perfectly suited for managing alternative layouts of your design or in every situation where different states are involved.
For example, if your design have two themes, dark and light, you can take snapshots for both of them. Thus you can easily preview them and export two completely different files without extra work.
This graphic shows the same design project with two different ‘Layer Comps’
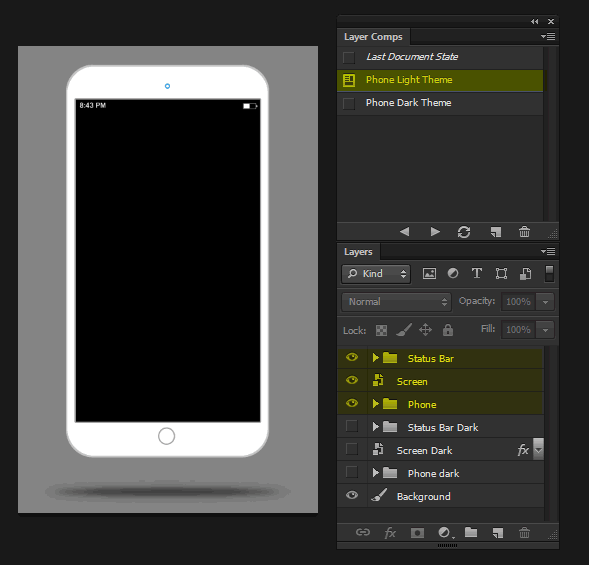
As you can see, swapping between the two versions of this file is an one-click operation.
6. Always Work in a Nondestructive Way
Making mistakes is a part of our nature. We just need to ensure our mistakes are recoverable.
Working in a nondestructive way allows us to make changes to images while keeping the original image data intact. Thus, we can do the most venturous experiments without worrying about damaging the original image.
The two the most significant ways to perform nondestructive editing involve the use of:
- Adjustment Layers. Adjustment layers allow you to use as many adjustments as you wish without actually applying them to the original image. They work as a preview of the final result. If you don’t like it just go back and change it again until you’re completely satisfied. It’s that easy.
- Smart Objects. A Smart Object keeps the source data safe and provides you with a representation of the image to work with. It can be freely modified without ever losing the original image data.
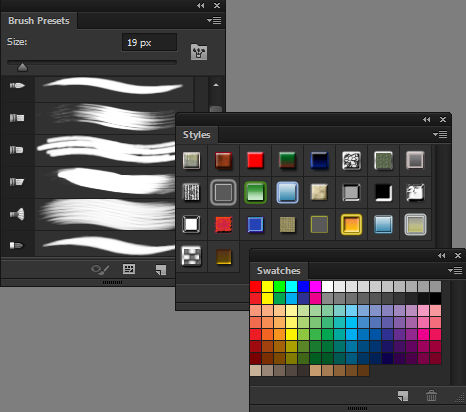
7. Make Use of Photoshop Presets
Photoshop offers many types of presets you can use to save time by following the DRY principle. Take the time to set something up the right way the first time, then reap the rewards going forward.
Here are the most important of them:
- Document Presets. If you end up creating one and the same type of document over and over again, for example, a website design or a logo, you can save its generic settings as a preset. Thus, there won’t be needed to specify them manually each time when you start a new project.
- Tool and Brush Presets. If you spend the time to set particular tool’s options, then saving them as presets is a good idea. Otherwise you’ll need to set them every single time, when you need to use the tool with the same options.
- Swatches. Choosing the right colors (for logo, brand, etc.) can be a time consuming process and once you end up with the right ones, you can do yourself a big favor by saving them as a library of color swatches in the Swatches panel. This is particularly useful for company colors and corporate style guides.
- Styles. Often when you create buttons or similar components in Photoshop, you take advantage of layer styles. A button may contain a subtle drop shadow, a gradient overlay, a stroke, and so on. We’re all familiar with the advantages stating a class once in CSS and re-using it many times. Use the same approach with layer styles. For that reason you should save the combination of applied effects as a new style in the Styles panel, giving your designs a consistent look and feel and making the future use of it a breeze.
Summary
It’s said that with great power comes great responsibility. Photoshop is a very powerful application and the responsibility to use it correctly and effectively is all ours.
If we resist making our life easier, by not following the above battle proven tips, then we’ll bear the consequences – slow and ineffective workflow, and many hours of lost time.
Frequently Asked Questions (FAQs) about Photoshop Tips and Tricks
How can I improve my productivity while using Photoshop?
Improving productivity in Photoshop involves mastering shortcuts, using the right tools, and understanding the software’s features. For instance, you can use the ‘Alt’ key to duplicate layers, use the ‘Ctrl’ key to select multiple layers, and use the ‘Shift’ key to select a range of layers. Additionally, you can use the ‘Tab’ key to hide or show the toolbar and panels, and the ‘F’ key to switch between screen modes.
What are some essential Photoshop tips for beginners?
For beginners, understanding the basics such as layers, masks, and brushes is crucial. Additionally, learning how to use the clone stamp tool, healing brush, and patch tool can be beneficial. It’s also important to familiarize yourself with the different blending modes and how to use adjustment layers for non-destructive editing.
How can I effectively use layers in Photoshop?
Layers are a fundamental aspect of Photoshop. They allow you to work on different parts of an image without affecting others. You can create a new layer by clicking on the ‘New Layer’ icon at the bottom of the layers panel. To organize your layers, you can group them by selecting the layers you want to group and pressing ‘Ctrl + G’.
What are some advanced Photoshop tips?
Advanced Photoshop tips include using the Pen tool for precise selections, using the Curves adjustment for advanced color correction, and using Smart Objects for non-destructive transformations. Additionally, you can use the Channels panel to make complex selections and the History panel to undo multiple steps.
How can I use Photoshop for graphic design?
Photoshop is a versatile tool for graphic design. You can use it to create logos, design website layouts, create social media graphics, and much more. It’s important to understand the principles of design such as balance, contrast, and hierarchy, and how to apply them in Photoshop.
How can I use Photoshop for photo editing?
Photoshop offers a wide range of tools for photo editing. You can use it to correct exposure, enhance colors, remove unwanted objects, retouch portraits, and much more. The key is to understand the different tools and how to use them effectively.
What are some common Photoshop mistakes to avoid?
Some common mistakes include over-editing photos, not using layers, and not saving your work regularly. It’s also important to avoid destructive editing by always working on a copy of your original image and using adjustment layers whenever possible.
How can I learn Photoshop quickly?
The best way to learn Photoshop quickly is through practice. Start with the basics and gradually move on to more advanced techniques. Online tutorials, courses, and forums can be very helpful.
How can I use Photoshop for digital painting?
Photoshop offers a variety of brushes and tools for digital painting. You can use the Brush tool for painting, the Mixer Brush tool for blending colors, and the Smudge tool for creating smudge effects. It’s also important to understand how to use layers and blending modes in your digital paintings.
How can I optimize Photoshop for better performance?
To optimize Photoshop for better performance, you can increase the amount of RAM allocated to Photoshop, set the scratch disk to a drive with plenty of free space, reduce the number of history states, and turn off the auto-recovery feature.
I am a web developer/designer from Bulgaria. My favorite web technologies include SVG, HTML, CSS, Tailwind, JavaScript, Node, Vue, and React. When I'm not programming the Web, I love to program my own reality ;)


Published in
·Canvas & SVG·Design·Design & UX·HTML·HTML & CSS·Illustration·UI Design·September 16, 2015

Published in
·Design·Design & UX·Photography & Imagery·Photoshop·Resources·Review·Typography·UI Design·September 5, 2017

Published in
·Accessibility·Community·Computer science·Debugging·Design·Design & UX·Programming·Software·Software·Software Development·Web·January 28, 2015