

Key Takeaways
- Begin by launching Visual Web Developer and creating a new ASP.NET Web Site project, choosing your preferred programming language (C# or VB.NET) and specifying a file location.
- Understand the structure of the newly created project, which includes various folders like App_Data, Scripts, and Styles, and files like Default.aspx and Web.config.
- Learn to modify the Default.aspx page by editing its HTML source to include dynamic content such as the current time using a Web Server Control like ``.
- Familiarize yourself with the process of debugging and running your ASP.NET page within Visual Web Developer, ensuring that script debugging is enabled in your browser settings.
- Explore the basics of handling server-side code and event handling in ASP.NET, using either C# or VB.NET, to display dynamic content on your web page.
This is an excerpt from our latest book, Build Your Own ASP.NET 4 Website Using C# & VB by Cristian Darie, Wyatt Barnett & Tim Posey.
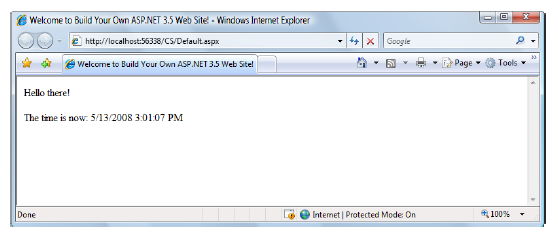
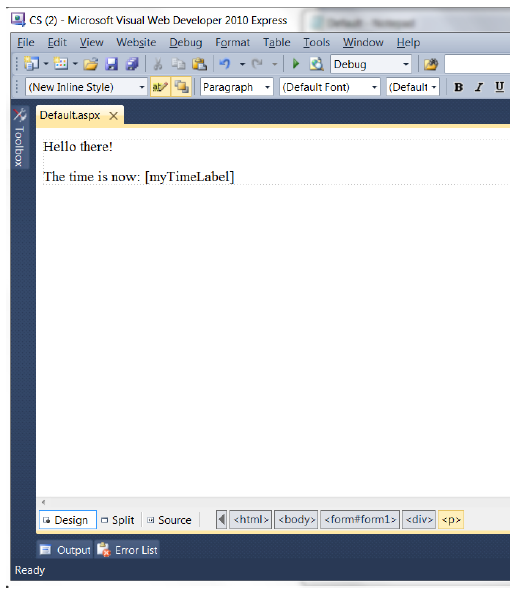
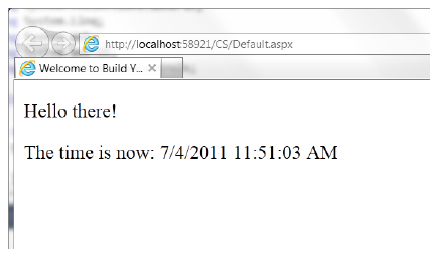
For your first ASP.NET exercise, we’ll create the simple example shown in Figure 1.7. We’ll go though the process of creating this page step by step.
To create this page in Visual Web Developer, you’ll need to follow a few simple steps:
- Start Visual Web Developer, and choose File > New Web Site (or hit the default keyboard shortcut, Shift+Alt+N).
- Choose ASP.NET Web Site for the template and File System for the location type. This location type tells Visual Web Developer to create the project in a physical folder on your disk, and execute that project using the integrated web server.
- Choose the language in which you prefer to code your pages. Although ASP.NET allows you to code different pages inside a project in different languages, for the sake of simplicity we’ll generally assume you work with a single language.
- If you chose C# for the language, type C:LearningASPCS for the folder location where you want to store the files for this exercise. If you prefer VB.NET, choose C:LearningASPVB. You can choose any location you like. Figure 1.8 shows the C# version of the selection.
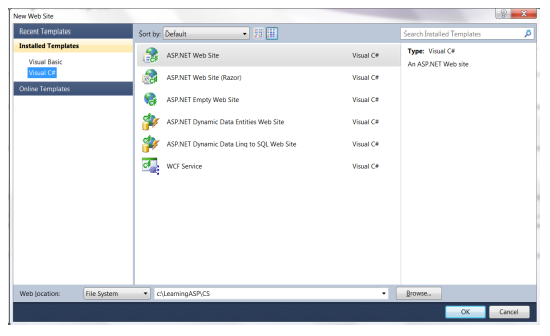 Figure 1.8. Starting a new ASP.NET Web Site project with Visual Web Developer
 - After clicking OK, VisualWeb Developer will create the project along with several files to ease your transition into the ASP.NET development world. Your project will also come with a Site.master file, which represents a template applied to your entire site automatically.
Your Project contains an empty App_Data folder, a Scripts folder which includes jQuery files, Styles which contains a basic Site.css stylesheet, a basic Default.aspx file, and a basic configuration file,Web.config—see Figure 1.9.
We will discuss all of these files in Chapter 5, along with the purpose of the Account directory in detail. For now, let’s jump right in to create our first ASP.NET web page.
You may notice that the HTML source is different than standard HTML. This is normal. You should also notice that there are two content areas one for “Header Content” and one for “Main Content”. Again, we will discuss templating and Master Pages in just a bit, but let’s get immediately going. To do so, we can just overwrite the sample file provided to us.
The main panel in the Visual Web Developer interface is the page editor, in which you’ll see the HTML source of the Default.aspx web page. Edit the title of the page to something more specific than Home Page, such as Welcome to Build Your Own ASP.NET 4 Website!:
<html xmlns="https://www.w3.org/1999/xhtml">

    <head runat="server">

        <title>Welcome to Build Your Own ASP.NET 4 Website!

        </title>

    </head>
Loading the Default.aspx page in a web browser now opens the sample page that was created when VisualWeb Developer created the project; this makes sense, since we didn’t add any content to this page! Because we don’t care for any of the sample page, we will simply modify the entire source code for the default.aspx page as follows:
    <body>

        <form id="form1" runat="server">

        <div>

            <p>Hello there!</p>

            <p>

              The time is now:

              <asp:Label ID="myTimeLabel" runat="server" />

            </p>

        </div>

        </form>

    </body>

</html>
Although our little page isn’t yet finished (our work with the Label control isn’t over), let’s execute the page to ensure we’re on the right track. Hit F5 or go to Debug menu.
You’ve just added aWeb Server Control to the page by adding an <asp:Label/> element to the page. You’ll learn all about Web Server Controls in Chapter 2, but for now you need to learn how this simple control works so that you can understand the exercise.
The Label control is one of the simplest controls in .NET, which lets you insert dynamic content into the page. The asp: part of the tag name identifies it as a built-in ASP.NET tag. ASP.NET comes with numerous built-in tags, and <asp:Label/> is probably one of the most frequently used.
The runat="server" attribute value identifies the tag as something that needs to be handled on the server. In other words, the web browser will never see the <asp:Label/> tag; when the page is requested by the client, ASP.NET sees it and converts it to regular HTML tags before the page is sent to the browser. It’s up to us to write the code that will tell ASP.NET to replace this particular tag with something meaningful to the user loading the page.
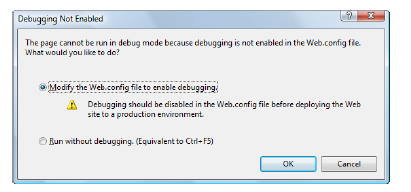
The first time you do this, VisualWeb Developer will let you know that your project isn’t configured for debugging, and it’ll offer to make the necessary change to the configuration (Web.config) file for you—see Figure 1.10. Confirm the change by clicking OK.
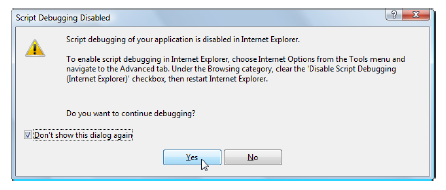
If Script Debugging is not enabled in Internet Explorer, you’ll get the dialog shown in Figure 1.11. Check the Don’t show this dialog again checkbox, and click Yes.
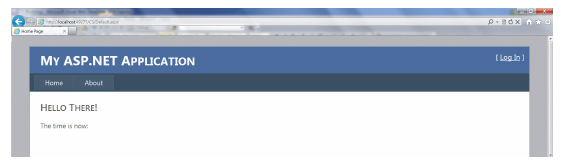
After all the notifications are out of the way, you should have a page like that in Figure 1.12:

You can now close the Internet Explorer window. Visual Web Developer will automatically detect this action and will cancel debugging mode, allowing you to start editing the project again. Now let’s do something with that Label control.
For our first dynamic web page using ASP.NET, let’s write some code that will display the current time inside the Label control. That mightn’t sound very exciting,but it’s only for the purposes of this simple demonstration; don’t worry, we’ll reach the good stuff before too long. To programmatically manipulate the Label control, you’ll have to write some C# or VB.NET code, depending on the language you’ve chosen when creating the project. As suggested earlier in this chapter, ASP.NET allows web forms (.aspx pages) to contain C# or VB.NET code, or they can use separate files—named code-behind files—for storing this code. The Default.aspx file that was generated for you when creating the project was generated with a codebehind file, and we want to edit that file now. There are many ways in which you can open that file. You can click the View Code icon at the top of the Solution Explorer window, right-click the Default.aspx file in Solution Explorer and choose View Code, or click the + symbol to expand the Default.aspx entry. No matter how you open this file, it should look like Figure 1.13 if you’re using C#, or Figure 1.14 if you’re using VB.NET.
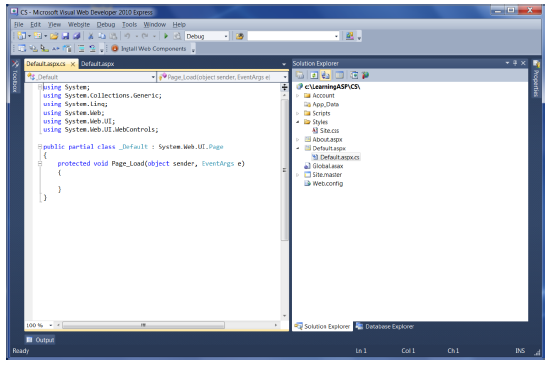
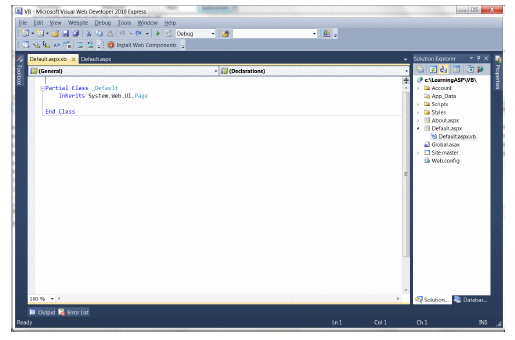
Looking at Figure 1.13 and Figure 1.14 you can see that the C# version contains a definition for a method called Page_Load, while the VB.NET version doesn’t. This is the method that executes automatically when the project is executed, and we want to use it to write the code that will display the current time inside the Label control.
If you’re using VB.NET, you’ll need to generate the Page_Load method first. The easiest way to have Visual Web Developer generate Page_Load for you is to open Default.aspx—not its code-behind file—and switch to Design view (as shown in Figure 1.15). If you double-click on an empty place on the form, an empty Page_Load method will be created in the code-behind file for Default.aspx.
Now edit the Page_Load method so that it looks like this, selecting the version that applies to your chosen language:
Inherits System.Web.UI.Page
Protected Sub Page_Load(ByVal sender As Object,
➥ ByVal e As System.EventArgs)
Handles Me.Load
myTimeLabel.Text = DateTime.Now.ToString()
End Sub
End Class
{
protected void Page_Load(object sender, EventArgs e)
{
myTimeLabel.Text = DateTime.Now.ToString();
}
}
If you’ve never done any server-side programming before, the code may look a little scary. But before we analyze it in detail, let’s load the page and test that it works for real. To see your dynamically generated web page content in all its glory, hit F5 to execute the project again, and see the current date and time, as depicted in Figure 1.16.
Both versions of the page achieve exactly the same thing. You can even save them both, giving each a different filename, and test them separately. Alternatively, you can create two Visual Web Developer projects—one for C# code, in C:LearningASPCS, and one for VB.NET code, in C:LearningASPVB.
So how does the code work? Let’s break down some of the elements that make up the page. We’re defining a method called Page_Load, in both languages:
➥ ByVal e As System.EventArgs)
Handles Me.Load
{
I won’t go into too much detail here. For now, all you need to know is that you can write script fragments that are run in response to different events, such as a button being clicked or an item being selected from a drop-down. What the first line of code basically says is, “execute the following script whenever the page is loaded.”
Note that C# groups code into blocks with curly braces ({ and }), while Visual Basic uses statements such as End Sub to mark the end of a particular code sequence. So, the curly brace ({) in the C# code above marks the start of the script that will be executed when the page loads for the first time.
Here’s the line that actually displays the time on the page:
As you can see, these .NET languages have much in common, because they’re both built on the .NET Framework. In fact, the only difference between the ways the two languages handle the above line is that C# ends lines of code with a semicolon (;).
In plain English, here’s what this line says:
Note that myTimeLabel is the value we gave for the id attribute of the <asp:Label/> tag where we want to show the time. So, myTimeLabel.Text, or the Text property of myTimeLabel, refers to the text that will be displayed by the tag. DateTime is a class that’s built into the .NET Framework; it lets you perform all sorts of useful functions with dates and times. The .NET Framework has thousands of these classes, which do countless handy things. The classes are collectively known as the .NET Framework Class Library.
The DateTime class has a property called Now, which returns the current date and time. This Now property has a method called ToString, which expresses that date and time as text (a segment of text is called a string in programming circles). Classes, properties, and methods: these are all important words in the vocabulary of any programmer, and we’ll discuss them in more detail a little later in the book. For now, all you need to take away from this discussion is that DateTime.Now.To-String() will give you the current date and time as a text string, which you can then tell your <asp:Label/> tag to display.
The rest of the script block simply ties up loose ends. The End Sub in the VB code, and the } in the C# code, mark the end of the script that’s to be run when the page is loaded:
One final thing that’s worth investigating is the code that ASP.NET generated for you. It’s clear by now that your web browser receives only HTML (no server-side code!), so what kind of HTML was generated for that label? The answer is easy to find!With the page displayed in your browser, you can use the browser’s View Source feature to view the page’s HTML code. In the middle of the source, you’ll see something like this:
<!DOCTYPE html PUBLIC "-//W3C//DTD XHTML 1.0 Transitional//EN"
   "https://www.w3.org/TR/xhtml1/DTD/xhtml1-transitional.dtd">

<html xmlns="https://www.w3.org/1999/xhtml">

    <head>

        <title>

          Welcome to Build Your Own ASP.NET 4 Web Site!

        </title>

    </head>

    <body>

        <form name="form1" method="post" action="Default.aspx" id="form1">

        <div>

          <input type="hidden" name="__VIEWSTATE" id="__VIEWSTATE" value="…" />

        </div>

        <div>

          <p>Hello there!</p>

          <p>

            The time is now:

            <span id="myTimeLabel">5/13/2008 3:10:38 PM</span>

          </p>

        </div>

        </form>

    </body>

</html>
Notice that all the ASP.NET code has gone? Even the <asp:Label/>; tag has been replaced by a <span> tag (which has the same id attribute as the <asp:Label/> tag we used) that contains the date and time. There’s a mysterious hidden input element named __VIEWSTATE that is used by ASP.NET for certain purposes, but we’ll ignore it for now. (Don’t worry, we’ll discuss it a bit later in the book!)
That’s how ASP.NET works. From the web browser’s point of view, there’s nothing special about an ASP.NET page; it’s just plain HTML like any other. All the ASP.NET code is run by your web server and converted to plain HTML that’s sent to the browser. So far, so good, but the example above was fairly simple. The next chapter will be a bit more challenging as we investigate some valuable programming concepts.
Getting Help
As you develop ASP.NET web applications, you’ll undoubtedly have questions that need answers, and problems that need to be solved. Help is at hand—Microsoft has developed the ASP.NET support website. This portal provides useful information for the ASP.NET community, such as news, downloads, articles, and discussion forums. You can also ask questions of the experienced community members in the Forums.
Summary
In this chapter, you learned about .NET, including the benefits of ASP.NET, and that it’s a part of the .NET Framework. First, we covered the components of ASP.NET. Then we explored the software that’s required not only to use this book, but also in order to progress with ASP.NET development.
You’ve gained a solid foundation in the basics of ASP.NET. The next chapter will build on this knowledge as we begin to introduce you to ASP.NET in more detail, covering page structure, the languages that you can use, various programming concepts, and the finer points of form processing.
Like this? Take a look at the book: Build Your Own ASP.NET 4 Website Using C# & VB.
Frequently Asked Questions (FAQs) about Writing Your First ASP.NET Page
What is the basic structure of an ASP.NET page?
An ASP.NET page is composed of two parts: the visual part, which is the HTML content, and the logic part, which is written in a .NET language like C# or VB.NET. The HTML part includes elements like text boxes, buttons, and labels, while the logic part handles events like button clicks and page loads. The logic part is enclosed in a script tag with runat=”server” attribute.
How do I create a simple ASP.NET web form?
To create a simple ASP.NET web form, you need to create a new .aspx file in your project. This file will contain the HTML and server-side code for your form. You can add controls like text boxes and buttons to the form using the Toolbox in Visual Studio. To handle events like button clicks, you can write server-side code in the .aspx.cs or .aspx.vb file associated with the form.
How do I run an ASP.NET page?
To run an ASP.NET page, you need to have a web server that can process ASP.NET pages. If you’re using Visual Studio, you can use the built-in IIS Express web server. To run the page, simply press F5 or click the “Start Debugging” button in Visual Studio. The page will open in your default web browser.
How do I handle events in ASP.NET?
In ASP.NET, you can handle events like button clicks and page loads by writing server-side code. This code is usually written in a .NET language like C# or VB.NET. For example, to handle a button click event, you can write a method in the .aspx.cs or .aspx.vb file and associate it with the button’s Click event.
What is the difference between ASP.NET Web Forms and ASP.NET MVC?
ASP.NET Web Forms and ASP.NET MVC are two different frameworks for building web applications in ASP.NET. Web Forms uses a page-based approach, where each page in the application is a separate .aspx file with its own HTML and server-side code. MVC, on the other hand, uses a model-view-controller approach, where the application is divided into models, views, and controllers.
How do I use data binding in ASP.NET?
Data binding in ASP.NET allows you to connect your web controls to a data source, such as a database or an XML file. You can use data binding to display data in controls like grids and lists, or to get and set values in input controls like text boxes and drop-down lists.
How do I debug an ASP.NET page?
Debugging an ASP.NET page is similar to debugging any other .NET application. You can set breakpoints in your server-side code, and when you run the page in debug mode, the execution will stop at the breakpoints. You can then inspect the values of variables and expressions in the Debug window.
How do I deploy an ASP.NET application?
To deploy an ASP.NET application, you need to copy the application’s files to a web server that can process ASP.NET pages. You can do this manually, or you can use a tool like Web Deploy, which can automate the deployment process.
How do I handle errors in ASP.NET?
ASP.NET provides several ways to handle errors. You can use try-catch blocks to handle exceptions, or you can use the Application_Error event in the Global.asax file to handle all unhandled exceptions. You can also use the customErrors section in the web.config file to specify custom error pages.
How do I secure an ASP.NET application?
ASP.NET provides several features to help you secure your application. You can use forms authentication to protect certain pages or the entire application. You can also use the ASP.NET membership system to manage users and roles. In addition, you can use the ValidateRequest and Encode methods to protect against cross-site scripting (XSS) attacks.

