
Key Takeaways
- Utilize Jade, a Node.js templating language, to create dynamic and reusable HTML documents efficiently, adhering to the DRY (Don’t Repeat Yourself) principle.
- Implement Grunt, a task runner, to automate repetitive tasks such as compiling Jade into HTML, enhancing productivity in web development workflows.
- Set up your environment by installing Node.js, Jade, and Grunt CLI, followed by creating a `package.json` to manage project dependencies.
- Leverage Jade’s inheritance features like blocks and extends to write modular and maintainable code, reducing redundancy across web pages.
- Pass JSON data to Jade templates using Grunt to dynamically generate HTML content, streamlining the process of updating web pages with new data.
Whenever we talk about building a web application, we need to talk about language preprocessors (transforming source code written in a particular language to target code in a native language). Often you’ll find yourself using languages that aren’t natively supported by web browsers because they help you wrap away repetitive work by providing features not available in plain HTML (e.g. Jade), CSS (e.g. Sass) and JavaScript (e.g. CoffeeScript).
An HTML template engine is a preprocessor that gives us the ability to write dynamic and reusable HTML documents that follows the (DRY) principle of application design.
Jade is an open source HTML templating language for Node.js (server-side JavaScript). Jade is totally free to use and provides fast, easy, and fun HTML. It is heavily influenced by Haml, and it was originally created in Node as a module. It typically includes features common to most high-level programming languages, with an emphasis on processing plain text.
When using modern CSS frameworks like Bootstrap and Foundation, most of the development becomes entirely about producing HTML, which brings out the power of Jade. Once you start using it, it’ll become an indispensable tool for you.
In this tutorial I am going to introduce how to accelerate HTML production and inject plain data with Jade features in conjunction with Grunt.
Our toolset for this tutorial will include:
- Jade
- Grunt
- NodeJS
Preparing the Environment: Installation
Here are the steps for installing Node.js, Jade, and the Grunt command-line interface (CLI). If you already have these installed, you can skip down to the next section in the tutorial.
-
Go to nodejs.org, and click on the “Install” button to download the latest version of node. Execute the downloaded file and follow the installation instructions.
-
npm (Node Package Manager) will come bundled with Node, and can be used via the terminal. Open your terminal and execute
npm initin the project directory. Then follow the instructions to createpackage.json. - To install Grunt, enter
npm install --save-dev grunt - Install the Grunt CLI (command-line interface)
npm install -g grunt-clito execute tasks straight from the command line. - To install the Grunt plugin for Jade tasks, type
npm install --save-dev grunt-contrib-jade - To install Jade, type
npm install --save-dev jade
NOTE:: There are three flags for installing npm packages:
--savemeans those packages are required locally for the project and listed under the dependencies property.--save-devadds the packages locally but as development dependencies. They are listed under devDependencies inpackage.json.-gindicates the package should be installed globally; this lets you execute grunt in your terminal, regardless of the current working directory.
A package.json manifest file will be created, which indicates a list of packages the project depends upon, and it includes some meta data such as project name, version, and description.
After the installation your package.json manifest will look like the following:
{

  "name": "jadeTutorial",

  "version": "1.0.0",

  "description": "Jade with Grunt tutorial",

  "main": "index.js",

  "author": "Nouran Mahmoud",

  "license": "ISC",

  "devDependencies": {

    "grunt": "^0.4.5",

    "grunt-contrib-jade": "^0.14.1",

    "jade": "^1.9.2",

  }

}
In addition, a node_modules directory will be created and will include the npm modules installed earlier as grunt and jade.
What is Grunt?
I’ll introduce you to Grunt, a popular task runner, we will use it to automate and execute time-consuming command line tasks in your development workflow. A task is an action that produces a target like compiling Jade to generate HTML. Using Grunt, we will be able to run Jade, watch tasks, and perform any other task with only one command line. It’s okay if you’ve never heard of a task runner before; it’s not a hard concept to wrap your head around.
Grunt is not the absolute best tool for this job. If you are curious about using other build tools, you can check out these resources: How to Use npm as a Build Tool or An Introduction to Gulp.js.
Creating Gruntfile.js
Grunt uses gruntfile.js to load any task and configure it with any parameters you need, as I’ll show you along the way.
Grunt tasks are configured by passing an object to the grunt.initConfig method, defining the affected files by the task and passing in a few other options. Learn more about Grunt.
The grunt.registerTask method defines a task that will be executed when we run grunt build via the command line. The array [jade, watch] indicates the tasks that will run respectively for accomplishing the build process.
To begin with, this is the minimum Gruntfile.js code:
module.exports = function (grunt) {

  grunt.initConfig({});

  grunt.registerTask('default', []);

};
Setting up the Grunt Jade Task
We’ll create our basic Gruntfile and put the following code inside it:
module.exports = function(grunt) {

  // Project configuration.

  grunt.initConfig({

    jade: {

      compile: {

        options: {

          pretty: true,

        },

        files: {

          'build/index.html': 'app/views/jobs.jade'

        }

      }

    }

  });

  // These plugins provide necessary tasks.

  grunt.loadNpmTasks('grunt-contrib-jade');

  // Default task.

  grunt.registerTask('build', 'Convert Jade templates into html templates', ['jade']);

};
Setting up a grunt task needs fetching of the plugin by the npm registry and loading the plugin package, which contains the task through the grunt.loadNpmTasks method, so you can configure and execute them.
The previous task configuration will compile each Jade file individually and place the results in the build directory with a single index.html file.
Setting up the Grunt Watch Task
The Watch task is one of the most useful plugins. This will watch your changes, rebuild and proceed immediately automatically without the need to run the jade task each time we make a change.
To add the watch task, install the plugin using this command:
npm install --save-dev grunt-contrib-watch
Then add its configuration to Gruntfile.js:
watch: {

  grunt: { files: ['Gruntfile.js'] },

  jade: {

    files: 'app/views/**/*.jade',

    tasks: ['jade']

  }

}
This will create a “watch” task for Jade files and the Grunt file. To complete this, you’ll also need to load the Grunt task and register the task:
grunt.registerTask('default','Convert Jade templates into html templates',

                  ['jade','watch']);

grunt.loadNpmTasks('grunt-contrib-watch');
Now when you run the grunt command it will accomplish the following tasks:
- Compile Jade
- Run the
watchtask to watch the changes on the Jade files and automatically re-compile them once they’ve changed.
The process will be active until it’s killed by CTRL+C
NOTE: The grunt command is a shortcut/alias for grunt default. It defines what tasks to be executed – jade and watch in our case – when we run the grunt command.
Scaffold gruntfile.js generator
You can use the grunt-init-gruntfile scaffolding command for creating a basic Gruntfile. We will not need all its default tasks in this tutorial, so we won’t use it.
Project Structure
We’ll create our source folder hierarchy as follows:
app

  └──views

     | └── layout.jade

     | └── jobs.jade

     | └── jobs-container.jade

     └──── partials

            |

            └─ head.jade

            └─ footer.jade
Execute the grunt jade command and the following structure will be created for you.
build

  └── index.html
A Simple Jade Example
Jade is indentation and whitespace based, as each level of indentation creates a level of nesting elements in HTML. For illustration, the following code shows how the basic structure might look using Jade for producing an HTML document.
doctype html

html

  head

    title Jade Tutorial

  body

    p.className#idName Hello SitePoint

    | Readers!

    img(src="images/image.png")
Which compiles into:
<!DOCTYPE html>

<html>

  <head>

    <title> Jade Tutorial </title>

  </head>

  <body>

    <p class="className" id="idName"> Hello SitePoint Readers! </p>

    <img src="images/image.png">

  </body>

</html>
Using Jade, you don’t have to write closing tags, which helps avoid potential mistakes, such as forgetting to add closing tags or losing the correct order of them. Any text at the beginning of a line is interpreted as a tag. You need to use proper indentation for each tag.
Note: if the tag name is omitted, a div will be created as a default tag.
To add attributes to a tag, put them inside parentheses after the tag name and follow the name=value format. To separate multiple attributes, use a comma. In addition, classes and IDs can be written with . and # symbols respectively, as in the previous example.
Using the Pipe Character (|)
Sometimes we need to write the raw content of a tag on a new line but, as I mentioned earlier, any text at the beginning of a line is considered a tag. To avoid this, use the pipe or | character at the beginning of the line and write the inner text for the tag on the new line.
Note: in order to see the changes you made in the Jade file by compiling it you need to run grunt based on the Grunt task we created before.
Powerful Jade Features with Grunt
In the previous section, I gave you a quick overview of Jade’s syntax. In the following sections, we’ll go over some other common and powerful Jade features, along with a few more advanced ones. We’ll do this by going through a simple “job vacancies page” sample. You can find the full examples for each case in the source code files or from this GitHub repo. Let’s start!
Block and Extend (Jade Inheritance)
The file called layout.jade will be the basic structure for our page’s layout, and this is a kind of DRY concept, as you don’t need to write these tags for each page. Instead you need to extend the layout and start to write the block content specific code, as we will see.
Blocks are kind of separating or organizing the layout. It can then be overwritten in another file.
NOTE: The CSS and JavaScript code are removed for brevity and focus. You can find these in the repo. Also, I’ve used the copy Grunt task for transferring the js and style directories from the app directory to the build directory.
Here is the layout.jade file:
doctype html

html(lang="en" dir="ltr")

  block head

    include partials/head.jade
  body

    block content

    block footer

      include partials/footer.jade
You can create footer.jade and head.jade according to your needs. For our page, we will use Foundation and jQuery to help us establish some basic design and functionality.
Here is the partials/head.jade file:
head

  meta(name="viewport", content="width=device-width, initial-scale=1.0")

  meta(charset="UTF-8")

  title Jobs

  link(rel = "stylesheet" href = "style/foundation.min.css")

  link(rel = "stylesheet" href = "style/app.css")
Here is the partials/footer.jade file:
div#footer.row

  div.small-12.large-12.columns

    p Copyright (c) foobar

script(src="js/jquery.min.js")

script(src="js/foundation.min.js")

script(src="js/app.js")
In the next snippet of code, we will create jobs.jade, which uses all the other files by inheriting our layout using the extends keyword and then overwriting the blocks that we need. In this example, we overwrite the content block.
jobs.jade:
extends layout.jade

block content

  div#container.row

    div.small-12.large-12.columns

      include job-container.jade
But what if we don’t need to overwrite the entire block? What if we just need to add content instead? Let’s take block head as an example. We need to add a special script for this page in the header, so we will use the append or prepend keywords after block.
// append head can be used without block 'append head'

block append head

  script.

    alert('Welcome to SitePoint')
Using Iterations and Mixins
In the previous section, we included job-container.jade. In this section, we will look at the benefit of loops and mixins and how we can use them it in Jade.
Here is the initial version of a new code snippet:
- each job in jobs

  div.sub-container.row

    div.title.small-12.large-12.columns

      p #{job.title}

    div.description.display.small-12.large-12.columns

      div.row

        div.block.small-12.large-12.columns

          p Skills and Requirements

          ul

            - each skill in job.skills

              li #{skill}

        div.block.small-12.large-12.columns

          p Preferred Skills

          ul

            - each pskill in job.pskills

              li  #{pskill}

      button.apply.button(value="apply") Apply
As you see, we’re using multiple normal loop statements like the one on the first line - each job in jobs. The - character is used for unbuffered code that does not add any output directly.
In the previous snippet of code, there is redundant code that can become DRY-ier using mixins, as in the following code:
- each job in jobs

  div.sub-container.row

    div.title.small-12.large-12.columns

      p #{job.title}

    div.description.display.small-12.large-12.columns

      div.row

        +skillsBlock("Skills and Requirements", job.skills)

        +skillsBlock("Preferred Skills", job.pskills)

      button.apply.button(value="apply") Apply

mixin skillsBlock(title, loopItems)

  div.block.small-12.large-12.columns

    p= title

    ul

      - each skill in loopItems

        li  #{skill}
Here we’re creating a reusable block of Jade using the mixin feature. Mixins are like methods (or functions) that have names and take arguments to evaluate in their inner code. In the above example, we created a mixin called skillsBlock().
To use this mixin, we just write its name and pass the proper parameter values, prefixing the mixin name with a + sign to identify it as a mixin call.
NOTE: as in the above code, we can evaluate values either by =, != or #{}. But be careful when you use !=, which does not do any escaping, so is not safe for user input.
Passing JSON Data Through Grunt
After establishing our environment, let’s do some awesome stuff with the combination of Grunt and Jade by passing JSON data from a JSON file to Jade using a Grunt task.
At first, create the JSON file data.json, and fill it with your desired data.
Then open Gruntfile.js and add the data attribute to the options of the Jade task, as follows:
jade: {

  compile: {

    options: {

      pretty: true,

      data: {

        jobs: grunt.file.readJSON('data.json')

      }

    },

    files: {

      'build/index.html': 'app/views/jobs.jade'

    }

  }

}
The jobs data/locals (data passed to Jade templates are called locals) attribute will be passed to the Jade files identified in the files property and can be used in the Jade code. This manner gives you the ability to add text content to web pages easily.
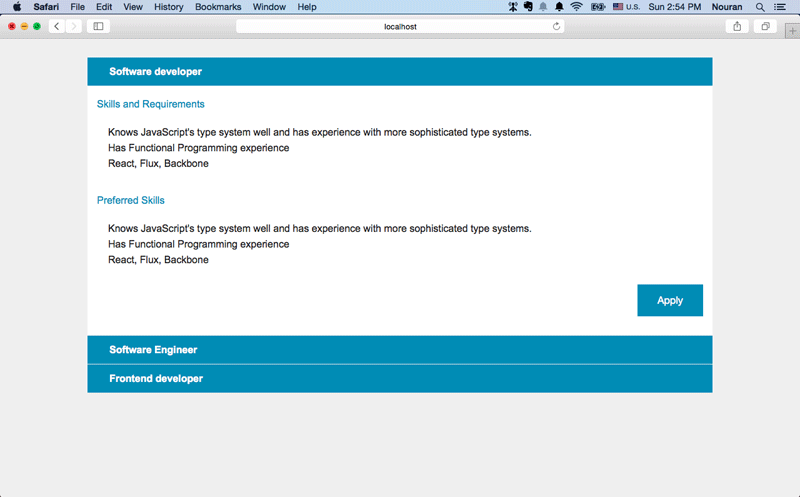
Lastly, you can see how the page looks if you check out the demo. Of course, the source is compiled so the demo is of little importance in this case. A screenshot is shown below.
Wrapping Up
Reasons to use template engines may vary, but they can be categorized as more productivity, less repetition, and having a more pleasant syntax. Also, you might not want to write code in the native language because it is too repetitive, error-prone, or maybe you simply don’t like it. This is where a language like Jade, tuned to keeping your code concise and simple, comes into play.
Jade helps you write cleaner code, which makes it less tedious to do your job. We’ve covered some of the basics and tips and tricks using Grunt. There is more you can learn about Jade that we didn’t cover in this tutorial, so you can check out the official documentation for more.
Frequently Asked Questions (FAQs) about Using Jade and Grunt to Speed Up HTML Production
What is Jade and why should I use it for HTML production?
Jade, now known as Pug, is a high-performance template engine heavily influenced by Haml and implemented with JavaScript for Node.js. It simplifies the process of writing HTML by allowing you to write clean, readable code that is easy to maintain. It also supports dynamic code, reusable blocks, and includes, which can significantly speed up HTML production.
How does Grunt complement Jade in speeding up HTML production?
Grunt is a JavaScript task runner that automates repetitive tasks like minification, compilation, unit testing, and linting. When used with Jade, Grunt can automate the process of compiling Jade templates into HTML, which can save a lot of time and effort in the long run.
How do I install Jade and Grunt?
Both Jade and Grunt can be installed via npm (Node Package Manager). You can install Jade by running ‘npm install jade -g’ and Grunt by running ‘npm install grunt-cli -g’ in your terminal or command prompt.
How do I convert HTML to Jade?
There are several online tools available that can convert HTML to Jade, such as html2jade.org and codebeautify.org. However, if you want to convert HTML to Jade programmatically, you can use the ‘html2jade’ npm package.
What are the benefits of using online tools for HTML to Jade conversion?
Online tools for HTML to Jade conversion are easy to use and do not require any installation. They can quickly convert your HTML code to Jade syntax, which can be very helpful if you are new to Jade or if you have a large amount of HTML code that needs to be converted.
How do I use the ‘html2jade’ npm package for HTML to Jade conversion?
After installing the ‘html2jade’ package via npm, you can use it to convert HTML to Jade by running ‘html2jade yourfile.html’ in your terminal or command prompt. This will output the Jade equivalent of your HTML code.
Can I use Jade with other task runners like Gulp?
Yes, Jade can be used with other task runners like Gulp. There are plugins available for Gulp that can compile Jade templates into HTML, similar to Grunt.
How do I include external files in my Jade templates?
You can include external files in your Jade templates using the ‘include’ keyword followed by the path to the file. This can be very useful for including common elements like headers and footers in multiple templates.
Can I use JavaScript in my Jade templates?
Yes, Jade supports inline JavaScript. You can use the ‘-‘ character to start a line of JavaScript code in your Jade templates.
How do I debug errors in my Jade templates?
Jade provides detailed error messages that can help you debug errors in your templates. If you are using Grunt, you can also use the ‘grunt-contrib-jade’ plugin which provides a ‘jade:debug’ task for debugging Jade templates.