
Key Takeaways
- Atoum is a modern, intuitive PHP testing framework that offers an alternative to PHPUnit with a fluent interface that enhances readability and ease of writing tests.
- Installation and configuration of Atoum are straightforward using Composer, and the framework supports enhanced IDE interaction through additional stubs packages.
- Atoum allows for expressive test writing using a BDD/Gherkin-style syntax or a more direct approach, catering to different developer preferences for structuring tests.
- The framework includes built-in code coverage tools and supports HTML output for easy visualization and assessment of test coverage.
- Atoum integrates well with continuous integration systems and supports advanced features like annotations for testing against different PHP versions and required extensions, making it a versatile tool for modern PHP development.
This article was peer reviewed by Christopher Pitt, @jubianchi, and Ivan Enderlin. Thanks to all of SitePoint’s peer reviewers for making SitePoint content the best it can be!
If you’ve been around PHP for more than a little while, you’ve no doubt started to test your code. And if you ask anyone in the PHP space what to use for writing unit tests, likely the first answer that they’ll give you is PHPUnit.
It’s the de facto standard in the PHP community, and with good reason. But it’s not the only choice. Whilst it does command the lion’s share, other choices abound, one of which I’m going to take you through in this tutorial; it’s called atoum.
If this is your first time hearing about it, it is self-described as:
A simple, modern, and intuitive unit testing framework for PHP!

I can’t necessarily vouch for it being all that intuitive, but it definitely is reasonably simple to use. And whilst its composer.json currently specifies a minimum version of PHP 5.3.3, one of the core developers told me that from version 3.0 support for PHP 5.3 will be officially dropped in favor of PHP 5.6. So don’t be fooled, it is a modern take on testing in PHP.
Recently, I decided to give it a test run on an existing codebase of mine, a health monitoring application which I’ve been writing to help me deal with some health problems I’ve had over the last 12 – 24 months. I found it to be an interesting take on software testing, combining several different styles into the one package.
Installing Atoum
Like all modern PHP software, we install it with Composer.
composer require atoum/atoum
For the purposes of this tutorial, I’ll assume that you’re following along using PhpStorm. No offense meant to Vim, Emacs, and other editors.
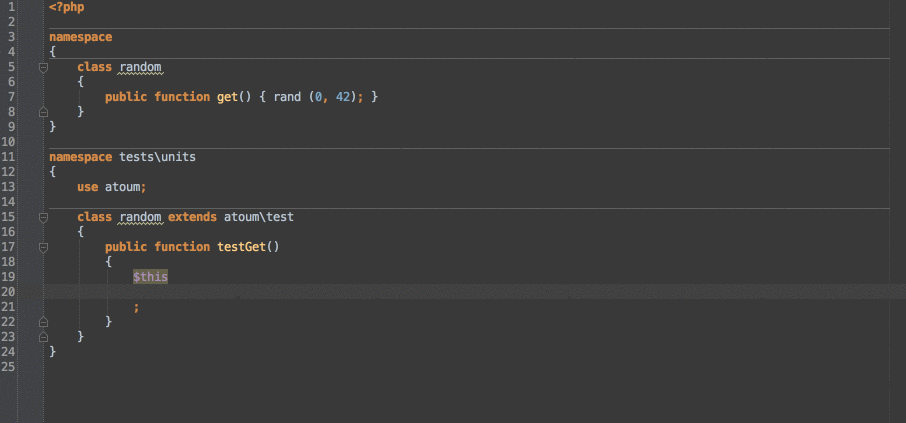
Given that, and given how atoum’s source code is structured, we should also install a supplementary library called atoum/stubs.
Without it, attempting to perform any kind of code completion in your IDE with atoum is less than straight-forward. Stubs make working with atoum much more user-friendly, as the graphic below will attest.
composer require atoum/stubs
Configuring Atoum
Now that it’s installed, let’s perform some preliminary configuration. Specifically, what we’re going to do is to configure how code coverage will reported, as well as what the test reporting will look like when run from the terminal.
This isn’t strictly necessary, but as we may be looking at the test output in the terminal a lot, it helps to give a bit of life to it. Second, whilst the built-in code coverage is pretty good, sometimes viewing it through a browser is just easier to do, as we’ll see in a little while.
If this is your first time hearing about code coverage, code coverage reports the percentage of the codebase which is covered by tests. Code coverage reports help us know how complete our tests are, and how confident we can feel when making changes to the code. So, while there is some work involved in getting code coverage set up, it’s worth having in place.
To begin configuring atoum, create a new file in the root directory of your project, called .atoum.php. There, add the following contents:
<?php

use mageekguy\atoum;

$stdout = new atoum\writers\std\out;
$report = new atoum\reports\realtime\santa;
$script->addReport(
    $report->addWriter($stdout)
);
No, you’re not dreaming that the reporting style is set to Santa. If you’re groaning that it’s still a few months until Christmas, it is already October. I’m sure that the shops in your area will soon be filled with all the tacky Christmas merchandise.
But before you groan too much, there are a number of other options; these include: cli, phing, tap, and NyanCat.
With that done, let’s set code coverage to export to HTML format. Create a new directory structure, /coverage/html, off the root directory of your project.
Then, copy vendor/atoum/resources/configurations/runner/coverage.php.dist to the root directory of your project as coverage.php. In there, we need to update the configuration entries, listed in the code snippet below:
<?php

use \mageekguy\atoum\report\fields\runner\coverage;

$coverageHtmlField = new coverage\html(
    'Your project name',
    '/path/to/destination/directory'
);
$coverageHtmlField->setRootUrl('http://url/of/web/site');
$coverageTreemapField = new coverage\treemap(
    'Your project name',
    '/path/to/destination/directory'
);

$coverageTreemapField
    ->setTreemapUrl('http://url/of/treemap')
    ->setHtmlReportBaseUrl($coverageHtmlField->getRootUrl());

$script
    ->addDefaultReport()
    ->addField($coverageHtmlField)
    ->addField($coverageTreemapField);
After that, we’re ready to start writing tests.
Our First Test
In my application’s source code, I have an entity called Journal, which stores a daily food intake entry which I write to track what I’ve eaten, and how I’ve reacted to it. In it, I have the following function:
public function populate(array $data)
{
    if (empty($data)) {
        throw new HydrationException();
    }

    $this->id = $data['id'];
    $this->userId = $data['userId'];
    $this->entry = $data['entry'];
    $this->created = $data['created'];
    $this->updated = $data['updated'];
}
You can see that it takes one parameter, $data, which is an array. If $data is empty, then it throws a HydrationException, which is a custom exception.
If $data’s not empty, then it populates each of the five private member variables using the key of the same name from $data. Nothing too special, yet enough to test with.
To create the first test, by default, we don’t follow the same approach which you might find in many other projects such as Zend Framework, Symfony, or Laravel.
Out of the box, atoum suggests a different style – creating a directory called tests/units, relative to the classes which you are going to test.
So, in the case of my Journal entity, which is located at src/App/Entity, I’d then create a new test class, also named Journal, in tests/units/Entity/Journal.php.
Then, I’d give it a PSR-4 type namespace, namespace App\Entity\tests\units;. After that, I only need to use the atoum namespace and I can begin writing tests.
<?php

namespace App\Entity\tests\units;

use App\Entity\Exception\HydrationException;
use App\Entity\Journal as Entity;
use Faker\Factory;
use Faker\Generator;
use atoum;
I’ll start off by including all of the namespaces and classes which the test will need. After that, as with PHPUnit, I’ve created the first test, following the standard naming style of prefixing a test with test, which identifies it as a test.
Then, using the excellent Faker library, I’ve created an array of test data to populate the entity with. With that ready, we next step through the test.
class Journal extends atoum
{
    public function testHydration()
    {
        $faker = Factory::create();

        $data = [
          'id' => $faker->randomDigitNotNull,
          'userId' => $faker->randomDigitNotNull,
          'entry' => $faker->text,
          'created' => $faker->dateTime,
          'updated' => $faker->dateTime,
        ];

        $this
            ->given($entity = new Entity())
            ->when($entity->populate($data))
            ->then
                ->integer($entity->getId())
                ->isEqualTo($data['id']);
    }
}
Atoum has a number of styles for writing tests. You can use the BDD/Gherkin-style of given -> when -> then, as I have above. Or, you can take a more direct approach, which you can see in the example below.
faker = Factory::create();
$entity = new Entity();
$data = [
    'id' => faker->randomDigitNotNull,
    'userId' => faker->randomDigitNotNull,
    'entry' => faker->text,
    'created' => faker->dateTime,
    'updated' => faker->dateTime,
];
$entity->populate($data);
$this
    ->object($entity)
    ->integer($entity->getId())
    ->isEqualTo($this->data['id']);
Personally, whilst a bit more verbose, I prefer the former style to the latter. I find it more readable and intuitive. The choice is yours.
Now let’s look a bit deeper at the tests. We used the given method to establish the preamble, or set up the system under test (SUT), that being a Journal entity object. We then used the when method to run the SUT and get a result, specifically by calling its populate() method to hydrate it with test data.
With the object hydrated, we then computed the test verdict using then() along with two assertions, comparing the post-state of the object, with the data used to hydrate it. In this assessment of the SUT’s post-state, we’re only checking if the Journal’s id member variable, returned by calling $entity->getId(), is both an integer, and is equal to the value in $data’s id element.
As there are a number of properties which can be set on the object, we could have continued to use the fluent interface to test them all, such as in the example below:
$this->object($entity)
    ->integer($entity->getId())->isEqualTo(data['id'])
    ->integer($entity->getUserId())->isEqualTo(data['userId'])
    ->string($entity->getEntry())->isEqualTo(data['entry'])
    ->dateTime($entity->getCreated())->isEqualTo(data['created'])
    ->dateTime($entity->getUpdated())->isEqualTo(data['updated']);
Here we’ve used another assertion method, string(), on the values which return a string, and dateTime() for the dateTime values, instead of integer(). However, as you might expect from a comprehensive testing library, there are a range of other assertion options.
Running the Tests
With the test ready, it’s time to run it. From the command line, in the root directory of your project, run the following command:
./vendor/bin/atoum -c coverage.php -f src/App/Entity/tests/units/Journal.php
This will run just the test that we’ve created, using the -f switch, and enable code coverage using the -c switch. When you run it, you should see output similar to that in the image below – ho ho ho!
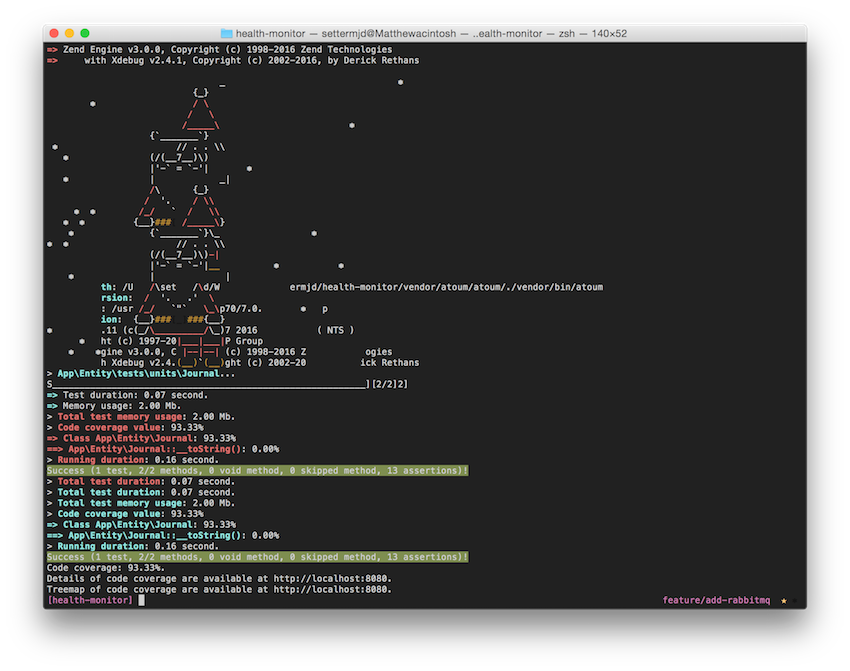
If you want though, feel free to change the output style to anything else; my personal favorite is NyanCat. Who wouldn’t love crazy output like this:
Code Coverage
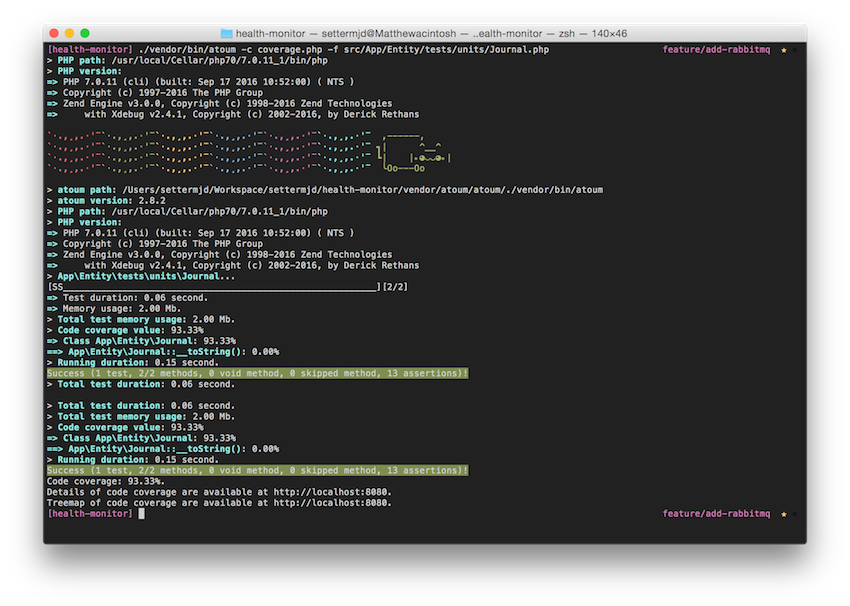
Now that we have a working test, let’s take a closer look at the code coverage reporting, starting with the command-line output. We can see, in the abridged sample output below, that for the class tested, App\Entity\Journal, it has total code coverage of 93.33%. This is because its __toString method has no coverage at all.
> Code coverage value: 93.33%
=> Class App\Entity\Journal: 93.33%
==> App\Entity\Journal::__toString(): 0.00%
Success (1 test, 2/2 methods, 0 void method, 0 skipped method, 13 assertions)!
> Code coverage value: 93.33%
=> Class App\Entity\Journal: 93.33%
==> App\Entity\Journal::__toString(): 0.00%
> Running duration: 0.15 second.
Now let’s look at the HTML coverage output. Firing up PHP’s web server using the command php -S 127.0.0.1:8080 -t ./coverage/html, we can see the HTML report at http://localhost:8080:
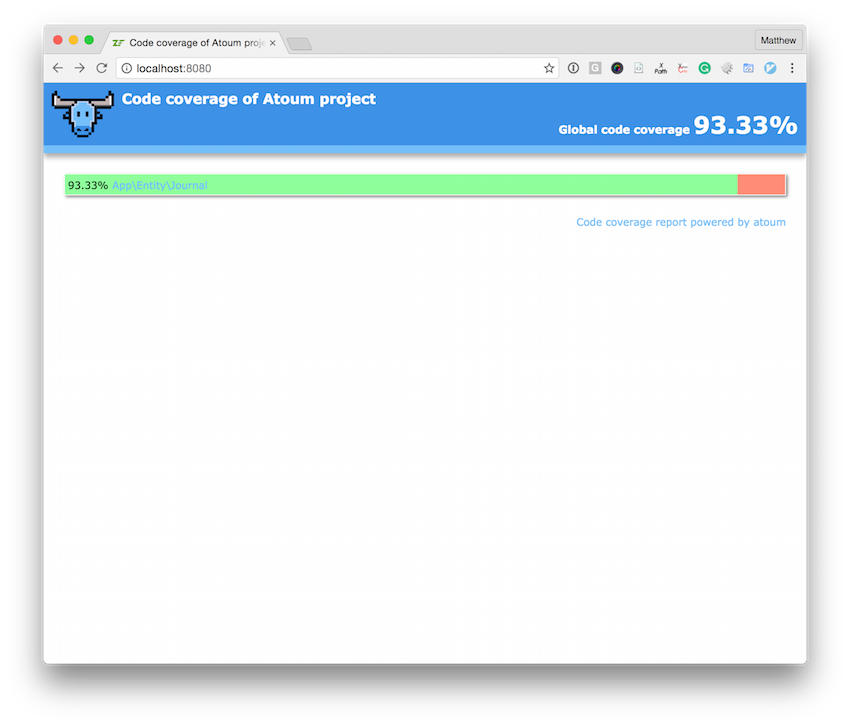
There, we see a list of all classes covered in the coverage report and their level of code coverage. By clicking on it, we then see how the code coverage level is assessed.
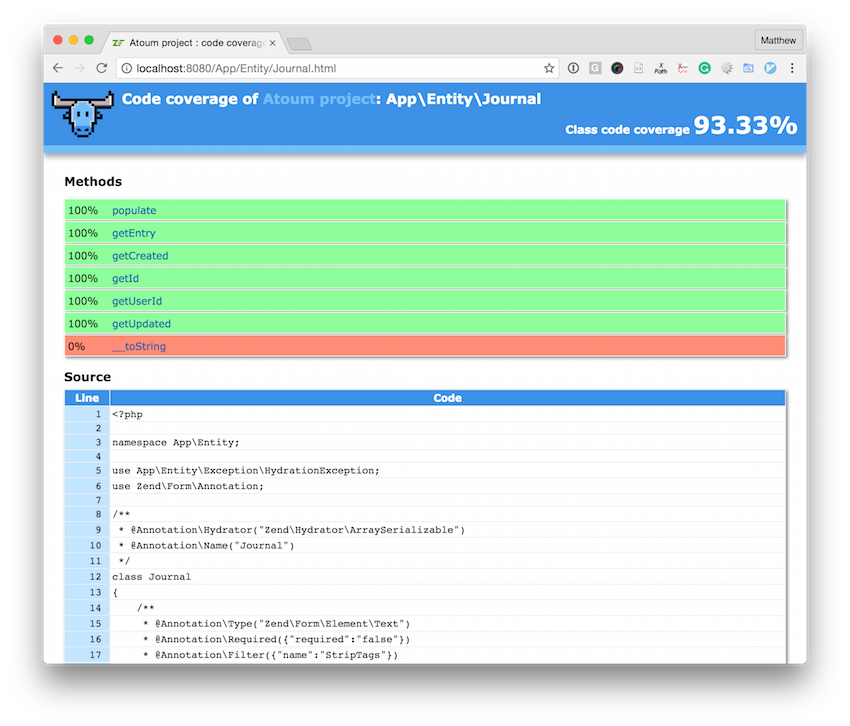
Each of the methods, bar __toString(), has 100% code coverage. Looking through the source, we see, highlighted in green, what has been covered, and in orange what is yet to be.
This is why using a generated report is much more effective, because it provides a better understanding than the command line output.
Debugging Tests
But, what if something goes wrong? Say for example, I hadn’t set a value for id in the $data array, or I expected it to match a different value. Given that, when I run it I’d expect to see an error like this one:
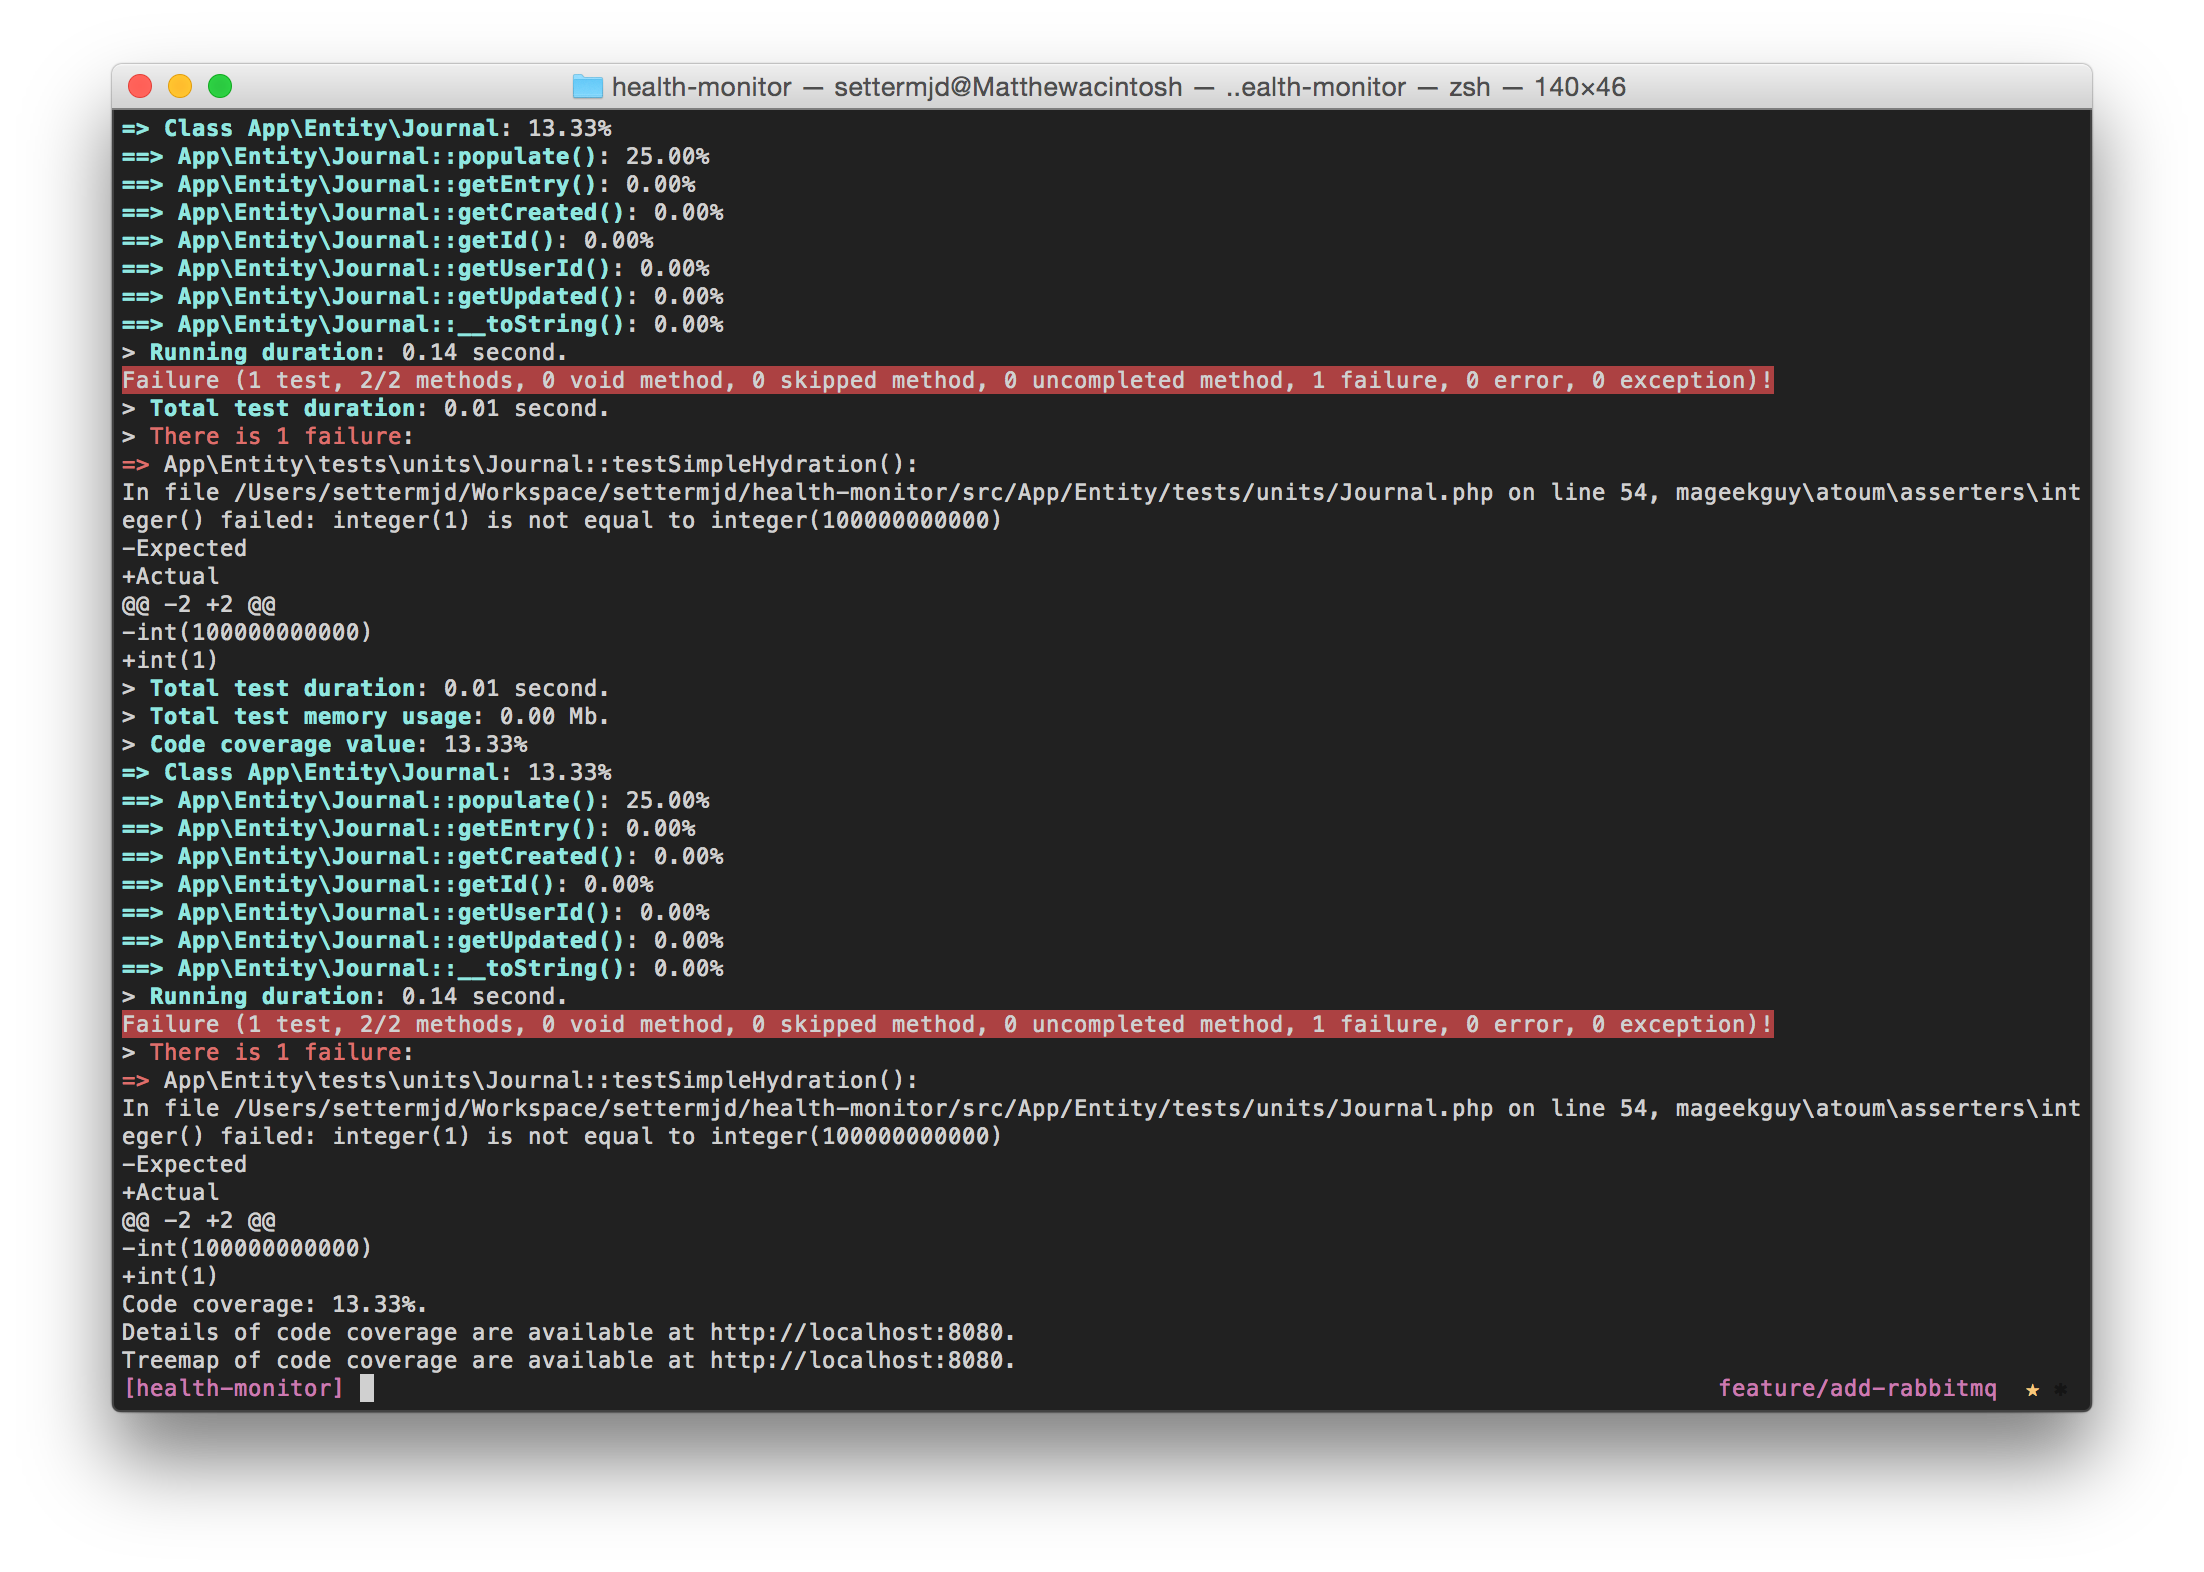
In this situation, it’s not always easy to see what’s going wrong. However, atoum offers a couple of options in this case. These come in the form of the dump(), stop(), and executeOnFailure() methods.
I’ll focus on dump(), but feel free to have a look at the other two on your own. Dump, similar to PHP’s var_dump(), will dump out the contents of a variable to stdout, as part of running the test. To use it, I just have to add a call to it in the test, like so:
$this
    ->dump($entity)
    ->object($entity)
    ->integer($entity->getId())->isEqualTo(100000000000)
    ->integer($entity->getUserId())->isEqualTo($data['userId'])
    ->string($entity->getEntry())->isEqualTo($data['entry'])
    ->dateTime($entity->getCreated())->isEqualTo($data['created'])
    ->dateTime($entity->getUpdated())->isEqualTo($data['updated'])
    ->dump($entity)
There is one thing to remember, though: the debug methods will only work if the tests are run in debug mode. To do that, we have to use either the -d or --debug switches when calling atoum. When you do so, you’ll see output similar to the following.
=> In App\Entity\tests\units\Journal::testSimpleHydration():
/Users/settermjd/Workspace/settermjd/health-monitor/vendor/atoum/atoum/classes/test.php:429:
class App\Entity\Journal#195 (5) {
  private $id =>
  int(1)
  private $userId =>
  int(3)
  private $entry =>
  string(165) "Reiciendis quod at voluptatem cupiditate error exercitationem at.
  Deserunt quos vero omnis est aliquam qui. Esse at quo dolorum fugit.
  Qui voluptas omnis amet nihil."
  private $created =>
  class DateTime#194 (3) {
    public $date =>
    string(26) "1992-06-18 01:55:51.000000"
    public $timezone_type =>
    int(3)
    public $timezone =>
    string(3) "UTC"
  }
  private $updated =>
  class DateTime#193 (3) {
    public $date =>
    string(26) "2016-09-28 08:27:18.000000"
    public $timezone_type =>
    int(3)
    public $timezone =>
    string(3) "UTC"
  }
}
You can see here the structure of the Journal entity and compare what you expected to receive to what was received.
Making Use of Annotations
Testing against Different Versions of PHP
What we’ve seen so far, could be argued, is fairly standard for a unit testing library. Now let’s finish up our initial tour of atoum, by looking at how it starts to come in to its own.
Say that you’re starting to refactor some of the existing libraries of your application to work with PHP 7, but they’re not ready for introduction in to the main branch, as that’s still highly dependent on PHP 5.6. Atoum can filter out tests for those aspects of code that can’t be tested against a given PHP runtime by using the @php annotation.
Atoum, via the use of annotations, lets you specify the version of PHP in effect for a test to run. It does this via the @php annotation. For the methods that require PHP 7, we specify @php 7.0 in the PhpDoc block header. For all the other methods, we can leave them as is. If an entire test class required PHP 7, we could use this in the class’ annotation instead of using it for every test contained in the class.
Now this might seem like a strange thing to want to do. Naturally, if you have a class which makes more than a passing use of PHP 7, such as scalar type hints, if you run the script (or application) with anything other than PHP 7, then it will result in fatal errors. So I would suggest that this feature would be used when you are working through a porting process.
Extensions
Now what if you need specific extensions for a test method to work? As with @php, we can specify @extensions. Say we need one, or a combination of the mbstring, PDO, and Xdebug extensions. We could use the @extensions annotation, as below, to require these extensions.
/**
   * @extensions mbstring
   * Or
   * @extensions pdo xdebug
 */
Through making astute use of these annotations, we can start to create more sophisticated tests, as well as a more sophisticated test automation infrastructure; one which allows us to seamlessly migrate our application from PHP 5.6, through to 7.0 (or 7.1).
In Conclusion
This has been a high-level overview of atoum, with some deep diving into a number of areas. There is far more on offer which I’ve not been able to cover, such as the extensions.
There’s [the visibility extension])(https://github.com/atoum/visibility-extension) which allows for testing protected and private methods. There’s the ruler extension which allows for filtering the tests which are run. Then there’s the Blackfire extension, which allows you to write Blackfire test suites using atoum.
On top of that, there’s CI server integration, as atoum can be integrated with Hudson, Jenkins, and TravisCI, amongst others.
But don’t let this introduction be all that you discover. Whilst atoum is newer than PHP’s de facto testing library, PHPUnit, I think it’s a library well worth considering — especially if the way PHPUnit works isn’t quite how you like it.
Keep in mind that this project has a strong community, several release managers, and a core development team. There’s a lot to it, and getting started is not as intuitive as I’d have liked. However — once you’re up and running, it can really grow on you!
If this tutorial’s whet your appetite, be sure to check out the online documentation, where you can find much more information about all aspects of the library.
What do you think about atoum? Did you give it a go? Will you?
Links
- https://github.com/atoum/bdd-extension
- https://github.com/atoum/visibility-extension
- https://github.com/atoum/json-schema-extension
- https://github.com/atoum/ruler-extension
- https://github.com/atoum/atoum
Frequently Asked Questions about PHP Testing with Atoum
How does Atoum differ from PHPUnit in terms of functionality?
Atoum is a modern, intuitive testing framework for PHP that offers a different approach compared to PHPUnit. While PHPUnit uses a declarative style for writing tests, Atoum uses a more expressive, fluent interface that makes tests easier to read and write. Atoum also supports all PHP versions from 5.3 onwards, making it a versatile choice for developers working with different PHP environments. Additionally, Atoum includes built-in mocking capabilities, eliminating the need for third-party libraries.
Can Atoum be used alongside PHPUnit?
Yes, Atoum can be used alongside PHPUnit. This can be beneficial if you want to gradually transition from PHPUnit to Atoum, or if you want to use the specific features of each framework in different parts of your project. However, keep in mind that maintaining tests in two different frameworks can increase complexity.
How does Atoum handle exceptions compared to PHPUnit?
Atoum provides a more intuitive way of handling exceptions compared to PHPUnit. In PHPUnit, you would typically use annotations or separate methods to test exceptions. In Atoum, you can use the ->exception() assertion to directly test if a piece of code throws an exception.
What are the advantages of Atoum’s fluent interface?
Atoum’s fluent interface makes tests more readable and easier to write. Instead of using a declarative style like PHPUnit, Atoum allows you to chain assertions together in a way that closely resembles natural language. This can make your tests more understandable and maintainable.
How does Atoum’s performance compare to PHPUnit?
Atoum is designed to be fast and efficient, and in many cases, it can run tests faster than PHPUnit. Atoum’s architecture allows it to run tests in separate processes, which can significantly improve performance when running large test suites.
Can Atoum be integrated with continuous integration systems?
Yes, Atoum can be integrated with various continuous integration systems like Jenkins, Travis CI, and GitLab CI. Atoum provides detailed reports that can be used to track the progress and status of your tests.
How does Atoum support test-driven development (TDD)?
Atoum fully supports test-driven development (TDD). Its expressive syntax and powerful assertions make it easy to write tests first and then develop your code to pass those tests. Atoum also supports behavior-driven development (BDD) with its spec testing capabilities.
What kind of support and community does Atoum have?
Atoum has a vibrant and active community of developers. There are numerous resources available online, including documentation, tutorials, and forums where you can ask questions and get help. The Atoum team is also active on GitHub, where they regularly update the framework and respond to issues.
How does Atoum handle mocking compared to PHPUnit?
Atoum has built-in mocking capabilities, which eliminates the need for third-party libraries. Atoum’s mocking system is flexible and powerful, allowing you to create complex mocks with ease. In contrast, PHPUnit requires a separate library for mocking.
Is Atoum suitable for large projects?
Yes, Atoum is suitable for projects of any size. Its efficient architecture and powerful features make it a good choice for both small and large projects. Atoum’s ability to run tests in separate processes can significantly improve performance when running large test suites.