

Sometimes you just want a simple webshop. You need it to work and that’s about it. Whether you want to add it to an existing WordPress site or configure it at the same time you set up a WordPress site, it’s all possible with WooCommerce. Let me show you how to setup a simple store with physical and virtual products, tax, and PayPal support without relying on any previous e-commerce or WordPress experience.
Key Takeaways
- Setting up a webshop with WordPress and WooCommerce involves installing WordPress, installing WooCommerce plugin, configuring WooCommerce settings (like general settings, tax rates, customer registration, and PayPal integration), and customizing the store by adding products and selecting a theme.
- WooCommerce requires a WordPress installation (version 3.5+), fsockopen support for payment gateway IPN access, an SSL certificate for direct payment gateways, and optional cURL and SOAP support. WooCommerce can be installed automatically via the WordPress dashboard or manually by downloading the plugin and placing it in the wp-content/plugins folder.
- Once WooCommerce is installed and activated, it can be configured to fit the needs of the store. Key settings include setting up the general settings (like country and currency), configuring tax rates, enabling customer registration and accounts, and integrating PayPal for payments. After configuration, the store can be customized by adding products, selecting a theme, and adjusting the site’s menu and URLs.
Installing the WordPress E-commerce Plugin
The first thing you need to do is to install WordPress. Don’t worry; it’s a straight-forward process that’s well documented here: codex.wordpress.org/Installing_WordPress.
Beyond a WordPress installation (version 3.5+), you’ll also need the following things:
- fsockopen support (for payment gateway IPN access).
- an SSL certificate if you choose to install any direct payment gateways
- cURL support (optional) – some plugins for WooCommerce require cURL.
- SOAP support (optional) – some plugins for WooCommerce require SOAP.
Once WordPress is installed, log in to the dashboard with the admin password you chose and familiarize yourself with the menu on the left. The dashboard is an important place where you’ll customize and manage your site to suit your needs.
Next you need to install WooCommerce. There’s two ways you can do this:
- The automatic installer – go to Plugins -> Add New, search for “WooCommerce”, and add the plugin. You’ll need to enter your FTP credentials if this is the first time you’re doing this.
- Manually – Download the plugin from wordpress.org/extend/plugins/woocommerce, unzip the archive, and place the folder in
wp-content/plugins.
After you have installed WooCommerce, go to Plugins -> Installed Plugins and activate the WooCommerce plugin.
Configuring WooCommerce
Now that the plugin is activate, click WooCommerce in the side menu. Add WooCommerce Pages by pressing the button labeled “Install WooCommerce Pages” in the banner that comes up.
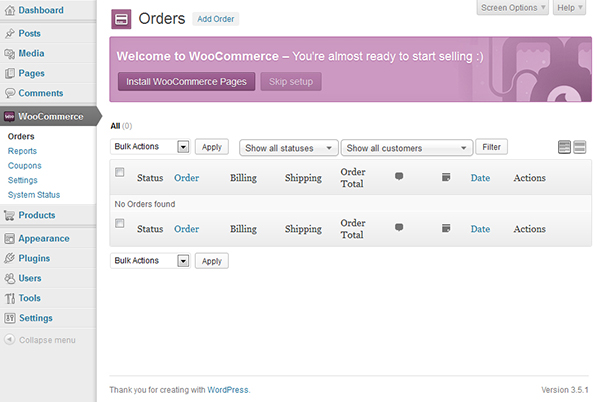
Then press the Settings button on the welcome page to reach the following page:

There’s a lot of settings on this page, but let’s focus on the ones you need to make a bookstore with PayPal as your payment provider.
General
The general settings speak for themselves. The only things I changed for my own setup was the country to Netherlands and the currency to Euros.
Taxes
You’ll need to have a little bit of tax knowledge to run a webshop. Under the Tax tab, I clicked the small link at the top that reads “Standard” to enter standard tax rates, and added the Dutch BTW tax (which is 21%). The taxes and their amount vary per location, so be sure to check the rules that apply to you. Because tax rules are different depending on where you are, I can’t provide detailed information beyond this is where you fill in the rates.
If you’re unsure, I recommend calling your local tax office and ask how much you’re allowed to earn and what kind of tax papers you’ll need for your specific store. Setting up a webshop is easy, but dealing with taxes is harder. After all, you don’t want to be accused of committing tax fraud!
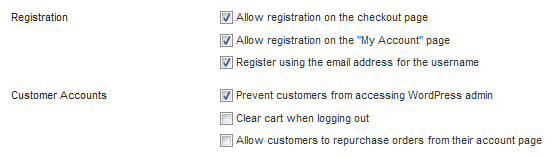
Customers
To enable customers, go back to the General tab and check the appropriate boxes in the Registration and Customer Accounts sections. For my store, I chose the options below:
Enabling PayPal
To enable PayPal integration, go to the Payment Gateways tab and press the small PayPal link at the top. For the sake of this article I’ll show you how to enable the PayPal sandbox since we don’t want to deal with real money in a fake store!
Go to developer.paypal.com and login with your existing PayPal account (if you don’t have one, sign up for one). Click the site’s “Applications” menu item and then “Sandbox accounts”. It’s here where you’ll make a new test account.
Create a customer account to test purchases. Fill in the form just as you would a normal account. When it comes to entering a balance, this is all fake money so I like to enter a million here. One can dream…
Go back to your webshop site again, and in the PayPal link from earlier fill in the e-mail address of your created sandbox account.
If you’re testing locally, payments won’t fully work. They’ll start working once you have the site up and running on an actual domain.
Customizing your Store
You now have a fully functional webshop, but it doesn’t really look much like a shop. We need to add some products and select a theme.
Adding Products
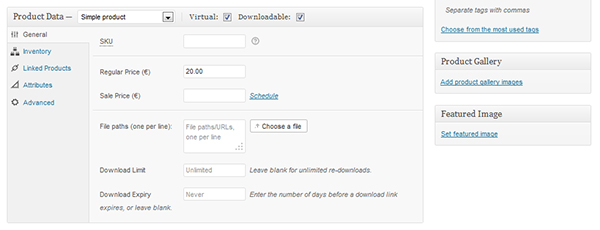
In the side menu you’ll see a Products category. Click it, then select Add Product and fill in the information for a new product. This is a pretty straight forward process.
For the sake of example, let’s add a “PHP book” for 20 euros. Let’s also add a “PHP e-book” with a download link (check the “Virtual” and “Downloadable” boxes to make a downloadable product). You can set the product image with the Featured Image feature, and add any additional images using the Product Gallery.
Adding a Theme
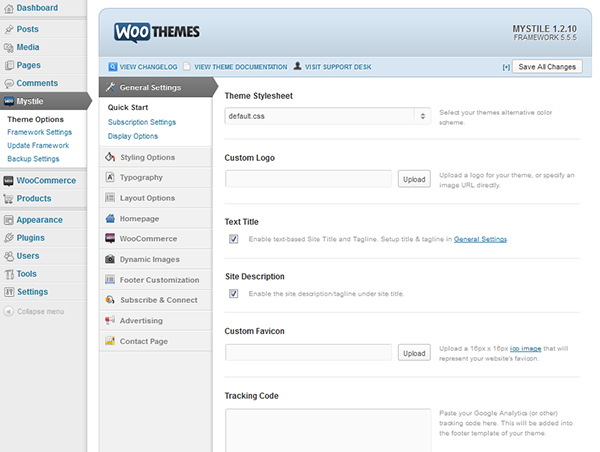
There are several themes for WooCommerce at woothemes.com/product-category/themes/woocommerce, but of course you’re also free to roll your own or customize an existing theme as you please. For the purpose of this article, we want to have the shop up and running as soon as possible, so let’s use mystile, a clean free theme. You do however need to register before downloading it.
The process of adding a theme is similar to adding a plugin; to install it manually, add it to wp-content/themes and activate it by going to Appearance -> Themes in the side menu and press “Activate” under the theme.
This theme has a selection of settings available in the side menu under Mystile, so feel free to try out the different options to make it look and feel the way you want.
If you get a PHP warning in the bottom of the new homepage, it most likely means you need to update your copy of WooFramework. You can do so by going to Mystile -> Update Framework.
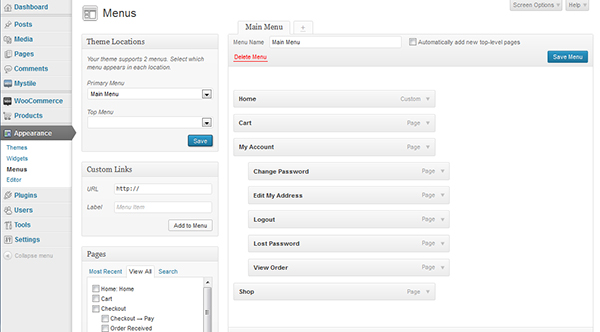
Changing the Menu
We probably don’t need the checkout pages to be available in the site’s menu, so let’s change the menu by going to Appearance -> Menus and make a new menu in the Plus sign tab. Name it whatever you want; I chose to name mine “Main menu”.
Then in the Pages box select the pages you want. I added Home:Home, Cart, Shop, My Account, and every subpage under My Account. Be sure that you drag the subpages into position by having them intended under My Account. Once the menu is saved, select it under the “Theme Locations primary menu” dropdown.
Extra Cleanup
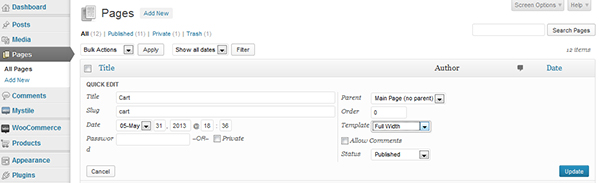
Remove the sample page by going to Pages -> All Pages in the side menu and remove it from there. You may also want to remove the visible sidebar from some of the pages. You can do this by clicking the page’s Quick Edit link and setting its template to “Full Width”.
The URLs don’t look very nice, either. Instead of something like http://wordpress.dev/?post_type=product you might prefer to have something like http://wordpress.dev/products. Go to Settings -gt; Permalinks and under the Common Settings section choose “Post name”.
You may also want to change the permalinks for the specific products. Under the Product permalink base section I chose “Shop base with category” to get a nice, sharable link.
Conclusion
Congratulations, you’ve successfully created a webshop. If you didn’t run into any problems, this process probably took you less than an hour, maybe two hours with reading this article. That’s how easy it is to get up and running with WordPress and WooCommerce!
WooCommerce is an Open Source project, so if you feel like extending it even further, please check them out on GitHub!
Image via Fotolia
Frequently Asked Questions about Setting Up a Webshop with WordPress and WooCommerce
How can I choose the best theme for my WooCommerce webshop?
Choosing the right theme for your WooCommerce webshop is crucial as it determines the look and feel of your online store. When selecting a theme, consider its compatibility with WooCommerce, its responsiveness on different devices, loading speed, and customization options. Some popular WooCommerce-compatible themes include Storefront, Astra, and OceanWP. Remember, a good theme should not only be visually appealing but also user-friendly and functional.
How can I add products to my WooCommerce webshop?
Adding products to your WooCommerce webshop is straightforward. Navigate to your WordPress dashboard, click on ‘Products’ then ‘Add New’. Fill in the product name, description, product data (like price, SKU, stock status), and product short description. You can also add product images and assign product categories and tags. Click ‘Publish’ when you’re done.
How can I set up payment methods on my WooCommerce webshop?
WooCommerce supports several payment gateways like PayPal, Stripe, and Direct Bank Transfer. To set up a payment method, go to WooCommerce settings, click on the ‘Payments’ tab, and enable your preferred payment gateways. You’ll need to configure each payment method, which may require API keys or other information from the payment provider.
How can I manage shipping on my WooCommerce webshop?
WooCommerce allows you to set up various shipping options. You can create shipping zones based on customer location and assign shipping methods (like flat rate, free shipping, or local pickup) to each zone. You can also set up shipping classes for different types of products.
How can I optimize my WooCommerce webshop for SEO?
SEO is vital for the visibility and success of your online store. You can optimize your WooCommerce webshop for SEO by using SEO-friendly URLs, writing unique and keyword-rich product descriptions, using alt tags for images, and ensuring your site loads quickly. You can also use SEO plugins like Yoast SEO to help with this.
How can I ensure the security of my WooCommerce webshop?
Ensuring the security of your WooCommerce webshop is crucial to protect your business and customers’ information. Use a secure hosting provider, keep your WordPress and WooCommerce versions updated, use strong passwords, and install security plugins like Wordfence or Sucuri. Also, ensure your site is SSL encrypted.
How can I handle taxes on my WooCommerce webshop?
WooCommerce provides several options for handling taxes. You can set up tax classes and rates, and configure whether taxes will be calculated based on your shop’s address, customer’s shipping address, or customer’s billing address. You can also enable automated taxes with Jetpack and WooCommerce Services.
How can I customize my WooCommerce webshop?
WooCommerce offers numerous customization options. You can customize your shop’s appearance using themes and plugins, customize product pages, and even customize checkout fields. You can also use a page builder like Elementor for more advanced customization.
How can I track sales and analytics on my WooCommerce webshop?
Tracking sales and analytics is essential for understanding your business performance. WooCommerce provides built-in reports that give you insights into your sales, customers, and products. You can also integrate your shop with Google Analytics for more detailed data.
How can I troubleshoot issues on my WooCommerce webshop?
If you encounter issues with your WooCommerce webshop, first check if your WordPress and WooCommerce versions are up-to-date, and if the issue persists with all plugins deactivated. You can also use the WooCommerce System Status report to diagnose issues. If you’re still having trouble, consider reaching out to WooCommerce support or the community forums.