

This article introduces what is probably one of the simplest ways of setting up and running an elastic LAMP stack on the cloud – using Zend Server on AWS.
Note: to be clear elastic does not refer to ElasticSearch here.
More specifically, the workflow described here includes launching a pre-configured AWS CloudFormation template that sets up all the components of a LAMP stack: Zend Server’s certified PHP stack plus all of Zend Server’s add-on features (including Z-Ray), a MySQL database, a Zend Server elastic group consisting of additional Zend Server instances, an elastic load balancer, and other pre-configured security definitions.
This article is perfect for those contemplating moving their production environment to the cloud or those who already have one set up on AWS.
Key Takeaways
- Zend Server on AWS offers a simple method to set up and run an elastic LAMP stack on the cloud. It includes launching a pre-configured AWS CloudFormation template that sets up all components of a LAMP stack.
- The process includes setting up Zend Server’s certified PHP stack, a MySQL database, a Zend Server elastic group, an elastic load balancer, and pre-configured security definitions.
- Managing the stack involves understanding how to manage the main components: Zend Server, PHP, and the RDS MySQL database instance. This can be achieved by accessing the instances list in the EC2 Console, managing the load balancer, and managing the MySQL instance through the RDS Console.
- Deploying an application involves using the WordPress sample application available on the Getting Started page. The application is then deployed on the cluster using the Deploy Application wizard.
- Monitoring the stack can be done using Zend Server’s advanced monitoring capabilities, which notify users when something goes wrong during execution. This includes centrally examining log files for all nodes in the cluster and triggering events when defined thresholds are crossed.
Basic concepts
Zend Server is an application platform for web and mobile PHP apps, which comes with an advanced PHP stack and a set of tools for developing, debugging, deploying and monitoring applications. If you are not familiar with Zend Server, check out Bruno Skvorc’s article for some background.
CloudFormation enables the creation and provisioning of AWS deployments using Amazon EC2, load balancing, auto scaling and other AWS products, to build applications in the cloud. Using a template file to create a collection of resources together as a single stack, CloudFormation enables you to quickly deploy your PHP apps without having to worry about creating and configuring the underlying infrastructure.
To follow the steps outlined here, all you need is a valid AWS account and 30 minutes of spare time.
Step 1: Launching the stack
We’re going to start by opening and logging into the AWS marketplace.
Entering Zend Server in the search box at the top of the page gives us a list of all the available Zend Server AMIs (Amazon Machine Instances). The list includes a wide variety of versions and editions, each supporting different PHP versions and Linux distros. There is even a PHP 5.3 LTS instance available.
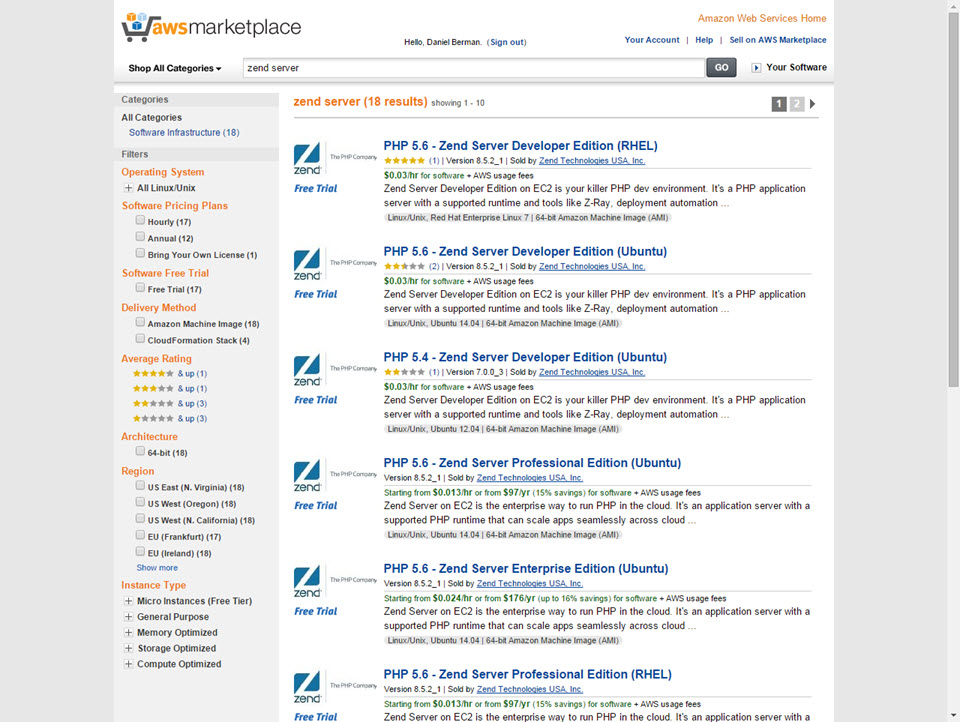
In this case, we’re going to select the “PHP 5.6 – Zend Server Professional Edition (Ubuntu)” instance.
It’s worth noting that only the Professional and Enterprise editions of Zend Server support clustering, so if you’re interested in setting up a development environment the Developer edition would suit your needs perfectly.
On the AMIs page, we now see some general info about the product, support details, a list of useful resources to check out, and pricing details.
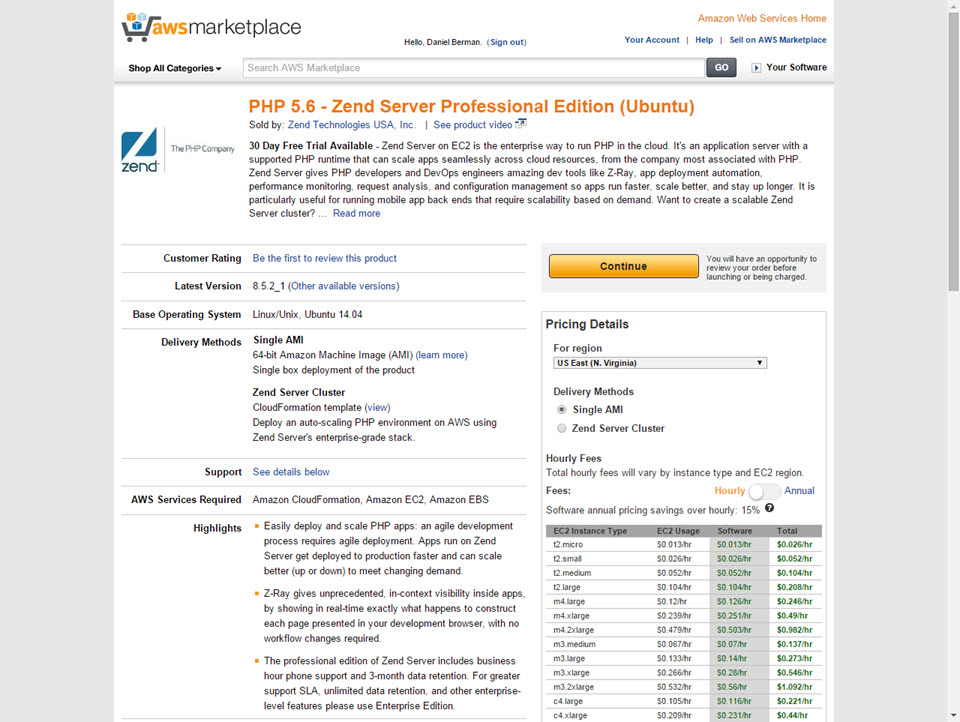
Under Delivery Methods, a Zend Server Cluster option is displayed, and clicking View gives us a description of what a Zend Server cluster looks like together with a detailed diagram of the CloudFormation template.
We are now faced with two options. We can either download the template file and subsequently manually upload it into a separate AWS CloudFormation wizard, or – we can take a closer look at the template in the CloudFormation Designer.
The CloudFormation Designer is a relatively new visual tool that allows you to easily create and modify CloudFormation templates using a very easy-to-use interface.
We’re going to opt for the latter option by clicking the link at the bottom of the dialog.
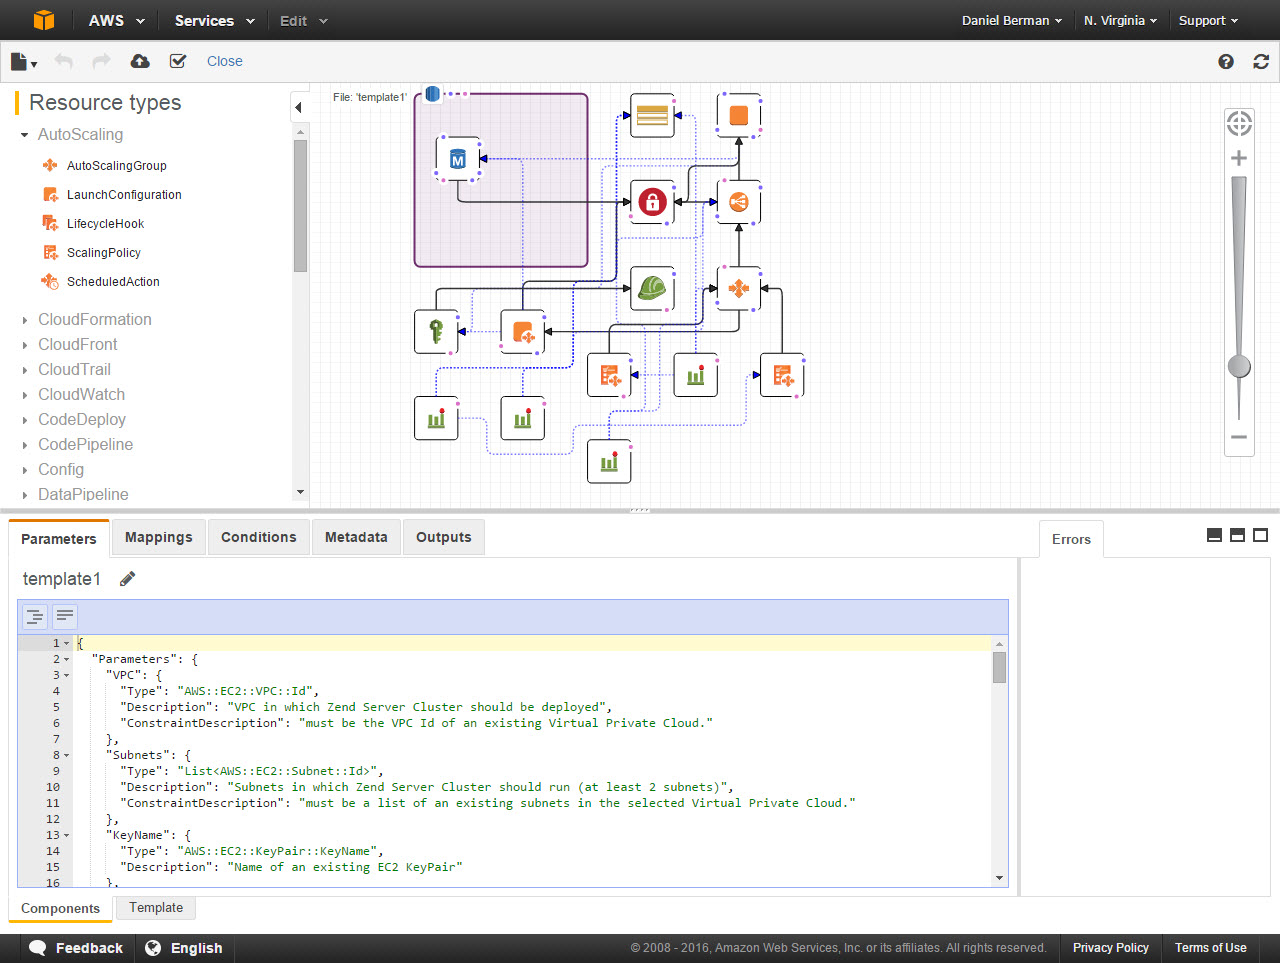
The CloudFormation Designer is opened with our pre-configured template displayed. The diagram in the center of the Designer displays all the various parts of the stack: Zend Server, MySQL database, elastic load balancer, Cloud Alarms, VPC Security Group and the auto-scaling group consisting of additional Zend Server instances.
If needed, you could easily drag-and-drop additional components into the template. Or, you could change the settings of any of the existing components by simply selecting it in the diagram and editing the text file displayed below. It’s worth pointing out that playing with the template should be done with caution and only if you know exactly what you’re doing.
In our case, we’re going to use the default template settings and continue on.
The next step is to create the stack. To do this, we’re going to click the Create Stack icon at the top of the page.
We’re now sent to the AWS Create a New Stack wizard, and we can see that on the first page, our CloudFormation template is already selected.
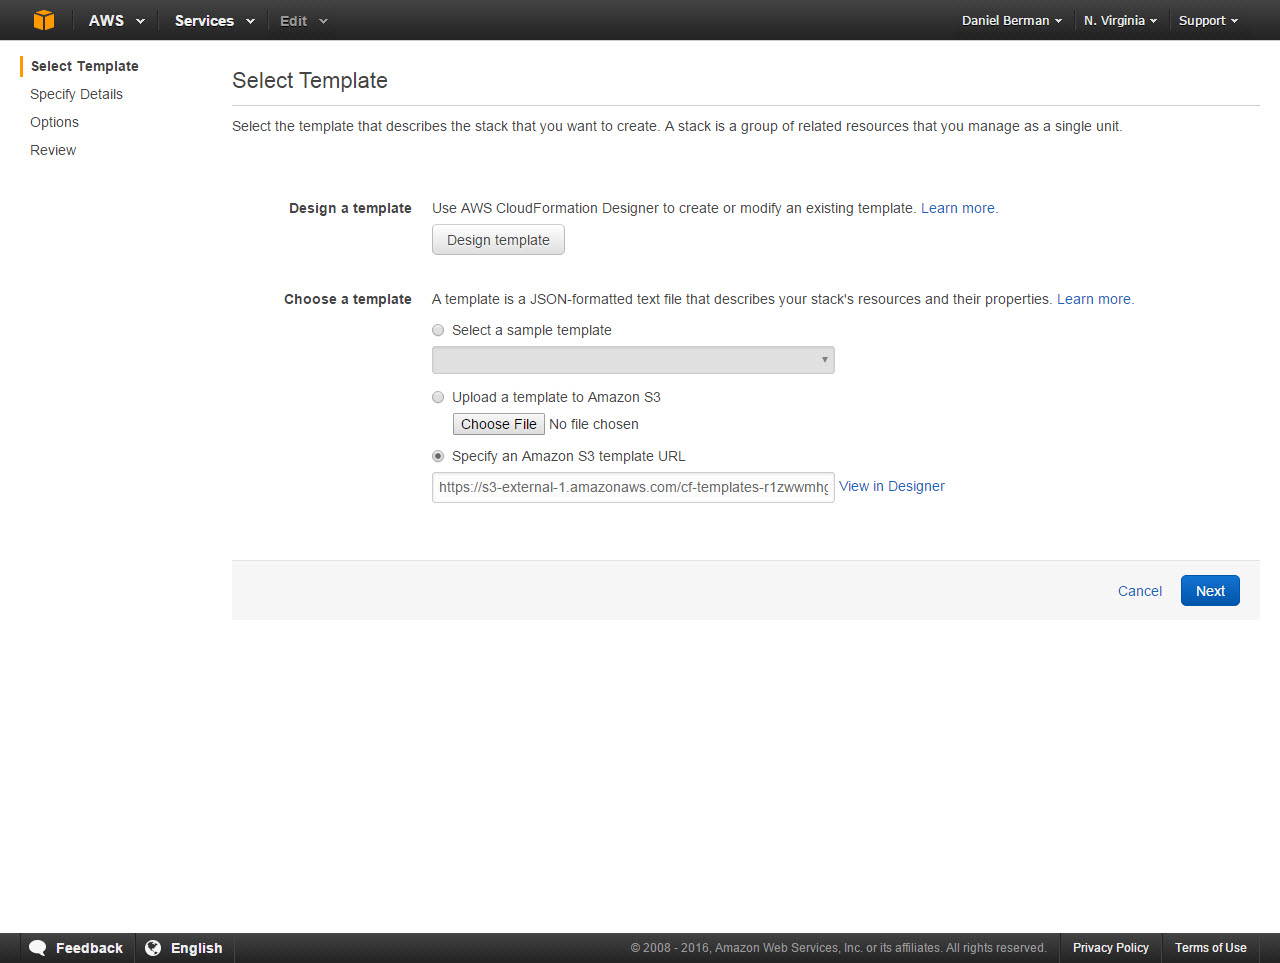
Clicking Next, we now have to specify the details of the stack about to be launched.
First, we’re going to enter a name for the stack for general identification and display purposes.
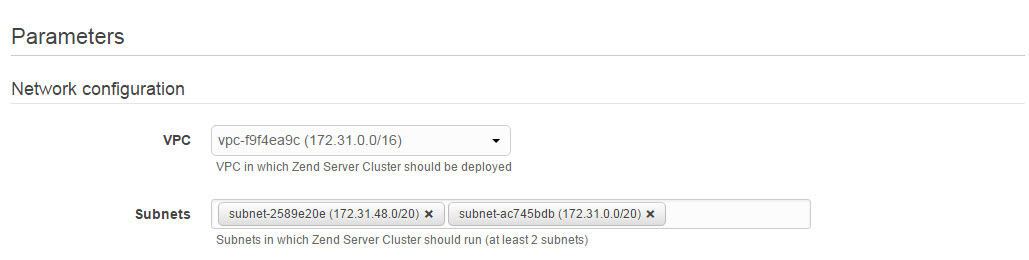
Second, we need to configure the network configurations. We have to select a VPC in which to run the cluster, and two subnets.
The next step is to configure access to our cluster.
We need to first select an existing EC2 keypair to use for accessing the cluster. If you do not have one already set up, do so using the EC2 console. Then, we’re going to enter a password for accessing the Zend Server cluster user interface (please make note of this cluster as we will need it in the next steps of the tutorial), and a username and password for accessing the cluster database. We also have the option to enter an email for receiving notifications from AWS on operational issues.
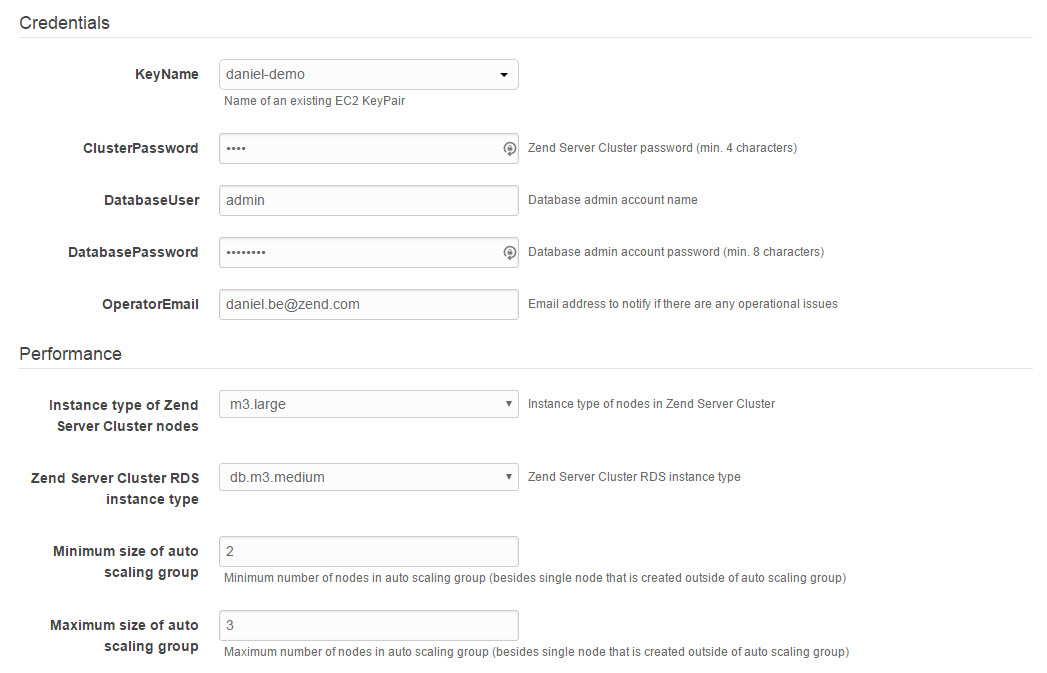
The last step on this page of the wizard is to select the instance types for the Zend Server nodes constructing the cluster, and the cluster database. These settings determine the hardware configurations for these components (CPU, memory, storage, etc.), and the default settings (m3.large and db.m3.medium, respectively) should suffice for running a cluster of a few nodes (up to 5) with a medium load (50-60 requests per second). Each Instance type has a different pricing, so you need to take that into consideration.
In this step we also need to determine the minimum and maximum size of our auto-scaling group, or in other words – the amount of servers we want the cluster to start with and the maximum amount of servers our cluster can scale to in case of an increase in traffic load.
Clicking Next takes us to the Options page.
Here we can configure tags for the stack, which are basically key-value pairs used to identify the stack for purposes such as cost allocation, and a set of other advanced options.
For example, we can configure the number of minutes before stack creation times out or we can define the resources that you want to protect from unintentional updates during a stack update.
We’re going to run with the default value and advance to the last and final page of the wizard – the Review page.
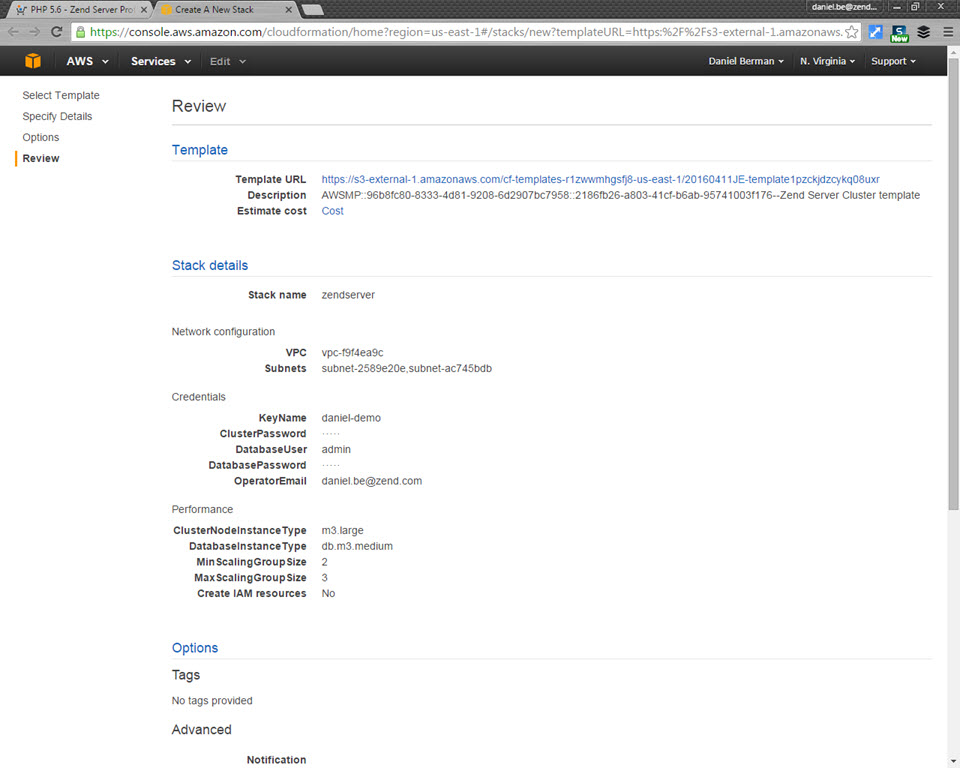
Here we have a final chance of taking a look at the entire stack before we hit the launch button. If we do decide we want to change any of the configurations, now’s the time to do so.
One final step we need to take here is to select the check-box at the bottom of the page – this acknowledges that we are aware that the template file is going to create a new IAM profile.
Since we’re fine with the current setup, we’re going to click the Create button at the bottom of the page.
The CloudFormation management console is displayed, and after a minute or two the stack we just launched is displayed in the Stacks list.
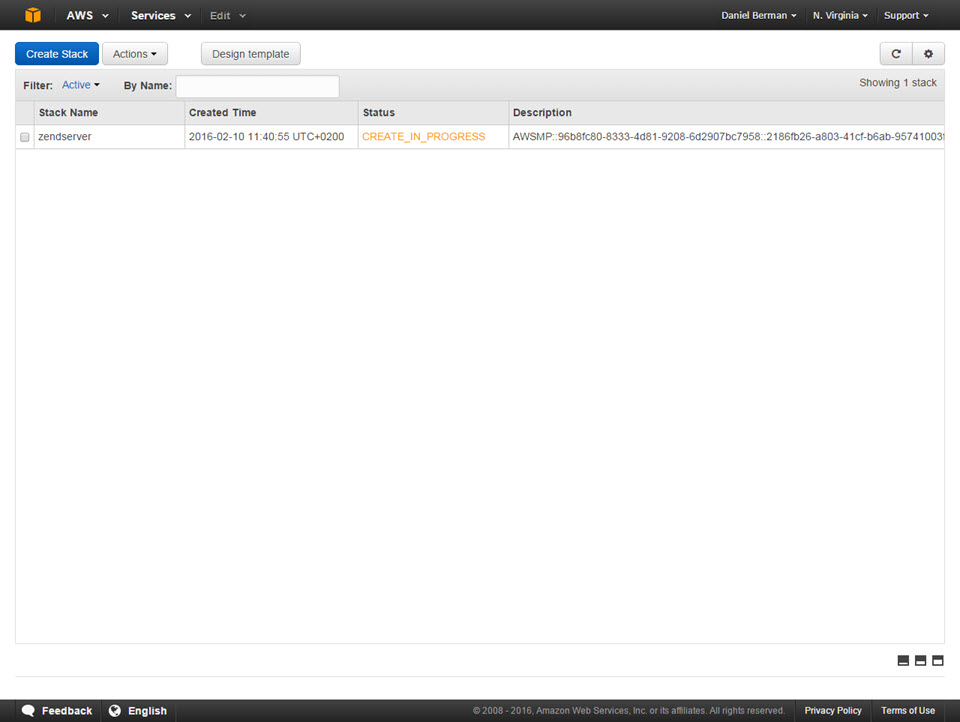
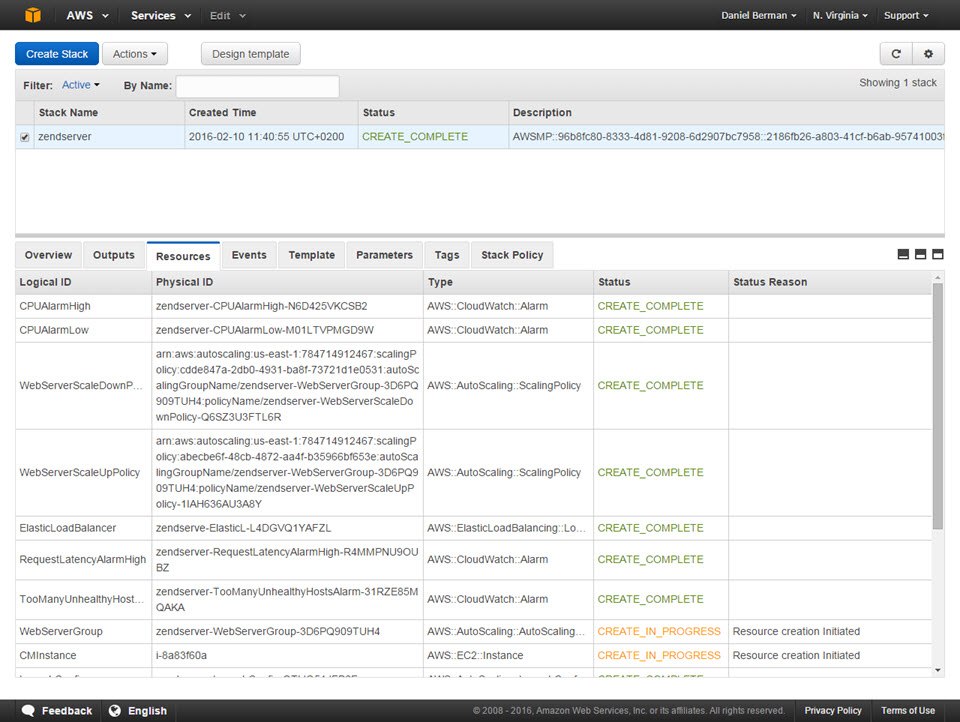
Selecting it, and opening up the display tabs at the bottom of the page, we can see that deployment is in progress.
This may take a few minutes to complete. In the meantime, we can select the Resources tab and view all the different stack components being built.
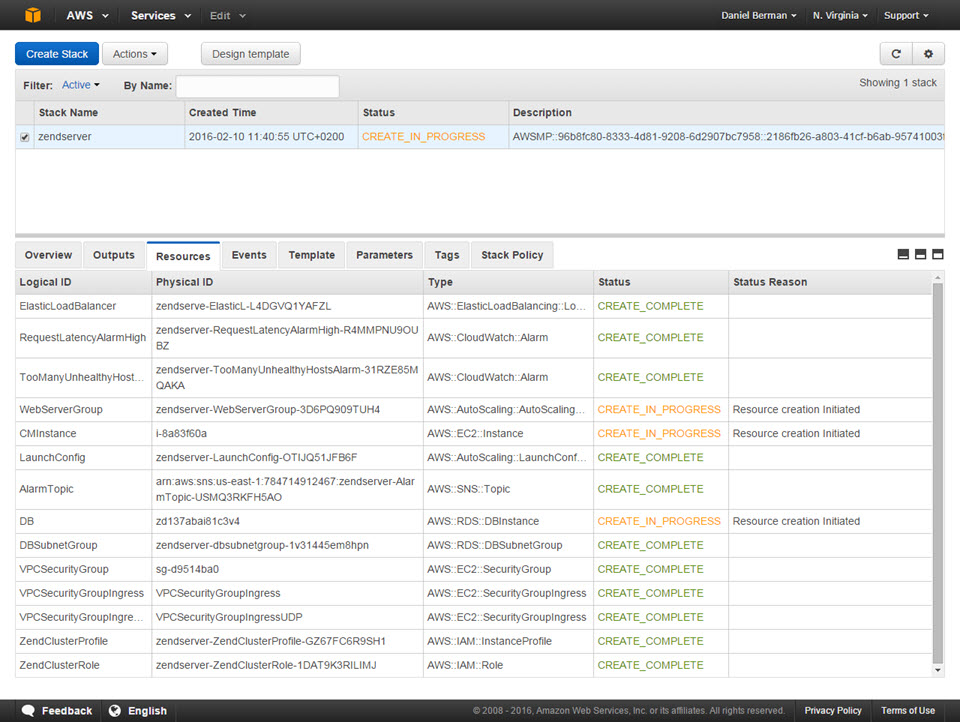
After a while, the status of the stack changes to complete, and the deployment process of the cluster is finished.
Step 2: Managing the stack
In just a few clicks, we succeeded in setting up an elastic and auto-scaling PHP cluster on the cloud which includes all the components of a production-grade LAMP stack.
Our next step is to understand how to manage the main components constructing the stack: Zend Server, PHP, and our RDS MySQL database instance.
First, let’s take a closer look at our cluster of Zend Server nodes. One way to do this is to open the Instances list in the EC2 Console.
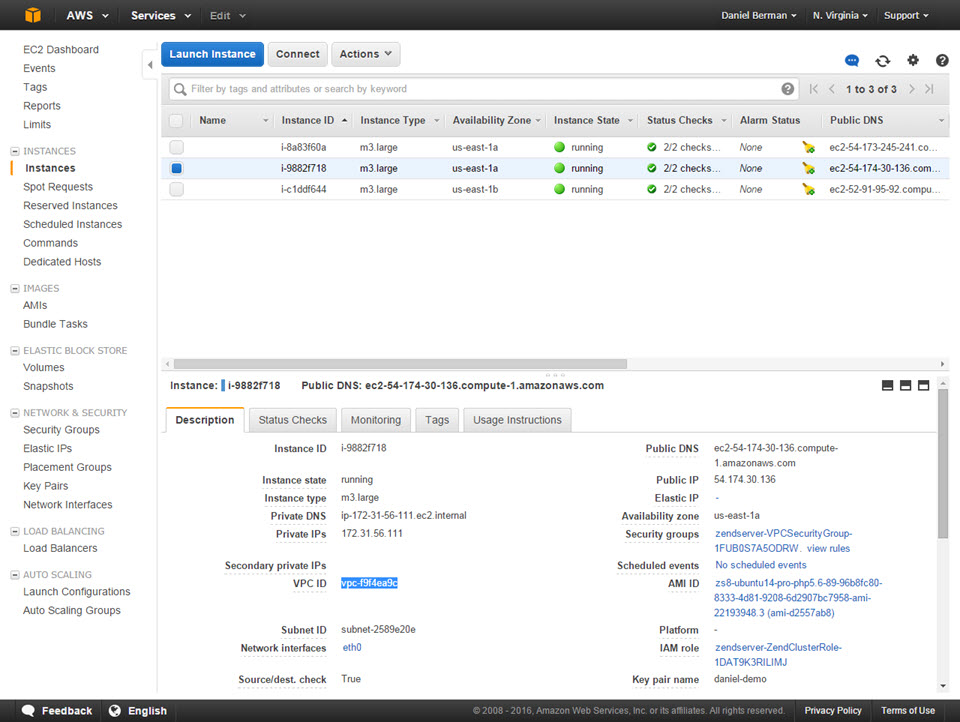
The three servers we defined when launching the stack are up and running. In case of an increase in traffic, we could actually observe how servers are slowly added to the cluster in accordance with the scaling policy we defined.
The EC2 Console is also the place to manage our load balancer. Simply click Load Balancers in the menu on the left.
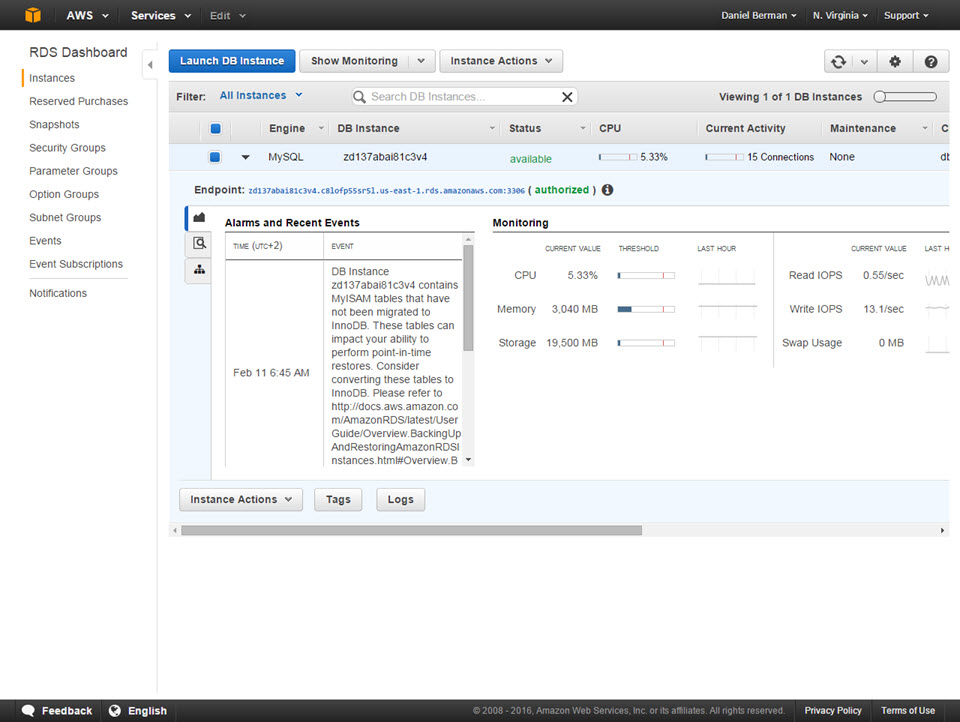
Second, we’re going to open the RDS Console where we can view and manage our MySQL instance.
Last but not least, we’re now going to access Zend Server. To do this, go back to the CloudFormation Console.

Select the Outputs tab, and click the URL of the Zend Server Cluster.
The Zend Server login page is then displayed, and to access Zend Server, all we have to do is enter the password we defined earlier in the wizard for accessing the cluster user interface, and click Login.
The Zend Server UI loads, and we’re presented with the Zend Server Guide Page. This page contains some useful resources for learning about Zend Server and some sample applications that can be deployed. We’ll get back to this page in the next step.
The Extensions page (PHP | Extensions) allows us to easily configure and manage our PHP for the entire cluster. We can enable and disable PHP extensions and configure directives. The best way to do this is to use the search box at the top-right corner of the page to locate a specific directive or extension.
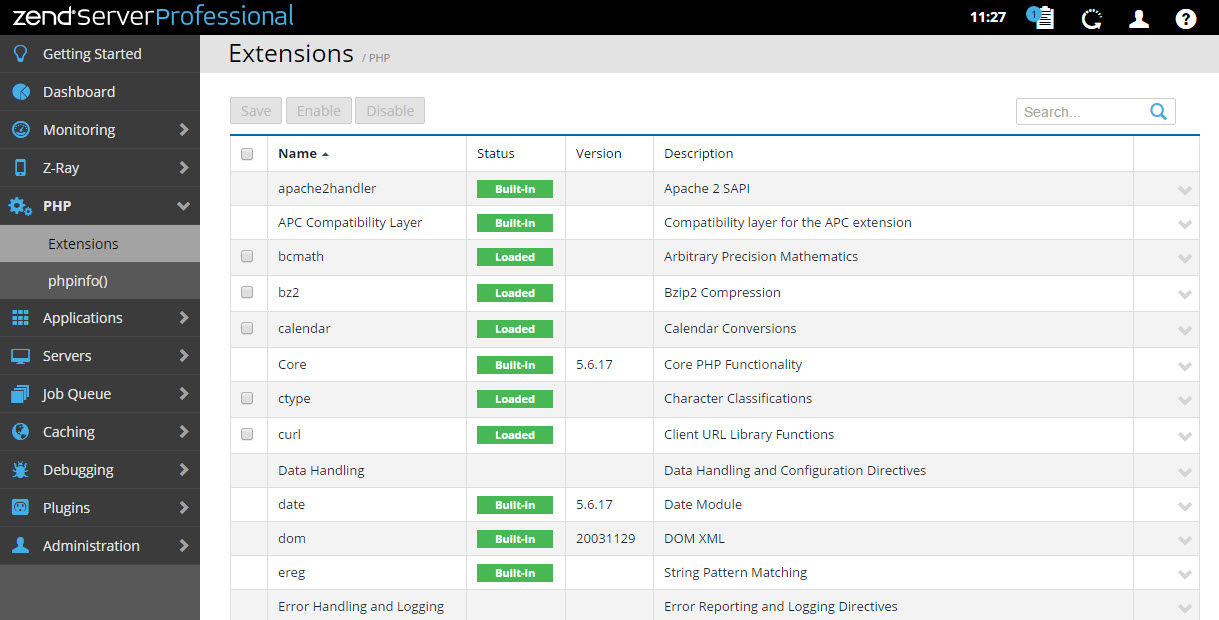
Once saved, the new configurations are propagated across the entire cluster. This is an important benefit that should be understood since usually, the task of syncing the PHP .ini file across a cluster and restarting Apache is not a simple one to say the least.
Step 3: Deploying an application
It’s time to get our hands dirty and deploy some code onto the cluster.
To do this, we’re going to use the WordPress sample application which is available on the Getting Started page. As mentioned before, the Getting Started page is a great place to start learning about the various features available in Zend Server and is recommended for first-time users.
Clicking the WordPress icon in the Deploy Sample Apps page, Zend Server downloads a ready-made WordPress .ZPK file and uploads it into the Deploy Application wizard.
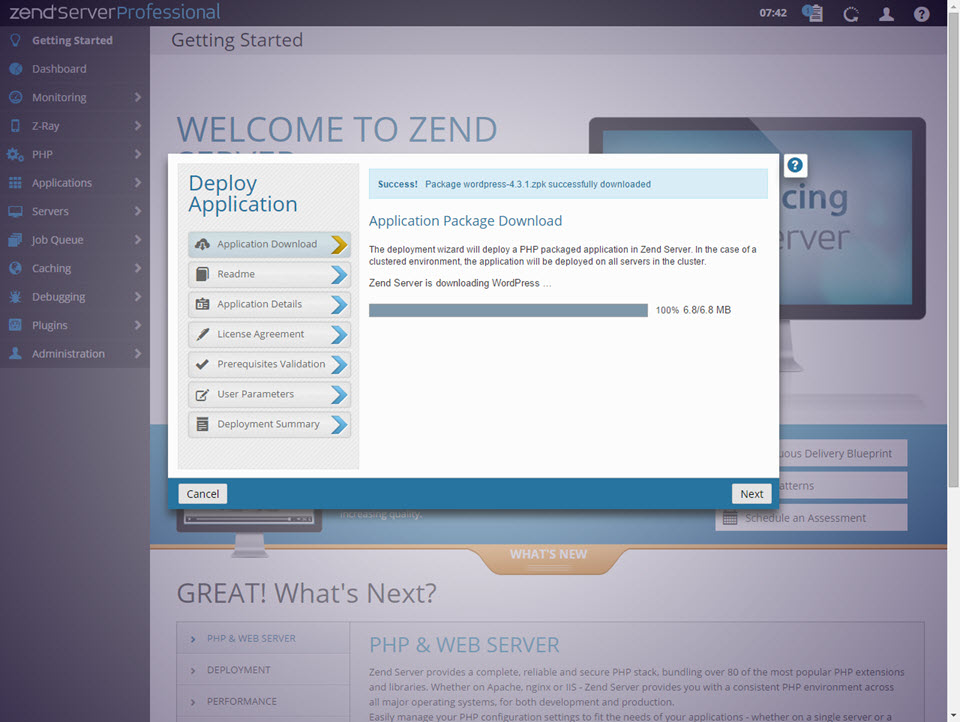
A few words about Zend deployment before we continue. A .ZPK file (Zend Deployment Package) is a standardized application package that includes all of the application’s source code, together with metadata that defines the parameters and prerequisites necessary for deploying the application (e.g. database credentials, required PHP extensions) and any additional hook scripts you would like to use during the various stages of deployment.
This feature is a huge help in standardizing and automating the deployment process and is used for creating a seamless continuous delivery pipeline.
Let’s continue. Advancing on in the wizard, we’re presented with the WordPress readme file, which we can take a look at and continue on.
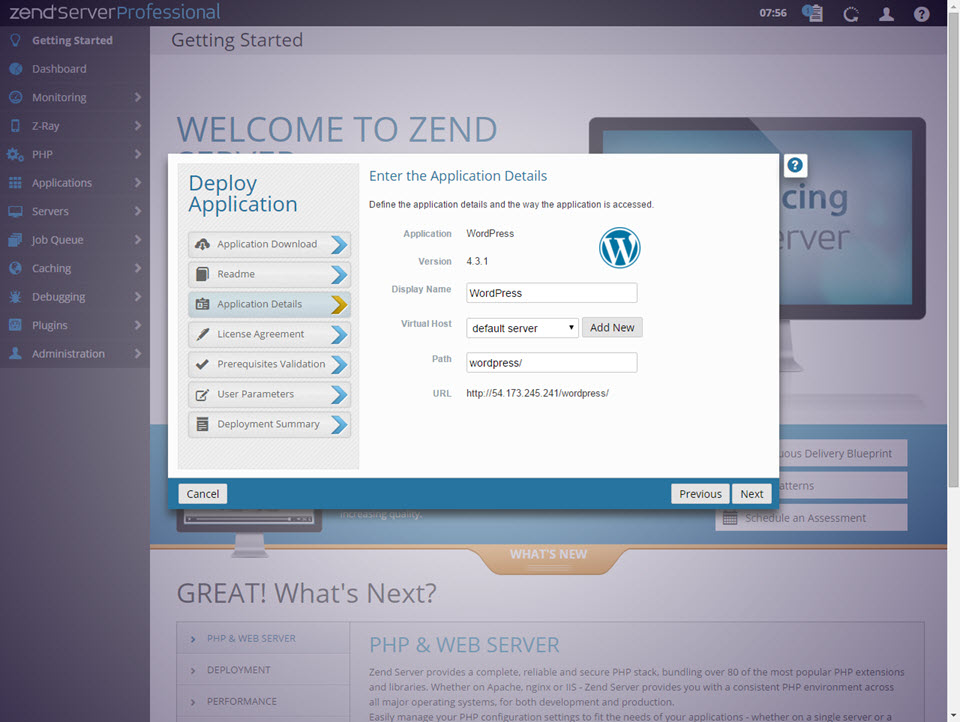
On the Application Details page, we need to set a path for our application. If we had defined a new virtual host, this would be the place to select it, but we can make do with the default server host for now.
After reading and accepting the license agreement on the next page, we see a list of all the application prerequisites as defined in the package.
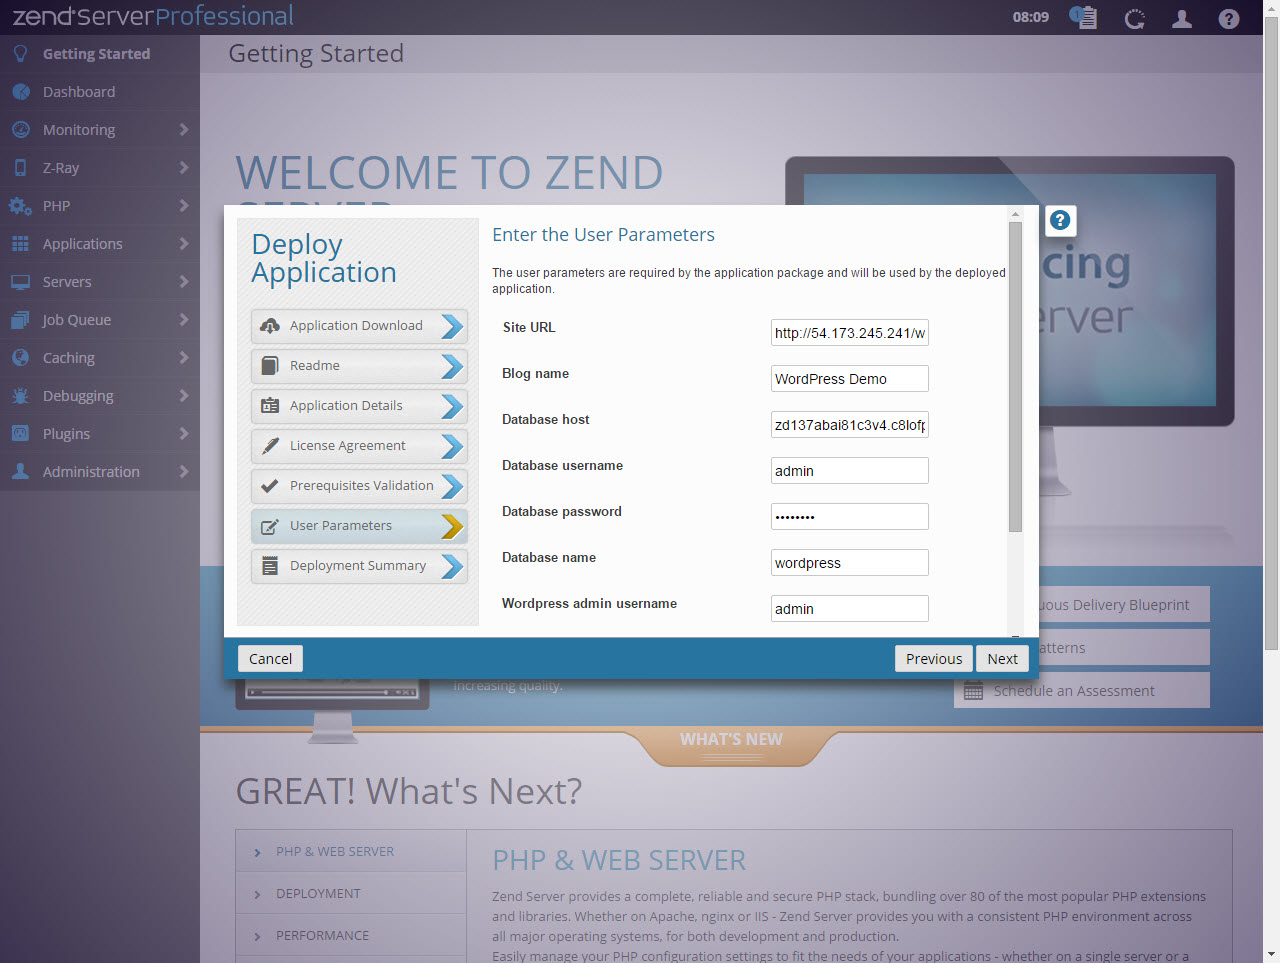
Next, we need to enter all the user parameters needed to deploy the application. Again, these were defined in the application package. To fill in the fields here, we need to access our RDS instance (from the RDS Console) and enter the database host, username and password. We will also need to enter the credentials for accessing the WordPress admin panel.
Please note, that for real-life applications, it is recommended to use a second and separate RDS instance and not the same database used for the Zend Server cluster. This ensures optimized performance and high availability.
Then, all we have to do is click the Deploy button on the Summary page and the WordPress application is deployed on the cluster.
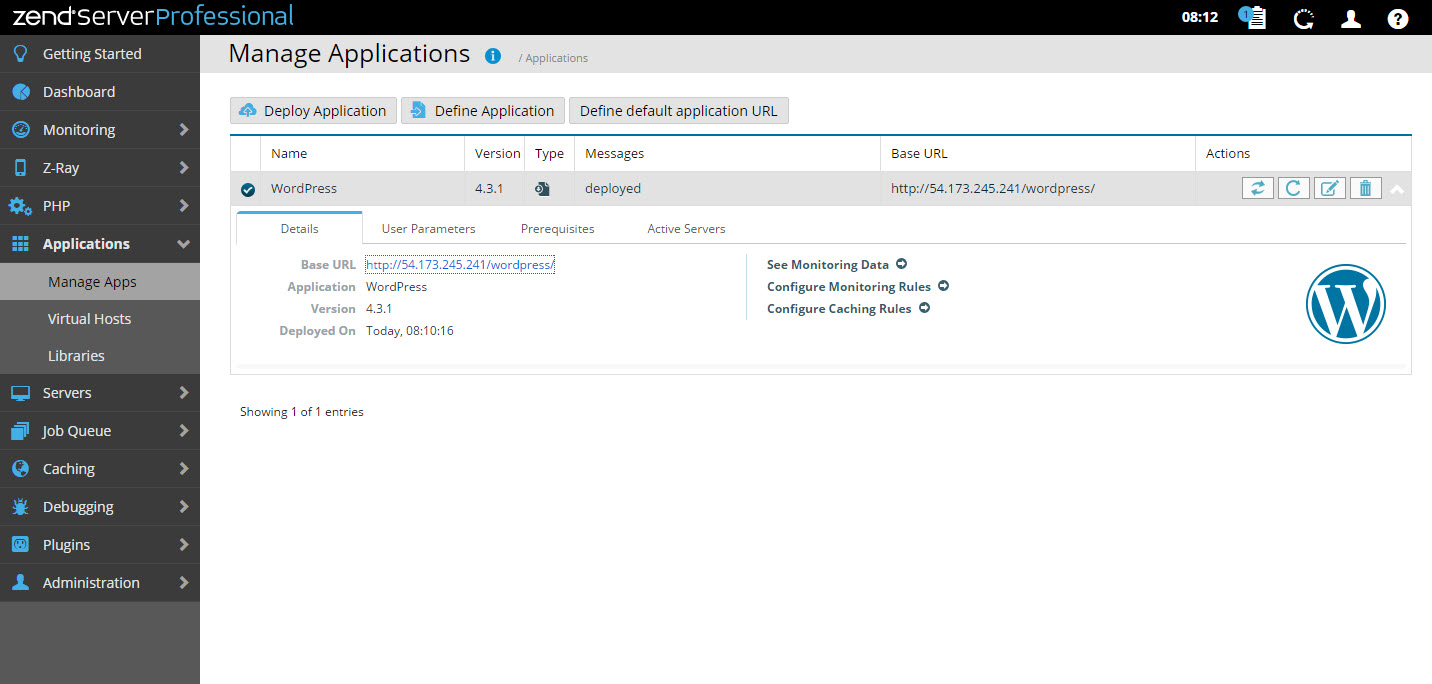
To take a look at the application, select it in the Applications list and click the URL.
Tip: Z-Ray is disabled by default. To enable it, go to Z-Ray | Access and turn it on.
Step 4: Monitoring the stack
Our final step is to understand some of the application and server monitoring features available in Zend Server.
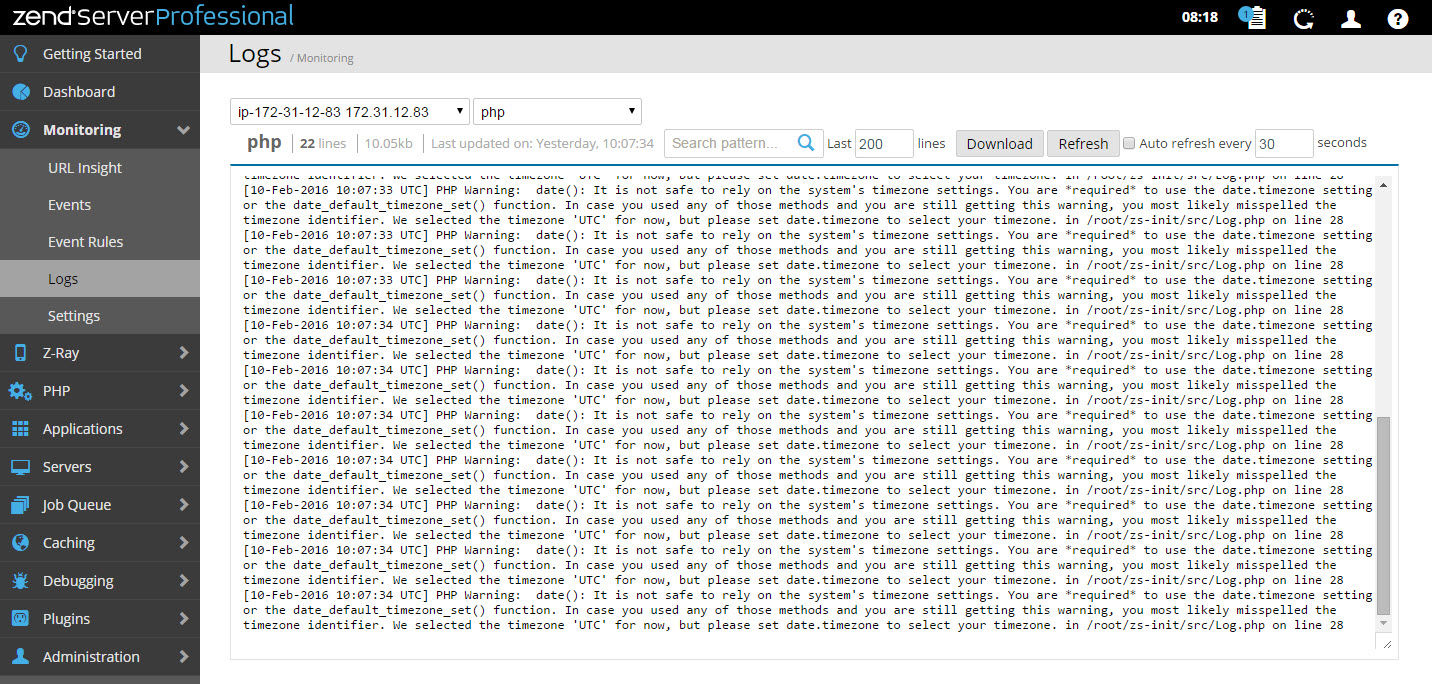
On the server and PHP level, Zend Server simplifies log analysis in a cluster scenario by allowing you to centrally examine log files for all the nodes in the cluster. Instead of manually going through each log file on each server, you can access the logs via the user interface.
To do this, go to Monitoring | Logs. Select the server you want to monitor and the specific log file.
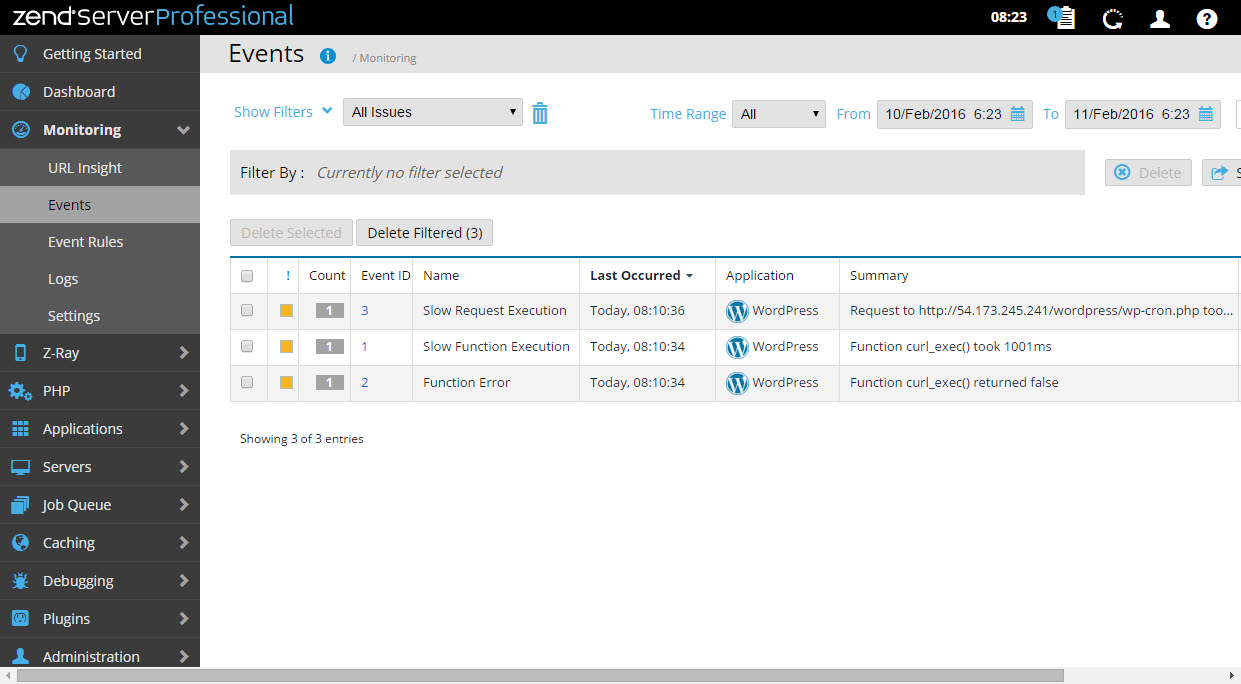
On the application level, Zend Server offers a set of advanced monitoring capabilities that will notify us when something went wrong during execution.
Zend Monitoring for example, triggers and displays events when thresholds we defined are crossed. If for example, a request took too long to execute, an event is triggered and we can be notified by email of the event.
URL Insight is another useful tool which displays reports on critical URLs. For example, we can view a list of the ten most visited URLs, or – the ten slowest URLs.
Conclusion
Running PHP clusters on the cloud is a huge task which usually involves a long list of challenges. From executing a scaling policy, to database handling, log analysis, session sharing and PHP synchronization. While there are numerous existing solutions to handle these tasks, most include manual labor and hand holding. Writing and managing scripts to execute all of the above is of course a valid option, but also time and resource consuming.
The elastic LAMP stack provided by Zend Server on AWS provides a very compelling alternative. Simplifying cluster management, this solution provides an easy answer to most of the common tasks involved in running a PHP cluster.
Hope you enjoyed the read!
Frequently Asked Questions (FAQs) about Running an Elastic LAMP Stack on AWS
What is the difference between an Elastic LAMP stack and a regular LAMP stack?
An Elastic LAMP stack is a scalable version of the traditional LAMP (Linux, Apache, MySQL, PHP) stack. It is designed to automatically adjust to changes in load or traffic, making it an ideal solution for applications that experience variable demand. On the other hand, a regular LAMP stack is a static setup that doesn’t automatically scale, making it less suitable for applications with fluctuating demand.
How does AWS support the Elastic LAMP stack?
AWS provides several services that support the Elastic LAMP stack. These include Elastic Beanstalk for easy deployment and scaling, RDS for managing databases, and EC2 for running applications. AWS also offers CloudWatch for monitoring and CloudFormation for infrastructure management.
What are the benefits of running an Elastic LAMP stack on AWS?
Running an Elastic LAMP stack on AWS offers several benefits. It provides scalability, allowing your application to handle increased traffic without manual intervention. It also offers high availability, as AWS services are designed to be reliable and fault-tolerant. Additionally, AWS provides a range of tools for monitoring and managing your stack, making it easier to maintain and troubleshoot.
How can I install an Elastic LAMP stack on AWS?
Installing an Elastic LAMP stack on AWS involves several steps. First, you need to set up an EC2 instance and install the necessary software (Linux, Apache, MySQL, PHP). Then, you need to configure Elastic Beanstalk to manage your application and RDS to handle your database. Finally, you need to set up CloudWatch for monitoring and CloudFormation for infrastructure management.
Can I use other databases with an Elastic LAMP stack on AWS?
Yes, while MySQL is traditionally used in a LAMP stack, AWS supports several other databases. These include PostgreSQL, Oracle, and SQL Server. You can choose the database that best fits your application’s needs.
How can I monitor my Elastic LAMP stack on AWS?
AWS provides CloudWatch, a monitoring service that allows you to collect and track metrics, collect and monitor log files, and set alarms. You can use CloudWatch to gain insight into your Elastic LAMP stack’s performance and troubleshoot any issues.
How can I scale my Elastic LAMP stack on AWS?
AWS provides several services that allow you to scale your Elastic LAMP stack. These include Elastic Beanstalk, which automatically scales your application based on defined conditions, and RDS, which allows you to scale your database.
What is the cost of running an Elastic LAMP stack on AWS?
The cost of running an Elastic LAMP stack on AWS depends on several factors, including the size and number of EC2 instances you use, the amount of data you store in RDS, and the amount of data you transfer. AWS provides a pricing calculator that can help you estimate your costs.
How can I secure my Elastic LAMP stack on AWS?
AWS provides several services that can help you secure your Elastic LAMP stack. These include Identity and Access Management (IAM) for controlling access to your resources, Security Groups for controlling inbound and outbound traffic, and AWS Shield for DDoS protection.
Can I automate the deployment of my Elastic LAMP stack on AWS?
Yes, AWS provides several services that can help you automate the deployment of your Elastic LAMP stack. These include Elastic Beanstalk, which automates the deployment process, and CloudFormation, which allows you to describe and provision all the infrastructure resources in your cloud environment.