In this particular post, we’ll demo a solution to install multiple versions of Phalcon and PHP and run them on a single web server. PHP 5.5.x and 5.6.x will be used here, but you can replace them with other versions. Any servers that support PHP-FPM should be enough but we recommend using Nginx. The environment used in this tutorial is Fedora OS – a Linux system, but the instructions are almost identical for any other *nix OS.
Preliminary Note
This tutorial will cover the installation of PHP 5.5.x with Phalcon 1.3.x and PHP 5.6.x with Phalcon 2.0.0. We’ll also build some additional PHP extensions such as APC, memcache, memcached, and ioncube.
Installing Nginx
Nginx is an available package in Fedora OS which we can install as follows:
sudo yum install nginxThen, we create the system startup links for Nginx and start it
sudo chkconfig nginx on
  sudo service nginx start
Building PHP
Before starting with PHP, we need to install the prerequisites for building PHP5:
- gcc or some other compiler suite.
- libc-dev, provides the C standard library, including headers.
- make, which is the build-management tool PHP uses.
- autoconf (2.59 or higher) for generating the configure script.
- automake (1.4 or higher), generates Makefile.in files.
- libtool, helps us manage shared libraries.
- bison (2.4 or higher), for generating the PHP parser.
- (optional) re2c, which is used to generate the PHP lexer. As the git repository already contains a generated lexer you will only need re2c if you wish to make changes to it.
On Centos/Fedora you can install all these with the following command:
sudo yum install gcc libxml2-devel libXpm-devel gmp-devel libicu-devel t1lib-devel aspell-devel openssl-devel bzip2-devel libcurl-devel libjpeg-devel libvpx-devel libpng-devel freetype-devel readline-devel libtidy-devel libxslt-devel libmcrypt-devel pcre-devel curl-devel mysql-devel ncurses-devel gettext-devel net-snmp-devel libevent-devel libtool-ltdl-devel libc-client-devel postgresql-devel bison gcc makeThen we need to get its source code. There are two ways to do this: You can either download an archive from PHP’s download page or clone the git repository from Github.
We recommend checking out the source code from git, because it provides you with an easy way to keep your installation up-to-date and to try your code with different versions. A git checkout is also required if you want to submit patches or pull requests for PHP.
To clone the repository, run the following commands in your terminal:
sudo mkdir /opt/source && cd /opt/source
  git clone git@github.com:php/php-src.git && cd php-src
By default you will be on the master branch, so if you want to move to a development version, you need to check out the stable branch. For example.
  PHP 5.3:  git checkout PHP-5.3
  PHP 5.4:  git checkout PHP-5.4
  PHP 5.6:  git checkout PHP-5.6
  PHP HEAD: git checkout master
Before going to the individual build steps, we must execute some commands for a “default” PHP build. This is only necessary for builds from git.
sudo ./buildconf./buildconf generates the configuration script. This may take several minutes.
In my opinion, storing the whole web server in a single directory is best, so I use /opt here. Open the terminal and type the following command.
sudo mkdir -p /opt/php-5.6
  sudo mkdir -p /opt/php-5.5
Once the ./configure script is generated via the step above, you can use it to customize your PHP build. You can list all supported options using –help:
./configure --helpThe command above will list various generic options, which are supported by all autoconf-based configuration scripts. One of them is already mentioned –prefix=DIR, which changes the installation directory used by make install. Another useful option is -C, which will cache the result of various tests in the config.cache file and speed up subsequent ./configure calls. Using this option only makes sense once you already have a working build and want to quickly change between different configurations.
Here are some useful settings:
[...]

  Usage: ./configure [OPTION]... [VAR=VALUE]...

  To assign environment variables (e.g., CC, CFLAGS...), specify them as
  VAR=VALUE.  See below for descriptions of some of the useful variables.

  Defaults for the options are specified in brackets.

  Configuration:
    -h, --help              display this help and exit
        --help=short        display options specific to this package
        --help=recursive    display the short help of all the included packages
    -V, --version           display version information and exit
    -q, --quiet, --silent   do not print `checking ...' messages
        --cache-file=FILE   cache test results in FILE [disabled]
    -C, --config-cache      alias for `--cache-file=config.cache'
    -n, --no-create         do not create output files
        --srcdir=DIR        find the sources in DIR [configure dir or `..']

  Installation directories:
    --prefix=PREFIX         install architecture-independent files in PREFIX
                            [/usr/local]
    --exec-prefix=EPREFIX   install architecture-dependent files in EPREFIX
                            [PREFIX]

  By default, `make install' will install all the files in
  `/usr/local/bin', `/usr/local/lib' etc.  You can specify
  an installation prefix other than `/usr/local' using `--prefix',
  for instance `--prefix=$HOME'.

  For better control, use the options below.

  Fine tuning of the installation directories:
    --bindir=DIR            user executables [EPREFIX/bin]
    --sbindir=DIR           system admin executables [EPREFIX/sbin]
    --libexecdir=DIR        program executables [EPREFIX/libexec]
    --sysconfdir=DIR        read-only single-machine data [PREFIX/etc]
    --sharedstatedir=DIR    modifiable architecture-independent data [PREFIX/com]
    --localstatedir=DIR     modifiable single-machine data [PREFIX/var]
    --libdir=DIR            object code libraries [EPREFIX/lib]
    --includedir=DIR        C header files [PREFIX/include]
    --oldincludedir=DIR     C header files for non-gcc [/usr/include]
    --datarootdir=DIR       read-only arch.-independent data root [PREFIX/share]
    --datadir=DIR           read-only architecture-independent data [DATAROOTDIR]
    --infodir=DIR           info documentation [DATAROOTDIR/info]
    --localedir=DIR         locale-dependent data [DATAROOTDIR/locale]
    --mandir=DIR            man documentation [DATAROOTDIR/man]
    --docdir=DIR            documentation root [DATAROOTDIR/doc/PACKAGE]
    --htmldir=DIR           html documentation [DOCDIR]
    --dvidir=DIR            dvi documentation [DOCDIR]
    --pdfdir=DIR            pdf documentation [DOCDIR]
    --psdir=DIR             ps documentation [DOCDIR]

  [...]
After finishing the preparation we install the PHP version 5.6. Run the following:
./configure \
--prefix=/opt/php-5.6 \
--with-pdo-pgsql \
--with-zlib-dir \
--with-freetype-dir \
--enable-mbstring \
--with-libxml-dir=/usr \
--enable-soap \
--enable-calendar \
--with-curl \
--with-mcrypt \
--with-zlib \
--with-gd \
--with-pgsql \
--disable-rpath \
--enable-inline-optimization \
--with-bz2 \
--with-zlib \
--enable-sockets \
--enable-sysvsem \
--enable-sysvshm \
--enable-pcntl \
--enable-mbregex \
--with-mhash \
--enable-zip \
--with-pcre-regex \
--with-mysql \
--with-pdo-mysql \
--with-mysqli \
--with-png-dir=/usr \
--enable-gd-native-ttf \
--with-openssl \
--with-fpm-user=nginx \
--with-fpm-group=nginx \
--with-libdir=lib64 \
--enable-ftp \
--with-imap \
--with-imap-ssl \
--with-kerberos \
--with-gettext \
--with-gd \
--with-jpeg-dir=/usr/lib/
--enable-fpm
The last switch (–enable-fpm) makes this PHP version work with PHP-FPM. If you want to use this PHP-FPM version with Apache, please use --with-fpm-user=apache and --with-fpm-group=apache. On the other hand, if you want to use this PHP-FPM version with nginx, please use --with-fpm-user=nginx and --with-fpm-group=nginx.
A successful message should be printed in the terminal like so:
[...]

creating libtool
appending configuration tag "CXX" to libtool

Generating files
configure: creating ./config.status
creating main/internal_functions.c
creating main/internal_functions_cli.c
+--------------------------------------------------------------------+
| License:                                                           |
| This software is subject to the PHP License, available in this     |
| distribution in the file LICENSE.  By continuing this installation |
| process, you are bound by the terms of this license agreement.     |
| If you do not agree with the terms of this license, you must abort |
| the installation process at this point.                            |
+--------------------------------------------------------------------+

Thank you for using PHP.

config.status: creating php5.spec
config.status: creating main/build-defs.h
config.status: creating scripts/phpize
config.status: creating scripts/man1/phpize.1
config.status: creating scripts/php-config
config.status: creating scripts/man1/php-config.1
config.status: creating sapi/cli/php.1
config.status: creating sapi/fpm/php-fpm.conf
config.status: creating sapi/fpm/init.d.php-fpm
config.status: creating sapi/fpm/php-fpm.service
config.status: creating sapi/fpm/php-fpm.8
config.status: creating sapi/fpm/status.html
config.status: creating sapi/cgi/php-cgi.1
config.status: creating ext/phar/phar.1
config.status: creating ext/phar/phar.phar.1
config.status: creating main/php_config.h
config.status: executing default commands
Now, you can use make to perform the actual compilation:
makeThe main result of this operation will be PHP binaries for the enabled SAPIs (by default sapi/cli/php and sapi/cgi/php-cgi), as well as shared extensions in the modules/ directory.
Now you can run “make install” to install PHP into /usr/local (default) or other directories by using the --prefix configuration. In this case it’s /opt/php-5.6
sudo make installPlease note that make install will not create an ini file.
/opt/php-5.6/bin/php --ini
Configuration File (php.ini) Path: /opt/php-5.6/lib
Loaded Configuration File:         (none)
Scan for additional .ini files in: (none)
Additional .ini files parsed:      (none)
Copy php.ini and php-fpm.conf to the correct directory:
sudo cp /opt/source/php-src/php-fpm.conf.default /opt/php-5.6/etc/php-fpm.conf
sudo cp /opt/source/php-src/php.ini-production /opt/php-5.6/lib/php.ini
We verify and check the php version one more time.
/opt/php-5.6/bin/php --ini
  Configuration File (php.ini) Path: /opt/php-5.6/lib
  Loaded Configuration File:         /opt/php-5.6/lib/php.ini
  Scan for additional .ini files in: (none)
  Additional .ini files parsed:      (none)

  ### Checking php
  /opt/php-5.6/bin/php --version
  PHP 5.6.2-dev (cli) (built: Oct  2 2014 17:20:23)
  Copyright (c) 1997-2014 The PHP Group
  Zend Engine v2.6.0, Copyright (c) 1998-2014 Zend Technologies
Open /opt/php-5.6/etc/php-fpm.conf and adjust the settings in the listen line. You must change to an unused port (e.g. 9001; the port 9000 might be in use by Fedora)
vi /opt/php-5.6/etc/php-fpm.conf[...]
pid = run/php-fpm.pid
[...]
user = nginx
group = nginx
[...]
listen = 127.0.0.1:9001
[...]
#include=/opt/php-5.6/etc/pool.d/*.confInit script setup
You will probably want to create an init script for your new php-fpm. Luckily, PHP 5.3+ already provides it for you, simply copy the init script to your directory and change permissions:
sudo cp /opt/source/php-src/sapi/fpm/init.d.php-fpm /etc/init.d/php5.6-fpm
  sudo chmod 755 /etc/init.d/php5.6-fpm
Your init script is ready. Now, you are able to start, stop and reload php-fpm:
sudo /etc/init.d/php5.6-fpm start
  sudo /etc/init.d/php5.6-fpm stop
  sudo /etc/init.d/php5.6-fpm reload
Building the second PHP (5.5.x)
We open up the terminal and type the following command.
git checkout PHP-5.5
sudo ./buildconf
./configure \
--prefix=/opt/php-5.5 \
--with-pdo-pgsql \
--with-zlib-dir \
--with-freetype-dir \
--enable-mbstring \
--with-libxml-dir=/usr \
--enable-soap \
--enable-calendar \
--with-curl \
--with-mcrypt \
--with-zlib \
--with-gd \
--with-pgsql \
--disable-rpath \
--enable-inline-optimization \
--with-bz2 \
--with-zlib \
--enable-sockets \
--enable-sysvsem \
--enable-sysvshm \
--enable-pcntl \
--enable-mbregex \
--with-mhash \
--enable-zip \
--with-pcre-regex \
--with-mysql \
--with-pdo-mysql \
--with-mysqli \
--with-png-dir=/usr \
--enable-gd-native-ttf \
--with-openssl \
--with-fpm-user=nginx \
--with-fpm-group=nginx \
--with-libdir=lib64 \
--enable-ftp \
--with-imap \
--with-imap-ssl \
--with-kerberos \
--with-gettext \
--with-gd \
--with-jpeg-dir=/usr/lib/ \
--enable-fpm

make && sudo make install
Building PHP Phalcon extensions
To install multiple versions of Phalcon including Phalcon 2.0, we need to install Zephir
git clone https://github.com/json-c/json-c.git
  cd json-c
  sh autogen.sh
  ./configure
  make && sudo make install

  git clone https://github.com/phalcon/zephir
  cd zephir
  sudo ./install -c
There are many ways to install PHP extensions. We will use phpize build it.
Phpize plays a similar role as the ./buildconf script used for PHP builds: first, it will import the PHP build system into your extension by copying files from $PREFIX/lib/php/build. Among these files are acinclude.m4 (PHP’s M4 macros), phpize.m4 (which will be renamed to configure.in in your extension and contains the main build instructions) and run-tests.php.
Then, phpize will invoke autoconf to generate a ./configure file, which can be used to customize the extension build. Such as installation memcached you must adding --enable-memcache .
Remember! You must specify the --with-php-config option when building the extensions (unless you have only a single, global installation of PHP). Otherwise ./configure will not be able to determine the PHP version and flags correctly. Furthermore, the php-config script also ensures that the “make install” command will move the generated *.so file to the right extension directory.
Building the first PHP Phalcon (2.0)
git clone http://github.com/phalcon/cphalcon
  cd cphalcon && git checkout 2.0.0
  zephir compile
  cd ext && /opt/php-5.6/bin/phpize
  ./configure --with-php-config=/opt/php-5.6/bin/php-config
  make && sudo make install
  Installing shared extensions:     /opt/php-5.6/lib/php/extensions/no-debug-non-zts-20131226/
Please check whether or not it is successful
ls /opt/php-5.6/lib/php/extensions/no-debug-non-zts-20131226/After the extension is installed. You still need to activate it by including it in php.ini file.
sudo su
  echo "extension=phalcon.so" >> /opt/php-5.6/lib/php.ini
  exit
Building the second PHP Phalcon (1.3.x)
git clone http://github.com/phalcon/cphalcon
  cd cphalcon && git checkout master
  cd ext && /opt/php-5.5/bin/phpize
  ./configure --with-php-config=/opt/php-5.5/bin/php-config
  make && sudo make install
  Installing shared extensions:     /opt/php-5.5/lib/php/extensions/no-debug-non-zts-20121212/
We check again to make sure the installation is successful
ls /opt/php-5.6/lib/php/extensions/no-debug-non-zts-20131226/
  sudo su
  echo "extension=phalcon.so" >> /opt/php-5.5/lib/php.ini
  exit
Configuring Nginx
sudo vi /etc/nginx/nginx.confThe following configuration will create two servers: the phalcon-prd.localhost runs on PHP 5.5.x and phalcon-dev.localhost works with PHP 5.6.x. This is an example, you can customize it to anything you want, see Nginx documentation
[...]
http {
  include       mime.types;
  default_type  application/octet-stream;
  sendfile        on;
  keepalive_timeout  65;
  #gzip  on;
  include /etc/nginx/conf.d/*.conf;

  index index.php index.html index.htm;

  #Prodution environment Phalcon
  server {
    listen       80;
    server_name  phalcon-prd.localhost;

    root   /usr/share/nginx/html/phalcon-prd;

    location / {
      index  index.php;
    }

    location ~ \.php$ {
      fastcgi_pass   127.0.0.1:9001;
      fastcgi_index  index.php;
      fastcgi_param  SCRIPT_FILENAME  $document_root$fastcgi_script_name;
      include        fastcgi_params;
    }
  }
  #Development environment Phalcon
  server {
    listen       80;
    server_name  phalcon-dev.localhost;

    root   /usr/share/nginx/html/phalcon-prd;

    location / {
      index  index.php;
    }

    location ~ \.php$ {
      fastcgi_pass   127.0.0.1:9002;
      fastcgi_index  index.php;
      fastcgi_param  SCRIPT_FILENAME  $document_root$fastcgi_script_name;
      include        fastcgi_params;
    }
  }
}
[...]
Set Up Local Hosts File
If you are using a Linux system, you can edit the host file:
sudo vi /etc/hostsThe new host file will look like.
[...]
127.0.0 localhost phalcon-dev.localhost phalcon-prd.localhost
::1   localhost6.localdomain6 localhost6
[...]
This one intercepts all requests for phalcon-dev.localhost and phalcon-prd.localhost then sends them to your server.
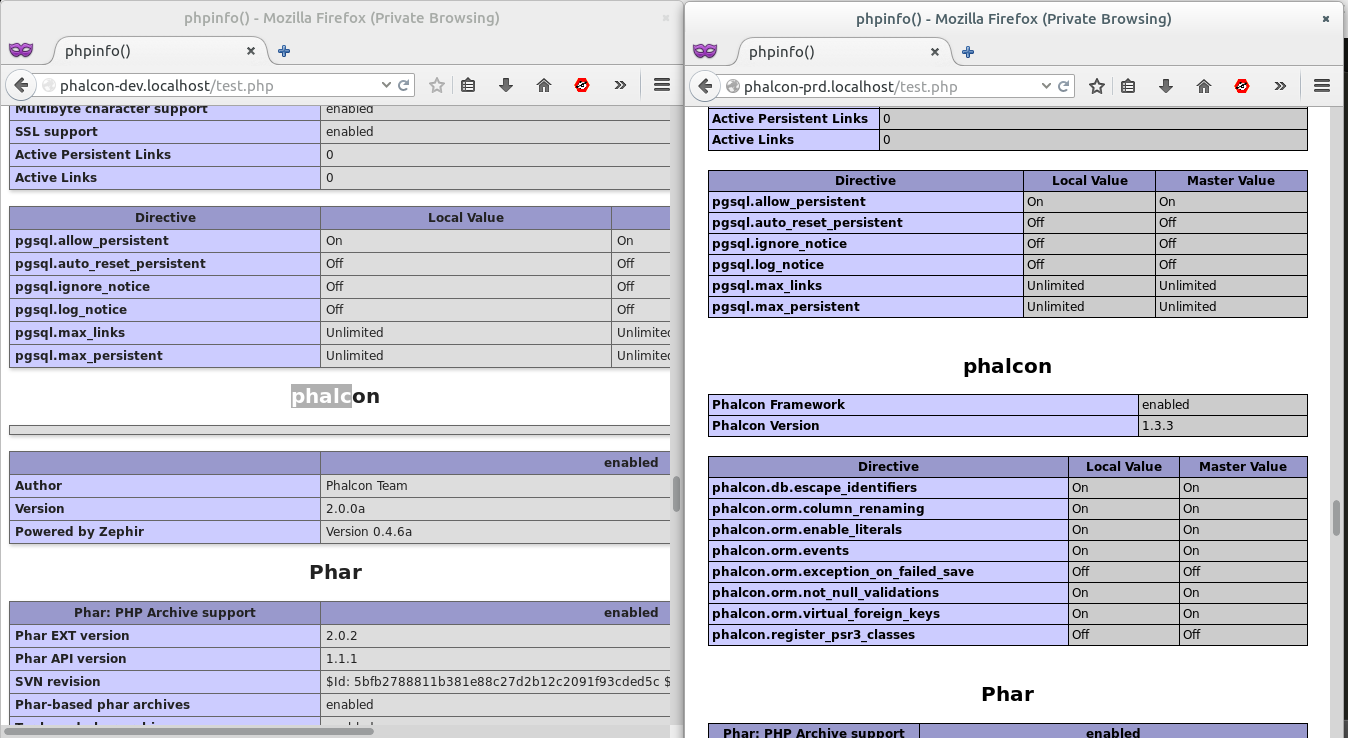
Testing it
For testing, we create a new file called test.php and put it into folder corresponding to the above configuration of Nginx. In each file, we add the following command.
<?php phpinfo(); ?>Now, running the test.php file in each server, we see a Phalcon 1.3.x phpinfo() at http://phancon-prd.localhost/test.php while at http://phancon-dev.localhost/test.php there should be phpinfo() of Phalcon 2.0.x.
In conclusion
In this tutorial, we’ve learned how we can easily have multiple actively running versions of PHP on our server, each with its own set of different extensions if necessary. This can come in handy if you’re doing shared hosting, or if you need to support ancient legacy apps while being able to develop and deploy on cutting edge versions, for example.
Leave your feedback in the comments below and, as always, please share this article if you liked it!
Frequently Asked Questions about Running Multiple PHP Versions on One Server
How can I run multiple PHP versions on one server using Apache and PHP-FPM on Ubuntu 18.04?
To run multiple PHP versions on one server using Apache and PHP-FPM on Ubuntu 18.04, you need to install the required PHP versions and Apache. Then, you need to configure Apache to use the PHP-FPM version for each site. You can do this by editing the Apache configuration file for each site and setting the ProxyPassMatch directive to use the correct PHP-FPM pool. After that, you need to create a PHP-FPM pool for each PHP version. Finally, restart Apache and PHP-FPM to apply the changes.
How can I switch between different PHP versions on my server?
You can switch between different PHP versions on your server using the a2enmod and a2dismod commands. The a2enmod command enables a module, and the a2dismod command disables a module. To switch to a different PHP version, you need to disable the current PHP version and enable the desired PHP version. After that, you need to restart Apache to apply the changes.
How can I run different websites with different versions of PHP?
To run different websites with different versions of PHP, you need to configure each website to use a different PHP version. You can do this by editing the Apache configuration file for each website and setting the ProxyPassMatch directive to use the correct PHP-FPM pool. After that, you need to create a PHP-FPM pool for each PHP version. Finally, restart Apache and PHP-FPM to apply the changes.
How can I install multiple PHP versions on Fedora 35 using Apache and PHP-FPM?
To install multiple PHP versions on Fedora 35 using Apache and PHP-FPM, you need to install the required PHP versions and Apache. Then, you need to configure Apache to use the PHP-FPM version for each site. You can do this by editing the Apache configuration file for each site and setting the ProxyPassMatch directive to use the correct PHP-FPM pool. After that, you need to create a PHP-FPM pool for each PHP version. Finally, restart Apache and PHP-FPM to apply the changes.
How can I use phpenv to manage multiple PHP versions?
You can use phpenv to manage multiple PHP versions by installing phpenv and the required PHP versions. Then, you can use the phpenv command to switch between different PHP versions. You can also use the phpenv global command to set the global PHP version, and the phpenv local command to set the local PHP version for a specific directory.
How can I check the current PHP version on my server?
You can check the current PHP version on your server by running the php -v command in the terminal. This command will display the current PHP version and other information about the PHP installation.
How can I install a specific PHP version on my server?
You can install a specific PHP version on your server by using the apt-get install command followed by the package name for the desired PHP version. For example, to install PHP 7.2, you would run the command apt-get install php7.2.
How can I configure Apache to use a specific PHP version?
You can configure Apache to use a specific PHP version by editing the Apache configuration file and setting the ProxyPassMatch directive to use the correct PHP-FPM pool. After that, you need to restart Apache to apply the changes.
How can I create a PHP-FPM pool for a specific PHP version?
You can create a PHP-FPM pool for a specific PHP version by creating a new pool configuration file in the /etc/php/7.2/fpm/pool.d/ directory. The configuration file should contain the settings for the PHP-FPM pool, such as the listen address and port, the user and group, and the process manager settings.
How can I troubleshoot issues with running multiple PHP versions on one server?
You can troubleshoot issues with running multiple PHP versions on one server by checking the Apache and PHP-FPM error logs. The error logs can provide information about any issues with the Apache configuration or the PHP-FPM pools. You can also use the php -v command to check the current PHP version and the a2enmod command to check which PHP modules are enabled.
 Thien Tran Duy
I'm a professional web developer from Vietnam with B.S Physics and Engineering. I'm a Phalcon enthusiast as Opensource. In free time, I was support on forum Phalcon also my forum and contribution core Phalcon.