Deploying to Heroku using Gulp, Node, and Git

Whether you’ve used it or not you’ve probably heard about Heroku at some point wandering around the Web. Heroku lets you deploy, run, and manage projects written in Ruby, Node.js, Java, Python, Clojure, Scala, and PHP. This platform brings joy to so many developers because of its amazing build packs that create a robust deployment workflow.

Let’s examine the required files needed to deploy a project to Heroku using Gulp, Git, and Node.
Key Takeaways
- Deploying to Heroku involves defining the correct dependencies in your package.json file, creating a Procfile to declare what command should be executed to start your app, and setting up a production server. These steps prepare your project for deployment.
- Heroku’s build packs and dynos offer a robust deployment workflow. Buildpacks produce slugs from your application, its dependencies, and the language runtime, while dynos are lightweight Linux containers that run a single user-specified command.
- After preparing your project, you can deploy to Heroku using the Heroku toolbelt. This involves logging in to your Heroku account from the shell, running a series of commands, and pushing your code to GitHub before deploying to Heroku.
- Heroku allows you to use a custom domain name, but it’s not possible to remove the www. Therefore, it’s recommended to forward calls from non-www references to the www reference. You can create a custom CNAME by adding the myproject.herokuapp.com domain to your CNAME record.
Heroku Terminology
Before we begin, we’ll make sure a few bits of terminology are defined.
- Dyno
- A lightweight Linux container that runs a single user-specified command. A dyno can run any command available in its default environment. Read more about Dyno types here.
- Buildpacks
- These lie behind the slug compilation process. They’re open source, enabling you to extend Heroku to other languages and frameworks. Buildpacks take your application, its dependencies, and the language runtime, and produce slugs.
- Slug
- A bundle of your source, fetched dependencies, the language runtime, and compiled/generated output of the build system – ready for execution.
File Requirements
In order to run a Node-based project on Heroku, we need a few things to get started. The first thing we need is a project. For our purposes, we’ll use the Transformicons Open Source project as the example for this tutorial. You can also use the Transformicons repo with your own free Heroku account to practice outside this article!
Make a Procfile
Begin by making a blank file named Procfile and placing it within the root of your project. Procfile is short for “Process File” and used to explicitly declare what command should be executed to start your app. By default, a Procfile is not required, but it’s good form for Node-based projects to create one.
If a Procfile isn’t defined, then one will be created automatically using npm start as the web process type. Here’s the Procfile process command for Transformicons:
web: node node_modules/gulp/bin/gulp buildThe line above lets us use the locally installed version of Gulp provided by Node’s Package Manager (NPM) instead of having to use a globally installed version. The gulp build portion of that command in this case will fire up a server, compile Sass, concatenate / uglify JavaScript, replace asset calls, cache bust file names, compile templates with Assemble, and finally minify our compiled HTML documents! This is the part where we dance our pants off
Create a Production Server
For those using Gulp to serve assets, you can use the following task in your gulpfile.js to fire up a static server for Heroku in order to view the deployed project in a browser.
gulp.task('serveprod', function() {
  connect.server({
    root: [your_project_path],
    port: process.env.PORT || 5000, // localhost:5000
    livereload: false
  });
});
Developers also have the option of using something like a Node-based server if desired, but for this discussion we’ll use Gulp to handle that for us.
Define the Correct Dependencies
Gulp requires the presence of a package.json file within the root of your project’s directory. Inside this file you must note whether the dependencies defined are installed or not. By default, Heroku config is set to production and will install dependencies from the dependencies object.
devDependencies for tasks such as gulp clean, like in the case below, will not install on the production environment. Using the example below, notice I require many items under dependencies that are necessary for deployment, like minification, concatenation, and anything that generally helps to build the project files themselves.
{
  "dependencies": {
    "gulp": "^3.8.10",
    "gulp-autoprefixer": "^1.0.1",
    "gulp-concat": "^2.4.1",
    "gulp-connect": "^2.0.6",
    "gulp-extname": "^0.2.0",
    "gulp-load-plugins": "^0.7.0",
    "gulp-minify-html": "^0.1.8",
    "gulp-rev": "^2.0.1",
    "gulp-sass": "^1.2.2",
    "gulp-template": "^1.1.1",
    "gulp-uglify": "^1.0.1",
    "gulp-usemin": "^0.3.8",
    "gulp-util": "^3.0.1",
    "assemble": "git://github.com/assemble/assemble#v0.6.0",
    "lodash": "^2.4.1",
    "marked": "^0.3.2"
  },
  "devDependencies": {
    "gulp-clean": "^0.3.1"
  }
}
Deploy to Heroku
Now that your project has the required files in place for deployment to Heroku, download the Heroku toolbelt and install it on your machine. The Heroku command-line client will install to /usr/local/heroku and /usr/local/heroku/bin will be added to your PATH. Assuming you already have a username and password with Heroku, begin by logging in to your Heroku account from the shell.
heroku loginOnce logged in, run the following commands in the order that follows (assuming your project has a git repo initialized).
cd [mysitedir]
heroku create
git push heroku master
heroku open
The heroku create command creates a new application on Heroku – along with a Git remote that must be used to receive your application’s source. Make sure your code (especially any changes that are not present on your remote repository) is pushed to GitHub (or Bitbucket if you choose) before you deploy to Heroku, otherwise changes will remain undetected when git push heroku master is executed.
If you need to check production code, you can always use foreman start from the shell to test instructions and functionality for deployment on your local machine. If you’re curious what the deployment logs look like for Heroku, feel free to check out this CodeShare.

Note for GitHub users: Heroku is limited to a rolling window of 75 Git requests per hour, per user, per app. Once this limit is reached, in order to protect the Git service, Git requests are denied for a few minutes until request levels drop below the limit.
Looking Back
Lets take a look at what’s happened up until this point and why Heroku is so cool for deployment. Most importantly, we’ve prevented production code from entering our GitHub repo, ultimately avoiding future merge conflicts that can and will occur often with compiled code.
We’ve also managed to concatenate, minify, and cache bust file references purely for deployment purposes. This approach prevents us from manually writing our replacement references within each individual document. All these tasks are completed automagically by machines! Now let’s get rid of that myproject.herokuapp.com domain name.
Custom Domain
For those that desire a custom domain name you should be aware that it’s not possible at the time of this writing to remove the www, so it’s good form to forward calls from non www references to the www reference if you desire that behaviour.
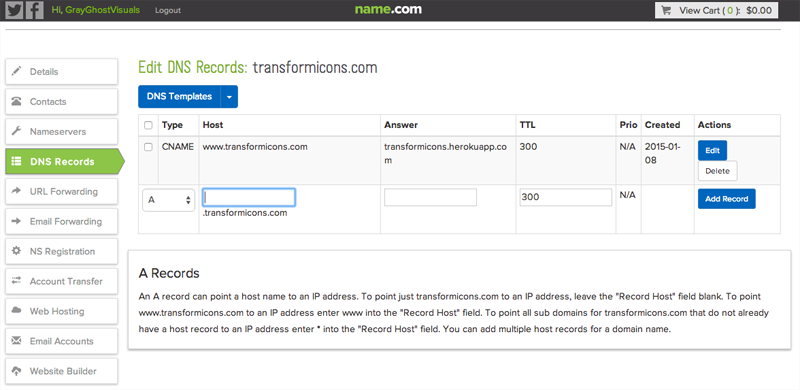
To create a custom CNAME, simply add the myproject.herokuapp.com domain to your CNAME record followed by name forwarding, should you choose to do so.
Additional Notes
Heroku users should take the time to understand the buildpack-api caching explanation that also clarifies a bit on how the flow works with Heroku projects. If at any time you need some “heroic” help via the command-line, you can always type heroku help to get a list of options available.
With regards to Gulp, there may be times when you require to be all “Bill Murray” and control Gulp’s streams as you deploy, ensuring one process has completed before another begins. In order to ensure one task completes before another begins, give your src line a var named stream and return the stream once your task pipes are completed.
This ensures that one task knows when another completes, avoiding simultaneously running in parallel. Here’s an example of what that looks like:
gulp.task('sass', function() {
  var stream = gulp.src(paths.sitesass + '/**/*.scss')
    .pipe($.sass())
    .pipe($.autoprefixer({
      browsers: ['last 2 versions'],
      cascade: false
    }))
    .pipe(gulp.dest(paths.sitecss))
    .pipe($.connect.reload());
  return stream; // return stream to notify us of completion
});
gulp.task('cssmin', ['sass'], function() {
  var stream = gulp.src(paths.sitecss + '/*.css')
    .pipe(minifyCSS({keepBreaks:true}))
    .pipe(gulp.dest(paths.sitecss));
  return stream; // return stream to notify us of completion
});
Conclusion
A productive workflow and the tools that help make deployment a breeze are essential to any developer’s arsenal. Whatever the tool is, make it the best it can be and don’t be afraid to break habits in order to venture into the unknown. Get started right now and empower your workflow and deployment methods.
Further Reading
- Deploying Nodejs : Heroku Dev Center
- Heroku Features
- Getting Started w/Gulp
- SSH Git Transport w/Heroku
- Multiple Remotes & Environments on Heroku
Frequently Asked Questions on Deploying Heroku Using Gulp, Node & Git
How can I troubleshoot common issues when deploying on Heroku using Gulp, Node & Git?
Troubleshooting issues when deploying on Heroku using Gulp, Node & Git can be done by checking the logs. Heroku provides a command heroku logs --tail that allows you to view real-time logs. If you encounter an application error, you can use this command to identify the problem. Additionally, ensure that your package.json file has the correct start script and that all necessary dependencies are included. If you’re using Gulp, ensure that your gulpfile.js is properly configured.
How can I manage environment variables in Heroku?
Environment variables in Heroku can be managed through the settings tab of your Heroku dashboard. Here, you can reveal your config vars and add new ones. You can also use the Heroku CLI to manage your environment variables. The command heroku config:set VARNAME=value allows you to set a new variable, and heroku config:unset VARNAME allows you to delete a variable.
How can I deploy a Node.js application with a child process in Heroku?
Deploying a Node.js application with a child process in Heroku requires a Procfile. A Procfile is a text file in the root directory of your application that defines process types and explicitly declares what command should be executed to start your app. For example, if you have a worker process, your Procfile might look like this: worker: node worker.js.
How can I scale my Node.js application on Heroku?
Scaling your Node.js application on Heroku can be done by adjusting the number of dynos – lightweight containers that run the command specified in the Procfile. You can scale your application by using the heroku ps:scale web=1 command, where ‘web’ is the name of the process type defined in the Procfile, and ‘1’ is the number of dynos.
How can I update my Node.js version on Heroku?
Updating your Node.js version on Heroku can be done by specifying the version in your package.json file. You can specify the version in the “engines” field. For example, "engines": {"node": "14.x"}. After updating the package.json file, you can push the changes to Heroku.
How can I use Gulp tasks in Heroku?
To use Gulp tasks in Heroku, you need to include Gulp in your package.json dependencies and define a postinstall script. The postinstall script will run after your application is deployed on Heroku. For example, "scripts": {"postinstall": "gulp build"}.
How can I rollback to a previous version of my application on Heroku?
Rolling back to a previous version of your application on Heroku can be done by using the heroku releases:rollback command. This command allows you to rollback to the previous release, or you can specify a release by appending the release number, for example, heroku releases:rollback v23.
How can I use Git to deploy my application on Heroku?
To use Git to deploy your application on Heroku, you need to initialize a Git repository in your application directory using git init. Then, you can add Heroku as a remote using heroku git:remote -a your-app-name. After making changes to your application, you can use git add ., git commit -m "message", and git push heroku master to deploy your application.
How can I use a custom domain with my Heroku application?
To use a custom domain with your Heroku application, you need to add the domain to your application through the Heroku dashboard or using the Heroku CLI with the command heroku domains:add www.example.com. Then, you need to configure your DNS provider to point to the Heroku-provided DNS target.
How can I monitor the performance of my Node.js application on Heroku?
Monitoring the performance of your Node.js application on Heroku can be done by using Heroku’s metrics dashboard. The metrics dashboard provides information about your application’s response times, throughput, memory usage, and CPU load. You can also set up alerts to be notified when your application exceeds certain thresholds.
Design Technologist passionate for Open Source, SVG, Typography, Web Animation and Interaction Development. droidpinkman.io


Published in
·Design·Design & UX·Illustration·Photography & Imagery·Resources·Technology·UI Design·Web·August 19, 2015