
Key Takeaways
- Firebase offers a robust alternative to Parse for creating a cloud backend for Android apps, especially after Parse’s shutdown announcement.
- Firebase, acquired by Google, provides a NoSQL cloud database where data is stored as JSON and synced across all clients in real-time, enhancing real-time data flow and offline data access.
- The platform supports various authentication methods, including email/password and social media logins, which simplifies the user authentication process.
- Firebase provides a comprehensive suite of services beyond database and authentication, such as Cloud Messaging, Storage, and Crash Reporting, facilitating diverse backend needs.
- Setting up Firebase involves creating a project in the Firebase console, integrating the Firebase SDK, and configuring your Android project with a google-services.json file.
- Firebase’s security features allow developers to set up rules for data access and validation directly in the Firebase console, ensuring data integrity and security.
- The tutorial demonstrates the implementation of a basic To Do app using Firebase, covering setup, user authentication, data storage, and retrieval, showcasing Firebase’s capabilities in handling real-time data operations.
Creating a Cloud Backend for your Android App Using Firebase
This post was updated in September 2016 to reflect changes in the Firebase platform.
18 months ago I wrote an article on Creating a Cloud Backend for Your Android App Using Parse. Facebook announced earlier this year that they were shutting down Parse on January 28th, 2017 and new signups to the service aren’t possible. With that surprise announcement, this forced developers relying on the service to start looking for alternatives that they could migrate their data to.
Because of this news, I thought I should revisit the topic and cover how to use a different Backend as a Service platform to manage data for your Android application.
For this tutorial, I’ll be looking at Firebase, a popular backend platform acquired by Google in October 2014.
You should always weigh the pros and cons of relying on a BaaS as opposed to building your own. Parse is not the first BaaS platform to shut down (e.g., StackMob) and won’t be the last. As a developer relying on one of these platforms, you should always be ready to migrate and have a backup plan.
With Firebase, you can store and sync data to a NoSQL cloud database. The data is stored as JSON, synced to all connected clients in realtime, and available when your app goes offline. It offers APIs that enable you to authenticate users with email and password, Facebook, Twitter, GitHub, Google, anonymous auth, or to integrate with existing authentication system. Other than the Realtime Database and Authentication, it offers a myriad of other services including Cloud Messaging, Storage, Hosting, Remote Config, Test Lab, Crash Reporting, Notification, App Indexing, Dynamic Links, Invites, AdWords, AdMob.
In this article, you’ll create a simple To Do app that will show how to save and retrieve data from Firebase, how to authenticate users, set read/write permissions on the data and validate the data on the server.
You can find the code for this project on GitHub.
Setting Up the Project
To get started, create a new project named To Do. Set Minimum SDK as API 15 in the next window and select Basic Activity in the next. Click Finish on the last window, leaving the settings at their default.
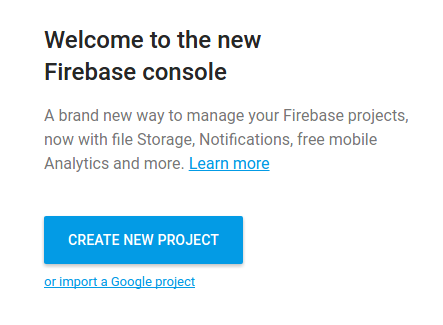
Before starting the Android project, head over to firebase.google.com and create an account. After logging in to your account, head over to the Firebase console and create a project that will hold your app’s data.
Enter a name and country/region for the project.
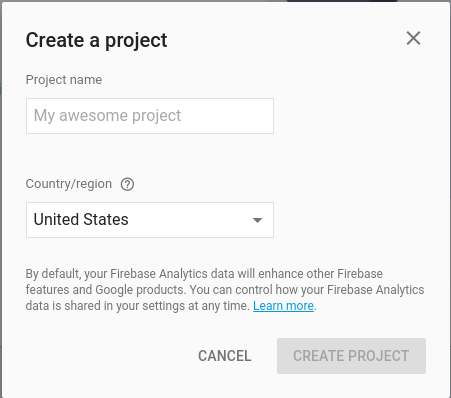
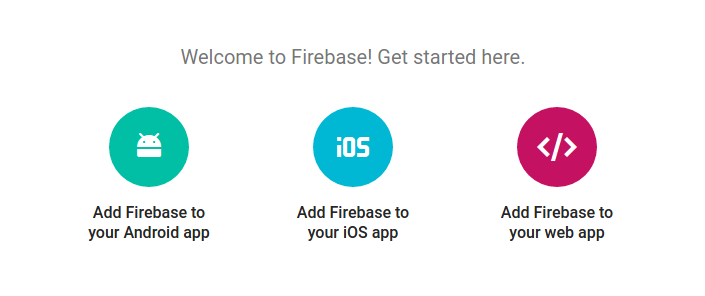
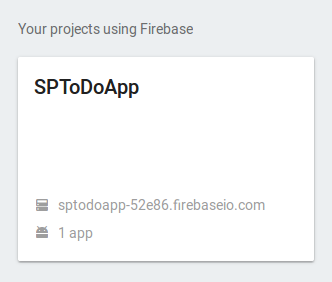
The country/region represents the country/region of your organization/company. Your selection also sets the appropriate currency for your revenue reporting. After setting a name (I used SPToDoApp) and region for the project, click on the Create Project button. This will create a project and its console will open. From the project’s console, click on the Add Firebase to your Android App option.
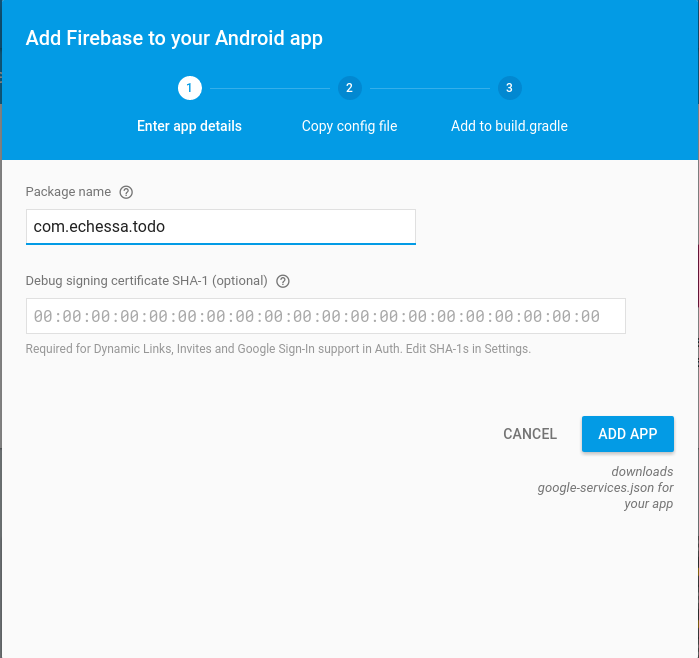
Enter your Android project’s package name in the window that pops up. If your app is going to use certain Google Play services such as Google Sign-In, App Invites, Dynamic Links, e.t.c. then you will have to provide the SHA-1 of your signing certificate. This app won’t be using any of these services, so leave this field empty. If you wish to add these services to your app, head over to this page for information on using keytool to get the SHA-1 hash of your signing certificate. The page contains instructions for obtaining both release and debug certificate fingerprints. When done, click on the Add App button.
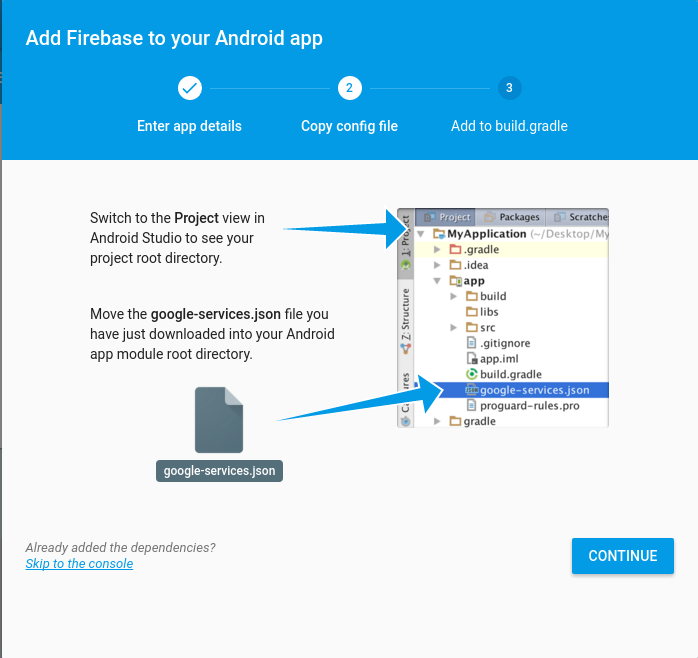
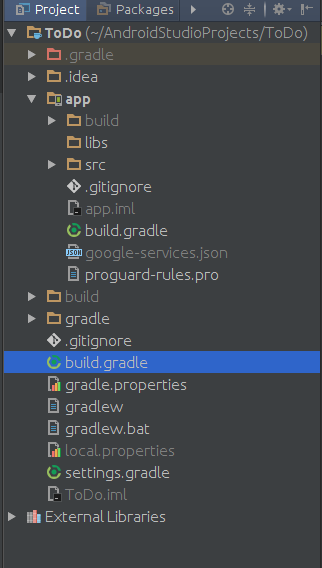
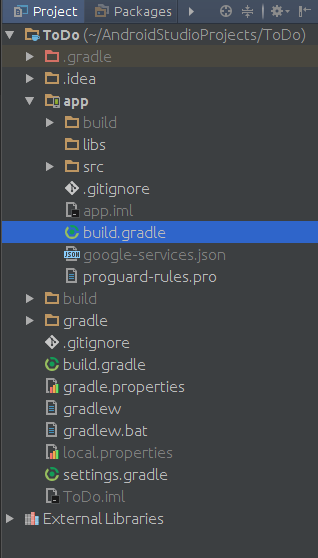
Clicking on Add App will download a google-services.json file to your computer. The next page of the dialog box gives instructions of where to place the downloaded JSON file. Locate the downloaded file and move it into your Android project’s app module root directory.
The JSON file contains configuration settings that the Android app needs to communicate with the Firebase servers. It contains details such as the URL to the Firebase project, the API key, etc. In the previous version of Firebase, you had to store these manually in your app’s code, but now the process has been simplified with the use of one file that contains the needed data.
If you are using version control and storing your code in a public repository, you should consider placing the google-services.json file in the .gitignore file, so that this information isn’t available to the public.
When finished, click Continue on the dialog window and you will be given further setup instructions.
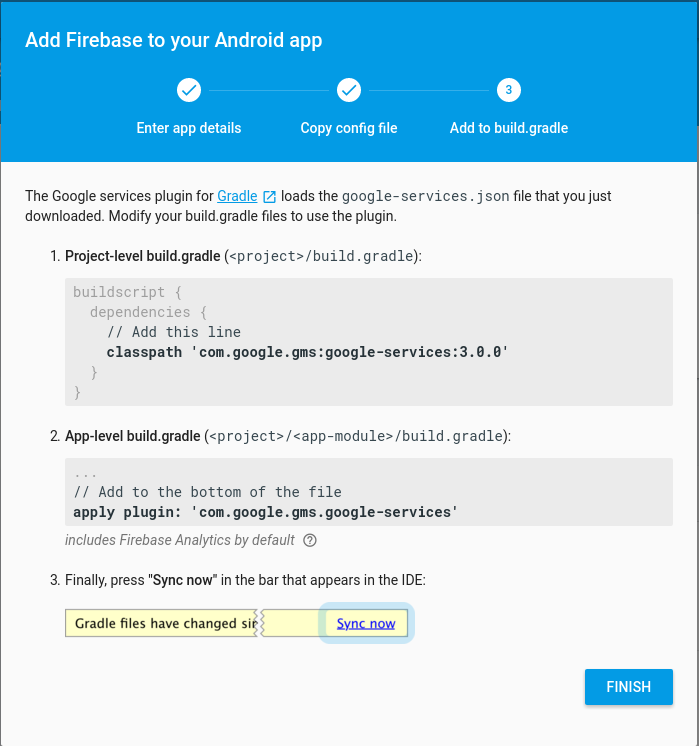
To your Project-level build.gradle file, add the following to the buildscript > dependencies node. This is done to include the Google services plugin for Gradle which loads the google-services.json file that you downloaded.
classpath 'com.google.gms:google-services:3.0.0'Make sure you are editing the right gradle file.
Then in your App-level build.gradle file, add the following at the bottom of the file to enable the Gradle plugin.
apply plugin: 'com.google.gms.google-services'Again, make sure it’s the right build.gradle file.
Then add the following dependencies to the same file. Firebase has different SDKs for its features. Here you add the library needed to use the Realtime Database and the one needed for Authentication.
compile 'com.google.firebase:firebase-database:9.4.0'
compile 'com.google.firebase:firebase-auth:9.4.0'
Create an empty activity by selecting the File -> New -> Activity -> Empty Activity menu item and name it LogInActivity. Create another and name it SignUpActivity.
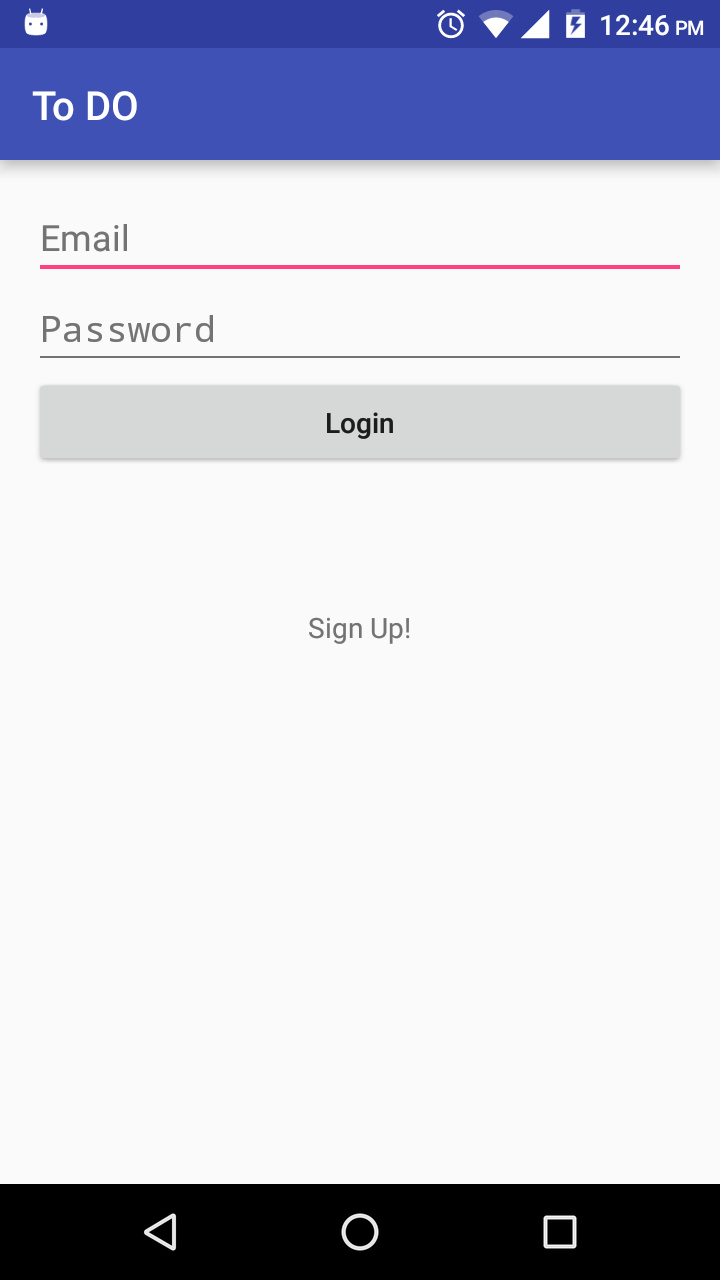
Change the contents of the activity_log_in.xml layout file to:
<?xml version="1.0" encoding="utf-8"?>
<RelativeLayout xmlns:android="http://schemas.android.com/apk/res/android"
            xmlns:tools="http://schemas.android.com/tools"
            android:layout_width="match_parent"
            android:layout_height="match_parent"
            android:paddingBottom="@dimen/activity_vertical_margin"
            android:paddingLeft="@dimen/activity_horizontal_margin"
            android:paddingRight="@dimen/activity_horizontal_margin"
            android:paddingTop="@dimen/activity_vertical_margin"
            tools:context=".LoginActivity" >

    <EditText
        android:id="@+id/emailField"
        android:layout_width="match_parent"
        android:layout_height="wrap_content"
        android:layout_alignParentLeft="true"
        android:layout_alignParentTop="true"
        android:ems="10"
        android:inputType="textEmailAddress"
        android:hint="@string/email_hint" >

        <requestFocus />
    </EditText>

    <EditText
        android:id="@+id/passwordField"
        android:layout_width="match_parent"
        android:layout_height="wrap_content"
        android:layout_alignLeft="@+id/emailField"
        android:layout_below="@+id/emailField"
        android:ems="10"
        android:hint="@string/password_hint"
        android:inputType="textPassword" />

    <Button
        android:id="@+id/loginButton"
        android:layout_width="match_parent"
        android:layout_height="wrap_content"
        android:layout_alignLeft="@+id/passwordField"
        android:layout_below="@+id/passwordField"
        android:text="@string/login_button_label" />

    <TextView
        android:id="@+id/signUpText"
        android:layout_width="wrap_content"
        android:layout_height="wrap_content"
        android:layout_below="@+id/loginButton"
        android:layout_centerHorizontal="true"
        android:layout_marginTop="69dp"
        android:text="@string/sign_up_text" />

</RelativeLayout>
Change the contents of the activity_sign_up.xml layout file to:
<?xml version="1.0" encoding="utf-8"?>
<RelativeLayout xmlns:android="http://schemas.android.com/apk/res/android"
            xmlns:tools="http://schemas.android.com/tools"
            android:layout_width="match_parent"
            android:layout_height="match_parent"
            android:paddingBottom="@dimen/activity_vertical_margin"
            android:paddingLeft="@dimen/activity_horizontal_margin"
            android:paddingRight="@dimen/activity_horizontal_margin"
            android:paddingTop="@dimen/activity_vertical_margin"
            tools:context=".SignUpActivity" >

    <EditText
        android:id="@+id/emailField"
        android:layout_width="match_parent"
        android:layout_height="wrap_content"
        android:layout_alignParentLeft="true"
        android:layout_alignParentTop="true"
        android:ems="10"
        android:inputType="textEmailAddress"
        android:hint="@string/email_hint" >

        <requestFocus />
    </EditText>

    <EditText
        android:id="@+id/passwordField"
        android:layout_width="match_parent"
        android:layout_height="wrap_content"
        android:layout_alignLeft="@+id/emailField"
        android:layout_below="@+id/emailField"
        android:ems="10"
        android:inputType="textPassword"
        android:hint="@string/password_hint" />

    <Button
        android:id="@+id/signupButton"
        android:layout_width="match_parent"
        android:layout_height="wrap_content"
        android:layout_alignLeft="@+id/passwordField"
        android:layout_below="@+id/passwordField"
        android:text="@string/sign_up_button_label" />

</RelativeLayout>
These layouts are for the Login and Signup views.
Add the following to values/strings.xml.
<string name="password_hint">Password</string>
<string name="email_hint">Email</string>
<string name="sign_up_button_label">Sign Up</string>
<string name="signup_error_message">Please make sure you enter an email address and password!</string>
<string name="signup_error_title">Error!</string>
<string name="signup_success">Account successfully created! You can now Login.</string>
<string name="login_error_message">Please make sure you enter an email address and password!</string>
<string name="login_error_title">Error!</string>
<string name="login_button_label">Login</string>
<string name="sign_up_text">Sign Up!</string>
<string name="title_activity_login">Sign in</string>
<string name="add_item">Add New Item</string>
<string name="action_logout">Logout</string>
In activity_main.xml, remove the FloatingActionButton markup.
<android.support.design.widget.FloatingActionButton
    android:id="@+id/fab"
    android:layout_width="wrap_content"
    android:layout_height="wrap_content"
    android:layout_gravity="bottom|end"
    android:layout_margin="@dimen/fab_margin"
    android:src="@android:drawable/ic_dialog_email"/>
And in MainActivity.java remove the FAB code there as well.
FloatingActionButton fab = (FloatingActionButton) findViewById(R.id.fab);
fab.setOnClickListener(new View.OnClickListener() {
    @Override
    public void onClick(View view) {
        Snackbar.make(view, "Replace with your own action", Snackbar.LENGTH_LONG)
                .setAction("Action", null).show();
    }
});
In res/menu/menu_main.xml replace the settings item with the following Logout item.
<item
    android:id="@+id/action_logout"
    android:orderInCategory="100"
    android:title="@string/action_logout"
    app:showAsAction="never"/>
Open MainActivity and replace the action_settings id with action_logout id in onOptionsItemSelected(MenuItem).
if (id == R.id.action_logout) {
    return true;
}
This menu item will logout the user.
Change content_main.xml to the below:
<?xml version="1.0" encoding="utf-8"?>
<LinearLayout xmlns:android="http://schemas.android.com/apk/res/android"
          xmlns:tools="http://schemas.android.com/tools"
          xmlns:app="http://schemas.android.com/apk/res-auto"
          android:layout_width="match_parent"
          android:layout_height="match_parent"
          android:paddingLeft="@dimen/activity_horizontal_margin"
          android:paddingRight="@dimen/activity_horizontal_margin"
          android:paddingTop="@dimen/activity_vertical_margin"
          android:paddingBottom="@dimen/activity_vertical_margin"
          app:layout_behavior="@string/appbar_scrolling_view_behavior"
          tools:context=".MainActivity"
          tools:showIn="@layout/activity_main"
          android:orientation="vertical">

    <ListView
        android:id="@+id/listView"
        android:layout_width="match_parent"
        android:layout_height="0dp"
        android:layout_weight="1">
    </ListView>

    <LinearLayout
        android:layout_width="match_parent"
        android:layout_height="wrap_content"
        android:orientation="vertical"
        android:layout_gravity="bottom">
        <EditText
            android:id="@+id/todoText"
            android:layout_width="match_parent"
            android:layout_height="wrap_content"/>
        <Button
            android:id="@+id/addButton"
            android:layout_width="match_parent"
            android:layout_height="wrap_content"
            android:text="@string/add_item"/>
    </LinearLayout>

</LinearLayout>
activity_main.xml has an include tag that points to and loads content_main.xml. The app will display the To Do items in a list view that will occupy most of the screen. At the bottom of the screen, will be an edit text field and a button to add items to the list.
With the app’s UI set up, you’ll now look at how to save and retrieve data to and from Firebase.
Security and Rules
Before retrieving and saving data from the Firebase server, you need to set up authentication and add rules that restrict access to data and validate user input before it’s saved.
Authentication
The Firebase API has built-in methods for email/password, Facebook, Twitter, GitHub, Google and anonymous authentication. This tutorial will use email and password authentication.
Head over to the Firebase console and open your project’s Dashboard by clicking on the project.
If you select Database from the left panel, you will be able to see project’s data that is in JSON format.
Firebase stores all database data as JSON objects. There are no tables or records. When you add data to the JSON tree, it becomes a key in the existing JSON structure.
At the moment you can only see the root node.

If you hover over a node, you will see + and x controls that you can use to add data to the tree and delete that node respectively.
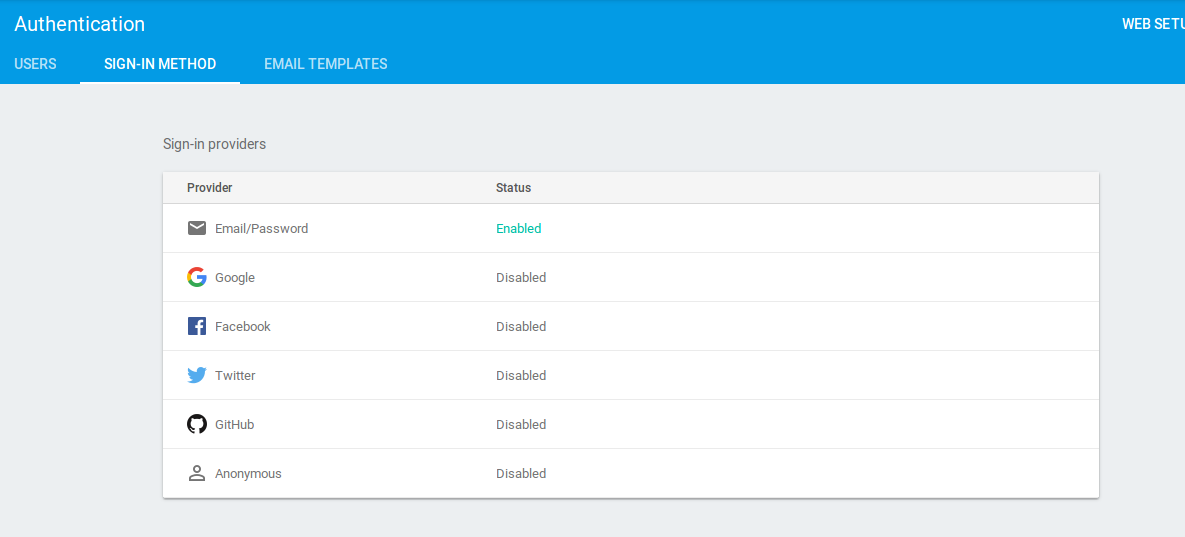
From the left panel, click on Auth and then select the Sign In Method tab on the right. Enable Email/Password authentication from the given providers.
In Android Studio, add the following method to MainActivity.
private void loadLogInView() {
    Intent intent = new Intent(this, LogInActivity.class);
    intent.addFlags(Intent.FLAG_ACTIVITY_NEW_TASK);
    intent.addFlags(Intent.FLAG_ACTIVITY_CLEAR_TASK);
    startActivity(intent);
}
This navigates to the Login view and clears the activity stack. This prevents the user going back to the main activity when they press the Back button from the login view.
Add the following variables to the class.
private FirebaseAuth mFirebaseAuth;
private FirebaseUser mFirebaseUser;
Then add the following to the bottom of onCreate().
// Initialize Firebase Auth
mFirebaseAuth = FirebaseAuth.getInstance();
mFirebaseUser = mFirebaseAuth.getCurrentUser();

if (mFirebaseUser == null) {
    // Not logged in, launch the Log In activity
    loadLogInView();
}
Here you check for the logged in user. If the user isn’t logged in, getCurrentUser() will return null, otherwise it will return a FirebaseUser object which will contain details of the logged in user. If the user isn’t logged in, loadLogInView() is called which redirects the user to the Login view.
Run the app and you should be redirected to the Login page.
Add the following to LogInActivity.
protected EditText emailEditText;
protected EditText passwordEditText;
protected Button logInButton;
protected TextView signUpTextView;
private FirebaseAuth mFirebaseAuth;
Change the onCreate() method of the LogInActivity class to:
@Override
protected void onCreate(Bundle savedInstanceState) {
    super.onCreate(savedInstanceState);
    setContentView(R.layout.activity_log_in);

    // Initialize FirebaseAuth
    mFirebaseAuth = FirebaseAuth.getInstance();

    signUpTextView = (TextView) findViewById(R.id.signUpText);
    emailEditText = (EditText) findViewById(R.id.emailField);
    passwordEditText = (EditText) findViewById(R.id.passwordField);
    logInButton = (Button) findViewById(R.id.loginButton);

    signUpTextView.setOnClickListener(new View.OnClickListener() {
        @Override
        public void onClick(View v) {
            Intent intent = new Intent(LogInActivity.this, SignUpActivity.class);
            startActivity(intent);
        }
    });

    logInButton.setOnClickListener(new View.OnClickListener() {
        @Override
        public void onClick(View v) {
            String email = emailEditText.getText().toString();
            String password = passwordEditText.getText().toString();

            email = email.trim();
            password = password.trim();

            if (email.isEmpty() || password.isEmpty()) {
                AlertDialog.Builder builder = new AlertDialog.Builder(LogInActivity.this);
                builder.setMessage(R.string.login_error_message)
                        .setTitle(R.string.login_error_title)
                        .setPositiveButton(android.R.string.ok, null);
                AlertDialog dialog = builder.create();
                dialog.show();
            } else {
                mFirebaseAuth.signInWithEmailAndPassword(email, password)
                        .addOnCompleteListener(LogInActivity.this, new OnCompleteListener<AuthResult>() {
                            @Override
                            public void onComplete(@NonNull Task<AuthResult> task) {
                                if (task.isSuccessful()) {
                                    Intent intent = new Intent(LogInActivity.this, MainActivity.class);
                                    intent.addFlags(Intent.FLAG_ACTIVITY_NEW_TASK);
                                    intent.addFlags(Intent.FLAG_ACTIVITY_CLEAR_TASK);
                                    startActivity(intent);
                                } else {
                                    AlertDialog.Builder builder = new AlertDialog.Builder(LogInActivity.this);
                                    builder.setMessage(task.getException().getMessage())
                                            .setTitle(R.string.login_error_title)
                                            .setPositiveButton(android.R.string.ok, null);
                                    AlertDialog dialog = builder.create();
                                    dialog.show();
                                }
                            }
                        });
            }
        }
    });
}
This initiates the view elements and the FirebaseAuth object, which is the entry point of the Firebase Authentication SDK. An event listener is added to the Sign Up text view that will open the Sign Up activity when tapped. Another event listener on the Login button performs validation on the user input, ensuring the user entered text for both fields. It then calls the Firebase server with signInWithEmailAndPassword(). The function takes the user email and password and returns a Task of AuthResult.You check if the Task is successful and redirect the user to the MainActivity, otherwise show them an error message. Below is the error message gotten from trying to login a user that hasn’t registered.
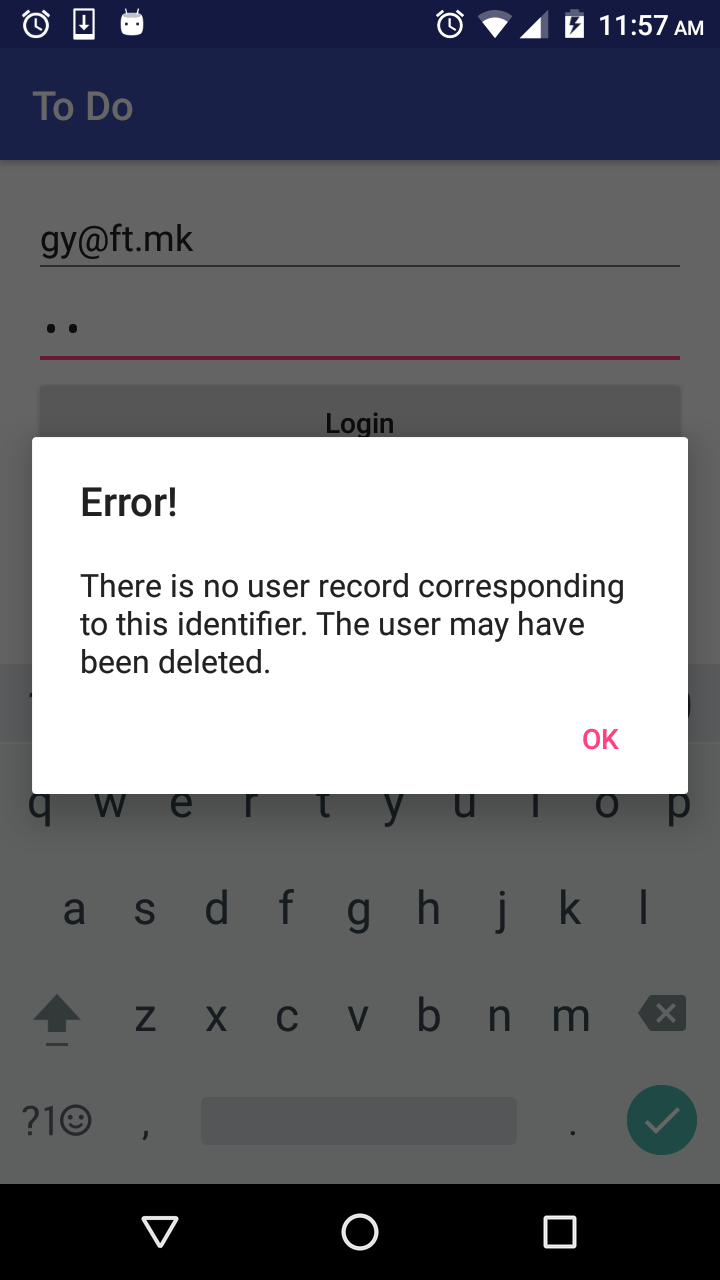
You might want to show the user a better message than the one returned by task.getException().getMessage() in your app. You can check for the Exception returned to determine the error message to show the user. You can get one of the following exceptions when authentication fails:
- FirebaseAuthInvalidUserException thrown if the user account corresponding to email does not exist or disabled.
- FirebaseAuthInvalidCredentialsException thrown if the password is wrong.
Apart from signInWithEmailAndPassword(), you can use the following to log in the user:
- signInWithCredential(AuthCredential) – Tries to sign in a user with the given AuthCredential. Use this method to sign in a user into your Firebase Authentication system. First retrieve the credential either directly from the user, in case of EmailAuthCredential, or from a supported authentication SDK, such as Google Sign-In or Facebook.
- signInAnonymously() – Signs in the user anonymously without requiring any credential. This method creates a new account in your Firebase Authentication system, except in the case where there was already an anonymous user signed in into this app.
- signInWithCustomToken(String) – Tries to sign in a user with a given Custom Token. Use this method after you retrieve a Firebase Auth Custom Token from your server, to sign in a user into your Firebase Authentication system.
With the Login functionality done, let’s set up Sign Up.
Modify SignUpActivity as shown.
package com.echessa.todo;

import android.content.Intent;
import android.os.Bundle;
import android.support.annotation.NonNull;
import android.support.v7.app.AlertDialog;
import android.support.v7.app.AppCompatActivity;
import android.view.View;
import android.widget.Button;
import android.widget.EditText;

import com.google.android.gms.tasks.OnCompleteListener;
import com.google.android.gms.tasks.Task;
import com.google.firebase.auth.AuthResult;
import com.google.firebase.auth.FirebaseAuth;

public class SignUpActivity extends AppCompatActivity {

    protected EditText passwordEditText;
    protected EditText emailEditText;
    protected Button signUpButton;
    private FirebaseAuth mFirebaseAuth;

    @Override
    protected void onCreate(Bundle savedInstanceState) {
        super.onCreate(savedInstanceState);
        setContentView(R.layout.activity_sign_up);

        // Initialize FirebaseAuth
        mFirebaseAuth = FirebaseAuth.getInstance();

        passwordEditText = (EditText)findViewById(R.id.passwordField);
        emailEditText = (EditText)findViewById(R.id.emailField);
        signUpButton = (Button)findViewById(R.id.signupButton);

        signUpButton.setOnClickListener(new View.OnClickListener() {
            @Override
            public void onClick(View v) {
                String password = passwordEditText.getText().toString();
                String email = emailEditText.getText().toString();

                password = password.trim();
                email = email.trim();

                if (password.isEmpty() || email.isEmpty()) {
                    AlertDialog.Builder builder = new AlertDialog.Builder(SignUpActivity.this);
                    builder.setMessage(R.string.signup_error_message)
                            .setTitle(R.string.signup_error_title)
                            .setPositiveButton(android.R.string.ok, null);
                    AlertDialog dialog = builder.create();
                    dialog.show();
                } else {
                    mFirebaseAuth.createUserWithEmailAndPassword(email, password)
                            .addOnCompleteListener(SignUpActivity.this, new OnCompleteListener<AuthResult>() {
                                @Override
                                public void onComplete(@NonNull Task<AuthResult> task) {
                                    if (task.isSuccessful()) {
                                        Intent intent = new Intent(SignUpActivity.this, MainActivity.class);
                                        intent.addFlags(Intent.FLAG_ACTIVITY_NEW_TASK);
                                        intent.addFlags(Intent.FLAG_ACTIVITY_CLEAR_TASK);
                                        startActivity(intent);
                                    } else {
                                        AlertDialog.Builder builder = new AlertDialog.Builder(SignUpActivity.this);
                                        builder.setMessage(task.getException().getMessage())
                                                .setTitle(R.string.login_error_title)
                                                .setPositiveButton(android.R.string.ok, null);
                                        AlertDialog dialog = builder.create();
                                        dialog.show();
                                    }
                                }
                            });
                }
            }
        });
    }

}
The createUserWithEmailAndPassword() method tries to create a new user account with the given email address and password. If successful, it also signs the user into the app. A Task of AuthResult is returned with the result of the operation. You check to see if registration was successful and redirect the user to MainActivity, otherwise show them an error message. In your app, you can check for the exception thrown to decide on the error message you will show to your users. The following are the possible exceptions thrown in case of an error in creating an account.
- FirebaseAuthWeakPasswordException thrown if the password is not strong enough
- FirebaseAuthInvalidCredentialsException thrown if the email address is malformed
- FirebaseAuthUserCollisionException thrown if there already exists an account with the given email
Run the app. If you tap on the Sign Up text view on the Log In view, the Sign Up view will open.
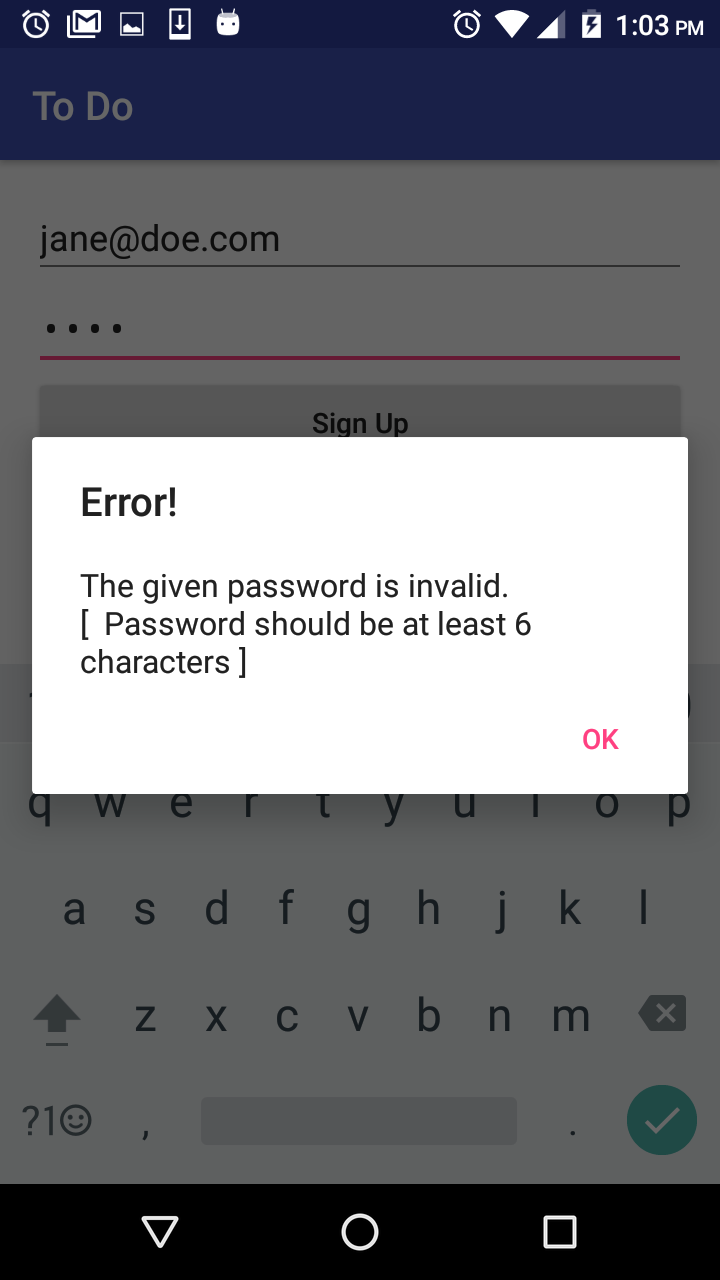
Register an account. By default, firebase does some default validation on the data. For example, your password has to be at least 6 characters long.
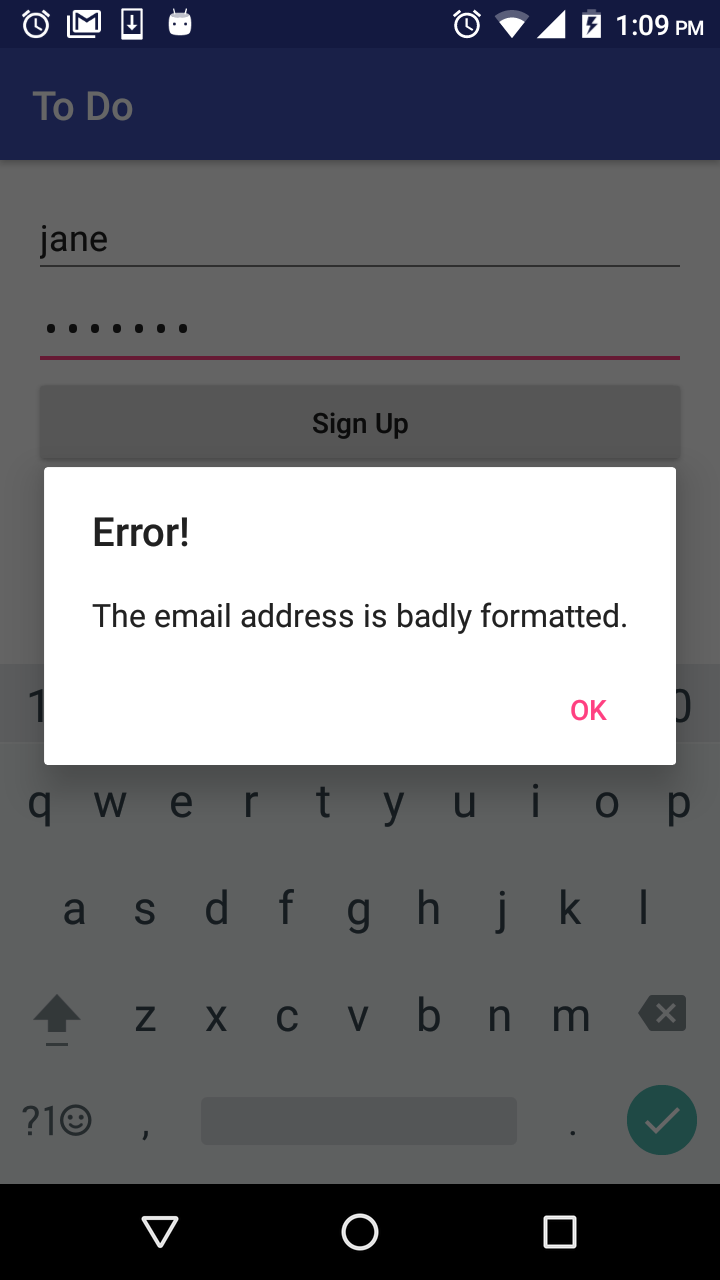
If you also try to sign up with an invalid email, you will get the following error.
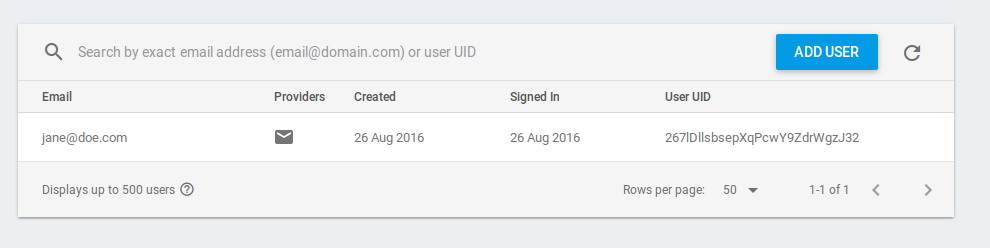
If registration is successful, you will be directed to the MainActivity. If you look at the Firebase Console, you should be able to see the created user under Auth > Users.
The Firebase team built an open source library called FirebaseUI that simplifies the process of adding Authentication and connecting common UI elements to the Firebase database. Read the documentation to learn more about the library.
Authorization and Data Validation
Identifying your user is only one part of security. Once you know who they are, you need a way to control their access to data in your Firebase database.
Firebase has a declarative language for specifying rules that live on the Firebase servers and determine the security of your app. You can edit them on the Database > Rules tab.
The Security Rules allow you to control access to each part of your database. By default, Firebase has security rules that require users to be authenticated.
{
  "rules": {
    ".read": "auth != null",
    ".write": "auth != null"
  }
}
Firebase Database Rules have a JavaScript-like syntax and come in four types:
- .read – Describes if and when data is allowed
d to be read by users. - .write – Describes if and when data is allowed to be written.
- .validate – Defines what a correctly formatted value will look like, whether it has child attributes, and the data type.
- .indexOn – Specifies a child to index to support ordering and querying.
.read and .write rules cascade, so the following ruleset grants read access to any data at path /foo/ (can also refer to it as the node foo) as well as any deeper paths such as /foo/bar/baz. Note that .read and .write rules shallower in the database override deeper rules, so read access to /foo/bar/baz would still be granted in this example even if a rule at the path /foo/bar/baz evaluated to false.
 {
  "rules": {
    "foo": {
      ".read": true,
      ".write": false
    }
  }
}
.validate rules do not cascade.
Modify the rules as shown and hit Publish.
{
  "rules": {
    "users": {
      "$uid": {
        ".read": "auth != null && auth.uid == $uid",
        ".write": "auth != null && auth.uid == $uid",
        "items": {
          "$item_id": {
            "title": {
              ".validate": "newData.isString() && newData.val().length > 0"
            }
          }
        }
      }
    }
  }
}
In the above rules, auth != null && auth.uid == $uid restricts read and write permission of data on the users node (as well as its child nodes) to the user whose uid matches the id of the logged in user (auth.uid). The $uid is a variable that holds the value at that node and not the name of the node itself. With this rule, not only will the user need to be authenticated to read or write any data to the node and its children, but they will also only have access to their own data.
The Firebase Database Rules include built-in variables and functions that allow you to refer to other paths, server-side timestamps, authentication information, and more. You can use these variables and functions to build expressive rules. These variables and functions give rules power and flexibility, allowing you to refer to other paths, server-side timestamps, e.t.c.
In the apps rules, you use the built-in variable auth. This variable is populated after your user authenticates. It contains data about the user including auth.uid, a unique, alphanumeric identifier that works across providers.
The available variables are:
- now – The current time in milliseconds since Linux epoch. This works particularly well for validating timestamps created with the SDK’s
firebase.database.ServerValue.TIMESTAMP. - root – A RuleDataSnapshot representing the root path in the Firebase database as it exists before the attempted operation.
- newData – A RuleDataSnapshot representing the data as it would exist after the attempted operation. It includes the new data being written and existing data.
- data – A RuleDataSnapshot representing the data as it existed before the attempted operation.
- $variables – A wildcard path used to represent ids and dynamic child keys.
- auth – Represents an authenticated user’s token payload.
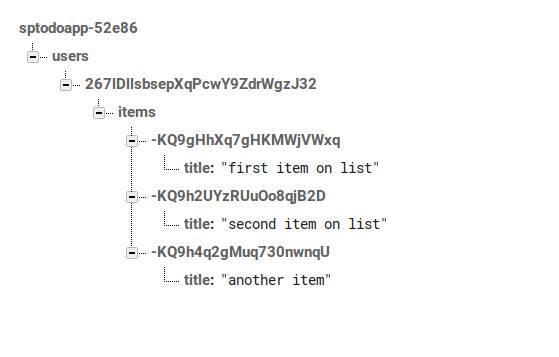
Firebase stores data in JSON format. In our database, each user will have an array of to-do items named items. Each item will have a title. In the above, you add some data validation that ensures that data written to /users//items must be a string greater than 0 characters long. Therefore, an item with an empty title won’t be saved.
Make sure you click on the Publish button, otherwise the rules won’t be saved. You should see a “Rules published” message.
Validation rules are great but they shouldn’t replace data validation code in your app. You should still validate input in you app to improve performance.
Saving and Retrieving Data
Add the following variables to MainActivity:
private DatabaseReference mDatabase;
private String mUserId;
Then change onCreate() as shown.
@Override
protected void onCreate(Bundle savedInstanceState) {
    super.onCreate(savedInstanceState);
    setContentView(R.layout.activity_main);
    Toolbar toolbar = (Toolbar) findViewById(R.id.toolbar);
    setSupportActionBar(toolbar);

    // Initialize Firebase Auth and Database Reference
    mFirebaseAuth = FirebaseAuth.getInstance();
    mFirebaseUser = mFirebaseAuth.getCurrentUser();
    mDatabase = FirebaseDatabase.getInstance().getReference();

    if (mFirebaseUser == null) {
        // Not logged in, launch the Log In activity
        loadLogInView();
    } else {
        mUserId = mFirebaseUser.getUid();

        // Set up ListView
        final ListView listView = (ListView) findViewById(R.id.listView);
        final ArrayAdapter<String> adapter = new ArrayAdapter<>(this, android.R.layout.simple_list_item_1, android.R.id.text1);
        listView.setAdapter(adapter);

        // Add items via the Button and EditText at the bottom of the view.
        final EditText text = (EditText) findViewById(R.id.todoText);
        final Button button = (Button) findViewById(R.id.addButton);
        button.setOnClickListener(new View.OnClickListener() {
            public void onClick(View v) {
                mDatabase.child("users").child(mUserId).child("items").push().child("title").setValue(text.getText().toString());
                text.setText("");
            }
        });

        // Use Firebase to populate the list.
        mDatabase.child("users").child(mUserId).child("items").addChildEventListener(new ChildEventListener() {
            @Override
            public void onChildAdded(DataSnapshot dataSnapshot, String s) {
                adapter.add((String) dataSnapshot.child("title").getValue());
            }

            @Override
            public void onChildChanged(DataSnapshot dataSnapshot, String s) {

            }

            @Override
            public void onChildRemoved(DataSnapshot dataSnapshot) {
                adapter.remove((String) dataSnapshot.child("title").getValue());
            }

            @Override
            public void onChildMoved(DataSnapshot dataSnapshot, String s) {

            }

            @Override
            public void onCancelled(DatabaseError databaseError) {

            }
        });
    }
}
You create a reference to the root node of the database with FirebaseDatabase.getInstance().getReference(). You then set a listener on the Add New Item button that saves data to Firebase when clicked.
There are four methods for writing data to the Firebase Realtime Database:
- setValue() – Write or replace data to a defined path, such as
users/<user-id>/<username>. - push() – Add to a list of data. Every time you call
push(), Firebase generates a unique key that can also be used as a unique identifier, such asuser-posts/<user-id>/<unique-post-id>. - updateChildren() – Update some of the keys for a defined path without replacing all of the data.
- runTransaction() – Update complex data that could be corrupted by concurrent updates.
In our code, data is saved with:
mDatabase.child("users").child(mUserId).child("items").push().child("title").setValue(text.getText().toString());.child gets a reference to the specified node if it exists or creates it if it doesn’t exist. The above will save the entered text at the path /users/<user id>/items/<item id>/title. .push() generates a new child location using a unique key. You use it to generate a unique key for each item added. .setValue() writes or replaces data to the defined path.
To retrieve data from Firebase, add a listener to the database reference with addChildEventListener(). You can listen for the following types of events that retrieve data:
- ValueEventListener: onDataChange() Read and listen for changes to the entire contents of a path.
- ChildEventListener: onChildAdded() – Retrieve lists of items or listen for additions to a list of items. Suggested use with
onChildChanged()andonChildRemoved()to monitor changes to lists. - ChildEventListener: onChildChanged() – Listen for changes to the items in a list. Use with
onChildAdded()andonChildRemoved()to monitor changes to lists. - ChildEventListener: onChildRemoved() – Listen for items being removed from a list. Use with
onChildAdded()andonChildChanged()to monitor changes to lists. - ChildEventListener: onChildMoved() – Listen for changes to the order of items in an ordered list.
onChildMoved()events always follow theonChildChanged()event that caused the item’s order to change (based on your current order-by method).
Our simple app only allows items to be removed or added to the list, so use onChildRemoved() and onChildAdded() respectively.
The listener receives a DataSnapshot, which is a snapshot of the data. A snapshot is a picture of the data at a particular location in a Firebase database at a single point in time. Calling getValue() on a snapshot returns the Java object representation of the data. The possible types returned by getValue() are Boolean, String, Long, Double, Map<String, Object>, and List<Object>. If no data exists at the location, the snapshot will return null and it’s a good idea to check for null before you try using the data. Finally, add the retrieved data to the list view.
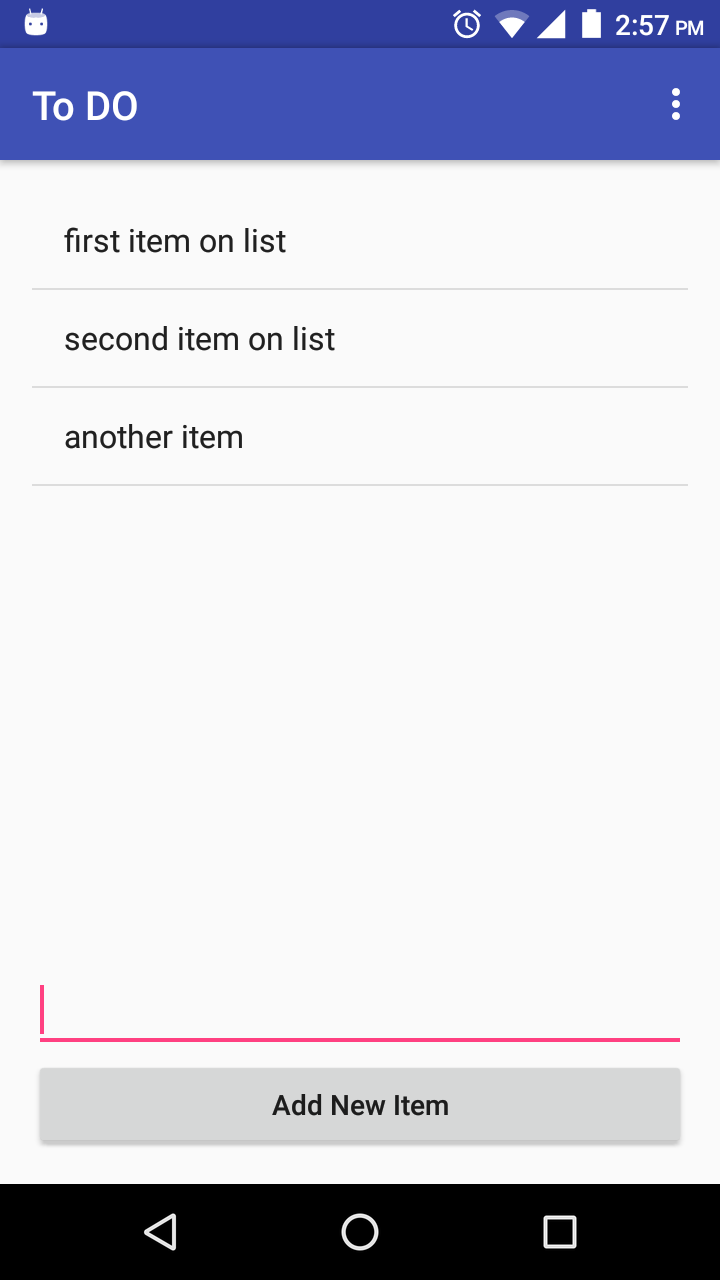
If you run the app and add some items, they will be added to the list and to the database.
You can add data from the Firebase console by clicking on the green + control on a node and entering the data. Just make sure you enter data in the correct format or the Android app will crash when it tries reading the data. In a production app, you should add validation to ensure it doesn’t crash when it gets the wrong data.
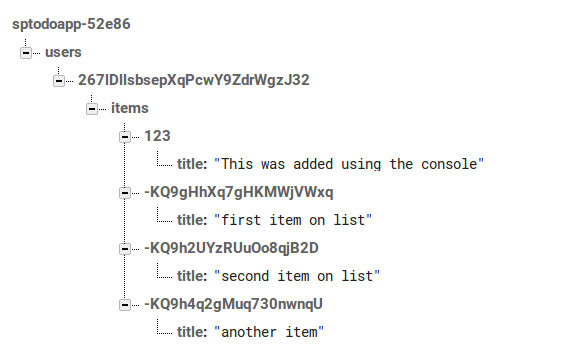
To add an item from the Console, click the + on the items node and add the following to the name field. You have to enter the full path //title.
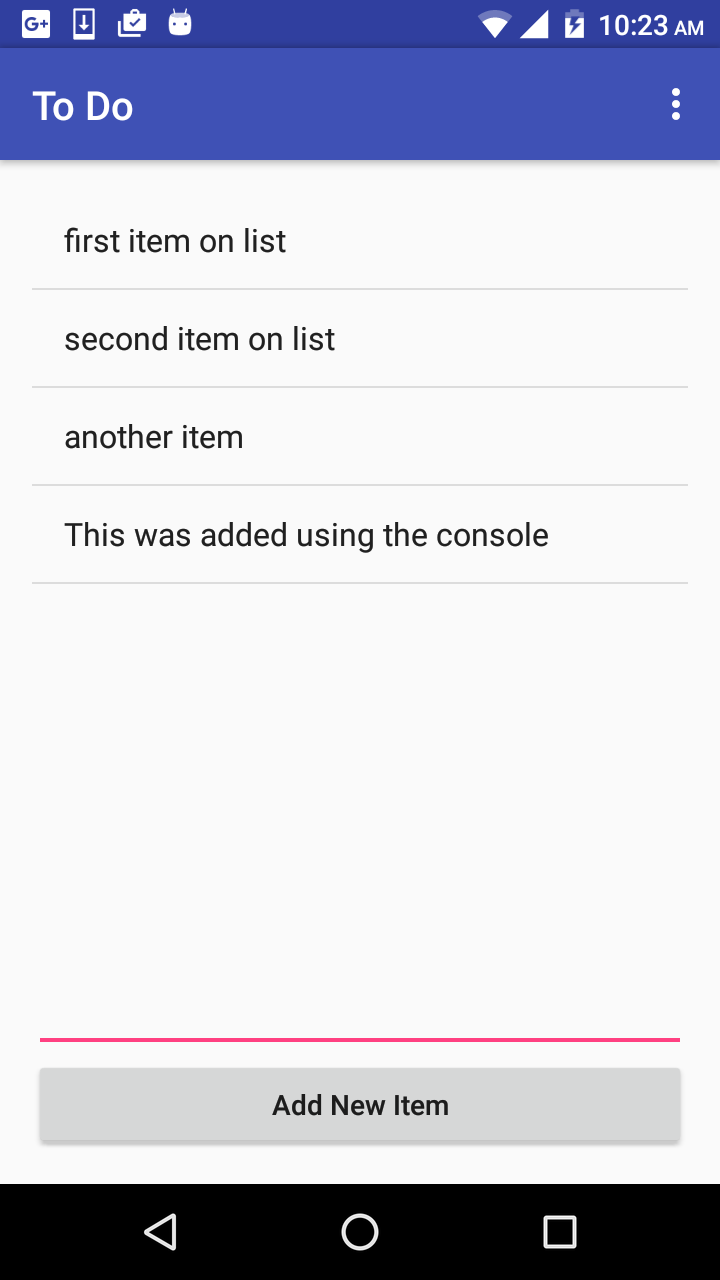
/123/titleAdd “This was added using the console” to the value field and hit Save.
The item will be added to the data and if you look at your Android app, the list will have updated itself with the item.
The current app sends a String to the server. This works, but for a more complex app, your model objects will be more complex.
Firebase allows you to pass your own custom Java object to DatabaseReference.setValue() read data into an object with DataSnapshot.getValue() , provided the class that defines it has a default constructor that takes no arguments and public getters for the properties to be assigned. For more on this check the documentation.
To see this in action, create a class named Item and change it to:
package com.echessa.todo;

/**
 * Created by echessa on 8/27/16.
 */
public class Item {

    private String title;

    public Item() {}

    public Item(String title) {
        this.title = title;
    }

    public String getTitle() {
        return title;
    }

    public void setTitle(String title) {
        this.title = title;
    }
}
Change the Add New Item button’s on click listener to:
button.setOnClickListener(new View.OnClickListener() {
    public void onClick(View v) {
        Item item = new Item(text.getText().toString());
        mDatabase.child("users").child(mUserId).child("items").push().setValue(item);
        text.setText("");
    }
});
This uses an Item object to save data to the database. The contents of the Item are mapped to child locations in a nested fashion. Run the app and you should still be able to add data to the list and see the saved data on the server console.
Deleting Data
Your app can now save data and retrieve it to populate a list view. Next it needs to allow users to delete items from a list and Firebase.
Add the following to the bottom of the else block in onCreate() in the MainActivity class:
// Delete items when clicked
listView.setOnItemClickListener(new AdapterView.OnItemClickListener() {
    public void onItemClick(AdapterView<?> parent, View view, int position, long id) {
        mDatabase.child("users").child(mUserId).child("items")
                .orderByChild("title")
                .equalTo((String) listView.getItemAtPosition(position))
                .addListenerForSingleValueEvent(new ValueEventListener() {
                    @Override
                    public void onDataChange(DataSnapshot dataSnapshot) {
                        if (dataSnapshot.hasChildren()) {
                            DataSnapshot firstChild = dataSnapshot.getChildren().iterator().next();
                            firstChild.getRef().removeValue();
                        }
                    }

                    @Override
                    public void onCancelled(DatabaseError databaseError) {

                    }
                });
    }
});
This sets an onclick listener on the list view and queries the database when an item is tapped. It searches the Firebase database for the item with a title equal to the string at the tapped location. With a more complex app you might want to search for something that is unique to the object, like an id. It then removes the first occurrence of the item from the database. The listview is automatically updated.
Run the app and you will be able to delete an item from Firebase by tapping on it in the Android app.
Logging Users Out
Calling signout() invalidates a user’s token, and logs them out of your app. Change the following lines in onOptionsItemSelected(). This logs out the user and redirects them to the Login view.
if (id == R.id.action_logout) {
    mFirebaseAuth.signOut();
    loadLogInView();
}
Conclusion
In this tutorial you learned how to use Firebase to manage your Android app’s user data. This was an introductory tutorial and Firebase offers plenty of features not covered which you can explore further in the documentation.
I’d love to hear your comments, ideas and experiences using Firebase in your apps.
Frequently Asked Questions (FAQs) about Creating a Cloud Backend for Your Android App Using Firebase
What are the key benefits of using Firebase for my Android app?
Firebase offers a multitude of benefits for Android app developers. It provides a real-time database that enables you to sync data across all clients in real time. This makes it ideal for collaborative applications or any app that requires real-time data updates. Firebase also offers robust authentication, making it easy to manage users and secure your app. It supports a variety of authentication methods, including email and password, third-party providers like Google and Facebook, and even phone number authentication. Firebase also provides cloud storage, allowing you to store and serve user-generated content, such as photos and videos, with ease.
How can I set up Firebase for my Android app?
Setting up Firebase for your Android app involves a few steps. First, you need to create a Firebase project in the Firebase console. Then, you need to register your app with the project. After that, you need to add a Firebase configuration file to your app. Finally, you need to add Firebase SDKs to your app. Detailed instructions for each of these steps can be found in the Firebase documentation.
How does Firebase’s real-time database work?
Firebase’s real-time database is a NoSQL database that lets you store and sync data between your users in real-time. This means that every time data is added or changed, connected clients are updated in real-time. This is achieved through Firebase’s powerful data synchronization technology. When a change is made to the data, Firebase calculates the difference and sends the updated data to all connected clients.
How secure is Firebase?
Firebase provides robust security features to protect your data and users. It uses Google’s secure, scalable infrastructure, and all data is transmitted over SSL and encrypted at rest. Firebase also provides a set of security rules that you can customize to control access to your data. These rules can be based on authentication, user roles, time, and more.
Can I use Firebase with other Google Cloud services?
Yes, Firebase works seamlessly with other Google Cloud services. For example, you can use Firebase Authentication to manage users and then use Google Cloud’s Identity and Access Management (IAM) to control access to other Google Cloud resources. You can also use Firebase Functions to trigger Cloud Functions in response to events in your Firebase app.
How does Firebase handle offline scenarios?
Firebase’s real-time database and Cloud Firestore both support offline data persistence. This means that your app can maintain its functionality even when it’s offline. When the app goes offline, it continues to work with the local data. When the app comes back online, it automatically syncs the local data changes with the server.
What is Firebase Cloud Messaging (FCM)?
Firebase Cloud Messaging (FCM) is a free service that lets you send notifications and messages to your users. It supports a variety of message types, including notification messages, data messages, and messages with both notification and data payloads. FCM can deliver messages to your app whether it’s in the foreground, background, or not running at all.
How can I test my Firebase app?
Firebase provides several tools for testing your app. Firebase Test Lab lets you test your app on a wide variety of devices and configurations. Firebase Crashlytics helps you track, prioritize, and fix stability issues in your app. Firebase Performance Monitoring lets you measure your app’s performance and identify performance issues.
Can I use Firebase for web apps?
Yes, Firebase supports web apps in addition to Android and iOS apps. Firebase provides a JavaScript SDK that lets you access its services from a web app. You can use Firebase to authenticate users, store and sync data, send notifications, track analytics, and more in your web app.
How much does Firebase cost?
Firebase offers a free tier called the Spark plan that includes many of its services. For more usage, Firebase offers two paid plans: the Flame plan and the Blaze plan. The Flame plan has a fixed monthly cost, while the Blaze plan charges you based on your usage. Detailed pricing information can be found on the Firebase pricing page.