

This article was updated on 11th January, 2017. Specifically: Update for Retrofit v2.1
Exchanging data between a mobile app and a backend server is an essential need for many development projects. Whilst the task became simpler with Google’s Volley library, it has a steep learning curve and Retrofit aims to make the task even simpler.
In this tutorial, I will show you how to exchange data between an Android app and a backend PHP application using the retrofit library. This sample application will simulate a login process by sending two strings (username and password) to the server, waiting for a response, and then show it to the user.
You can find the final code for this application on GitHub.
Key Takeaways
- Retrofit simplifies data exchange between Android apps and backend servers by providing a straightforward HTTP client that’s easier to use compared to Google’s Volley.
- The setup in Android Studio involves adding internet permissions, Retrofit and other dependencies, and configuring a simple login UI with username and password inputs.
- Retrofit utilizes interfaces to define HTTP requests using annotations, which helps in creating type-safe client-side APIs that reduce runtime errors.
- The tutorial demonstrates both POST and GET requests using Retrofit, showing detailed code examples on how to handle server responses and errors effectively.
- Server-side setup is briefly covered with a PHP script example that handles both GET and POST requests, returning JSON responses based on the provided credentials.
Building Android App
Create a new project in Android Studio, choosing a minimum API level of 18 and adding a Empty Activity.
Add a permission to access the internet to AndroidManifest.xml inside the application tag:
<uses-permission android:name="android.permission.INTERNET"/>Add the library dependencies to the dependencies section of the build.gradle (Module: app) file:
    compile 'com.squareup.okhttp3:logging-interceptor:3.4.0'
    compile 'com.squareup.retrofit2:retrofit:2.1.0'
    compile 'com.squareup.retrofit2:converter-gson:2.1.0'
    compile 'com.squareup:otto:1.3.8'
    compile 'com.google.code.gson:gson:2.6.2'
Creating login layout
The only layout needed for this application is activity_main.xml, change it to the below:
<?xml version="1.0" encoding="utf-8"?>
<RelativeLayout xmlns:android="http://schemas.android.com/apk/res/android"
    xmlns:tools="http://schemas.android.com/tools"
    android:layout_width="match_parent"
    android:layout_height="match_parent"
    android:paddingBottom="@dimen/activity_vertical_margin"
    android:paddingLeft="@dimen/activity_horizontal_margin"
    android:paddingRight="@dimen/activity_horizontal_margin"
    android:paddingTop="@dimen/activity_vertical_margin"
    tools:context="com.example.theodhorpandeli.retrofit.MainActivity">

    <LinearLayout
        android:layout_width="match_parent"
        android:layout_height="wrap_content"
        android:orientation="vertical"
        android:id="@+id/loginLayout">

            <EditText
                android:layout_width="match_parent"
                android:layout_height="wrap_content"
                android:id="@+id/usernameInput"
                android:hint="Username:"/>

            <EditText
                android:layout_width="match_parent"
                android:layout_height="wrap_content"
                android:id="@+id/passwordInput"
                android:hint="Password:"/>

        <LinearLayout
            android:layout_width="match_parent"
            android:layout_height="wrap_content"
            android:orientation="horizontal">

            <Button
                android:layout_width="wrap_content"
                android:layout_height="wrap_content"
                android:id="@+id/loginButtonPost"
                android:text="Login - Post"
                android:layout_gravity="right"
                android:layout_weight="1" />

            <Button
                android:layout_width="wrap_content"
                android:layout_height="wrap_content"
                android:id="@+id/loginButtonGet"
                android:text="Login - Get"
                android:layout_weight="1" />

        </LinearLayout>

    </LinearLayout>

    <LinearLayout
        android:orientation="vertical"
        android:layout_width="match_parent"
        android:layout_height="fill_parent"
        android:layout_below="@id/loginLayout">

        <TextView
            android:layout_width="wrap_content"
            android:layout_height="wrap_content"
            android:id="@+id/information"
            android:layout_gravity="center_horizontal"
            android:layout_marginTop="20dp" />

        <TextView
            android:layout_width="wrap_content"
            android:layout_height="wrap_content"
            android:id="@+id/extraInformation"
            android:layout_gravity="center_horizontal"
            android:layout_marginTop="20dp" />
    </LinearLayout>

</RelativeLayout>
The layout includes two EditText elements (username and password), two Buttons and two TextViews to show the server response.
Creating Classes
To send data to the server, Retrofit uses a Communicator and an Interface class. The Communicator methods create RestAdapters that use the Interfaces to perform a server request.
To create the Interface Class, right-click on the main package and select New -> Java Class. Call this class Interface and select Kind -> Interface.
This class contains the methods which will communicate with the API. First adding the methods for POST requests.
public interface Interface {

    //This method is used for "POST"
    @FormUrlEncoded
    @POST("/api.php")
    Call<ServerResponse> post(
            @Field("method") String method,
            @Field("username") String username,
            @Field("password") String password
    );

  //This method is used for "GET"
    @GET("/api.php")
    Call<ServerResponse> get(
            @Query("method") String method,
            @Query("username") String username,
            @Query("password") String password
    );

}
Three variables are sent to the API encoded as form data. You will build the ServerResponse class later, so don’t worry about any errors you might see.
The Communicator class performs the call and contains the methods which create the Rest Adapter.
Create a new class called Communicator and add this code:
public class Communicator {
    private static  final String TAG = "Communicator";
    private static final String SERVER_URL = "http://127.0.0.1/retrofit";

     public void loginPost(String username, String password){

        //Here a logging interceptor is created
        HttpLoggingInterceptor logging = new HttpLoggingInterceptor();
        logging.setLevel(HttpLoggingInterceptor.Level.BODY);

        //The logging interceptor will be added to the http client
        OkHttpClient.Builder httpClient = new OkHttpClient.Builder();
        httpClient.addInterceptor(logging);

        //The Retrofit builder will have the client attached, in order to get connection logs
        Retrofit retrofit = new Retrofit.Builder()
                .client(httpClient.build())
                .addConverterFactory(GsonConverterFactory.create())
                .baseUrl(SERVER_URL)
                .build(); Interface service = retrofit.create(Interface.class);

        Call<ServerResponse> call = service.post("login",username,password);

        call.enqueue(new Callback<ServerResponse>() {
            @Override
            public void onResponse(Call<ServerResponse> call, Response<ServerResponse> response) {
                BusProvider.getInstance().post(new ServerEvent(response.body()));
                Log.e(TAG,"Success");
            }

            @Override
            public void onFailure(Call<ServerResponse> call, Throwable t) {
                // handle execution failures like no internet connectivity
                BusProvider.getInstance().post(new ErrorEvent(-2,t.getMessage()));
            }
        });
    }

    public void loginGet(String username, String password){
        //Here a logging interceptor is created
        HttpLoggingInterceptor logging = new HttpLoggingInterceptor();
        logging.setLevel(HttpLoggingInterceptor.Level.BODY);

        //The logging interceptor will be added to the http client
        OkHttpClient.Builder httpClient = new OkHttpClient.Builder();
        httpClient.addInterceptor(logging);

        //The Retrofit builder will have the client attached, in order to get connection logs
        Retrofit retrofit = new Retrofit.Builder()
                .client(httpClient.build())
                .addConverterFactory(GsonConverterFactory.create())
                .baseUrl(SERVER_URL)
                .build();

        Interface service = retrofit.create(Interface.class);

        Call<ServerResponse> call = service.get("login",username,password);

        call.enqueue(new Callback<ServerResponse>() {
            @Override
            public void onResponse(Call<ServerResponse> call, Response<ServerResponse> response) {
                BusProvider.getInstance().post(new ServerEvent(response.body()));
                Log.e(TAG,"Success");
            }

            @Override
            public void onFailure(Call<ServerResponse> call, Throwable t) {
                // handle execution failures like no internet connectivity
                BusProvider.getInstance().post(new ErrorEvent(-2,t.getMessage()));
            }
        });
    }
Change SERVER_URL to the URL of your PHP server, I won’t cover setting up PHP in this tutorial, but you can find comprehensive instructions here.
Create a new class called BusProvider and add the following code:
public class BusProvider {

    private static final Bus BUS = new Bus();

    public static Bus getInstance(){
        return BUS;
    }

    public BusProvider(){}
}
In the MainActivity class, get the values from the EditText elements and use them as parameters to the server call. Change the MainActivity class to:
public class MainActivity extends AppCompatActivity {

    private Communicator communicator;
    private String username, password;
    private EditText usernameET, passwordET;
    private Button loginButtonPost, loginButtonGet;
    private TextView information, extraInformation;
    private final static String TAG = "MainActivity";
    public static Bus bus;

    @Override
    protected void onCreate(Bundle savedInstanceState) {
        super.onCreate(savedInstanceState);
        setContentView(R.layout.activity_main);

        communicator = new Communicator();

        usernameET = (EditText)findViewById(R.id.usernameInput);
        passwordET = (EditText)findViewById(R.id.passwordInput);
        //This is used to hide the password's EditText characters. So we can avoid the different hint font.
      passwordET.setTransformationMethod(new PasswordTransformationMethod());

        loginButtonPost = (Button)findViewById(R.id.loginButtonPost);
        loginButtonPost.setOnClickListener(new View.OnClickListener() {
            @Override
            public void onClick(View v) {
                username = usernameET.getText().toString();
                password = passwordET.getText().toString();
                usePost(username, password);
            }
        });

        loginButtonGet = (Button)findViewById(R.id.loginButtonGet);
        loginButtonGet.setOnClickListener(new View.OnClickListener() {
            @Override
            public void onClick(View v) {
                username = usernameET.getText().toString();
                password = passwordET.getText().toString();
                useGet(username, password);
            }
        });

        information = (TextView)findViewById(R.id.information);
        extraInformation = (TextView)findViewById(R.id.extraInformation);
    }

    private void usePost(String username, String password){
        communicator.loginPost(username, password);
        }

  private void useGet(String username, String password){
        communicator.loginGet(username, password);
      }
      }
Recapping what you have done so far. The values of the EditText elements are passed to the usePost() method. Then the communicator method is called and uses these values to create its Rest Adapter and perform the call.
Now that the posting method is almost complete, the application should handle responses from the server. For this, Retrofit uses classes called Model. For this application, the Model’s name is ServerResponse and is called inside the Interface’s method as a Callback, and when the RestAdapter is created. In both cases, it specifies the type of response expected from the server.
Create a new class called ServerResponse and add the code below:
public class ServerResponse {
    public class ServerResponse implements Serializable {
        @SerializedName("returned_username")
        private String username;
        @SerializedName("returned_password")
        private String password;
        @SerializedName("message")
        private String message;
        @SerializedName("response_code")
        private int responseCode;

        public ServerResponse(String username, String password, String message, int responseCode){
            this.username = username;
            this.password = password;
            this.message = message;
            this.responseCode = responseCode;
        }

        public String getUsername() {
            return username;
        }

        public void setUsername(String username) {
            this.username = username;
        }

        public String getPassword() {
            return password;
        }

        public void setPassword(String password) {
            this.password = password;
        }

        public String getMessage() {
            return message;
        }

        public void setMessage(String message) {
            this.message = message;
        }

        public int getResponseCode() {
            return responseCode;
        }

        public void setResponseCode(int responseCode) {
            this.responseCode = responseCode;
        }
    }
}
Retrofit’s models usually implement Serializable because they need to parse data from objects, in this case, from a JSONObject. This class declares variables, coupled with the name of the JSON key, whose data they handle.
To show the server responses, Retrofit uses ‘Events’. To get the server response, you need to create event classes. Create a new class called ServerEvent.
public class ServerEvent {
  private ServerResponse serverResponse;

  public ServerEvent(ServerResponse serverResponse) {
      this.serverResponse = serverResponse;
  }

  public ServerResponse getServerResponse() {
      return serverResponse;
  }

  public void setServerResponse(ServerResponse serverResponse) {
      this.serverResponse = serverResponse;
  }
}
When called, this class constructs a ServerResponse.
Create another class called ErrorEvent and add the following code:
public class ErrorEvent {
  private int errorCode;
  private String errorMsg;

  public ErrorEvent(int errorCode, String errorMsg) {
      this.errorCode = errorCode;
      this.errorMsg = errorMsg;
  }

  public int getErrorCode() {
      return errorCode;
  }

  public void setErrorCode(int errorCode) {
      this.errorCode = errorCode;
  }

  public String getErrorMsg() {
      return errorMsg;
  }

  public void setErrorMsg(String errorMsg) {
      this.errorMsg = errorMsg;
  }
}
These methods get more information about the server response or any errors. For this sample app, the Event classes are created but not used. Add these methods to the Communicator class, before the closing bracket:
...
@Produce
  public ServerEvent produceServerEvent(ServerResponse serverResponse) {
      return new ServerEvent(serverResponse);
  }

  @Produce
  public ErrorEvent produceErrorEvent(int errorCode, String errorMsg) {
      return new ErrorEvent(errorCode, errorMsg);
  }
  ...
The RestAdapter is now complete, the most important part of the code is:
...
Call<ServerResponse> call = service.post("login",username,password);

        call.enqueue(new Callback<ServerResponse>() {
            @Override
            public void onResponse(Call<ServerResponse> call, Response<ServerResponse> response) {
                // response.isSuccessful() is true if the response code is 2xx
                BusProvider.getInstance().post(new ServerEvent(response.body()));
                Log.e(TAG,"Success");
            }

            @Override
            public void onFailure(Call<ServerResponse> call, Throwable t) {
                // handle execution failures like no internet connectivity
                BusProvider.getInstance().post(new ErrorEvent(-2,t.getMessage()));
            }
        });
...
This specifies that the callback will have a ServerResponse structure and implements two overridden methods, success and failure. The first method is called when the client gets a response from the server and the second when the server is not found or when a connection error occurs.
Retrofit uses BusProvider to get data from the server whenever the success or failure method is called. A BusProvider is like a channel where every response is passed. Depending on the case, BusProvider posts a ServerEvent, from where you can get the desired data or an ErrorEvent which contains error information.
At one end of the channel is the Retrofit Builder which pushes the response data, and at the other, any activity which waits for data.
To make the MainActivity class wait for an event, first, you need to implement two methods. Add the following to the class:
@Override
  public void onResume(){
      super.onResume();
      BusProvider.getInstance().register(this);
  }

  @Override
  public void onPause(){
      super.onPause();
      BusProvider.getInstance().unregister(this);
  }
This causes the activity to wait for an event by registering it to the Event Bus, now the event needs to be caught. Since you built two types of event, ServerEvent and ErrorEvent, they both need to be caught by implementing two Subscribed methods. Add the following methods to MainActivity:
@Subscribe
  public void onServerEvent(ServerEvent serverEvent){
      Toast.makeText(this, ""+serverEvent.getServerResponse().getMessage(), Toast.LENGTH_SHORT).show();
      if(serverEvent.getServerResponse().getUsername() != null){
          information.setText("Username: "+serverEvent.getServerResponse().getUsername() + " || Password: "+serverEvent.getServerResponse().getPassword());
      }
      extraInformation.setText("" + serverEvent.getServerResponse().getMessage());
  }

  @Subscribe
  public void onErrorEvent(ErrorEvent errorEvent){
      Toast.makeText(this,""+errorEvent.getErrorMsg(),Toast.LENGTH_SHORT).show();
  }
Now the class is subscribed to the events provided by the Bus and depending on the type of Event, the user receives information.
Server side
PHP Script
For this sample app, the server consists of a simple PHP script. For simplicity, this script is not connected to a database. Create api.php and add the following:
<?php
//Post Method here
if(isset($_POST['method']) == 'login'){
$username = $_POST['username'];
$password = $_POST['password'];
if($username == "admin" && $password == "admin"){
$response = array('returned_username' => "-admin-",
'returned_password' => "-admin-",
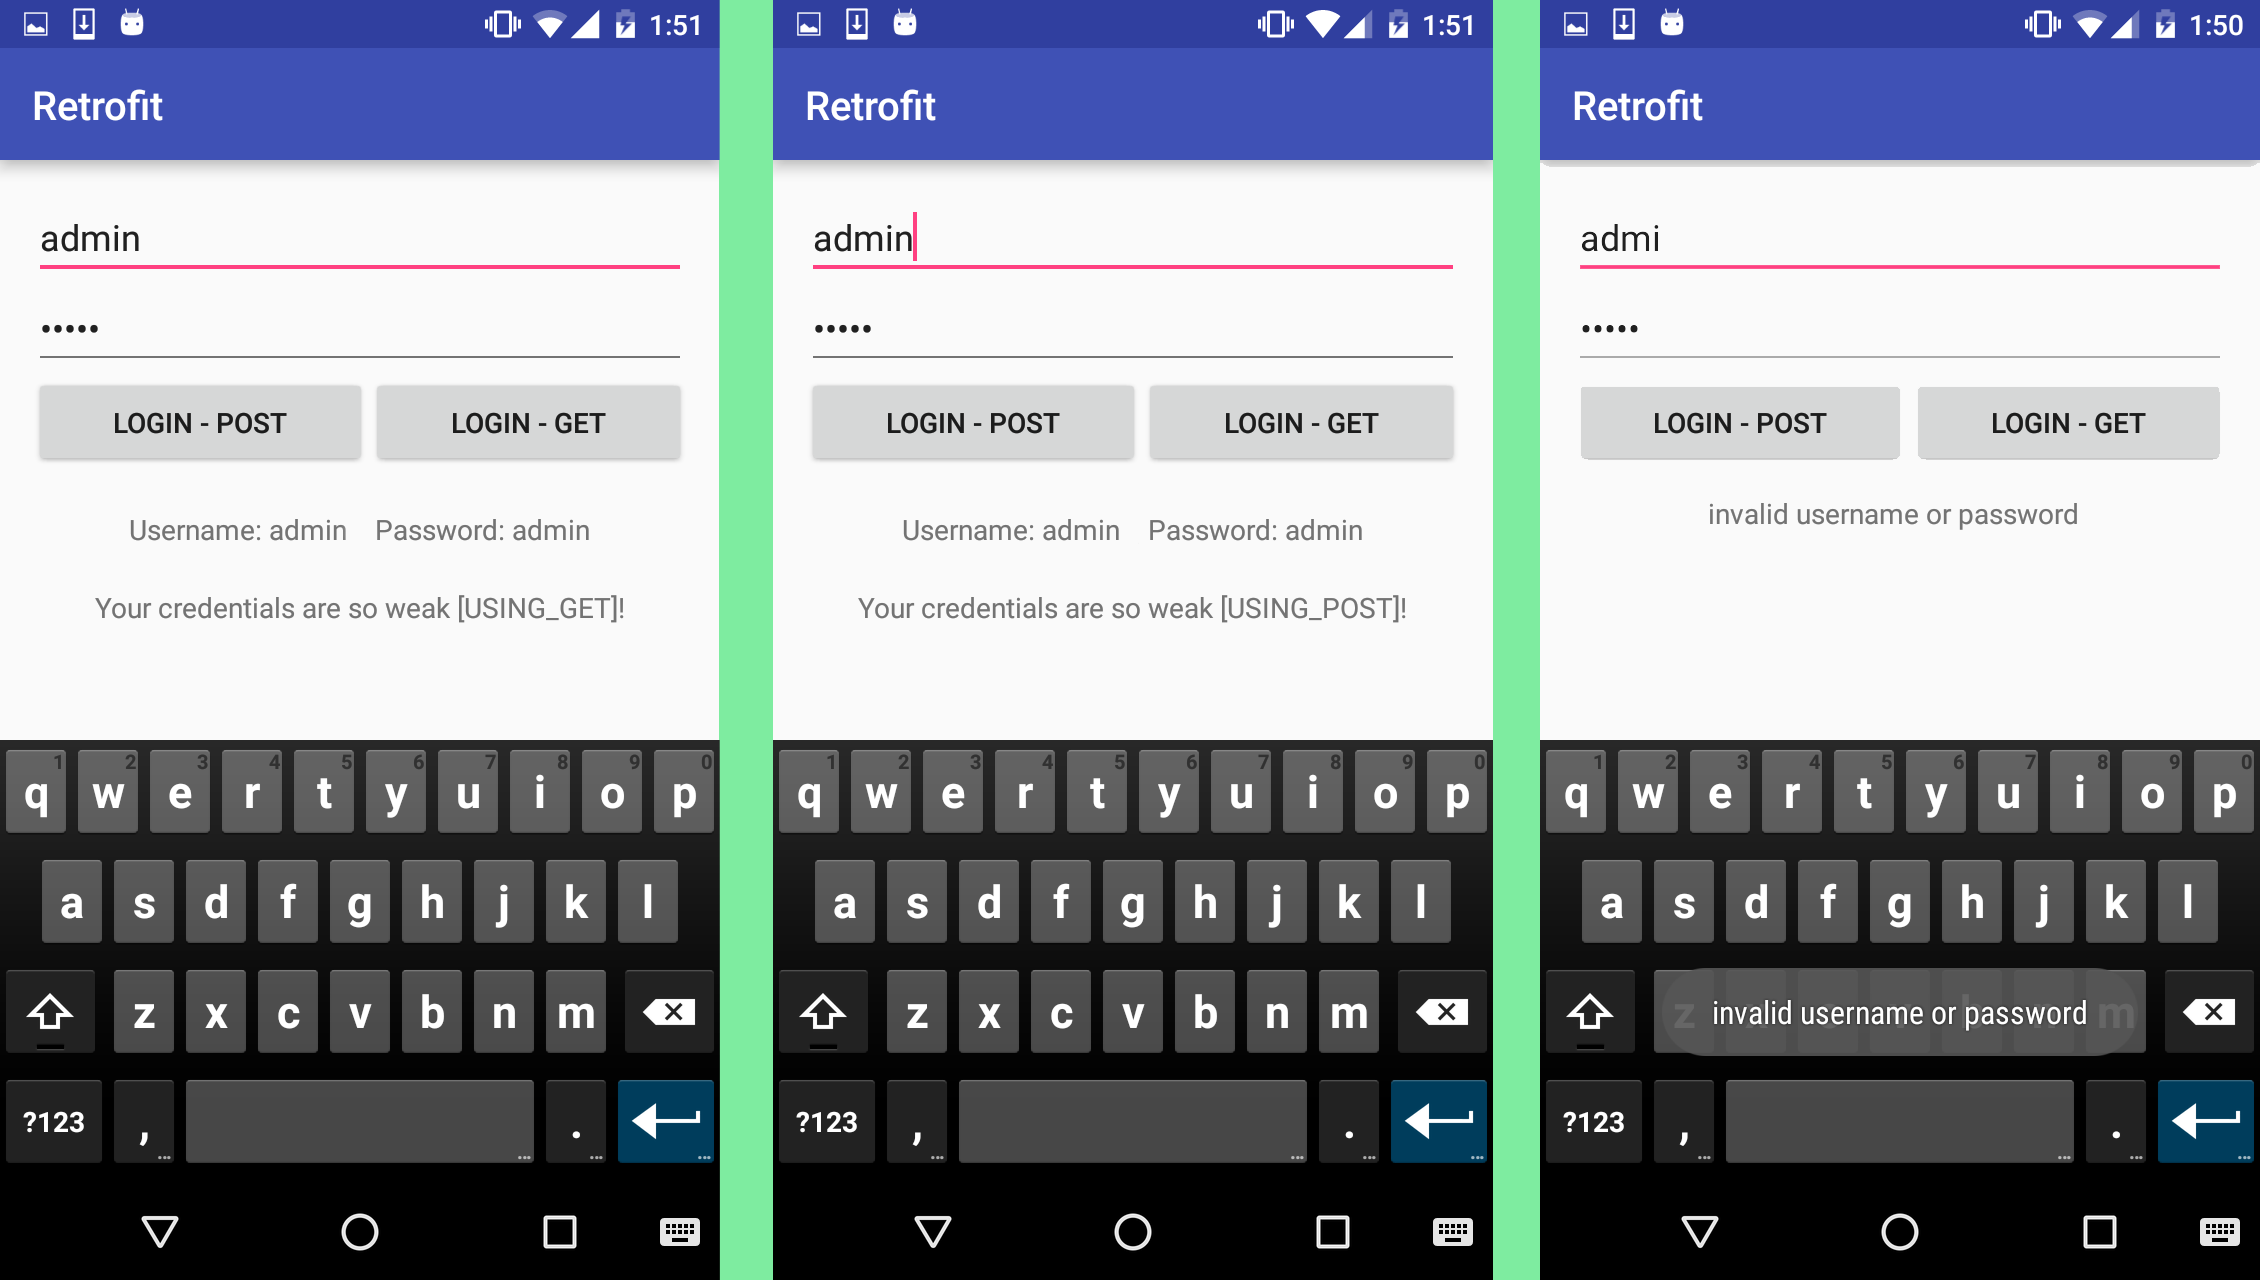
'message' => "Your credentials are so weak [USING_POST]!",
'response_code' => "1");
echo json_encode($response);
}else{
$response = array('response_code' => "-1",
'message' => "invalid username or password");
echo json_encode($response);
}
}The first part gets parameters from the POST method and if they are as expected, the statement is true and a JSON response sent back to the client. If the statement is not true, a JSON error message response is sent back to the client.
The second part is almost the same as the first, but the parameters are sent using the GET method. The response options are the same. If none of the methods are used, a general response with an error code is generated as a JSON Object.
Add the following to your PHP file:
//Get Method here
else if(isset($_GET['method']) == 'login'){
    $username = $_GET['username'];
    $password = $_GET['password'];

    if($username == "admin" && $password == "admin"){
        $response = array('returned_username' => "=admin=",
                          'returned_password' => "=admin=",
                          'message' => "Your credentials are so weak [USING_GET]!",
                          'response_code' => "1");
             echo json_encode($response);
    }else{
        $response = array('response_code' => "-1",
                          'message' => "invalid username or password");
           echo json_encode($response);
    }
}

//If no method
else{
        $response = array('response_code' => "-2",
        'message' => "invalid method");
             echo json_encode($response);
}
?>
Start your PHP server and the Android app. You should get the following results depending on what you type into the text fields and which button you tap.
Conclusion
After some initial setup, the retrofit library lets you add network calls to an Android application and I have used in most of the applications I develop. I hope you enjoy using the library as much as I do and I look forward to your comments and questions.
Frequently Asked Questions (FAQs) about Retrofit HTTP Client for Android and Java
What is the main difference between Retrofit and other HTTP clients?
Retrofit stands out from other HTTP clients due to its simplicity and ease of use. It is a type-safe HTTP client for Android and Java, which means it ensures type safety at compile time. This reduces the chances of runtime errors. Retrofit uses annotations to describe HTTP requests, which makes it easier to manipulate APIs. It also integrates seamlessly with converters for JSON, making it easier to decode data into usable objects.
How can I add headers to a Retrofit request?
Adding headers to a Retrofit request is straightforward. You can add them directly to the interface method using the @Headers annotation. For example:@Headers("Cache-Control: max-age=640000")@GET("widget/list")Call<List<Widget>> widgetList();
In this example, the Cache-Control header is added to the HTTP request. You can also add multiple headers by separating them with a comma.
Can Retrofit handle synchronous and asynchronous requests?
Yes, Retrofit can handle both synchronous and asynchronous requests. Synchronous requests run on the same thread that they were started on, while asynchronous requests run on a background thread and deliver results on the main thread. You can choose the type of request based on your application’s needs.
How can I handle errors with Retrofit?
Retrofit provides several ways to handle errors. The most common way is to use the onFailure method of the Call interface. This method is called when a network exception occurred communicating to the server or when an unexpected exception occurred creating the request or processing the response.
How can I cancel a request with Retrofit?
You can cancel a request with Retrofit by calling the cancel() method on the Call object. This is useful when you want to cancel a request due to user action or to prevent unnecessary network usage.
How can I use Retrofit with RxJava?
Retrofit can be easily integrated with RxJava. You just need to add the RxJava adapter to Retrofit when building the Retrofit instance. Then, you can return an Observable, Flowable, Single, Completable or Maybe from your API interface methods.
Can I use Retrofit with a custom OkHttp client?
Yes, you can use Retrofit with a custom OkHttp client. You just need to pass the OkHttp client instance when building the Retrofit instance. This allows you to customize the HTTP client to suit your needs.
How can I log requests and responses with Retrofit?
You can log requests and responses with Retrofit using an OkHttp interceptor. The logging interceptor logs the request method, URL, headers, and body (if present) before the request is sent, and it logs the response code, headers, and body (if present) after the response is received.
How can I upload files with Retrofit?
You can upload files with Retrofit using the @Multipart annotation and the RequestBody object. You can create a RequestBody instance from a file and then pass it to the @Part annotation in your API interface method.
How can I download files with Retrofit?
You can download files with Retrofit using the @Streaming annotation. This annotation tells Retrofit to stream the response body. This is useful when downloading large files, as it prevents Retrofit from loading the entire file into memory.

