

Apache Maven is a build automation tool with the purpose of building, reporting, and creating documentation of projects. It builds projects using a Project Object Model (POM) and a set of plugins shared by all projects using Maven, thus providing a uniform build system. Once you familiarize yourself with how one Maven project builds, you automatically know how all Maven projects build. This saves you an immense amount of time from trying to navigate the build process of many different projects.
Through this article you will gain familiarity with Maven for PHP, and how to install and use the PHP-Maven plugin from the command line and in Eclipse.
Key Takeaways
- Apache Maven is a build automation tool that uses a Project Object Model (POM) and a set of plugins shared by all projects using Maven, providing a uniform build system.
- PHP-Maven adapts the Maven build life cycle to the PHP world while fully supporting PHP 5, using PHPUnit for unit testing and phpDocumentor for creating project documentation.
- The Maven Archetype Plugin allows users to create a Maven project from an existing template, and Maven automatically downloads all the dependencies needed for the project.
- The PHP-Maven plugin supports integration with the Eclipse IDE, but it needs to be manually integrated; once integrated, it allows for the creation of PHP-Maven projects within Eclipse.
Install Maven
PHP-Maven uses the power of Maven for building, reporting, and creating documentation of your PHP projects. It adapts the Maven build life cycle to the PHP world while fully supporting PHP 5. PHP-Maven uses PHPUnit for unit testing and phpDocumentor for creating the project documentation.
To install Maven:
- Download Maven from http://maven.apache.org/download.cgi. For this article, the version is 3.0.4.
- Unpack the archive wherever you would like to store the binaries, and a folder named
apache-maven-<version>will be created. - Add its
binfolder to yourPATH. - Make sure
JAVA_HOMEis set to the location of your JDK.
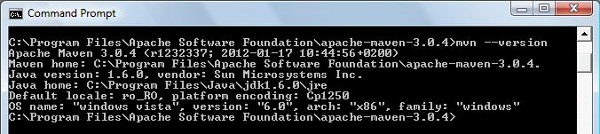
After you’ve completed the above steps, to test whether Maven is installed correctly or not you should run mvn --version at a command prompt.
Once Maven is successfully installed, go to the settings.xml file (found in ~/.m2 on Unix/Mac OS X and in C:Documents and Settingsusername.m2 on Windows) and add the PHP for Maven repository. If there is no settings.xml file, you must create it.
Below is a sample settings.xml file:
<settings>

 <profiles>

  <profile>

   <id>profile-php-maven</id>

   <pluginRepositories>

    <pluginRepository>

     <id>release-repo1.php-maven.org</id>

     <name>PHP-Maven 2 Release Repository</name>

     <url>http://repos.php-maven.org/releases</url>

     <releases>

      <enabled>true</enabled>

     </releases>

    </pluginRepository>
    <pluginRepository>

     <id>snapshot-repo1.php-maven.org</id>

     <name>PHP-Maven 2 Snapshot Repository</name>

     <url>http://repos.php-maven.org/snapshots</url>

     <releases>

      <enabled>false</enabled>

     </releases>

     <snapshots>

      <enabled>true</enabled>

     </snapshots>

    </pluginRepository>

   </pluginRepositories>
   <repositories>

    <repository>

     <id>release-repo1.php-maven.org</id>

     <name>PHP-Maven 2 Release Repository</name>

     <url>http://repos.php-maven.org/releases</url>

     <releases>

      <enabled>true</enabled>

     </releases>

    </repository>
    <repository>

     <id>snapshot-repo1.php-maven.org</id>

     <name>PHP-Maven 2 Snapshot Repository</name>

     <url>http://repos.php-maven.org/snapshots</url>

     <releases>

      <enabled>false</enabled>

     </releases>

     <snapshots>

      <enabled>true</enabled>

     </snapshots>

    </repository>

   </repositories>

  </profile>

 </profiles>
 <activeProfiles>

  <activeProfile>profile-php-maven</activeProfile>

 </activeProfiles>

</settings>
Create Your First Project
To create a simple project from the command line I’ll use the Maven Archetype Plugin. The Archetype Plugin allows a user to create a Maven project from an existing template called an archetype. You can run the Maven Archetype plugin with the mvn archetype:generate command to generate a new project from an archetype, in a folder corresponding to its artifact ID.

Maven will start downloading all the dependencies needed to your computer. At some point, Maven will ask you to define a value for groupId, artifactId, version and package, as you see here:
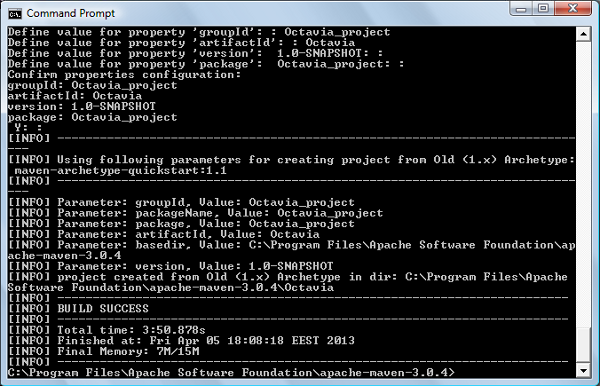
Notice that at the official Maven Archetype Plugin page you will find all the available parameters along with their description.
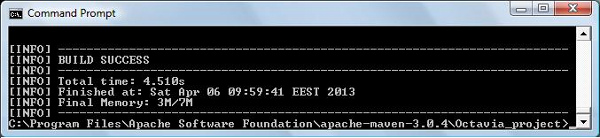
After successfully creating your first project, you should find the following in the corresponding folder, in my case Octavia_project:
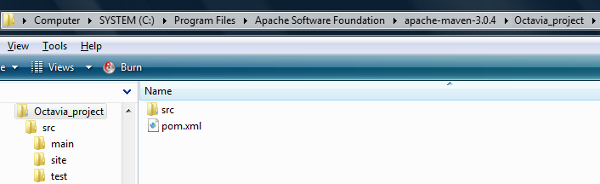
src/main/php– contains the project’s source code.src/test/php– contains the project’s test code.src/site– contains the project’s site descriptor.pom.xml– contains the project’s POM description.
The contents of pom.xml looks like this:
<?xml version="1.0" encoding="UTF-8"?>

<project xmlns="http://maven.apache.org/POM/4.0.0"

 xmlns:xsi="https://www.w3.org/2001/XMLSchema-instance"

 xsi:schemaLocation="http://maven.apache.org/POM/4.0.0 http://maven.apache.org/xsd/maven-4.0.0.xsd">
 <parent>

  <groupId>org.phpmaven</groupId>

  <artifactId>php-parent-pom</artifactId>

  <version>2.0.2</version>

 </parent>
 <modelVersion>4.0.0</modelVersion>

 <groupId>org.phpsample</groupId>

 <artifactId>Octavia_project</artifactId>

 <packaging>php</packaging>

 <version>1.0-SNAPSHOT</version>

 <build>

  <plugins>

   <plugin>

    <groupId>org.phpmaven</groupId>

    <artifactId>maven-php-plugin</artifactId>

    <extensions>true</extensions>

   </plugin>
   <plugin>

    <groupId>org.apache.maven.plugins</groupId>

    <artifactId>maven-site-plugin</artifactId>

    <version>3.0</version>

    <configuration>

     <reportPlugins>

      <plugin>

       <groupId>org.phpmaven</groupId>

       <artifactId>maven-php-plugin</artifactId>

       <reportSets>

        <reportSet>

         <reports>

          <report>phpdocumentor</report>

          <report>phpunit-coverage</report>

          <report>phpunit</report>

         </reports>

        </reportSet>

       </reportSets>

      </plugin>

     </reportPlugins>

    </configuration>

   </plugin>

  </plugins>

 </build>
 <dependencies>

  <!--  phpUnit for PHP 5 -->

  <dependency>

   <groupId>de.phpunit</groupId>

   <artifactId>PHPUnit</artifactId>

   <version>3.6.10</version>

   <type>phar</type>

  </dependency>

 </dependencies>

</project>
The test phase comes after creating your application, and for that you need the PHPUnit dependency. If it’s missing, be sure to add it to your pom.xml as shown above.
The PHPUnit tests should be place into the src/test/php folder and a test should be named SomthingTest.php, that is, the suffix “Test.php” is a must. My test, MyTest.php, is listed below:
<?php

class MyTest extends PHPUnit_Framework_TestCase

{

    public function testBar() {

        include "org/sample/app.php";

        $this->fail("we will fail");

    }

}
To execute a test you use the command mvn test. In the official documentation has a section How to Ignore Failing Tests, and you can find there some commands that may help you run your test. (The only command that actually worked for me was the one that executed a single test.)
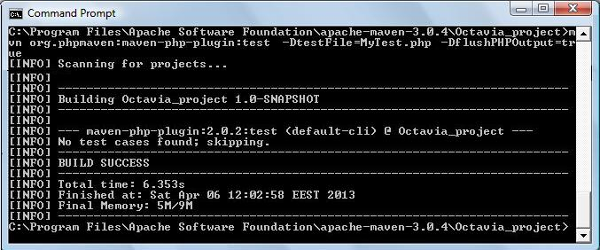
To build your newly created Maven project, you run the command mvn:package. You will notice again that Maven automatically starts downloading any dependencies needed for your project.
After downloading all needed dependencies and performing the build actions, you should get the following success message:
To create documentation from the project, you’ll need the phpDocumentor 2 PEAR package. In the src/site folder, create the site.xml file with the following contents:
<?xml version="1.0" encoding="ISO-8859-1"?>

<project name="Maven">

 <version position="left" />
 <skin>

  <groupId>org.apache.maven.skins</groupId>

  <artifactId>maven-stylus-skin</artifactId>

  <version>1.0</version>

 </skin>

 <body>

  <links>

   <item name="PHP-Maven" href="http://www.php-maven.org/" />

  </links>
  <menu name="Main">

   <item name="Welcome" href="index.html" />

  </menu>
  <menu ref="reports" />

 </body>

</project>
Next run the mvn site command and you’ll find the results in the target/site folder.
Eclipse Integration
The php-maven plugin supports integration with the Eclipse IDE, but it doesn’t contain the php-maven plugin by default. You need to integrate it manually. To do that, follow these steps:
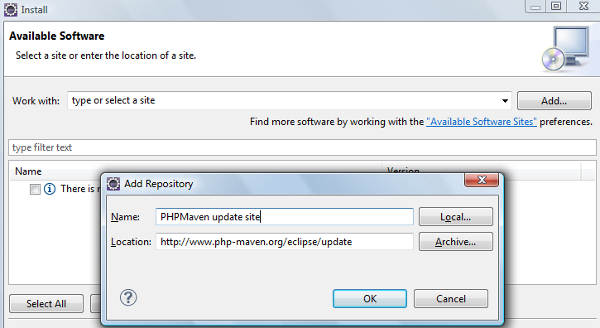
- From the Help menu, choose Install New Software option and then press the “Add…” button.
- In the Add Repository window enter the name: “PHPMaven update site” and URL http://www.php-maven.org/eclipse/update.
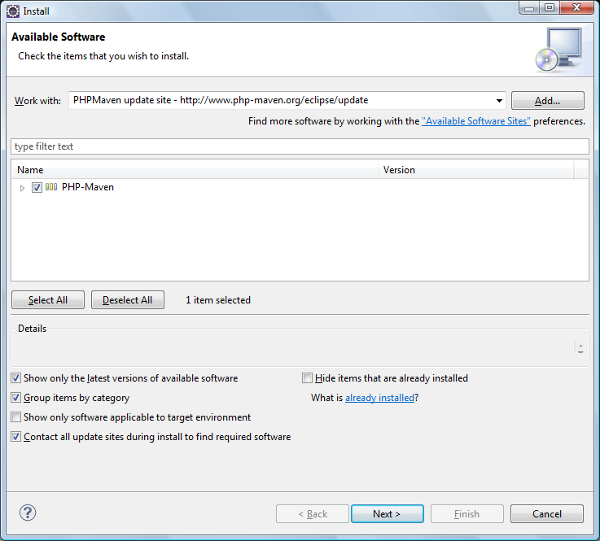
- The PHPMaven update site is listed and you can choose the PHP-Maven option.
- Hit Next/Finish to install the plugins.
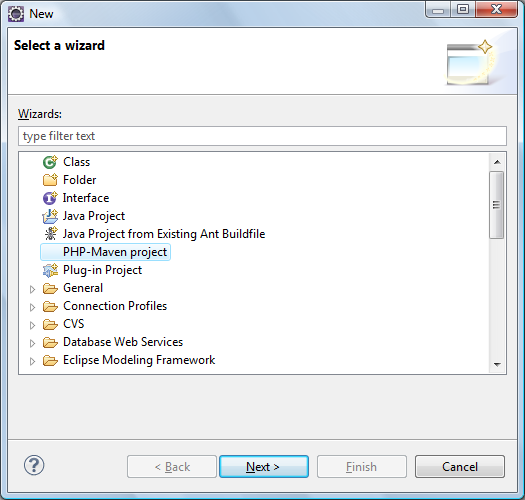
After the installation you will find the PHP-Maven project option when you go to create a new project. Select it, and press Next in order to install the plugin.
To create a new project within Eclipse, select File > New > Other (or press the CTRL + N combination) and you should see something like in the image below:
After pressing the Next button you will receive a list of different archetypes.
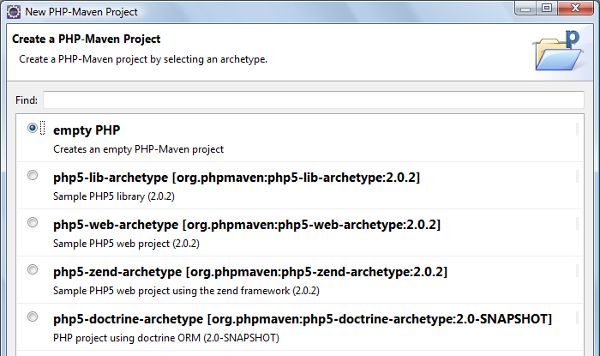
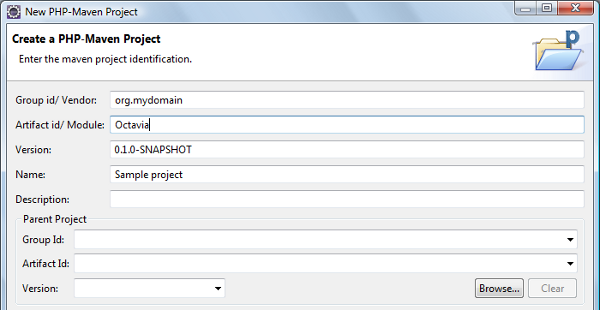
Choose your artifact and you will be prompted for the project information, just like earlier on the command prompt.
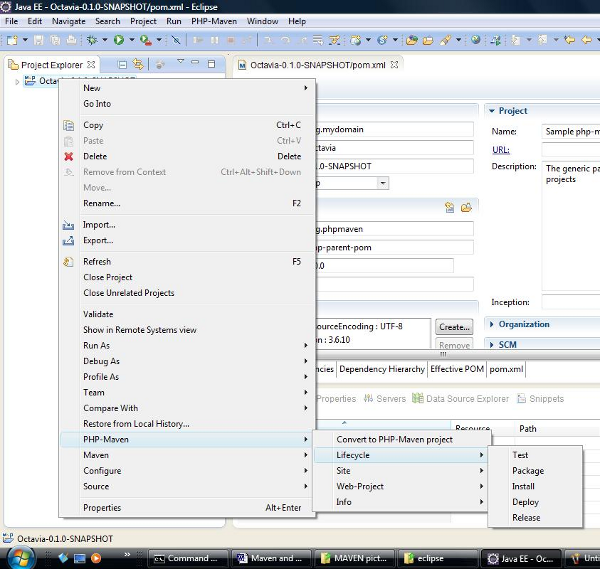
The new project will be added to the Project Explorer tab. The folder structure is mostly similar to the one for the project created from command line.
After you create the project, right click on it and you’ll see the PHP-Maven option at the bottom of the menu, and its children list the most important phases of a PHP-Maven project.
Summary
In this article you’ve learned how to install and use the PHP-Maven plugin from the command line and in Eclipse. Maven for PHP is a capable build automation tool for the PHP platform. Using Maven, the user only needs to provide the configuration for the project, while the configurable plugins do the work of compiling the project, running unit tests, generating API documentation and so on. Maven for PHP will quickly become a necessary tool in the PHP developer’s toolbox.
Image via Fotolia
Frequently Asked Questions (FAQs) about Maven and PHP
What is the role of Maven in PHP development?
Maven is a powerful project management tool that is primarily used in Java projects. However, it can also be used in PHP development. It provides a standardized way to build projects, a clear definition of what the project consists of, an easy way to publish project information, and a way to share JARs across several projects. In PHP development, Maven can help manage dependencies, build processes, and documentation, making the development process more efficient and streamlined.
How do I integrate Maven with PHP?
Integrating Maven with PHP involves a few steps. First, you need to install Maven and ensure it’s correctly set up on your system. Then, you need to create a Maven project for your PHP application. This involves creating a pom.xml file, which is the project object model that contains information about the project and configuration details used by Maven to build the project. You can then use Maven commands to build and manage your PHP project.
Can I use Maven to deploy PHP applications?
Yes, Maven can be used to deploy PHP applications. Maven’s build lifecycle includes a deploy phase, which comes after the package phase. During the deploy phase, the final package (after the package phase) is copied to the remote repository for sharing with other developers and projects. This can be particularly useful in a team setting where you want to share your application with others.
How does Maven handle dependencies in PHP?
Maven handles dependencies in PHP in a similar way to how it handles dependencies in Java. It uses the pom.xml file to define the dependencies that your project needs. When you build your project, Maven checks this file and downloads the necessary dependencies from the Maven repository. This means that you don’t have to manually manage the dependencies yourself, making the development process more efficient.
What are the benefits of using Maven with PHP?
Using Maven with PHP brings several benefits. It provides a standardized way to build your projects, making it easier for new developers to understand the project structure. It also manages dependencies and the build process, saving you from having to do these tasks manually. Additionally, Maven can generate reports, create a project website, and facilitate communication among team members.
Can I use Maven with PHP frameworks?
Yes, Maven can be used with PHP frameworks. However, the process may be a bit more complex than using Maven with a simple PHP project. You’ll need to ensure that the framework and your Maven project are properly configured to work together.
How do I troubleshoot issues when using Maven with PHP?
Troubleshooting issues when using Maven with PHP involves checking a few key areas. First, ensure that Maven is correctly installed and set up on your system. Check your pom.xml file for any errors or misconfigurations. Also, ensure that your PHP project is correctly set up to work with Maven. If you’re still having issues, consider seeking help from the Maven community or a knowledgeable colleague.
Can I use Maven to test PHP applications?
Yes, Maven can be used to test PHP applications. Maven has a test phase in its build lifecycle, during which the application is tested using a suitable unit testing framework. For PHP, this could be PHPUnit. The tests are automatically run when you build your project, helping to ensure the quality of your code.
How do I update dependencies using Maven in PHP?
Updating dependencies using Maven in PHP involves modifying the pom.xml file. In this file, you’ll find a list of the dependencies for your project. To update a dependency, you need to change the version number to the desired version and then run a Maven update. Maven will then download the new version of the dependency from the Maven repository.
How can I optimize the use of Maven in PHP development?
Optimizing the use of Maven in PHP development can involve a few strategies. First, ensure that you’re using Maven effectively to manage dependencies – this is one of its key strengths. Also, make use of Maven’s build lifecycle to automate tasks such as testing and deployment. Finally, consider using Maven plugins to extend its functionality and make it even more powerful in managing your PHP projects.

