Introduction to Nest.js for Angular Developers

Key Takeaways
- Nest.js is an open-source, progressive Node.js framework that shares many concepts with Angular and is built for TypeScript, making it an ideal choice for Angular developers looking to create backends for their applications. It combines the best concepts of Object Oriented Programming, Functional Programming and Functional Reactive Programming.
- The Nest.js framework is extensible, versatile, and progressive, with a modular architecture that allows for easy integration of other libraries, effortless testability, scalability, and maintainability, and an ecosystem for building all kinds of server-side applications.
- The Nest.js framework uses a command-line interface utility, Nest CLI, for quickly generating projects with the necessary base files and dependencies. This utility also allows for scaffolding of various artifacts like components and modules, serving the application in development, and building the final production-ready application.
In this post, we’ll be introducing Nest.js for Angular developers. Nest.js is particularly interesting for this group, since it was heavily inspired by Angular and built for TypeScript. So what’s Nest.js?
Nest.js is an open source MIT-licensed progressive Node framework, written in TypeScript and sharing many concepts with Angular. It’s for the server side and can be used to build efficient, reliable and scalable web applications for the enterprise. It’s built by Kamil Mysliwiec.
Nest.js combines the best concepts of Object Oriented Programming, Functional Programming and Functional Reactive Programming.
Nest.js has a plethora of features such as:
- Extensibility: Thanks to its modular architecture, Nest allows you to use the other existing libraries in your project.
- Architecture: Nest has a project’s architecture that provides effortless testability, scalability, and maintainability.
- Versatility: Nest provides an ecosystem for building all kinds of server-side applications.
- Progressiveness: Nest makes use of the latest JavaScript features and implements mature solutions and design patterns in software development.
Since it makes use of TypeScript and the base concepts of Angular, Angular developers can learn it quickly and will be able to create backends for their Angular apps without resorting to other server-side frameworks.
Behind the curtains, Nest.js makes use of the existing and mature libraries that Node.js developers have used for a long time, such as Express.js and TypeORM.
Express is a fast, unopinionated, minimalist web framework for Node.js that provides many HTTP utilities for easily and quickly building robust REST APIs. For TypeORM, it’s the most mature ORM (Object Relational Mapper) for TypeScript language and modern JavaScript. It has support for both Active Record and Data Mapper patterns, which allow you to build high quality, loosely coupled, scalable and maintainable applications on top of the most popular existing database systems like MySQL, PostgreSQL and Oracle.
Prerequisites
To get started with Nest.js, you need a few prerequisites. Since this introductory tutorial assumes you are an Angular developer, you may already have them all:
- Node.js and NPM installed on your system. You can install both of them from the official website or follow your system documentation for instructions.
- Familiarity or working experience with TypeScript. As an Angular developer, you have already worked with TypeScript, since Angular is based on TypeScript.
Installing Nest CLI
Nest CLI is a command-line interface utility that allows you to quickly generate projects with the base files and necessary dependencies. It also allows you to scaffold various artifacts like components and modules, serving the application in development and building the final production-ready application. The Nest CLI is based on the Angular Devkit package and uses nodemon to watch file changes.
Let’s get started by installing Nest CLI. Open a new terminal and run the following command:
npm install -g @nestjs/cli
Please note that you may need to add sudo before your command in Debian-based systems or macOS, or use an administrator CMD prompt in Windows. If you want to install packages globally on your system without being a superuser you need to fix your npm permissions.
After installing the CLI, you can use it to quickly generate Nest.js projects and work with them.
Generating Your First Nest Project
After installing the CLI, let’s generate a first project. Head back to your terminal and run the following command:
nest new firstnestproject
The CLI will ask you for some information about your project such as the description, version and author. You can submit these details or just leave them empty and hit Enter.
The CLI will create a bunch of files and folders then prompt you for the package manager you want to use with your project. You can choose either npm or yarn, but we’ll proceed with npm for the purposes of this tutorial.
After successfully installing the required dependencies, you can navigate to your project’s root folder and run the following command to start a live-reload development server based on nodemon:
npm run start:dev
You can use your web browser to navigate to http://127.0.0.1:3000/, where your Nest server is listening. You should be able to see a page with Hello World!.
You can leave this server running and start a new terminal for the other commands we’ll be running in this tutorial.
The Project Structure
The Nest.js project we generated has a predefined structure with best practices for testability, scalability, and maintainability. Let’s take a look in more detail.
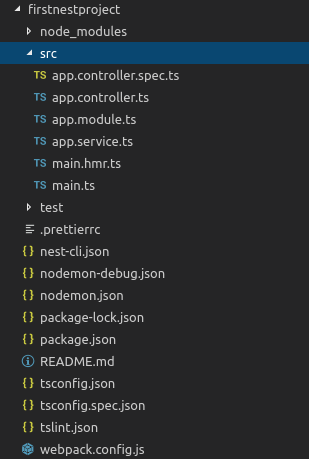
This is a screenshot of the project structure:

The project has a node_modules folder and a package.json file which are necessary for every Node.js project. It also has:
- A
tsconfig.jsonfile for configuring TypeScript - A
nodemon.jsonfile for nodemon configuration - A
tslint.jsonfile for TypeScript linting - A
nest-cli.jsonfor CLI configuration - A
src/folder containing the actual code of the project - A
test/folder containing the tests.
Creating a Nest Module
Nest.js projects have a modular architecture. This is the definition of modular programming from Wikipedia:
Modular programming is a software design technique that emphasizes separating the functionality of a program into independent, interchangeable modules, such that each contains everything necessary to execute only one aspect of the desired functionality.
In Nest.js, you can create a module as a TypeScript class annotated with the @Module() decorator, which provides the metadata that will be used to organize the application structure.
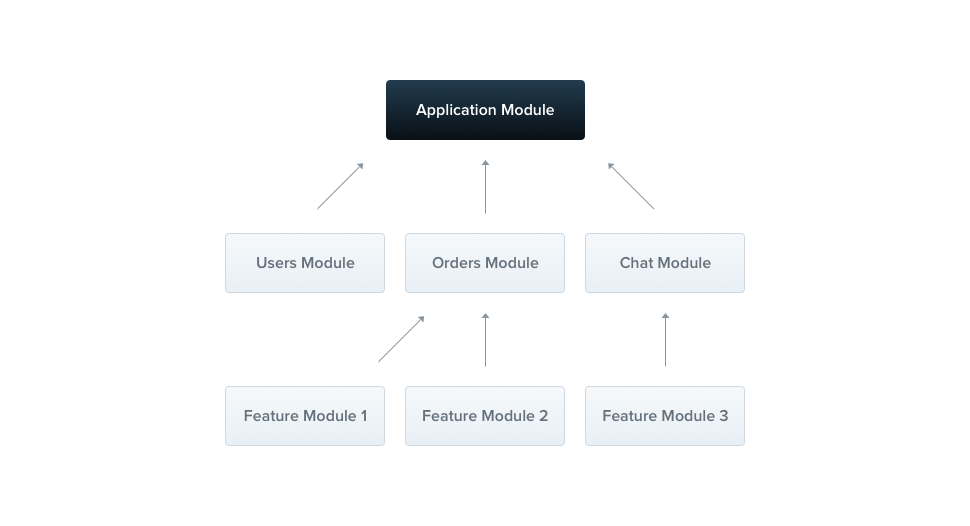
This is an image from the official Nest.js website of how modules can be structured in an example application:

Each Nest.js application has at least one module, called the root module.
You can create modules using the CLI with the nest generate module command. Let’s create a module in our project. Head back to your terminal, make sure you are navigated to the project’s root folder and run the following command:
nest generate module example
This will generate the src/example/example.module.ts file and will update the src/app.module.ts file to include the newly created module.
If we open the module file we’ll get the following content for a basic Nest module:
import { Module } from '@nestjs/common';

@Module({})
export class ExampleModule {}
This is a simple TypeScript class decorated with the @Module() decorator available from the @nestjs/common package.
Now, if you open the main application module in src/app.module.ts file, you should see the module imported:
import { Module } from '@nestjs/common';
import { AppController } from './app.controller';
import { AppService } from './app.service';
import { ExampleModule } from './example/example.module';

@Module({
  imports: [ExampleModule],
  controllers: [AppController],
  providers: [AppService],
})
export class AppModule {}
ExampleModule is imported from the ./example/example.module path and added to the imports array.
Creating a Nest Controller
In Nest.js, controllers are used to handle incoming HTTP requests and return responses. They are mapped to routes.
You can create a controller by defining a TypeScript class and using the @Controller() decorator.
In your terminal, run the following command to generate a controller:
nest generate controller example/example
We created a controller named example and we prefixed the name with the example/ path, which instructs the CLI to make this controller part of the example module we created before.
Open the src/example/example/example.controller.ts file, you should see the following code:
import { Controller } from '@nestjs/common';

@Controller('example')
export class ExampleController {}
If you open the src/example/example.module.ts file, you’ll see the controller imported and included in the imports array of the example module:
import { Module } from '@nestjs/common';
import { ExampleController } from './example/example.controller';

@Module({
  imports: [ExampleModule],
  controllers: [ExampleController]
})
export class ExampleModule {}
Let’s go back to our example controller and create some routes. Re-open the src/example/example/example.controller.ts file and add the following imports:
import { Get, Post, Body } from '@nestjs/common';
Next, add an index() method:
    @Get()
    index() {
      return "Example Controller!";
    }
We decorate the method with the @Get() decorator to create a route that accepts GET requests and return a response with the Example Controller! text. We can access this route from the 127.0.0.1:3000/example URL. You should see a blank page with Example Controller! text.
Next, let’s add a route that accepts POST requests. Add the following method:
    @Post('echo')
    echo(@Body() data): any {
        return data;
    }
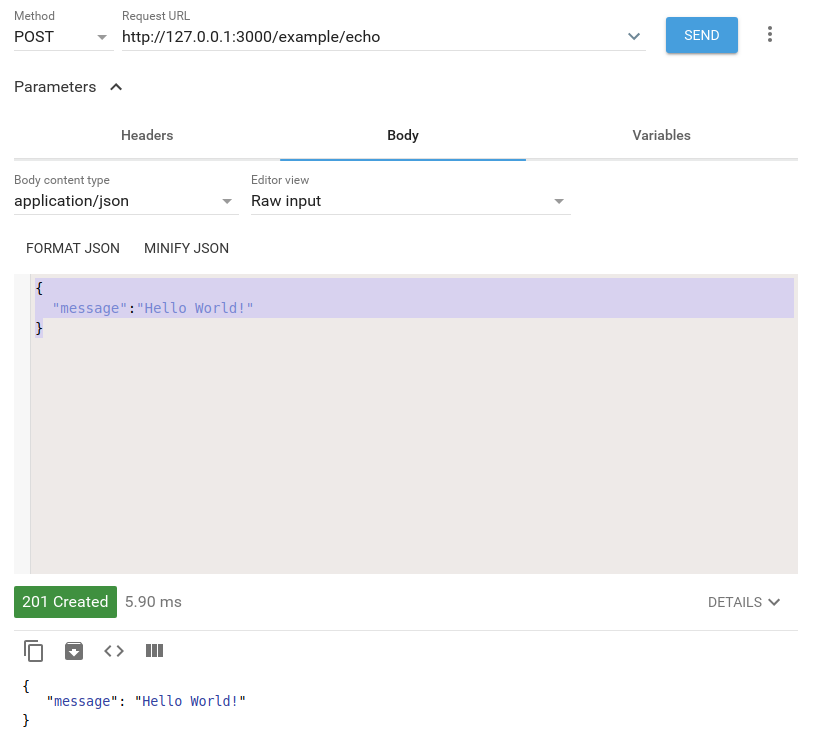
We create an example/echo route that will receive a JSON object and return it back. We use the @Body() decorator to extract the body from the response. Using a REST API client (cURL or Postman etc.), you can send a POST request with some data to the 127.0.0.1:3000/example/echo URL and get the data back. Here is an example:

Conclusion
In this article, we’ve introduced the Nest.js framework for Angular developers. We have also seen how to install the Nest CLI and used it to create an example project and various artifacts like modules and controllers. For more in-depth details about the other concepts, you can read the official docs.
You can also check NestJS boilerplates if you’re interested in a jumpstart to create web apps using NestJS.
Frequently Asked Questions (FAQs) about Nest.js for Angular Developers
What makes Nest.js a progressive Node.js framework?
Nest.js is considered a progressive Node.js framework because it allows developers to build efficient, reliable, and scalable server-side applications. It uses modern JavaScript and is built with TypeScript, but still preserves compatibility with pure JavaScript. Nest.js combines elements of Object-Oriented Programming (OOP), Functional Programming (FP), and Functional Reactive Programming (FRP). Moreover, it leverages the power of decorators and metadata reflection, concepts borrowed from Angular, making it familiar to developers with an Angular background.
How does Nest.js enhance the capabilities of Node.js?
Nest.js enhances the capabilities of Node.js by providing a high-level, modular structure that helps organize code in a maintainable and scalable way. It provides out-of-the-box application architecture which allows developers and teams to create highly testable, scalable, loosely coupled, and easily maintainable applications. It also supports a wide range of libraries and tools, further extending the capabilities of Node.js.
Can I use Nest.js if I only know JavaScript and not TypeScript?
Yes, you can use Nest.js even if you only know JavaScript. While Nest.js is written in TypeScript, it maintains compatibility with JavaScript. However, to fully leverage the power of Nest.js, understanding TypeScript is beneficial as it introduces static types, interfaces, and other powerful features that can make your code more robust and maintainable.
How does Nest.js compare to other Node.js frameworks like Express.js or Koa.js?
While Express.js and Koa.js are minimalistic frameworks, Nest.js is a full-fledged, feature-rich framework. Nest.js uses Express.js under the hood, but it provides a higher level of abstraction, offering a robust foundation and architecture for your applications. Unlike Express.js or Koa.js, Nest.js comes with built-in solutions for key architectural components like modules, services, and controllers.
What are decorators in Nest.js and how are they used?
Decorators are a special kind of declaration in TypeScript (and therefore in Nest.js) that can be attached to classes, methods, and properties. They introduce a way to add annotations and a meta-programming syntax for class declarations and members. In Nest.js, decorators play a crucial role in the way the framework handles things like dependency injection, routing, middleware, and more.
How does Nest.js handle real-time event-based applications?
Nest.js provides first-class support for building real-time event-based applications with its built-in WebSocket module. It abstracts the complexities of building real-time applications with a simple, easy-to-use API. You can easily set up event listeners and broadcasters, making it ideal for building chat applications, live updates, and more.
How does Nest.js support microservices?
Nest.js has a dedicated microservices module that makes it easy to build and manage microservice architecture. It provides out-of-the-box support for transport mechanisms like TCP, Redis, MQTT, NATS, gRPC, and more. It also provides a message pattern-based communication style between microservices, making it easier to manage inter-service communication.
How does testing work in Nest.js?
Nest.js provides a full testing suite based on Jest, a popular JavaScript testing framework. It provides utilities to test utilities, services, controllers, and even whole applications with end-to-end testing. The testing module in Nest.js is designed to make the testing process as easy as possible, with features like dependency injection for test components.
How does Nest.js handle database operations?
Nest.js doesn’t directly handle database operations but it integrates seamlessly with a wide range of ORMs like TypeORM, Sequelize, or Mongoose. These integrations provide a high-level API to interact with your database, allowing you to perform CRUD operations, run complex queries, and more.
How does Nest.js ensure the security of applications?
Nest.js provides a range of features to help secure your applications. It integrates with Passport.js, a popular authentication library for Node.js. It also provides features like guards and interceptors that can be used to implement authorization and input validation. However, like any framework, the security of your Nest.js application also depends on best practices like using HTTPS, sanitizing user input, and more.
Ahmed is a technical author and web developer living in Morocco with a Master's degree in software development. He authors technical content about JavaScript, Angular and Ionic. He is also a fan of entrepreneurship, poetry, and teaching. You can contact me on my personal website and read my other articles on Techiediaries.
Published in
·Design·Design & UX·HTML & CSS·Review·Sketch·Software·UI Design·Usability·UX·December 24, 2015


