

Web users today expect the fluid, dynamic experiences that single-page applications (SPAs) deliver. However, creating SPAs often involves intricate frameworks like React and Angular, which can be complex to learn and work with. Enter htmx — a library that brings a fresh perspective to building dynamic web experiences by leveraging features such as Ajax and CSS transitions directly in HTML.
In this guide, we’ll explore the capabilities of htmx, how it simplifies dynamic web development, and how you can harness its potential to enhance your web development process.
Key Takeaways
- htmx Basics: htmx allows for dynamic web experiences by leveraging HTML, reducing the complexity typically associated with JavaScript-heavy SPAs.
- Simple Installation: htmx can be easily included in projects via CDN, facilitating quick integration without complex setup.
- Ajax Simplified: The library enables straightforward Ajax requests directly from HTML elements using specific attributes, enhancing user interaction without the need for extensive JavaScript.
- Dynamic Content Loading: htmx supports targeting specific elements for content updates and offers various options for how new content is inserted, making web pages more interactive.
- Enhanced User Experience: With built-in support for CSS transitions and the experimental View Transitions API, htmx allows for smooth visual effects when updating content.
- Form Handling and Validation: htmx integrates with HTML5 validation, ensuring that forms behave as expected, enhancing both usability and functionality.
What Is htmx and How Does It Work?
When building interactive web experiences, developers have traditionally had two main options, each with its own trade-offs. On one hand, there are multi-page applications (MPAs) which refresh the entire page every time a user interacts with it. This approach ensures that the server controls the application state and the client faithfully represents it. However, the full page reloads can lead to a slow and clunky user experience.
On the other hand, there are single-page applications (SPAs) which rely on JavaScript running in the browser to manage the application state. They communicate with the server using API calls, which return data, often in JSON format. The SPA then uses this data to update the user interface without a page refresh, providing a much smoother user experience somewhat akin to a native desktop or mobile app. However, this approach isn’t perfect either. The computational overhead is usually higher due to substantial client-side processing, the initial load times can be slower as the client has to download and parse large JavaScript bundles before rendering the first page, and setting up the development environment often involves dealing with intricate build tools and workflows.
htmx provides a middle ground between these two extremes. It offers the user experience benefits of SPAs — with no need for full page reloads — while maintaining the server-side simplicity of MPAs. In this model, instead of returning data that the client needs to interpret and render, the server responds with HTML fragments. htmx then simply swaps in these fragments to update the user interface.
This approach simplifies the development process by minimizing client-side complexity, as well as the substantial JavaScript reliance common to SPAs. It requires no elaborate setup and provides a smooth and responsive user experience.
Installing htmx
There are several ways to include htmx in your project. You could download it directly from the project’s GitHub page, or if you’re working with Node.js, you can install it via npm using the command npm install htmx.org.
However, the simplest way, and the one we’ll be using in this guide, is to include it via a content delivery network (CDN). This allows us to start using htmx without any setup or installation process. Just include the following script tag in your HTML file:
<script src="https://unpkg.com/htmx.org@1.9.4"></script>
This script tag points to version 1.9.4, but you can replace “1.9.4” with the latest version if a newer one is available.
htmx is very lightweight, with a minified and gzipped version weighing at ~14KB. It has no dependencies and is compatible with all major browsers, including IE11.
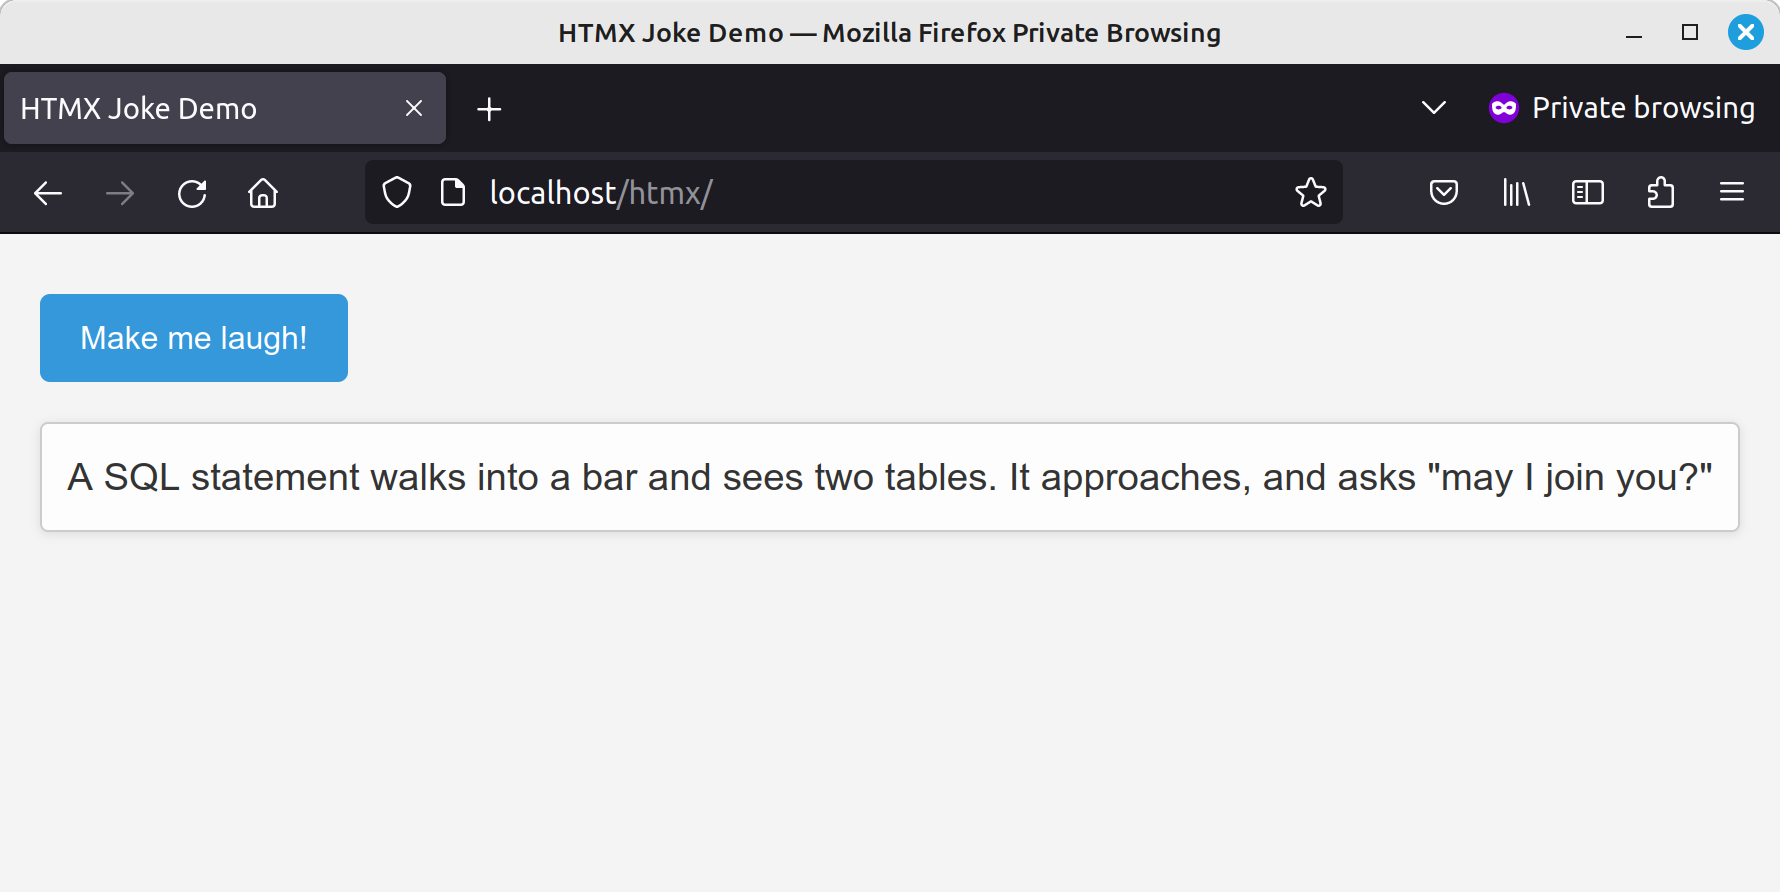
Once you’ve added htmx to your project, you might want to check that it’s working correctly. You can test this with the following simple example:
<button
  hx-get="https://v2.jokeapi.dev/joke/Any?format=txt&safe-mode&type=single"
  hx-target="#joke-container"
>
  Make me laugh!
</button>

<p id="joke-container">Click the button to load a joke...</p>
When you click the button, if htmx is working correctly, it will send a GET request to the Joke API and replace the contents of the <p> tag with the server’s response.
Ajax Requests: the htmx Approach
One of the main selling points of htmx is that it gives developers the ability to send Ajax requests directly from HTML elements by utilizing a set of distinct attributes. Each attribute represents a different HTTP request method:
hx-get: issues a GET request to a specified URL.hx-post: issues a POST request to a stated URL.hx-put: issues a PUT request to a certain URL.hx-patch: issues a PATCH request to a set URL.hx-delete: issues off a DELETE request to a declared URL.
These attributes accept a URL, to which they will send the Ajax request. By default, Ajax requests are triggered by the “natural” event of an HTML element (for example, a click in the case of a button, or a change event in the case of an input field).
Consider the following:
<button hx-get="/api/resource">Load Data</button>
In the above example, the button element is assigned an hx-get attribute. Once the button is clicked, a GET request is fired off to the /api/resource URL.
What happens when the data returns from the server? By default, htmx will inject this response directly into the initiating element — in our example, the button. However, htmx isn’t limited to this behavior and provides the ability to specify different elements as the destination for the response data. We’ll delve more into this capability in the upcoming sections.
Triggering Requests with htmx
htmx initiates an Ajax request in response to specific events happening on certain elements:
- For
input,textareaandselectelements, this is thechangeevent. - For
formelements, this is thesubmitevent. - For all other elements, this is the
clickevent.
Let’s demonstrate this by expanding our joke example from above to allow the user to search for jokes containing a specific word:
<label>Keyword:
  <input
    type="text"
    placeholder="Enter a keyword..."
    hx-get="https://v2.jokeapi.dev/joke/Any?format=txt&safe-mode"
    hx-target="#joke-container"
    name="contains"
  />
</label>

<p id="joke-container">Results will appear here</p>
To trigger the search, we need to fire the change event. For <input> elements, this occurs when the element loses focus after its value was changed. So type something into the box (such as “bar”), click elsewhere on the page, and a joke should appear in the <div> element.
This is good, but normally users expect to have their search results updated as they type. To do this, we can add an htmx trigger attribute to our <input> element:
<input
  ...
  hx-trigger="keyup"
/>
Now the results are updated immediately. This is good, but it introduces a new problem: we’re now making an API call with every keystroke. To avoid this, we can employ a modifier to change the trigger’s behavior. htmx offers the following:
once: use this modifier if you want a request to be executed just once.changed: this modifier ensures a request is only issued if the value of the element has been altered.delay:<time interval>: this modifier sets a waiting period (like1s) before the request is issued. Should the event trigger again during this waiting period, the countdown resets.throttle:<time interval>: With this modifier, you can also set a waiting period (such as1s) prior to issuing the request. However, unlikedelay, if a new event is triggered within the set time, the event will be disregarded, ensuring the request is only triggered after the defined period.from:<CSS Selector>: This modifier lets you listen for the event on a distinct element instead of the original one.
In this case it seems that delay is what we’re after:
<input
  ...
  hx-trigger="keyup delay:500ms"
/>
And now when you type into the box (try a longer word like “developer”) the request is only fired when you pause or finish typing.
See the Pen
htmx Smart Search by SitePoint (@SitePoint)
on CodePen.
As you can see, this allows us to implement an active search box pattern in only a few lines of client-side code.
Request Indicators
In web development, user feedback is crucial, particularly when it comes to actions that may take a noticeable amount of time to complete, such as making a network request. A common way of providing this feedback is through request indicators — visual cues indicating that an operation is in progress.
htmx incorporates support for request indicators, allowing us to provide this feedback to our users. It uses the hx-indicator class to specify an element that will serve as the request indicator. The opacity of any element with this class is 0 by default, making it invisible but present in the DOM.
When htmx makes an Ajax request, it applies an htmx-request class to the initiating element. The htmx-request class will cause that — or any child element with an htmx-indicator class — to transition to an opacity of 1.
For example, consider an element with a loading spinner set as its request indicator:
<button hx-get="/api/data">
  Load data
  <img class="htmx-indicator" src="/spinner.gif" alt="Loading spinner">
</button>
When the button with the hx-get attribute is clicked and the request starts, the button receives the htmx-request class. This causes the image to be displayed until the request completes and the class is removed.
It’s also possible to use an htmx-indicator attribute to indicate which element should receive the htmx-request class.
Let’s demonstrate this with our Joke API example:
<input
  ...
  hx-indicator=".loader"
/>

<span class="loader htmx-indicator"></span>
Note: we can grab some CSS styles for the spinner from CSS Loaders & Spinners. There are lots to choose from; just click one to receive the HTML and CSS.
This will cause a loading spinner to displayed while the request is in flight.
If we’re on a fast network, the spinner will only flash briefly when making the request. If we want to assure ourselves that it’s really there, we can throttle our network connection speed using our browser’s dev tools.
Or, just for fun (that is, don’t do this on a real app), we could configure htmx to simulate some network latency:
function sleep(milliseconds) {
  const date = Date.now();
  let currentDate = null;
  do {
    currentDate = Date.now();
  } while (currentDate - date < milliseconds);
}

document.body.addEventListener('htmx:afterOnLoad',  () => {
  sleep(2000);
});
This utilizes htmx’s event system, which we can tap into to modify and enhance its behavior. Here, we’re using the htmx:afterOnLoad event, which is triggered after the Ajax onload has finished. I’m also using a sleep function from a SitePoint article on the same subject.
Here’s the completed demo. Type something into the box (such as “JavaScript”) then observe the loading indicator once the request is initiated.
See the Pen
htmx Smart Search With Simulated Latency by SitePoint (@SitePoint)
on CodePen.
Targeting Elements & Swapping Content
In some cases, we might want to update a different element than the one that initiated the request. htmx allows us to target specific elements for the Ajax response with the hx-target attribute. This attribute can take a CSS selector, and htmx will use this to find the element(s) to update. For example, if we have a form that posts a new comment to our blog, we might want to append the new comment to a comment list rather than updating the form itself.
We actually saw this in our first example:
<button
  hx-get="https://v2.jokeapi.dev/joke/Any?format=txt&safe-mode&type=single"
  hx-target="#joke-container"
>
  Make me laugh!
</button>
Instead of the button replacing its own content, the hx-target attribute states that the response should replace the content of the element with an ID of “joke-container”.
Extended CSS selectors
htmx also offers some more advanced ways to select elements into which content should be loaded. These include this, closest, next, previous, and find.
- The
thiskeyword specifies that the element with thehx-targetattribute is the actual target. - The
closestkeyword finds the closest ancestor of the source element that matches the given CSS selector. - The
nextandpreviouskeywords find the following or preceding element in the DOM that matches the given CSS selector. - The
findkeyword locates the first child element that matches the given CSS selector.
With reference to our previous example, we could also write hx-target="next p" to avoid specifying an ID.
Content swapping
By default, htmx will replace the content of the target element with the Ajax response. But what if we want to append new content instead of replacing it? That’s where the hx-swap attribute comes in. This attribute lets us specify how the new content should be inserted into the target element. The possible values are outerHTML, innerHTML, beforebegin, afterbegin, beforeend, and afterend. Using hx-swap="beforeend", for example, would append the new content at the end of the target element, which would be perfect for our new comment scenario.
CSS Transitions with htmx
CSS Transitions allow the smooth alteration of an element’s style from one state to another, without using JavaScript. These transitions can be as simple as a color change, or as complex as a full 3D transformation.
htmx makes it easy to use CSS Transitions in our code: all we need to do is maintain a consistent element ID across HTTP requests.
Consider this HTML content:
<button hx-get="/new-content" hx-target="#content">
  Fetch Data
</button>

<div id="content">
  Initial Content
</div>
After an htmx Ajax request to /new-content, the server returns this:
<div id="content" class="fadeIn">
  New Content
</div>
Despite the change in content, the <div> maintains the same ID. However, a fadeIn class has been added to the new content.
We can now create a CSS transition that smoothly transitions from the initial state to the new state:
.fadeIn {
  animation: fadeIn 2.5s;
}

@keyframes fadeIn {
  0% {opacity: 0;}
  100% {opacity: 1;}
}
When htmx loads the new content, it triggers the CSS transition, creating a smooth visual progression to the updated state.
Using the View Transitions API
The new View Transitions API provides a way to animate between different states of a DOM element. Unlike CSS Transitions — which involve changes to an element’s CSS properties — view transitions are about animating changes to an element’s content.
The View Transitions API is a new, experimental feature currently in active development. As of this writing, this API is implemented in Chrome 111+, with more browsers expected to add support in the future (you can check its support on caniuse). htmx provides an interface for working with the View Transitions API, and falls back to the non-transition mechanism in browsers where the API isn’t available.
In htmx, there are a couple of ways to use the View Transitions API:
- Set the
htmx.config.globalViewTransitionsconfig variable totrue. This will use transitions for all swaps. - Use the
transition:trueoption in thehx-swapattribute.
View Transitions can be defined and configured using CSS. Here’s an example of a “bounce” transition, where the old content bounces out and the new content bounces in:
@keyframes bounce-in {
  0% { transform: scale(0.1); opacity: 0; }
  60% { transform: scale(1.2); opacity: 1; }
  100% { transform: scale(1); }
}

@keyframes bounce-out {
  0% { transform: scale(1); }
  45% { transform: scale(1.3); opacity: 1; }
  100% { transform: scale(0); opacity: 0; }
}

.bounce-it {
  view-transition-name: bounce-it;
}

::view-transition-old(bounce-it) {
  animation: 600ms cubic-bezier(0.4, 0, 0.2, 1) both bounce-out;
}

::view-transition-new(bounce-it) {
  animation: 600ms cubic-bezier(0.4, 0, 0.2, 1) both bounce-in;
}
In the htmx code, we use the transition:true option in the hx-swap attribute, and apply the bounce-it class to the content that we want to animate:
<button
  hx-get="https://v2.jokeapi.dev/joke/Any?format=txt&safe-mode"
  hx-swap="innerHTML transition:true"
  hx-target="#joke-container"
>
  Load new joke
</button>

<div id="joke-container" class="bounce-it">
  <p>Initial joke content goes here...</p>
</div>
In this example, when the <div>‘s content is updated, the old content will bounce out and the new content will bounce in, creating a pleasing and engaging visual effect.
See the Pen
htmx View Transition API Demo by SitePoint (@SitePoint)
on CodePen.
Please keep in mind that, currently, this demo will only work on Chromium-based browsers.
Form Validation
htmx integrates well with the HTML5 Validation API and will prevent form requests from being dispatched if user input fails validation.
For example, when the user clicks Submit, a POST request will only be sent to /contact if the input field contains a valid email address:
<form hx-post="/contact">
  <label>Email:
    <input type="email" name="email" required>
  </label>
  <button>Submit</button>
</form>
If we wanted to take this a step further, we could add some server validation to ensure that only gmail.com addresses are accepted:
<form hx-post="/contact">
  <div hx-target="this" hx-swap="outerHTML">
    <label>Email:
      <input type="email" name="email" required hx-post="/contact/email">
    </label>
  </div>
  <button>Submit</button>
</form>
Here we’ve added a parent element (div#wrapper) that declares itself as the recipient of the request (using the this keyword) and employs the outerHTML swap strategy. This means that the entire <div> will be replaced by the server’s response, even though it’s not the actual element triggering the request.
We’ve also added hx-post="/contact/email" to the input field, which means that whenever this field is blurred, it will send a POST request to the /contact/email endpoint. This request will contain the value of our field.
On the server (at /contact/email), we could do the validation using PHP:
<?php
// Get the email from the form submission
$email = $_POST['email'];

// Validate that the domain is "gmail.com" using regex
$pattern = "/@gmail\.com$/i"; // Case-insensitive match for "@gmail.com" at the end of the email address
$error = !preg_match($pattern, $email);

// Sanitize email to avoid XXS
$sanitizedEmail = htmlspecialchars($email, ENT_QUOTES, 'UTF-8');

// Create error message if there's an error
$errorMessage = $error ? '<div class="error-message">Only Gmail addresses accepted!</div>' : '';

// Construct the HTML template, with conditional error message
$template = <<<EOT
  <div hx-target="this" hx-swap="outerHTML">
    <label>Email:
      <input type="email" name="email" hx-post="/contact/email" value="$sanitizedEmail">
      $errorMessage
    </label>
  </div>
EOT;

// return the template
echo $template;
?>
As you can see, htmx is expecting the server to respond with HTML (not JSON) which it then inserts into the page at the specified place.
If we run the above code, type a non-gmail.com address into the input, then make the input lose focus, an error message will appear below the field stating “Only Gmail addresses accepted!”
Note: when inserting content into the DOM dynamically, we should also think about how a screen reader will interpret this. In the example above, the error message finds itself inside our label tag, so it will be read by a screen reader the next time the field receives focus. If the error message is inserted elsewhere, we should use an aria-describedby attribute to associate it with the correct field.
It’s also worth noting that htmx fires a set of events around the validation process, which we can use to add our own validation logic and error handling methods. For example, if we wanted to implement the email check in JavaScript code, we could do this:
<form hx-post="/contact">
  <label>Email:
    <input type="email" name="email" required>
  </label>
  <button>Submit</button>
</form>

<script>
  const emailInput = document.querySelector('input[type="email"]');

  emailInput.addEventListener('htmx:validation:validate', function() {
    const  pattern = /@gmail\.com$/i;

    if (!pattern.test(this.value)) {
      this.setCustomValidity('Only Gmail addresses accepted!');
      this.reportValidity();
    }
  });
</script>
Here, we’re using htmx’s htmx:validation:validate event, which is called before an elements checkValidity() method is called.
Now when we try and submit the form with a non-gmail.com address, we’ll see the same error message.
What Else Can htmx Do?
htmx is a versatile library, built to boost the capabilities of HTML and provide a simple and powerful way of handling dynamic content updates in our web application. Its functionality extends beyond what has been outlined here, with features designed to give us a more interactive and responsive website without the complexity of heavy JavaScript frameworks.
Before we wrap up, let’s have a quick look at some of these additional capabilities.
Extensions
Extensions are a powerful tool in the htmx toolbox. These customizable JavaScript components allow us to further augment and tailor the library’s behavior to our specific needs. Extensions range from enabling JSON encoding in requests, manipulating the addition and removal of classes on HTML elements, debugging elements, supporting client-side template processing, and more. With these at our disposal, we can customize htmx to a finer granularity.
You can find a list of available extensions on the htmx site.
Boosting
htmx’s “boosting” functionality allows us to enhance standard HTML anchors and forms by transforming them into Ajax requests (akin to technologies like pjax from back in the day):
<div hx-boost="true">
  <a href="/blog">Blog</a>
</div>
The anchor tag in this div will issue an Ajax GET request to /blog and swap the HTML response into the <body> tag.
By leveraging this feature, we can create more fluid navigation and form submission experiences for our users, making our web applications feel more like SPAs.
History management
Speaking of SPAs, htmx also comes with built-in history management support, aligning with the standard browser history API. With this, we can push URLs into the browser navigation bar and store the current state of the page in the browser’s history, ensuring that the “Back” button behaves as users expect. This allows us to create web pages that feel like SPAs, maintaining state and handling navigation without reloading the entire page.
Use with a third-party library
One of the nice things about htmx is its ability to play well with others. It can integrate seamlessly with many third-party libraries, utilizing their events to trigger requests. A good example of this is the SortableJS demo on the htmx website.
There’s also a confirm example which shows how to use sweetalert2 for confirmation of htmx actions (although this also uses hyperscript, an experimental frontend scripting language designed to be expressive and easily embeddable directly in HTML).
Conclusion
htmx is a versatile, lightweight, and easy-to-use tool. It successfully merges the simplicity of HTML with the dynamic capabilities often associated with complex JavaScript libraries, offering a compelling alternative for creating interactive web applications.
However, it’s not a one-size-fits-all solution. For more complex applications, you may still find the need for a JavaScript framework. But if your goal is to create a snappy, interactive, and user-friendly web application without adding much complexity, htmx is definitely worth considering.
As web development continues to evolve, tools like htmx provide exciting new ways to build better experiences for users. Why not give it a try on a future project and see what htmx can do for you?
Frequently Asked Questions (FAQs) about HTMX
What is HTMX and how does it differ from other UI design tools?
HTMX is a modern, lightweight HTML extension for AJAX, CSS Transitions, WebSockets, and Server Sent Events. It allows you to access modern browser features directly from HTML, without requiring JavaScript or JQuery. This makes it different from other UI design tools, which often rely heavily on JavaScript. HTMX is easy to integrate with any backend and doesn’t require you to rewrite your existing code. It’s a powerful tool for enhancing user interfaces while keeping your code clean and maintainable.
How can I get started with HTMX?
Getting started with HTMX is straightforward. You simply need to include the HTMX script in your HTML file. Once you’ve done that, you can start using HTMX attributes in your HTML tags to enable AJAX, WebSockets, and other features. The HTMX website provides a comprehensive guide and examples to help you get started.
Can HTMX be used with any backend?
Yes, one of the key advantages of HTMX is its backend-agnostic nature. It can be used with any server-side language or framework. This makes it a versatile tool for developers working in different environments.
What are some common use cases for HTMX?
HTMX can be used in a variety of scenarios where you want to enhance the user interface without relying on JavaScript. This includes things like form submissions, live search, infinite scrolling, real-time updates, and more. It’s a powerful tool for creating dynamic, interactive web applications.
How does HTMX handle CSS transitions?
HTMX has built-in support for CSS transitions. You can use the ‘hx-swap’ attribute to specify how elements should be swapped in and out when a request is made. This allows you to create smooth, visually appealing transitions without needing to write any JavaScript.
Is HTMX compatible with all browsers?
HTMX aims to be compatible with all modern browsers. However, as it uses some newer browser features, it may not work perfectly in older or less common browsers. It’s always a good idea to test your application in the browsers your users are likely to be using.
How does HTMX improve the performance of web applications?
By allowing you to access modern browser features directly from HTML, HTMX can significantly reduce the amount of JavaScript you need to write. This can lead to faster load times and improved performance, especially on mobile devices where JavaScript can be particularly slow.
Can I use HTMX with my existing HTML and CSS?
Yes, HTMX is designed to work with your existing HTML and CSS. You don’t need to rewrite your code or learn a new language to start using HTMX. This makes it a great choice for enhancing existing applications.
What kind of support is available for HTMX?
HTMX is an open-source project, and there’s a vibrant community of developers who use and contribute to it. You can find help and advice on the HTMX website, GitHub, and various online forums.
How can I contribute to the HTMX project?
As an open-source project, HTMX welcomes contributions from the community. You can contribute in many ways, from reporting bugs and suggesting new features to writing code and improving documentation. Check out the HTMX GitHub page for more information on how to get involved.