

Key Takeaways
- Jetpack is a versatile WordPress plugin developed by Automattic, offering over 30 features including integrated daily and real-time backups, traffic and engagement tools, and security provisions.
- To backup your website with Jetpack, two subscription options are available – ‘Premium’ and ‘Professional’. The ‘Premium’ subscription provides daily backups of your WordPress themes, plugins, uploads and database, while the ‘Professional’ plan includes unlimited off-site real-time backups.
- Jetpack’s backup and restore process is automated and user-friendly, allowing users to restore a backup to a new hosting provider or a new domain.
- Jetpack also offers a range of security features, including protection against brute force attacks, site downtime monitoring, single sign-on for secure authentication, security scanning, Akismet spam control, and automatic backups of your entire site.
- Setting up Jetpack involves installing the plugin, activating it, and connecting it to a WordPress.com account. From there, users can access Jetpack’s features from their WordPress dashboard.
This article was sponsored by Jetpack. Thank you for supporting the companies who make SitePoint possible.
Jetpack is undoubtedly one of the most popular WordPress plugins with millions of installs at the time of writing.
If you’ve been following WordPress in the news, you might have heard that Jetpack has undergone some serious redevelopment over the past year, if you haven’t checked it out for a while — now is a good time to take another look.
Developed by Automattic (the people behind WordPress.com) Jetpack is more than just another plugin, it’s more like a plugin on steroids. It brings self-hosted WordPress sites many of the same features of WordPress.com, with a few powerful additions.
We’ve covered Jetpack in detail at SitePoint, however the latest version boasts a completely redesigned UI, along with a wide range of new features. In this article, we’ll be covering some of the new security features including integrated daily and real-time backups.
Jetpack Installation and Features Overview
How to Install Jetpack
Before you begin, double check you’re running the latest version of WordPress and that your site is publicly accessible (if you’re using a local installation check out Jetpack’s developer mode). You might also want to double check that your web host uses PHP 5 or later (if not, it might be a good idea to move!).
The easiest method of installation is via the online Jetpack installer. I’ll take you through a brief walkthrough:
- Start by typing in your site URL (eg: www.mywebsite.com) — Jetpack will automatically check whether your site is compatible — and click “Start Installation“.
- On the next page, click “Install Jetpack“. This will take you to your WordPress dashboard where you will need to click “Install Plugin”.
- Once the plugin has installed click “Activate“.
- You will then see the following alert to connect your website to WordPress.com:

- When you click ‘Connect to WordPress.com’ you will be redirected to WordPress.com to either create an account or sign in with an existing account.
- After you’ve created an account or logged in with your existing account, Jetpack will confirm that you’re happy to connect the site to this user and then return you to your WordPress site.
- You will now find you have a new ‘Jetpack’ dashboard menu item which enables you to control what features you use.
For WP-CLI users, you can also get Jetpack up and running using this command: wp plugin install jetpack.
For more information on the installation process, check out Jetpack.com and the handy quick start guide.
Key Features in Jetpack
The Jetpack interface has been rewritten from the ground up using the popular JavaScript library React. The user experience is smooth and navigating the module selection and configuration feels very snappy.
Jetpack is definitely the Swiss Army knife of WordPress plugins. It offers more than 30 features with a comprehensive range of services and benefits all in the one plugin. What’s even better is that you can just activate what you need, which enables this plugin to be highly customizable for any WordPress site.
The main features of the Jetpack plugin centre around 5 key areas:
- Backups and Security – Brute force protection and single sign-on. Jetpack’s Premium features also allow spam protection, offsite backups with archive and storage, automated restores and malware scanning.
- Performance – High-speed CDN and uptime monitoring.
- Traffic and Engagement – Site stats, related posts, enhanced distribution, sharing tools and the ‘Professional’ subscription level also enables your site to run polls, ratings and surveys.
- Site Management – Plugin management, auto updates and cross platform tools. The subscription options also include easy site migration (via Backups).
- Support – The free plugin provides basic support to all users, however the Premium options for Jetpack provide additional WordPress and security support.
Some of the lesser known features I like are Custom Content Types, Markdown support and Custom CSS, but in this article I’m going to dig deeper into the first point of Backups and Security.
How to Backup Your Website with Jetpack
Jetpack offers some powerful site management and system administration capabilities. One of the most overlooked and underrated tasks for all site owners is backups. We’ll take a look at the Premium options for backups available with Jetpack, but first I’ll delve into why backups are important.
Not All Backups Are Created Equal
Just because your host includes ‘backups’, if you look in the fine print these backups are often not kept for very long and they come with no guarantees, sometimes even charging you to restore the backup if the need arises.
I always recommend that my clients never rely on hosting provider backups, for many reasons. Here are a few:
- The backups are often on the same system (or network) as your website. If the hosting service fails, your backup goes down with your website
- Your backups are not guaranteed
- They are just best effort, and typically nobody is checking the integrity of your backups
- You have no legal comeback if your backups are lost
- You have no control over your backups, sometimes being unable to download your own copy for archiving
It doesn’t matter what you’re working on — losing all of your hard earned work can be one of the most frustrating and expensive occurrences we face. It’s all too common, and happens all too easily.
Despite your best efforts, failures do happen, so be prepared. A good backup strategy includes storing (preferably offsite) a number of backups, on an automated schedule to help protect you in the event that things go wrong. Certain types of failures might not be apparent immediately, which is why it’s recommended you also maintain an archive of your older backups.
Backup Options with Jetpack
For individuals and businesses that take their website operations seriously, there are two subscription options available with Jetpack. Both of these options come with professional support, something that many businesses using WordPress want.
If you only need daily backups of your site, then Jetpack’s ‘Premium’ subscription option is a great choice. It will provide daily backups of your WordPress themes, plugins, uploads and database. As mentioned above, site owners don’t immediately realize there is an issue with their site, so having access to a 30 day archive of these daily backups is a great feature so you can choose to restore any daily point in time within that 30 day period.
For $99 per year, per site, the ‘Premium’ option provides you with:
- Automated daily backups with an easy one click restore feature
- Spam filtering via the Akismet plugin
- Malware scanning on a daily basis
If you spend a significant amount of time in your website on a daily basis then realtime backups are a better choice. These are part of Jetpack’s ‘Professional’ plan which will backup every post, comment, media file, revision and dashboard settings as the changes happen. You can also reap the benefits of a full backup archive so you will be able to restore any backup for the life of your subscription.
For $299 per year, per site, the ‘Professional’ option provides all the great features in the ‘Premium’ subscription but also includes:
- Unlimited off-site backups in real time
- One-click security threat resolution
- Premium WordPress and security support
Daily backups will be adequate for many sites, however with WordPress now powering more and more ecommerce, membership or community sites, realtime backups are becoming increasingly more important. Realtime backups mean that each change is saved at on offsite location, separate from your hosting environment.
Walkthrough of the Backup and Restore Process
Backups in Jetpack happen automatically in the background. As mentioned above, the initial complete backup will take a little longer than subsequent backups.
Once you’ve selected your subscription and made your payment, Jetpack will automatically install and configure VaultPress (which powers backups and security scanning) and Akismet (which powers spam filtering).
If you’ve signed up for a Premium subscription, backups will automatically occur on a daily basis. If you have a Professional subscription, they’ll happen in realtime as your site changes. We’ll walk through an example using a Premium subscription, showing you how to restore a backup.
Locating Your Backups
You can find your backups in the VaultPress dashboard, you can visit https://dashboard.vaultpress.com/, follow the link in your WordPress.com account, or your own WordPress dashboard. You can then navigate to the date you’re looking for and either restore a complete backup, or browse and download or restore individual files. This is a handy feature that not all backup plugins or services offer.

Restoring a Backup
The Settings page is where you can give VaultPress access to your host using SSH, SFTP or FTP, as well as set alternate credentials if you want to move your site to a new host. These settings are provided at the time you sign up for your hosting account. If you ever need to restore from a backup, you’ll need to make sure you’ve configured server access.
Once you’ve configured your server settings, restoring a backup is easy. Here are the steps:
- Sign in to the dashboard and the ‘view backups’ section
- Find the backup you want to restore and click ‘restore’
- You can then select any or all of the options for restoring database, plugins, themes and uploads
- You will then be asked to confirm the restore
- That’s it! No need to mess around with manual database and file restores yourself, Jetpack handles all of the heavy lifting.
On the Settings page you can also add other users via their WordPress.com accounts and grant them access.
Once you’ve activated VaultPress, an initial backup will kick off. This initial backup can take a while, however subsequent backups are much faster.
You can also restore a backup to a new hosting provider or a new domain, here’s some more information on how to do this.
How to Secure Your Website with Jetpack
Web security is a topic that I am particularly passionate about and something that website owners should never take for granted.
Common WordPress Security Threats
In a recent report (called the Website Hacked Trend Report 2016 – Q1), Sucuri analyzed over 11,000 infected websites.
Of those that were running WordPress, over 50% were out of date.
In the conclusion, they noted:
“If there is one thing we know from this report is that vulnerable software is a big problem, contributing to a large number of compromises. The blanket guidance to stay current and update is falling on deaf ears. Some initiatives, like those undertaken by WordPress – emphasis on backward compatibility and auto-updates – are having positives effects on the core of the platform, but we know that the majority of the compromises are coming from a platform’s extensible components, not its core.”
Source: https://sucuri.net/website-security/website-hacked-report
The bolding is mine, but it’s something I feel worth highlighting because I constantly keep seeing this problem in the field — and from people that should know better. It’s up to all of us to take security and backups seriously, and also educate our peers and clients. Regular updates and backups are easily enabled, so there aren’t any excuses.
Jetpack also offers a centralized management interface that makes the job of managing lots of sites much easier.
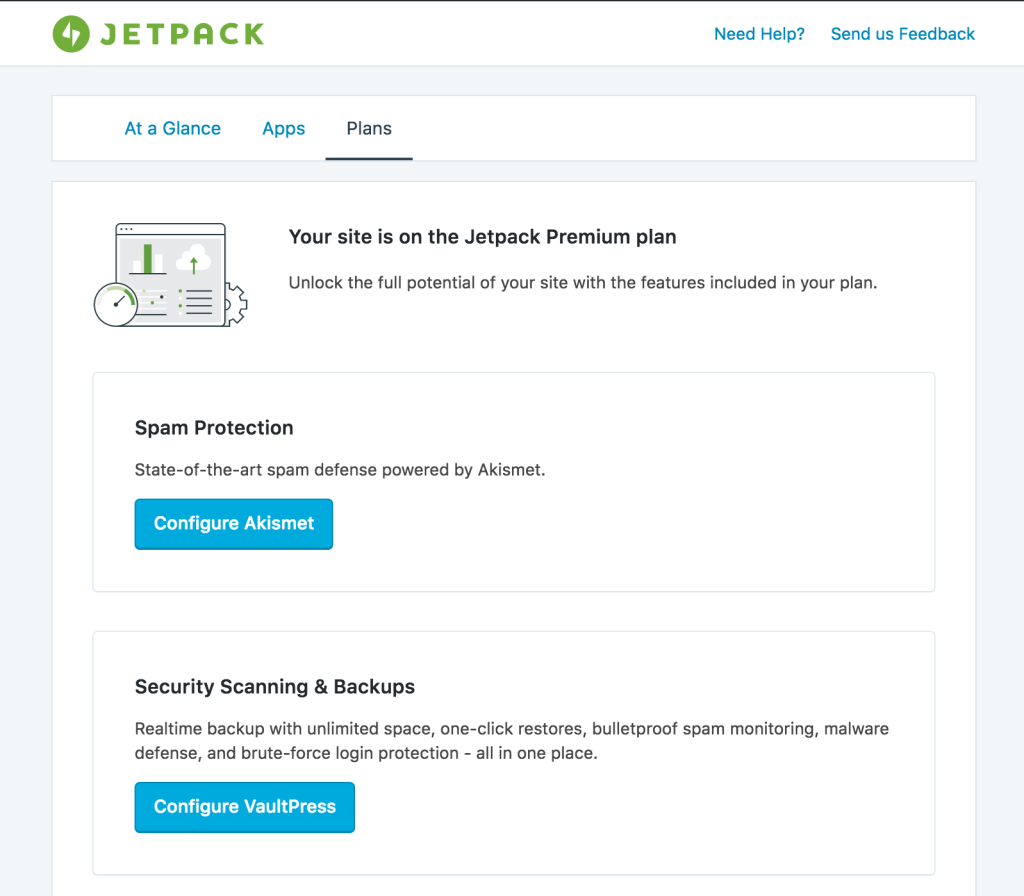
The Security Options Available in Jetpack
Security is a process. It should never be a ‘set and forget’ approach. Monitoring your website for security threats is an important consideration for any website owner.
Recognizing the importance of web security, Jetpack has simplified security monitoring for your website with a dedicated section called ‘Security’ under the ‘Settings’ section of the plugin which offers:
- Protection against brute force attacks (Free)
- Monitoring of site downtime (Free)
- Single sign-on for secure authentication (Free)
- Security Scanning to protect from threats and attacks (Premium)
- Akismet spam control (Free and Premium options)
- Automatic backups of your entire site (Premium)
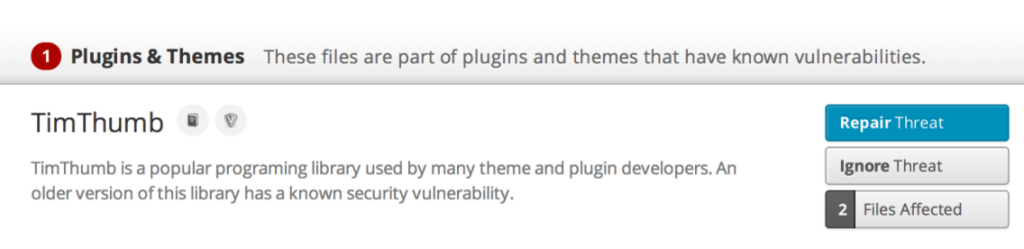
Example of Mitigated Attacks
Jetpack will check for several common threats, including changed WordPress core files, web shells (that give attackers control of your site) and detection of plugins and themes with known security vulnerabilities.
Below is an example of a very common issue caused by the TimThumb script used in many older themes.
Conclusion
In this article, we’ve covered the core features available with Jetpack, focusing on security and backups. It couldn’t be easier to get started with using Jetpack as part of your website security and backup regime.
If you want to learn more about the features of Jetpack, SitePoint has previously covered this topic, along with WordPress maintenance, in the following articles:
- Add WordPress.com Features To Your Site : A Guide to Jetpack
- The Definitive Guide to WordPress Maintenance
- Using Jetpack’s Publicize for Easy WordPress Social Sharing
- 5 Things You May Not Know about Jetpack for WordPress
I’d also recommend the official documentation for reference and support:
Automattic is offering SitePoint readers 10% off on Jetpack plans — follow this link to get the code.
Frequently Asked Questions about Backing Up and Securing WordPress with Jetpack
How do I set up Jetpack for the first time on my WordPress site?
Setting up Jetpack on your WordPress site is a straightforward process. First, you need to install the Jetpack plugin from the WordPress plugin directory. Once installed, activate the plugin and connect it to your WordPress.com account. If you don’t have a WordPress.com account, you’ll need to create one. After connecting, you’ll be able to access Jetpack’s features from your WordPress dashboard.
What are the benefits of using Jetpack for backups?
Jetpack provides a comprehensive backup solution for your WordPress site. It automatically backs up your entire site daily, including your database, all content, settings, and files. In case of any issues, you can easily restore your site to a previous state. Jetpack also offers unlimited storage space for your backups.
How can I restore my site from a Jetpack backup?
To restore your site from a Jetpack backup, go to the ‘Activity’ section in your Jetpack dashboard. Here, you’ll see a list of all your backups. Choose the backup you want to restore, click on the ‘Restore’ button, and Jetpack will automatically restore your site.
Can I schedule backups with Jetpack?
Yes, Jetpack automatically backs up your site once every day. However, if you want to schedule additional backups, you can do so from the ‘Settings’ section in your Jetpack dashboard.
What security features does Jetpack offer?
Jetpack offers a range of security features to protect your WordPress site. These include brute force attack protection, spam filtering, downtime monitoring, and malware scanning. It also offers a firewall that blocks suspicious activity.
How do I add my credentials to Jetpack?
To add your credentials to Jetpack, go to the ‘Settings’ section in your Jetpack dashboard. Here, you can enter your FTP or SSH credentials, which Jetpack will use to access your site for backups and restores.
What should I do if I encounter issues while installing Jetpack?
If you encounter issues while installing Jetpack, check the error message for details. Common issues include plugin conflicts, server configuration issues, and connectivity issues. If you can’t resolve the issue yourself, contact Jetpack support for assistance.
Can I use Jetpack on a managed WordPress hosting platform?
Yes, you can use Jetpack on a managed WordPress hosting platform. However, some hosting providers may have specific settings or restrictions related to Jetpack, so it’s best to check with your provider.
How does Jetpack compare to other backup solutions?
Jetpack is a comprehensive backup solution that offers automatic daily backups, unlimited storage space, easy restores, and a range of security features. While other backup solutions may offer similar features, Jetpack’s integration with WordPress makes it a convenient choice for many users.
Is there a video tutorial on how to use Jetpack?
Yes, there are several video tutorials available online that guide you through the process of setting up and using Jetpack. You can find these tutorials on platforms like YouTube.