

Key Takeaways
- Understanding the basics of JavaScript and programming in general is crucial before starting any project. This includes variables, functions, if statements, loops, arrays, and DOM manipulation methods.
- Before diving into a project, it’s essential to create a plan. This includes identifying what needs to happen and formulating a general plan without getting bogged down in technical details.
- Breaking down a project into smaller pieces and writing the steps in plain language, also known as pseudocode, can simplify the coding process. This approach allows for clear thinking about what the project is doing without getting distracted by syntax details.
- Writing code in small pieces provides numerous benefits, including ensuring individual functionality works before moving on to the next steps, reducing distractions, and making it easier to spot and prevent errors.
- Refactoring code before finishing a project can improve its efficiency and readability. This involves checking the code for potential errors, redundancies, and areas that could be made cleaner and more efficient.

I often hear that people who follow tutorials find themselves unable to approach JavaScript projects on their own.
One reason this happens is that tutorials give you a neat set of steps rather than the actual process of figuring out those steps on your own. Another reason people struggle with projects is that they compare their intermediate steps with someone else’s finished product and get discouraged.
The truth of approaching a project isn’t as neat as the tutorials (mine included) make it seem. The reality is that rather than belting out lines of perfect code, projects are done in small pieces with plenty of trial and error and a healthy dose of searching through reference materials.
In this article, you’ll “>learn how to approach JavaScript projects on your own.
Important note: As you go through this article, you’ll see some code examples. If any of them seem new or unfamiliar, it’s okay to skim over them for now. The purpose of this article is to have you understand the overall process of approaching a project rather than getting distracted by technical details.
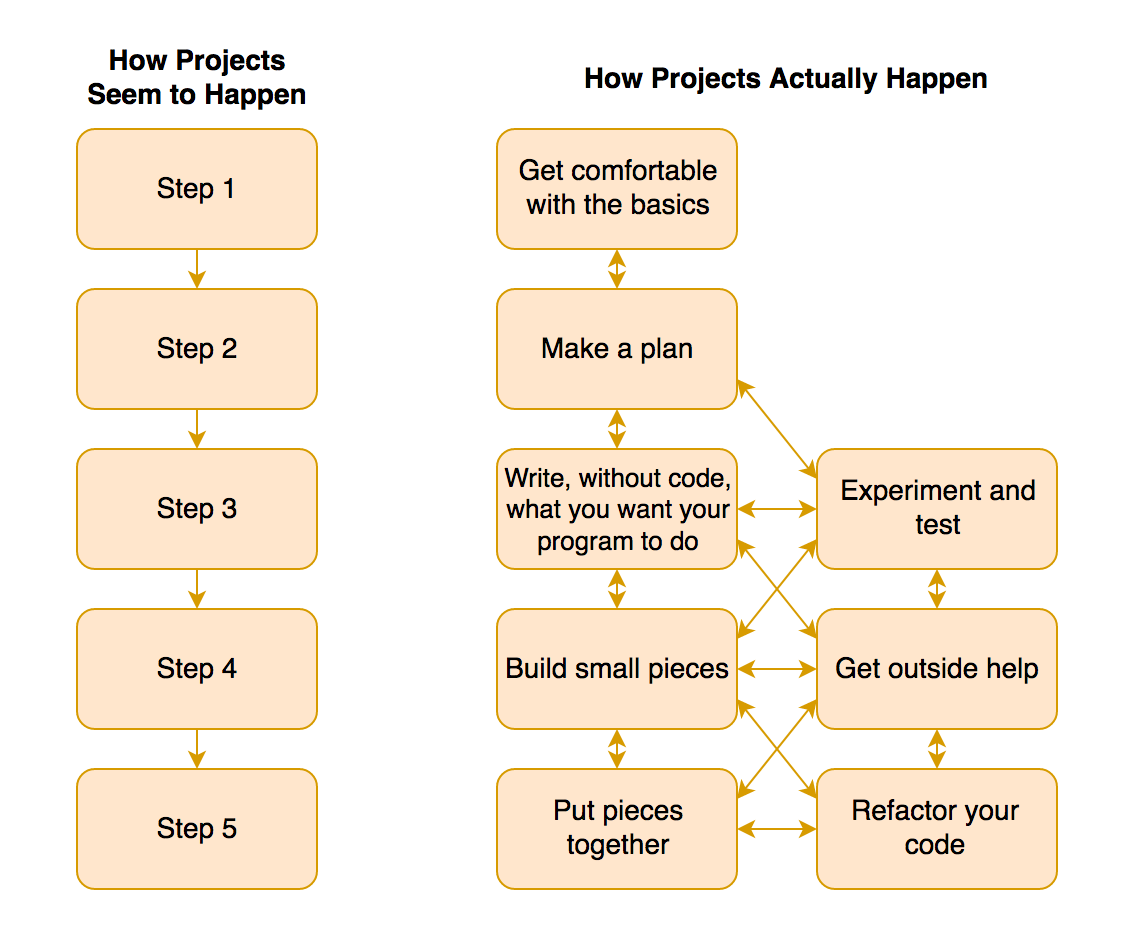
First Get Comfortable With the Basics
At a minimum, you’ll want to get familiar with some of the basics of JavaScript (and programming in general). This might include variables, functions, if statements, loops, arrays, objects, DOM manipulation methods, such as getElementById, querySelectorAll, and innerHTML. You can Google these or look them up on MDN when you’re done with this article.
Once you’re comfortable with these concepts, you’ll move much faster because you can focus on creating your project instead of worrying about how to write an if statement.
A lot of people rush past this step, and everything takes longer as a result. It’s like attempting to play Level 3 of a video game without getting comfortable with the controls back in Level 1. Lots of avoidable frustration.
Make a Plan
Instead of jumping in and trying to do your project in a series of linear steps, take some time to look at the big picture first. Make a general plan. What sorts of things need to happen? For example, if you’re trying to make a countdown clock, you might need a way to measure time, a place to hold the data, somewhere to display the numbers, and maybe a way to control the clock.
At this stage, you don’t want to get bogged down in technical details because you’re still thinking through the general ideas of what you want. As long as you have an overall plan, you’ll have guideposts that will prevent you from getting too badly lost. In software design. this technique is often referred to as a use-case analysis.
Write It Without Code
Now that you have your plan, you’ll want to figure out the details. My favorite way to do this is to write specifically what you want each part of your project to do. The key is to write it not in code but in plain language. (This is called pseudocode.) That way, you can think clearly about what your project is doing without getting distracted by syntax details.
For a countdown clock, your notes might look something like this:
- Get current time
- Specify end time
- Find difference between current time and end time to get remaining time
- Repeatedly get the remaining time for each step of the countdown
- Show remaining time on screen at each step of the countdown
You can break individual parts into smaller pieces like so:
- Show remaining time on screen at each step of the countdown
- Divide time into hours, minutes, seconds
- Show hours in one container
- Do the same for minutes and seconds
Once you have your logic written out, you’ll have a much easier time writing code. This is because it’s simpler to write the code for a concrete step such as “subtract current time from end time” than it is to write the code for a whole project like “build a countdown clock.”
Also note that you won’t need to have a perfect series of steps written out at the beginning. This is a fluid process where it’s okay to add things, remove things, get things wrong, learn, and improve.
Build Small Pieces
Once you have your steps written out, you can start writing small pieces of code. For a countdown clock, you might start by getting the current time:
const currentTime = new Date().getTime();
console.log(currentTime);
Once you’re satisfied, you might then get the countdown’s end time:
const endTime = new Date(2017, 4, 4, 7, 30).getTime();
console.log(endTime);
When you’re making your own clock, you can pick a specific end date as in the code sample above, but since I don’t want the code in this article to stop working after a certain date, I’m going set the end time to 10 days from now instead (note the conversion of 10 days to milliseconds since those are the units JavaScript uses):
const endTime = new Date().getTime() + 10*24*60*60*1000;
console.log(endTime);
Here are some benefits of writing your code in small pieces:
- You get a chance to make sure the individual pieces of functionality work before moving on to the next steps.
- It’s easier to think through what you’re doing when you’re not distracted by too many moving parts at a time.
- You’ll move faster because you’re not trying to keep track of a million things at once.
- It’s a lot easier to spot and prevent errors this way.
- You can experiment and learn as needed.
- You’ll often end up writing helpful pieces of code you can use elsewhere.
Put the Pieces Together
With your individual pieces ready, you can start putting your project together. For this stage, the key challenge is to make sure the pieces that worked on their own will still work once they’re connected. This might require some small changes.
For example, here’s how you might put together the start time and end time to calculate the remaining time in a countdown clock:
// set our end time
const endTime = new Date().getTime() + 10*24*60*60*1000;

// calculate remaining time from now until deadline
function getRemainingTime(deadline){
  const currentTime = new Date().getTime();
  return deadline - currentTime;
}

// plug endTime into function to output remaining time
console.log(getRemainingTime(endTime));
This method of putting smaller pieces together is much easier than trying to make an entire project all at once because this way, you don’t need to keep track of everything in your head at the same time.
Now that we have a function to get the remaining time, we can run the function repeatedly to keep the time display updated.
The HTML:
<div id="clock"></div>
The JavaScript:
// set our end time
const endTime = new Date().getTime() + 10*24*60*60*1000;

// calculate remaining time from now until deadline
function getRemainingTime(deadline){
  const currentTime = new Date().getTime();
  return deadline - currentTime;
}

// store clock div to avoid repeatedly querying the DOM
const clock = document.getElementById('clock');

// show time repeatedly
function showTime(){
  const remainingTime = getRemainingTime(endTime);
  clock.innerHTML = remainingTime;

  requestAnimationFrame(showTime);
}
requestAnimationFrame(showTime);
In the above example, we’ve added a showTime function that displays the remaining time on the screen. At the end of the function, we include requestAnimationFrame(showTime), which basically says run showTime again as soon as the browser is ready. This allows us to keep updating the time display in a highly performant manner.
You’ll notice the countdown is entirely in milliseconds. The next step will be to convert everything into days, hours, minutes, and seconds.
Using the approaches you’ve learned so far (small steps, etc.), you could first convert milliseconds to seconds, see how that looks, and put it in your function. Then you can repeat this process to calculate minutes, hours, and days. The end result might look something like this:
function showTime(){
  const remainingTime = getRemainingTime(endTime);
  const seconds = Math.floor((remainingTime/1000) % 60);
  const minutes = Math.floor((remainingTime/(60*1000)) % 60);
  const hours = Math.floor((remainingTime/(60*60*1000)) % 24);
  const days = Math.floor(remainingTime/(24*60*60*1000));

  clock.innerHTML = `${days}:${hours}:${minutes}:${seconds}`;
  requestAnimationFrame(showTime);
}
requestAnimationFrame(showTime);
Experiment and Test
By this point in your project, you will have done plenty of experimenting and testing to make sure everything works. Once it seems to work, see if you can break it. For example, what if the user clicks here or there? What if one of the inputs is unexpected? What if the screen size is narrow? Does everything work in the browsers you expect? Is there a more efficient approach to any part of this project?
Going back to our countdown clock example, what happens if the timer reaches zero? We can add an if statement to make sure the clock stops at zero:
function showTime(){
  ...

  // ensure clock only updates if a second or more is remaining
  if(remainingTime >= 1000){
    requestAnimationFrame(showTime);
  }
}
Note that the reason we used 1000 milliseconds (1 second) in this case is that if we used zero, the clock would overshoot and end up at -1. If your clock is using smaller units than seconds, then make the ending condition smaller than one second.
A good friend pointed out this issue as I was working on this article, and it’s just another example of how code might not come out perfect the first time.
This leads perfectly into the next point.
Get Outside Help
Getting outside help can be an important step at any point when doing a project. This help can come from reference materials or other people. The reason I bring this up is that there’s a common myth that developers sit down and write perfect code without having to look anything up or ask anyone for advice.
I’ve often heard that newer developers are surprised to know how frequently an experienced developer will look things up. In fact, since it’s impossible to know everything, being able to look up information is one of the most valuable skills you can have.
Tools and techniques change, but the skill of learning doesn’t go away.
Refactor Your Code
Before you finish your project, you’ll want to refactor your code. Here are some questions you can ask yourself in order to improve your project:
Is your code concise and readable?
If you have to make a choice between conciseness and readability, you’ll usually want to pick readability unless there’s a huge performance reason. Readability makes your code easier to maintain, update, and fix.
Is your code efficient?
For example, if you’re searching your document for the same element over and over, you could store the element in a variable instead, to make your code do less work. We’ve already done this in our countdown clock example with the following piece:
// store clock div to avoid repeatedly querying the DOM
const clock = document.getElementById('clock');
Have you used clear naming for your functions and variables?
For example a function name like showTime would be much clearer than st. This is important because people often name things thinking they make sense, and then they get lost later because they forgot what their abbreviations meant. A good test for clarity is whether you’d have to explain a name too much to someone who is unfamiliar with the code.
Are there any potential naming collisions?
For example, are you using names like “container” that are highly likely to be used elsewhere?
Are you polluting global scope with too many variables?
One easy way to protect global scope is to throw your countdown clock code into an IIFE (immediately-invoked function expression). That way, the clock can access all its variables, but nothing else can.
(function(){
    // code goes here
})();
Has the editing process caused any errors?
For instance, have you changed a variable name in one place without changing it everywhere else? Have you added something to an object but forgotten to put in an extra comma?
Does the output need to be polished?
In our countdown clock example, it would be nice to see leading zeroes (so 10:09 instead of just 10:9). One way would be to see if a number is less than 9, and then put a ‘0’ in front of it, but that’s kind of long. I saw a code sample once that had a neat trick which was to add a ‘0’ in the front and then use slice(-2) to just take the last two digits no matter what. The changes would make our code look like this:
function showTime(){
  const remainingTime = getRemainingTime(endTime);
  const seconds = ('0' + Math.floor((remainingTime/1000) % 60)).slice(-2);
  const minutes = ('0' + Math.floor((remainingTime/(60*1000)) % 60)).slice(-2);
  const hours = ('0' + Math.floor((remainingTime/(60*60*1000)) % 24)).slice(-2);
  const days = ('0' + Math.floor(remainingTime/(24*60*60*1000))).slice(-2);

  clock.innerHTML = `${days}:${hours}:${minutes}:${seconds}`;

  // ensure clock only updates if a second or more is remaining
  if(remainingTime >= 1000){
    requestAnimationFrame(showTime);
  }
}
requestAnimationFrame(showTime);
Is your code unnecessarily redundant?
Are you repeating code that could be in a function or a loop instead? With reference to the above, we could move the code to add an extra zero to the output into its own function. This reduces duplication and makes things easier to read.
function pad(value){
  return ('0' + Math.floor(value)).slice(-2);
}

const seconds = pad((remainingTime/1000) % 60);
Would it help to look at this project with fresh eyes?
Try coming back to your code after a few days. With a fresh perspective, you’ll start to see which parts can be made cleaner and more efficient.
As you refactor, your code will start to seem more and more elegant. Then you’ll put out the finished product and people will wonder how you wrote such perfect code.
A few months later, you’ll look back on it and realize you could have made it so much better. As a friend of mine wisely said, that’s a good thing; it means you’re making progress.
In case you’re curious, here’s a live demo of the clock example (with some added styles):
See the Pen requestAnimationFrame Countdown by SitePoint (@SitePoint) on CodePen.
Recap
A coding project is rarely a linear process. If there’s one thing I’d like you to take away from this article, it’s that small pieces and experimentation will take you farther than trying to do everything at once.
If you’ve struggled with JavaScript projects in the past, I hope this article has been helpful, and if you have any other ideas that have helped you approach projects, I’d love to hear them in the comments.
This article was peer reviewed by Vildan Softic and Matt Burnett. Thanks to all of SitePoint’s peer reviewers for making SitePoint content the best it can be!
Frequently Asked Questions (FAQs) about JavaScript Projects
What are some beginner-friendly JavaScript projects I can start with?
Starting with simple projects is a great way to learn JavaScript. Some beginner-friendly projects include creating a simple calculator, a to-do list, or a weather application. These projects will help you understand basic concepts such as variables, functions, and event listeners. You can also try building a simple game like Tic Tac Toe or Rock Paper Scissors. As you progress, you can move on to more complex projects like a note-taking app or a simple e-commerce site.
How can I approach JavaScript projects effectively?
The first step in approaching a JavaScript project is to understand the problem you’re trying to solve. Break down the problem into smaller, manageable tasks. Start by creating a basic structure of your project, then gradually add features and functionalities. Make sure to test your code regularly to catch any errors early. Also, don’t hesitate to seek help from online communities if you’re stuck.
What resources can I use to learn JavaScript?
There are numerous resources available online to learn JavaScript. Websites like FreeCodeCamp, Codecademy, and Mozilla Developer Network offer comprehensive tutorials and exercises. You can also find a plethora of video tutorials on YouTube. Books like “Eloquent JavaScript” and “You Don’t Know JS” are also highly recommended.
How can I debug my JavaScript code?
Debugging is an essential skill for any programmer. You can use console.log() to print out values and check if they’re what you expect. The browser’s developer tools also come with a powerful debugger that allows you to step through your code and inspect variables. Additionally, using a linter can help catch common mistakes and enforce a consistent coding style.
How can I make my JavaScript code more efficient?
There are several ways to make your JavaScript code more efficient. Avoid global variables as much as possible, as they can lead to unexpected behavior. Use the ‘strict’ mode to catch common mistakes. Use built-in methods and functions whenever possible, as they’re usually optimized for performance. Also, keep your code DRY (Don’t Repeat Yourself) by reusing code through functions and classes.
How can I handle errors in JavaScript?
JavaScript provides try…catch statements to handle errors. The try block contains the code that may throw an error, and the catch block contains the code to handle the error. You can also use the ‘finally’ block to run code regardless of whether an error was thrown or not.
How can I make my JavaScript code more readable?
Good code readability is crucial for maintainability. Use meaningful variable and function names. Comment your code to explain what it does, especially for complex parts. Follow a consistent coding style, such as the Airbnb JavaScript Style Guide. Also, keep your functions small and focused on a single task.
How can I use JavaScript with other technologies like HTML and CSS?
JavaScript can manipulate HTML and CSS to create dynamic web pages. You can use the Document Object Model (DOM) to interact with HTML elements. You can change the content, attributes, and styles of these elements. You can also handle user events like clicks and key presses.
How can I use external libraries and frameworks in my JavaScript projects?
External libraries and frameworks can help you build complex applications more easily. You can include them in your project by linking to their CDN or installing them via npm. Make sure to read their documentation to understand how to use them. Some popular choices include jQuery for DOM manipulation, React for building user interfaces, and Express for building web servers.
How can I deploy my JavaScript projects?
You can deploy your JavaScript projects on platforms like GitHub Pages, Netlify, or Vercel. These platforms provide a simple way to publish your web pages online. You just need to push your code to a repository, and they’ll take care of the rest. Make sure to check their documentation for specific instructions.