Happy Star Wars Day & How To Make A Star Wars Text Effect In Photoshop
May The Fourth Be With You. (May 4th)
Today, apparently is Star Wars day so it seems like the ideal time to do a Photoshop tut on how to make a Star Wars type text effect. It’s probably not one you’ll use too often, it’s just for a bit of fun but we’ll be looking at layer effects and blending that you might find useful for other projects.
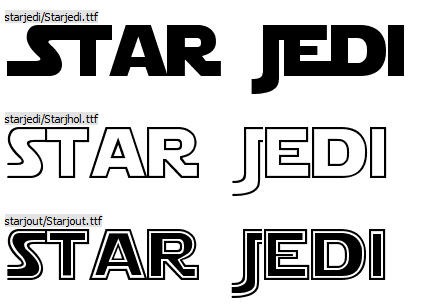
1. You can download a free set of Star Warsesque fonts called Star Jedi from DaFont.
2. When you’ve installed the fonts, open Photoshop and create a new document with a black background. Mine is 600 x 300 pixels.
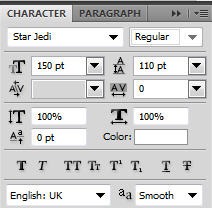
3. Add some text and set it in the Stars Wars font. It doesn’t matter what color it is because you’ll put a gradient overlay on it later. Set the text at 150pt high and the leading to 110pt.
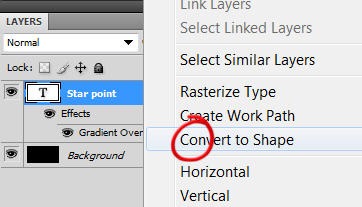
4. Right-click on the Text layer in the Layers Palette and choose Convert to Shape. You don’t have to convert to shape, but the reason why we are here is because when we add a Pillow Emboss later, the letters that are joined together (S and T and N and T) will behave as one smooth shape rather than individual letters.
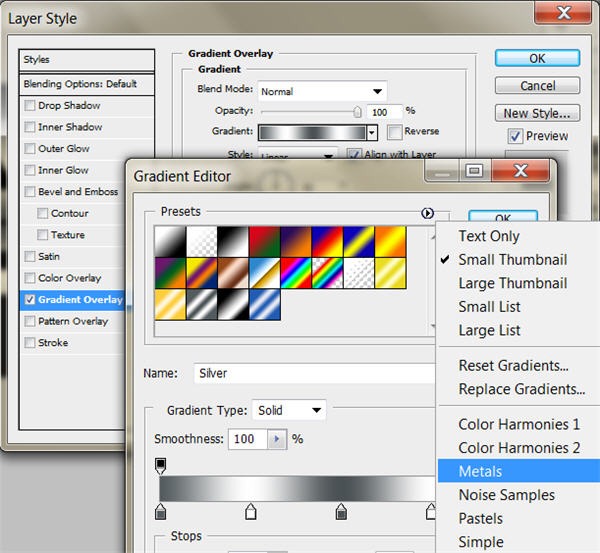
5. Click on the Layer Effects button at the bottom of the Layers Palette and choose Gradient Overlay. When the Gradient Overlay dialog box opens up, click on the Gradient in the middle to open the Gradient Editor. On the Gradient Editor click on the triangle in the top right corner to open the Gradient menu. Choose Metals from the pop-up menu. Then click on the “Silver” gradient thumbnail.
6. Set the Angle to 133 degrees. Don’t click OK yet.
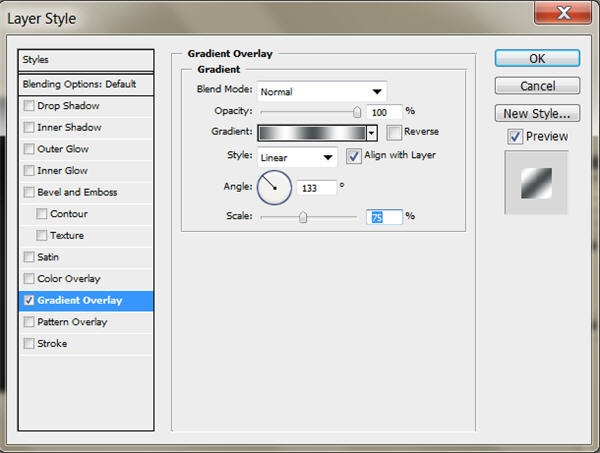
You can play around with the settings to get the lighting effects you want. But don’t click OK Yet.
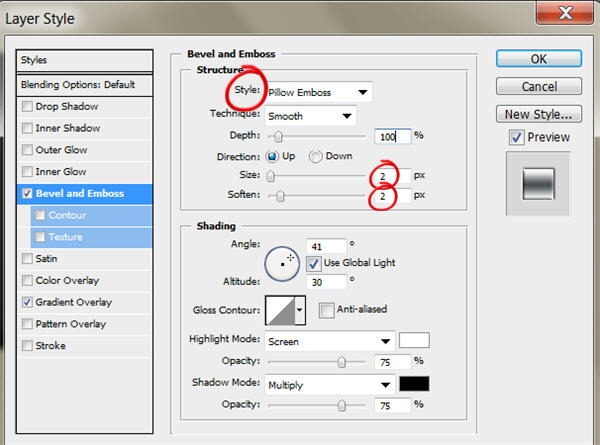
7. Still in the Layer Style dialog box, click on the words Bevel and Emboss on the left hand side. Set the Style to Pillow Emboss, Depth to 100%, Size and Soften to 2px each. Now click OK.
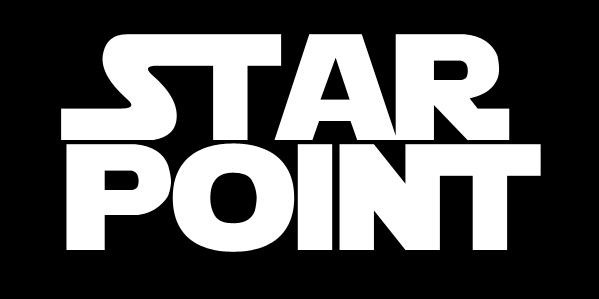
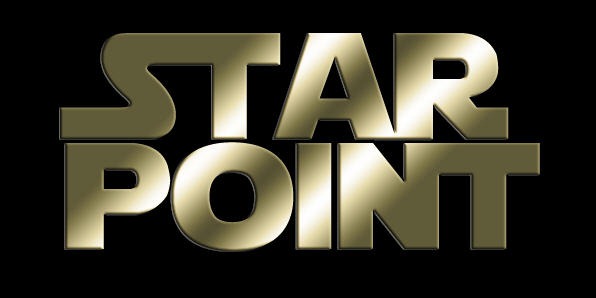
8. So your text should look suitably futuristic now, something like this.
9. On some of posters for the newer Star Wars movies, the text has a gold tint. To apply a tint make a new layer and name it Tint.
Ctrl + Click on text layer thumbnail to select it.
10. Set the blending mode of the Tint layer to Color and Opacity to about 40%. You can vary the Opacity to change how “golden” the type looks. And that’s it.
Maybe not an effect for everyday, but just a bit of fun for Star Wars day.
Frequently Asked Questions (FAQs) about Star Wars Text Effect in Photoshop
How can I create a Star Wars text effect in Photoshop without using any external fonts?
You can create a Star Wars text effect in Photoshop without using any external fonts by using the built-in 3D tools in Photoshop. Start by creating a new document and typing your text with the Text tool. Then, go to the 3D menu and select “New 3D Extrusion from Selected Layer”. Adjust the extrusion depth and bevel to create the desired effect. You can also add a gradient overlay to the text to give it a metallic look. Finally, add a starry background to complete the effect.
Can I use other software to create a Star Wars text effect?
Yes, you can use other graphic design software to create a Star Wars text effect. Software like Adobe Illustrator, GIMP, and CorelDRAW also have tools that can be used to create this effect. However, the process may vary depending on the software you are using. It’s best to refer to specific tutorials or guides for the software you are using.
What are some free Star Wars fonts I can use?
There are several free Star Wars fonts available online. Some popular ones include Star Jedi, Death Star, and Star Wars. These fonts can be downloaded from websites like FontSpace, DaFont, and Creative Bloq. Please note that these fonts are for personal use only and may not be used for commercial purposes without permission from the copyright owner.
How can I add a starry background to my Star Wars text effect in Photoshop?
To add a starry background to your Star Wars text effect in Photoshop, you can use the Noise filter. Create a new layer and fill it with black. Then, go to the Filter menu, select Noise, and then Add Noise. Adjust the amount of noise to create a starry effect. You can also add a Gaussian Blur to make the stars look more realistic.
Can I create a Star Wars text effect in Photoshop on a Mac?
Yes, you can create a Star Wars text effect in Photoshop on a Mac. The process is the same as on a Windows computer. You just need to have Photoshop installed on your Mac.
How can I make my Star Wars text effect look more realistic?
To make your Star Wars text effect look more realistic, you can add a gradient overlay to the text to give it a metallic look. You can also add a starry background and adjust the lighting in the 3D settings to create a more realistic effect.
Can I use the Star Wars text effect for commercial purposes?
The Star Wars text effect can be used for personal projects and fan art. However, if you plan to use it for commercial purposes, you should be aware of copyright laws. Star Wars is a trademark of Lucasfilm Ltd., and any commercial use of Star Wars-related content without permission could potentially lead to legal issues.
How can I save my Star Wars text effect in Photoshop?
To save your Star Wars text effect in Photoshop, go to the File menu and select Save As. Choose the format you want to save the file in, and then click Save. You can also choose to save the file as a Photoshop PSD file if you want to be able to edit the text effect later.
Can I animate my Star Wars text effect in Photoshop?
Yes, you can animate your Star Wars text effect in Photoshop using the Timeline panel. You can create a new video timeline, add keyframes, and then animate the position and rotation of the text to create a scrolling text effect similar to the opening crawl in the Star Wars movies.
What are some other text effects I can create in Photoshop?
Besides the Star Wars text effect, there are many other text effects you can create in Photoshop. Some examples include the 3D text effect, the neon text effect, the fire text effect, and the water text effect. You can find tutorials for these effects online or in Photoshop guidebooks.
Jennifer Farley is a designer, illustrator and design instructor based in Ireland. She writes about design and illustration on her blog at Laughing Lion Design.
