

MongoDB is one of those NoSQL databases that has gathered popularity quickly. Even if you are a little skeptical about the NoSQL movement, some time spent with MongoDB will be a good experience. Especially when you learn that it is an open-source project, and is supported on all of the major operating systems.
It should come as no surprise that a number of PaaS options have appeared for remotely hosting MongoDB. The one I am going to introduce you to in this article is called MongoLab.
Key Takeaways
- MongoLab, now known as mLab, is a fully managed cloud database service that offers automated provisioning and scaling of MongoDB databases, backup and recovery, 24/7 monitoring and alerting, web-based management tools, and expert support.
- MongoLab provides a free account option with 240MB on a shared account, hosted on Amazon, Rackspace, or Joyent, with the option to scale up as needed. The web admin area provides an overview of databases, users, and collections, and connection strings for connecting to the database via the MongoDB shell.
- MongoDB must be installed on the user’s computer to connect to a MongoLab account. MongoDB drivers are available for all the popular programming languages, including PHP, Python, and Ruby.
- With MongoLab, users can create databases, collections, and records without pre-defining data structures. PHP can be used to connect to the MongoLab database and retrieve documents. The MongoDB PHP class includes methods for retrieving all documents in a collection and iterating through returned documents.
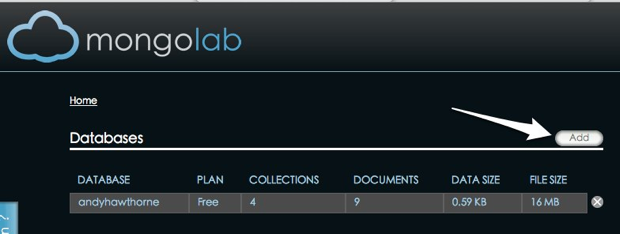
The Free Account Options
There is a free account option available. You get 240MB on a shared account, and it can be hosted on Amazon, Rackspace, or Joyent. There is also the option to scale up, should your needs grow. You get a web admin area that shows you an overview of your databases, users, and collections. It also shows you the required connection strings so that you can connect to your database via the MongoDB shell from your own machine.
Get an Account
It only takes seconds to sign up for a free account. Just go here to sign up and you’ll be up and running in no time.
Installing MongoDB
You will need MongoDB installed on your own computer. There are various options you can use, and they are described in detail on the MongoDB website. I recommend that you follow their instructions for creating a data directory. I have installed MongoDB on several different machines, and the process works as detailed every time.
If you use a Mac, I suggest that you download the 64-bit binary release. I have used that method on several different machines and it just works. You can place the folder anywhere you like; I put mine in my home directory to make it easy to call the bin folder from the terminal.
A Word about Drivers
There are MongoDB drivers for all the popular programming languages.
PHP
If you want to work with PHP and MongoDB as detailed in this article, you will need to install the Mongo PHP drivers. There are drivers available for all the main operating systems.
Python
Other programming languages are also supported. If Python is your thing, for example, then you will need to install PyMongo.
Once you have that done, running Python from the shell should allow you to do:
import pymongo
… without getting any errors.
Ruby
There is a Mongo gem for Ruby. First, make sure RubyGems is up to date:
gem update --system
Then you can install the Mongo gem:
gem install mongo
Best advice also suggests that you install the bson_ext gem to optimize performance:
gem install bson_ext
Now you can fire up the Ruby interactive shell and do this:
require 'mongo'
Hit enter, and you should get this response:
=> true
This tells you all is well.
Creating a Database
In the MongoLab web admin panel, you can create a database, which you then connect to and use via your local shell. While logged into your account, click on the “Add” button to create a database:
You will then be prompted to enter some basic config information:
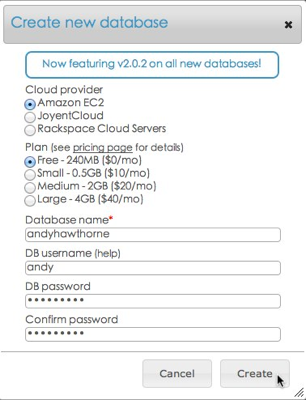
Once that is done, your database will be ready for you to connect to.
Connecting to your MongoLab Account
It might seem strange at first, but to connect to your MongoLab account, you will need MongoDB running on your own machine. Once you have it running, you can then connect to your MongoDB instance on your MongoLab account.
First, start the localhost server from terminal/console:
./mongodb/bin/mongod
This assumes that you have MongoDB installed in your home directory. Then open your MongoLab account in your web browser. You will see the connection information you need at the top of the database window in the web admin area:
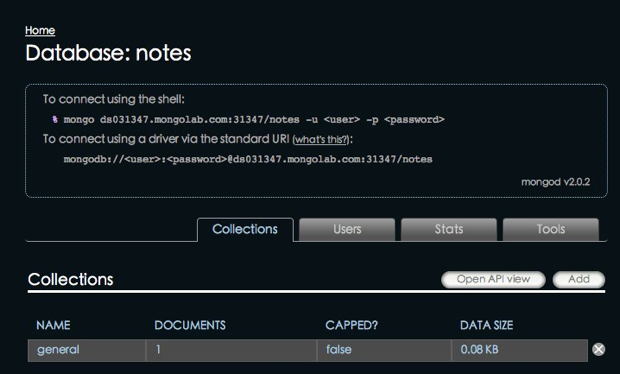
I recommend that you use the shell access method since the standard URI method is not yet supported by all drivers.
Open another terminal tab, and instead of the usual ./mongodb/bin/mongo, do this:
./mongodb/bin/mongo dbh23.mongolab.com:27237/my_new_db -u <db-user> -p <db-password>
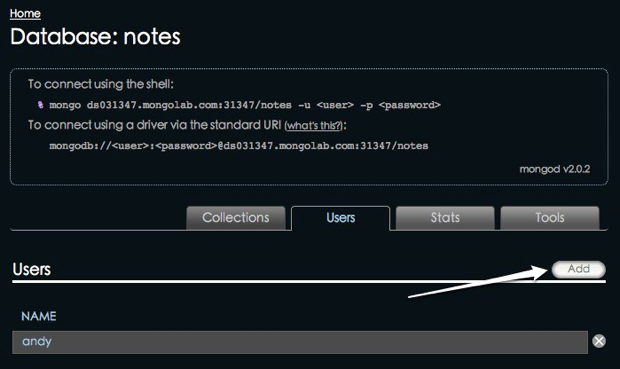
The exact string you need to use will be the one shown in the web admin section of your account. You can create a user for your database in the web admin area, by clicking on the users tab:
Creating a Collection and Adding Some Records
One of the nice things about MongoDB is that you don’t have to define data structures first. We can just go ahead and start creating records in the shell. We will then be able to view those records in the web admin area of our MongoLab account.
So in the console/terminal session you have running that is connected to your MongoLab database, try the following:
db.task.insert({title:"create a web app that uses Mongodb",status:"in progress",context:"today"})
When you hit return, your record will be saved. What has happened at this point is your collection has been created in the database you are connected to, and your document has been saved to it. With MongoDB, a collection is contextually equivalent to a table, and a document is equivalent to a row in more traditional databases such as MySQL.
Go ahead and add a few more documents in the same manner.
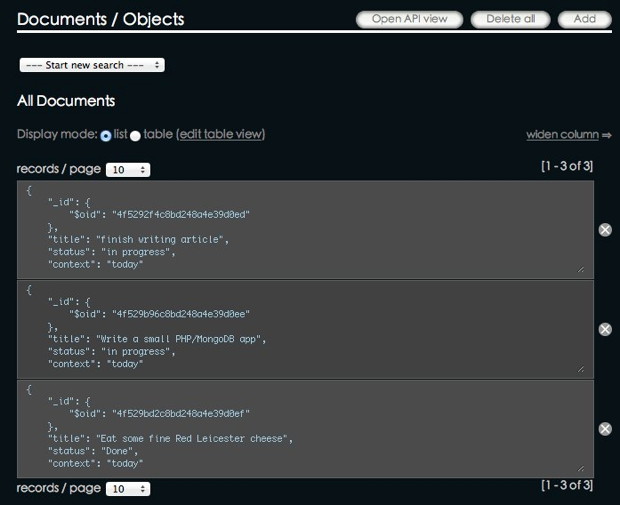
We can then check our documents in the MongoLab web admin area. Click on “Tasks” in the list of collections:

And you will see a list of the documents you have created:
Using PHP to Access the MongoLab Database and Retrieve Documents
This assumes that you have managed to install the MongoDB PHP drivers for your local system.
The first iteration for our simple app requires us to:
- Connect to the MongoLab database
- Establish which database we want to work with
- Establish which collection we want to work with
We can do that by creating some variables and using the connection string information provided for us by MongoLabs. This time, we’ll use the driver (standard URI) version. We can put our connection attempt in a try/catch block so that the app fails gracefully if we can’t connect for some reason:
<?php

try

{

    $connection = new Mongo('mongodb://<username>:<password>@ds031347.mongolab.com:31347/your_database');

    $database   = $connection->selectDB('your_database');

    $collection = $database->selectCollection('tasks');

}

catch(MongoConnectionException $e)

{

    die("Failed to connect to database ".$e->getMessage());

}
$cursor = $collection->find();
?>
Hopefully, much of this is self explanatory. However, there is some PHP MongoDB class specific stuff in there such as this:
$cursor = $collection->find();
That line of code uses the MongoCursor method to retrieve all the documents in the collection.
Next, we’ll create a HTML document below the existing code, and iterate through the documents to display them on our page:
<!DOCTYPE html>

<head>

    <meta http-equiv="Content-Type" content="text/html; charset=iso-8859-1" />

    <title>Tasks Viewer</title>
    <link type="text/css" rel="stylesheet" href="" />

    <!--[if lt IE 9]>

        <script src="http://html5shim.googlecode.com/svn/trunk/html5.js"></script>

    <![endif]-->
</head>

<body>

<h1>My Tasks</h1>
<?php while ($cursor->hasNext()):

    $task = $cursor->getNext(); ?>

    <h2><?= $task['title'] ?></h2>

    <strong>Status:</strong> <?= $task['status']?> <br />

    <strong>Context:</strong> <?= $task['context']?><br />

<?php endwhile;?>

</body>

</html>
Again, if you have spent much time with PHP, this should look fairly simple. We use a while loop to iterate through the returned documents, printing out the data held within them. Notice that the PHP class has hasNext() and getNext() methods specifically for that purpose.
You can read more about the PHP MongoDB class here.
Finally…
Hopefully this article has whetted your appetite enough for you to have a serious look at MongoDB. MongoLab is an excellent service that provides cloud-based access to MongoDB, and runs very quickly indeed. Provided that you get everything installed correctly, you can be coding apps that connect to MongoDB using your favorite technologies in no time.
In the next article, we’ll expand on this simple app, and add the C, U, and D parts of the usual “CRUD” operations we use with other databases.
Leaf image via Shutterstock
Frequently Asked Questions about Getting Started with MongoLab
What is the difference between MongoLab and MongoDB Atlas?
MongoLab, now known as mLab, is a fully managed cloud database service featuring automated provisioning and scaling of MongoDB databases, backup and recovery, 24/7 monitoring and alerting, web-based management tools, and expert support. MongoDB Atlas, on the other hand, is a global cloud database service for modern applications. It is developed by the same team that builds MongoDB, ensuring seamless compatibility and integration. MongoDB Atlas provides advanced security and privacy standards, robust scalability and flexibility, and global availability.
How can I migrate my data from MongoLab to MongoDB Atlas?
MongoDB Atlas provides a live migration service that makes it easy to import data from existing MongoDB deployments, including mLab. The service connects to your existing MongoDB database, replicates the data to a new MongoDB Atlas cluster, and then cuts over to the new cluster once the data is in sync. This allows for minimal downtime during the migration process.
What are the pricing models for MongoLab and MongoDB Atlas?
Both MongoLab (mLab) and MongoDB Atlas offer a variety of pricing options to suit different needs. mLab offers both shared and dedicated hosting plans, with prices based on the size of the database and the level of support required. MongoDB Atlas, on the other hand, offers a pay-as-you-go model based on the size of your databases and the regions in which your data is hosted.
How does MongoLab ensure data security?
MongoLab (mLab) takes data security very seriously. It provides a secure database environment with features like IP whitelisting, SSL connections, and two-factor authentication. Additionally, mLab conducts regular security audits and maintains strict access controls to ensure the integrity and security of your data.
Can I use MongoLab with AWS?
Yes, you can use MongoLab (mLab) with AWS. mLab is available on several cloud platforms, including Amazon Web Services (AWS). This means you can leverage the power of AWS while enjoying the convenience and features of mLab’s fully managed MongoDB service.
What kind of support does MongoLab offer?
MongoLab (mLab) offers 24/7 support to its customers. This includes monitoring and alerting, backup and recovery, and access to a team of MongoDB experts for troubleshooting and advice. mLab’s support team is committed to helping customers get the most out of their MongoDB deployments.
How does MongoLab handle backups?
MongoLab (mLab) provides automated backup and recovery for MongoDB databases. This includes regular snapshots of your data, as well as continuous backups that capture every change to your database in real-time. In the event of a failure, you can quickly restore your data to any point in time.
What tools does MongoLab provide for database management?
MongoLab (mLab) provides a variety of web-based management tools for MongoDB databases. These include tools for data browsing and querying, index management, user and role management, and performance analytics. These tools are designed to make it easy to manage and optimize your MongoDB deployments.
How does MongoLab handle scaling?
MongoLab (mLab) provides automated scaling for MongoDB databases. This means that as your data grows, mLab can automatically provision additional resources to ensure that your database continues to perform optimally. This includes both vertical scaling (adding more CPU and memory) and horizontal scaling (adding more database nodes).
What is the future of MongoLab now that it’s part of MongoDB?
Since being acquired by MongoDB, MongoLab (now known as mLab) has continued to operate as a fully managed MongoDB service. However, MongoDB has announced plans to integrate mLab’s features and functionality into MongoDB Atlas, its global cloud database service. This will provide customers with a single, unified platform for all their MongoDB needs.

